


Identify and Remove a Faulty Processor
Identify and Remove a Faulty Processor
Caution -
Be careful not to touch the processor socket pins. The processor socket pins are very
fragile. A light touch can bend the processor socket pins beyond repair.
Caution -
Whenever you remove a processor, replace it with another processor and reinstall the
processor heatsink; otherwise, the server might overheat due to improper airflow. See
.
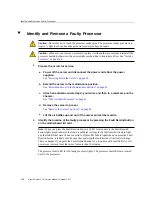
1.
Prepare the server for service.
a.
Power off the server and disconnect the power cords from the power
supplies.
See
“Powering Down the Server” on page 53
.
b.
Extend the server to the maintenance position.
See
“Extend the Server to the Maintenance Position” on page 59
.
c.
Attach an antistatic wrist strap to your wrist, and then to a metal area on the
chassis.
See
“Take Antistatic Measures” on page 61
.
d.
Remove the server top cover.
See
“Remove the Server Top Cover” on page 62
e.
Lift the air baffles up and out of the server and set them aside.
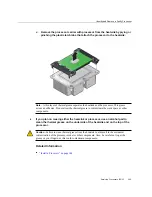
2.
Identify the location of the faulty processor by pressing the Fault Remind button
on the motherboard I/O card.
Note -
When you press the Fault Remind button, an LED located next to the Fault Remind
button lights green, indicates that there is sufficient voltage in the fault remind circuit to light
any fault LEDs that were lit due to a failure. If this LED fails to light when you press the Fault
Remind button, it is likely that the capacitor powering the fault remind circuit lost its charge.
This can happen if you press the Fault Remind button for a long time with fault LEDs lit, or if
power was removed from the server for more than 15 minutes.
The processor fault LED for the faulty processor lights. The processor fault LEDs are located
next to the processors:
138
Oracle Server X7-2 Service Manual • October 2017
Содержание X7-2
Страница 1: ...Oracle Server X7 2 Service Manual Part No E72445 03 October 2017 ...
Страница 2: ......
Страница 14: ...14 Oracle Server X7 2 Service Manual October 2017 ...
Страница 86: ...86 Oracle Server X7 2 Service Manual October 2017 ...
Страница 92: ...Install a Power Supply Remove a Power Supply on page 88 92 Oracle Server X7 2 Service Manual October 2017 ...
Страница 96: ...96 Oracle Server X7 2 Service Manual October 2017 ...
Страница 110: ...110 Oracle Server X7 2 Service Manual October 2017 ...
Страница 136: ...136 Oracle Server X7 2 Service Manual October 2017 ...
Страница 150: ...150 Oracle Server X7 2 Service Manual October 2017 ...
Страница 162: ...162 Oracle Server X7 2 Service Manual October 2017 ...
Страница 168: ...168 Oracle Server X7 2 Service Manual October 2017 ...
Страница 178: ...178 Oracle Server X7 2 Service Manual October 2017 ...
Страница 184: ...184 Oracle Server X7 2 Service Manual October 2017 ...
Страница 192: ...192 Oracle Server X7 2 Service Manual October 2017 ...
Страница 216: ...216 Oracle Server X7 2 Service Manual October 2017 ...
Страница 252: ...252 Oracle Server X7 2 Service Manual October 2017 ...
Страница 282: ...282 Oracle Server X7 2 Service Manual October 2017 ...
Страница 306: ...306 Oracle Server X7 2 Service Manual October 2017 ...


