background image

EN-27

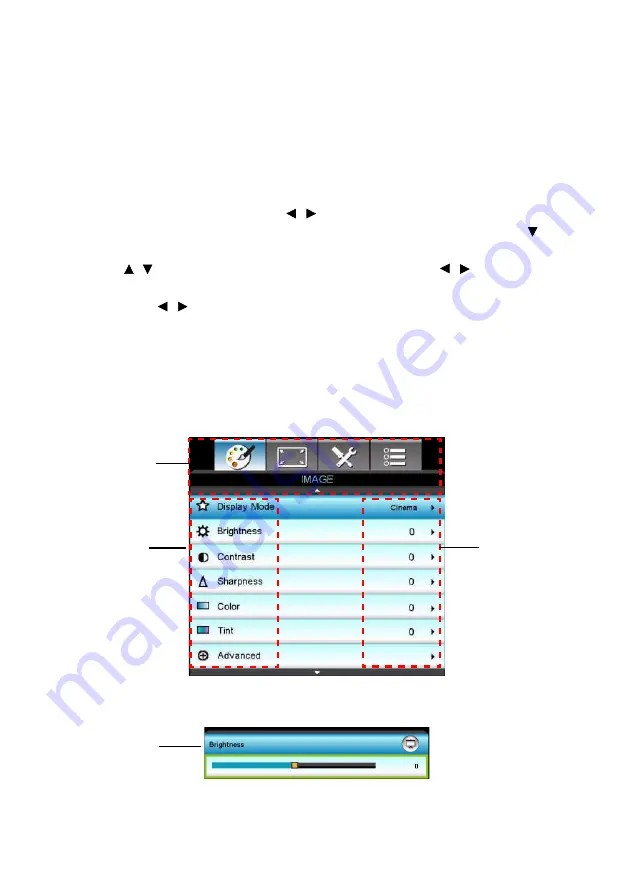
Menu Operation

The projector has multilingual on-screen display menus that allow you to 
make image adjustments and change a variety of settings.

How to operate

1. To open the OSD menu, press “Menu” on the Remote Control or 

Projector Keypad.

2. When OSD is displayed, use  /  key to select to select any item in the 

main menu. While making a selection on a particular page, press 


or 

“Enter key to enter sub menu.

3. Use  /  key to select the desired item and press  / /”Enter” key to

enter the Single-Item-Menu.

4. Use the  /  key to adjust the value. Use “Enter” to confirm the

selection.

5. Select the next item to be adjusted in the sub menu and adjust as

described above.

6. Press ”Menu” to go back to Sub-Menu.
7. To exit, press “Menu” again. The OSD menu will close and the projector

will automatically save the new settings.

Main Menu

Sub-Menu

Settings

Single-Item-

Menu

Содержание HT31

Страница 1: ...a computer or monitor 18 Connecting Video source devices 20 Operation 23 Powering On Off the Projector 23 Adjusting the Projector Height 24 Adjusting the Projector Zoom and Focus 24 Adjusting Project...

Страница 2: ...terials from the projector accessories and optional parts out of the reach of children as these bags may result in death by suffocation Be particularly careful around the small children 5 Ventilation...

Страница 3: ...d location to a warm one When the projector is exposed to such a change in temperature moisture may condense on the lens and the crucial internal parts To prevent the unit from possible damage do not...

Страница 4: ...please contact your sales dealer This projector is equipped with a grounding type AC line plug Please ensure that your outlet fits the plug Do not defeat the safety purpose of this grounding type plu...

Страница 5: ...h computers Compatibility with NTSC PAL SECAM and HDTV D Sub 15 pin terminal for analog video connectivity RS 232 connector for serial control Quick Resume feature Eco mode for more economic usage HDM...

Страница 6: ...ntact Optoma customer service Standard Accessories Optional accessories Note Optional accessories vary depending on model specification and region 5 User s Manual 5 Warranty Card 5 Quick Start Card 5...

Страница 7: ...Overview Front View Front adjustment foot Speaker Projection lens Ventilation holes Focus ring Control panel Front IR remote control sen sor Zoom ring Security bar Top cover 9 10 1 2 3 4 5 8 6 7 1 6 2...

Страница 8: ...iling mount for support The ceiling mount is not included in the package Contact your dealer for information to mount the projector on a ceiling Optional dust filter Rear IR remote control sensor AC p...

Страница 9: ...Indicator Messages on page 61 LAMP Lamp LED indicator Refer to LED Indicator Messages on page 61 POWER Power LED indicator Refer to LED Indicator Messages on page 61 Four directional buttons Use four...

Страница 10: ...andby VGA OUT is enabled S VIDEO Connect S Video output from video equipment to this jack MOUSE SERVICE This connector supports firmware update remote mouse and page up down Remote mouse function is n...

Страница 11: ...D AUDIO2 IN VGA2 Connect an audio output from a computer to this jack 3D SYNC OUT For 3D glasses emitter AUDIO3 IN L R S VIDEO VIDEO Connect an audio output from a video device to this jack VIDEO Con...

Страница 12: ...s Display the setting bar for adjustment of brightness Aspect Ratio Toggle to switch the display aspect ratio Keystone Manually correct distorted images resulting from an angled projection Mute Cut of...

Страница 13: ...p User3 User definable key for customized functions including DVI D S VIDEO Color Settings Color Temp Gamma Test Pattern AV Mute Default is Gamma Contrast Adjust the image contrast Mode Toggle to swit...

Страница 14: ...h of children There is a danger of death by accidentally swallowing the batteries Remove batteries from remote control when not using for extended periods Do not dispose of the used batteries along wi...

Страница 15: ...is sunlight or other strong light such as a fluorescent lamp shining on the remote sensor Operate the remote control from a position where the remote sensor is visible Do not drop the remote control o...

Страница 16: ...tions 2 Use the correct signal cables for each source 3 Ensure the cables are firmly inserted 1 VGA cable D Sub to D Sub 2 USB cable B type to A type 3 Audio cable 4 DVI D cable 5 VGA to DVI A cable 6...

Страница 17: ...mposite video cable 11 USB port for power charging 12 Microphone 3 5 mini jack cable 13 3D glasses emitter Note Due to the difference in applications for each country some regions may have different a...

Страница 18: ...one end to the D Sub output socket of the computer 2 Connect the other end of the VGA cable to the VGA1 YPbPr or VGA2 YPbPr signal input socket on the projector Important Many notebooks do not turn o...

Страница 19: ...monitor Or if your monitor is equipped with a DVI input socket take a VGA to DVI A cable and connect the DVI end of the cable to the DVI input socket of the video monitor 3 Connect the other end of th...

Страница 20: ...evel of video quality The method you choose will most likely depend upon the avail ability of matching terminals on both the projector and the Video source device as described below Terminal name Term...

Страница 21: ...ble If so you can continue with this procedure If not you will need to reassess which method you can use to connect to the device To connect the projector to a Component Video source device 1 Take a V...

Страница 22: ...using an S Video connection as this makes an unnecessary second connection of poorer picture quality See Connecting Video source devices on page 20 for details Connecting a composite Video source devi...

Страница 23: ...lamp You will see a message Power off Press Power again appear on the screen 2 Press again to confirm The cooling fans continue to operate for cooling cycle When the Power LED becomes steady red the p...

Страница 24: ...n turn the rear adjustment feet to fine tune the height Note To avoid damaging the projector make sure that the adjustment feet are fully retracted before placing the projector in its carrying case Ad...

Страница 25: ...dealer for special installation such as suspending from a ceiling Screen size Diagonal inch cm 16 9 Screen Projection distance feet m Image height inch cm Vertical offset inch cm min zoom max zoom 30...

Страница 26: ...The display position can be shifted upward up to 17 elevation of the dis play When turn the vertical lens shift ring to the right left the display moves up down Attention Please note the following s...

Страница 27: ...nu While making a selection on a particular page press or Enter key to enter sub menu 3 Use key to select the desired item and press Enter key to enter the Single Item Menu 4 Use the key to adjust the...

Страница 28: ...10 Gamma Film Video Graphics 2 2 1 8 2 0 2 6 BrilliantColor DynamicBlack On Off Color Temp Warm Standard Cool Cold Color Settings Red Hue Saturation Gain Green Hue Saturation Gain Blue Hue Saturation...

Страница 29: ...ion VGA V Position VGA Exit Exit Reset Yes No DISPLAY Format 4 3 16 9 LBX Native Auto Superwide Edge Mask Zoom Image Shift H V V Keystone Auto Keystone On Off 3D 3D Mode Off DLP Link VESA 3D 3D 2D 3D...

Страница 30: ...n Off Security Timer Month Day Hour Change Password Exit Projector ID Audio Settings Internal Speaker On Off Mute On Off Volume Audio Mic Audio Input Default Audio 1 Audio 2 Audio 3 Advanced Logo Defa...

Страница 31: ...n None Grid White 12V Trigger On Off Auto 3D IR Function On Front Back Off Background Color Black Red Blue Green White Remote Settings User1 DVI D S VIDEO Color Settings Color Temp Gamma Test Pattern...

Страница 32: ...in Quick Resume On Off Power Mode Standby Active Eco Lamp Settings Lamp Hour Lamp Reminder On Off Lamp Mode Bright Eco Lamp Reset Yes No Exit Optional Filter Settings Optional Filter Installed Yes No...

Страница 33: ...o produce strikingly bright colorful images Bright Maximum brightness from PC input Game For game content 3D Recommended setting for 3D mode enabled Any further adjustments by the user in 3D will be s...

Страница 34: ...amma table that has been fine tuned to bring out the best image quality for the input Film for home theater Video for video or TV source Graphics for image source 2 2 1 8 2 0 2 6 for PC or video sourc...

Страница 35: ...adjust the value Reset Choose Yes to return the factory default settings for color adjustments Color Space Select an appropriate color matrix type from AUTO RGB RGB 0 255 RGB 16 235 or YUV Note for HD...

Страница 36: ...tion Adjust the image left or right within the projection area V Position Adjust the image up or down within the projection area Reset Return the display parameters on IMAGE menu to the factory defaul...

Страница 37: ...4 3 1440x1080 center 16 9 1920x1080 center LBX 1920x1440 center then get the central 1920x1080 image to display Native 1 1 mapping centered Auto Default If this format is select Screen type will auto...

Страница 38: ...ages resulting from an angled projection 3D 3D Mode Off Select Off to turn off 3D mode DLP Link Select DLP Link to use optimized settings for DLP Link 3D glasses VESA 3D Select VESA 3D to use optimize...

Страница 39: ...down in front of or behind the screen Invert or reverse the image accord ingly Menu Location Choose the menu location on the display screen Security Security On Choose On to use security verification...

Страница 40: ...s on the remote then press Enter to confirm 4 Enter new password again and press Enter to confirm If the incorrect password is entered 3 times the projector will automatically shut down If you have fo...

Страница 41: ...screen that you captured Logo Capture Capture the current projection screen as a start up screen Closed Captioning Use this function to set the desired startup screen If changes are made they will tak...

Страница 42: ...for inputs that are not selected Source Lock On The projector will only search current input connection Off The projector will search for other signals if the current input signal is lost High Altitu...

Страница 43: ...2V 250mA 3 5mm Mini Jack IR Function Choose the setting from On Front Back to Off and then choose Yes to apply the selection Background Color Use this feature to display a Black Red Blue Green or Whit...

Страница 44: ...nected to AC power Eco The VGA OUT and AUDIO OUT functions will not work when the projector is in standby Active The VGA OUT and AUDIO OUT functions will work when the projector is in standby Note Whe...

Страница 45: ...nder Sets a filter reminder if timer is up Filter Reset Reset the dust filter hour counter after replacing the dust filter Reset Choose Yes to return the display parameters on all menus to the factory...

Страница 46: ...to cleaned or replaced the dust filter more frequently 1 Remove the dust filter located at the rear side of the projector by pulling it out as the illustration 2 Clean the dust filter To clean the dus...

Страница 47: ...of vibration shock or degradation as a result of hours of use as its lifetime draws to an end Risk of explosion may differ according to the environment or conditions in which the projector and lamp ar...

Страница 48: ...r b sliding it toward the back and c locking it back into place 10 Turn on the projector If the lamp does not turn on after the warm up period try reinstalling the lamp 11 Reset the lamp hour Refer to...

Страница 49: ...ew length 10mm Minimum screw length 8mm Note Please note that damage resulting from incorrect installation will void the warranty Warning 1 If you buy a ceiling mount from another company please be su...

Страница 50: ...80 60 67 72 85 Mac 60 72 85 SVGA 800 X 600 60 72 85 120 Mac 60 72 85 XGA 1024 X768 60 70 75 85 120 Mac 60 70 75 85 HDTV 720P 1280 X 720 50 60 120 Mac 60 WXGA 1280 X768 60 75 85 Mac 60 75 85 1280 X800...

Страница 51: ...120 Mac 60 70 75 85 SDTV 480I 640 X 480 60 SDTV 480P 640 X 480 60 SDTV 576I 720 X 576 50 SDTV 576P 720 X 576 50 WSVGA 1024X600 1024 X 600 60 HDTV 720p 1280 X 720 50 60 120 Mac 60 WXGA 1280 X768 60 75...

Страница 52: ...tom 1280 X 720P 50Hz Frame packing 1280 X 720P 60Hz Frame packing 1920 X 1080i 50 Hz Side by Side Half 1920 X 1080i 60 Hz Side by Side Half 1920 X 1080P 24 Hz Top and Bottom 1920 X 1080P 24 Hz Frame p...

Страница 53: ...1 Format 1 32 CD 02 FD 2 3 OFF Power 4 Format 1 32 CD 2E D1 User1 5 Format 1 32 CD 36 C9 User2 6 Format 1 32 CD 65 9A User3 7 Format 1 32 CD 66 99 Brightness 8 Format 1 32 CD 41 BE Contrast 9 Format 1...

Страница 54: ...RS232 Pin Assignments D Sub 9 pin from the projector side 1 1 CD 2 RXD 3 TXD 4 DTR 5 GND 6 DSR 7 RTS 8 CTS 9 RI from the cable side C1 COLOR C2 1 Black 1 2 Brown 3 3 Red 2 4 Orange 6 5 Yellow 5 6 Gree...

Страница 55: ...a carriage return r There is a CR after all ASCII commands 0D is the HEX code for CR in ASCII code Baud Rate 9600 Data Bits 8 Parity None Stop Bits 1 Flow Control None UART16550 FIFO Disable Projector...

Страница 56: ...50 a 2D 35 30 50 a 35 30 XX33 1 7E 30 30 33 33 20 31 0D Reset XX34 n 7E 30 30 33 34 20 a 0D BrilliantColorTM n 1 a 31 10 a 31 30 XX191 0 7E 30 30 31 39 31 20 30 0D DynamicBlack Off XX191 1 7E 30 30 3...

Страница 57: ...X71 2 7E 30 30 37 31 20 32 0D Rear Desktop XX71 3 7E 30 30 37 31 20 33 0D Front Ceiling XX71 4 7E 30 30 37 31 20 34 0D Rear Ceiling XX72 1 7E 30 30 37 32 20 31 0D Menu Location Top Left XX72 2 7E 30 3...

Страница 58: ...X105 0 7E 30 30 31 30 35 20 30 0D Off 0 2 for backward compatible XX113 0 7E 30 30 31 31 33 20 30 0D Signal Power On Off XX113 1 7E 30 30 31 31 33 20 31 0D On XX106 n 7E 30 30 31 30 36 20 a 0D Auto Po...

Страница 59: ...id Bright Game 3D User ISF Day ISF Night XX124 1 7E 30 30 31 32 34 20 31 0D Power State OKn n 0 1 Off On XX125 1 7E 30 30 31 32 35 20 31 0D Brightness OKn XX126 1 7E 30 30 31 32 36 20 31 0D Contrast O...

Страница 60: ...rce is turned on and connected For a computer connection ensure your notebook computer s external video port is turned on Refer to the computer manual If the image is out of focus While displaying the...

Страница 61: ...wer on Lamp lighting Steady light Power off Cooling Flashing 0 5 sec off 0 5 sec light Back to Red steady light when cooling fan turns off Quick Resume 100 secs Flashing 0 25 sec off 0 25 sec light Er...

Страница 62: ...The Watford Business Park Watford Hertfordshire WD18 8QZ UK 44 0 1923 691 800 www optoma eu 44 0 1923 691 888 Service Tel 44 0 1923 691865 service tsc europe com France Batiment E 33 1 41 46 12 20 81...

Страница 63: ...D 4F Minu Bldg 33 14 Kangnam Ku 82 2 34430004 seoul 135 815 KOREA 82 2 34430005 Japan 3 25 18 info os worldwide com 0120 380 495 www os worldwide com Taiwan 12F No 213 Sec 3 Beixin Rd 886 2 8911 8600...

Страница 64: ...EN 64 86 21 62947376 1205 5 86 21 62947375 www optoma com cn...

Страница 65: ...ipment does cause harmful interference to radio or television reception detectable by turning the equipment in question off and on the user is encouraged to try to correct the interference by one or m...

Страница 66: ...tal apparatus complies with Canadian ICES 003 Remarque l intention des utilisateurs canadiens Cet appareil numerique de la classe B est conforme a la norme NMB 003 du Canada Declaration of Conformity...

Отзывы: