background image

2

PREPARATION


1.Carefully unpack the cleaner and remove all traces of packing materials 
from it.  Visually inspect the cleaner for any parts that may have become 
loose or damaged during transit.

2. Place the cleaner on a flat, clean surface where the cooling fans will


receive adequate ventilation and ensure all controls are set to off.

Also


ensure the drain tap is in the closed position.

3. Ensure the power lead is securely plugged into the cleaner and that no


part of the lead is likely to come into contact with moisture.

4. Carefully fill at least 1/2 of the tank with a solvent solution. For demand-
ing cleaning we recommend a small amount of washing up liquid, this will


help increase the cleaning performance.The cleaner is now ready for use


.

Содержание OZL-2AK

Страница 1: ...ULTRASONIC CLEANER USER MANUAL ...

Страница 2: ...CATALOG ACCESSORIES ULTRASONIC PRINCIPLE 1 PREPARATION 2 SAFETY PRECAUTIONS 3 APPLICATIONS OPERATION 4 DIFFERENT WAYS OF CLEANING ADVANTAGE 5 EXPLANATION OF FUNCTION KEY SPECIFICATIONS 6 ...

Страница 3: ...mall enough to penetrate microscopic crevic es cleaning them thoroughly and con sistently Ultrasonic cleaning is extremely effective at removing dirt and grime which would normally require tedious manual cleaning by hand It has been used to clean a wide variety of instruments and mechanical parts such as carburetors returning them to almost like new condition with out damage to delicate parts 1 AC...

Страница 4: ...ive adequate ventilation and ensure all controls are set to off Alsoensure the drain tap is in the closed position 3 Ensure the power lead is securely plugged into the cleaner and that no part of the lead is likely to come into contact with moisture 4 Carefully fill at least 1 2 of the tank with a solvent solution For demand ing cleaning we recommend a small amount of washing up liquid this will h...

Страница 5: ... This will prevent splashes and reduce evaporation of the fluid 6 Never immerse the machine or power cord in water or other liquid 7 DO NOT touch the power plug with wet hands especially when inserting or removing the plug 8 DO NOT touch the unit if the machine has fallen into water during operation Remove the power plug from the socket first 9 DO NOT disassemble the machine except by professional...

Страница 6: ...ical components Make up cases Diesel injection pumps Ultrasonic cleaning is not recommended for the following gemstones Opal Pearl Emerald Tanzanite Malachite Turquoise Lapis and Coral 4 1 Fill stainless steel tank with liquid Plug the cleaner into grounded outlet Powering on NOTE 1 Do not run the cleaner continuously for more than one hour 2 Do not pour water out until it s cooling Hot water will...

Страница 7: ...dangerous Ultrasonic is widely used throughout industries to remove difficult contaminants from the parts during or after manufacturing process which might require a stage of cleaing before the next process In general if an item can be cleaned with liquid it can be cleaned much faster and more thoroughly with an ultrasonic cleaner Compared to traditional solvent scrubbing meth ods of cleaning in a...

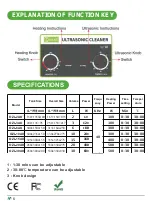
Страница 8: ...50 135X100 3 300x150x150 6 300x235x150 330x270x275 240 300 325x300x155 355x325x275 15 360 400 20 30 450x300x150 530x330x275 480 500 450x300x200 530x330x330 600 0 30 0 30 0 30 0 30 0 30 0 30 0 30 30 80 30 80 30 80 30 80 30 80 30 80 30 80 120 10 2 180 1 1 30 mins can be adjustable 2 30 80 temperature can be adjustable 3 Knob design EXPLANATION OF FUNCTION KEY Tank Size 165 150 195 240 136 95 313x164...

Отзывы: