background image

Basic Troubleshooting

FQ2-S4 User’s Manual

455

 11 

Tro

ubl
eshoo

tin
g

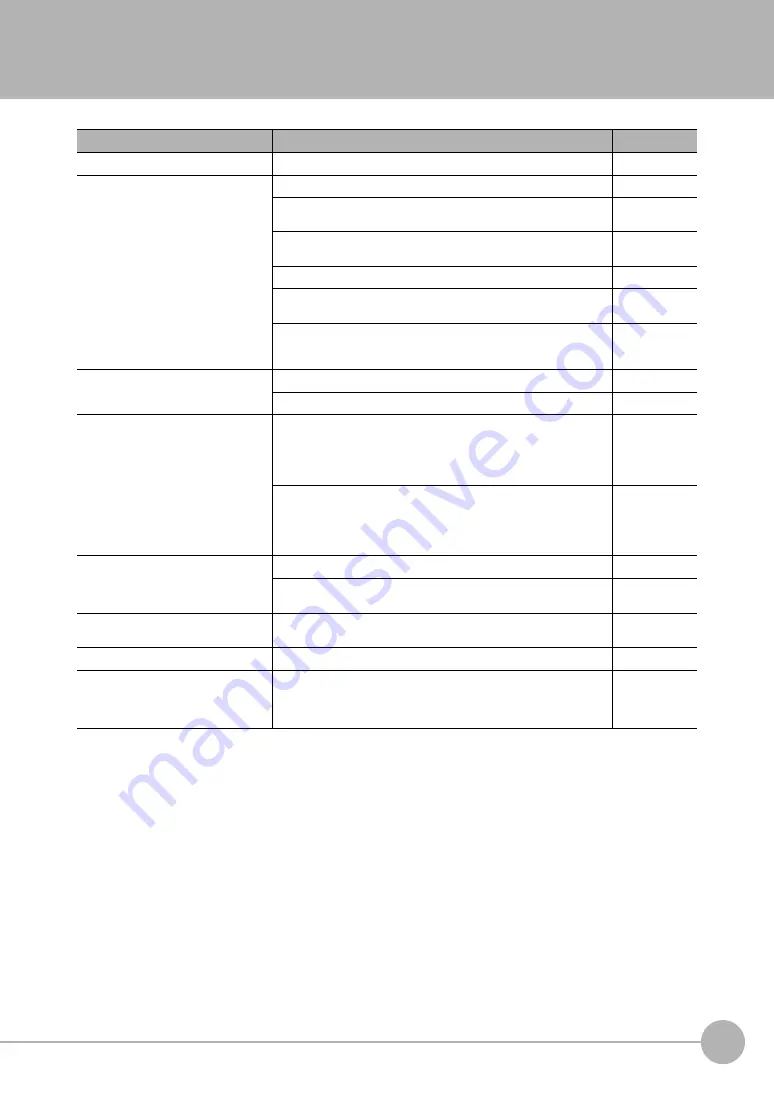
11-3 Basic Troubleshooting

Problem

Measures to perform

Reference

The Sensor or Touch Finder will not start. Check the power supply capacity to see if it is sufficient.

---

The Sensor cannot be detected.

Check the Ethernet cable to see if it is connected correctly.

---

Check the Ethernet settings to see if they are correct between the 
devices.

p. 53

Check if there are any Sensors that were not detected by the Sensor 
connection check.

p. 53

Check the communications cable to see if it is disconnected.

---

Check the switching hubs to see if any of them are faulty. (If switching 
hubs are used.)

---

The PC Tool and Touch Finder cannot be connected at the same time.
If the PC Tool or Touch Finder is already connected to the Sensor, dis-
connect it.

---

The results display is not updated.

Check to see if the TRIG signal is being correctly input to the Sensor.

p. 247

Check to see if the most recent NG result is being displayed.

p. 245

Updating the results display is slow.

If other devices are connected to the same network as the Sensor, dis-
connect the other devices from the network and check the update
speed.
If the update speed returns to normal, check the specifications of the 
disconnected devices and take suitable measures.

---

If there are power lines running in parallel with the Ethernet cable or if 
there are inverters or other sources of noise near the communications 
cable, separate the communications cable from them and check the 
update speed.
Noise may be adversely affecting the communications response.

---

Data is not logged properly.

Check to see if the logging setting in the Sensor are correct.

p. 252

If logging to an SD card is not possible, check the available space on the 
SD card and check to see if the SD card is write-protected.

p. 264

The ERROR indicator lights.

Check the error history to see what error has occurred and take suitable 
measures.

p. 452

The measurement trigger is not input.

Check to see it the measurement trigger is set correctly.

---

The image brightness does not stabilize. 
(FQ2-S4

@@@@@

/FQ2-S4

@@@@@

-M 

only)

Turn ON the brightness correction mode.
When the Brightness Correction Mode is ON, the timing when images 
are taken changes. Check that the images of the measured objects 
taken when the Brightness Correction Mode is ON are appropriate.

p. 61

Содержание FQ2-S4

Страница 1: ...User s Manual Smart Camera FQ2 S4 Cat No Z330 E1 01 ...

Страница 2: ...ired for using the FQ2 S4 When using the FQ2 S4 be sure to observe the following The FQ2 S4 must be operated by personnel knowledgeable in electrical engineering To ensure correct use please read this manual thoroughly to deepen your understanding of the product Please keep this manual in a safe place so that it can be referred to whenever necessary ...

Страница 3: ...onnections Taking Images Setting Up Inspections Testing and Saving Settings Operation Convenient Functions Controlling Operation and Outputting Data with a Parallel Connection Connecting through Ethernet Connecting with RS 232C Troubleshooting Appendices APPLICATION CONSIDERATIONS Please Read ...

Страница 4: ...RODUCTS UNLESS OMRON S ANALYSIS CONFIRMS THAT THE PRODUCTS WERE PROPERLY HANDLED STORED INSTALLED AND MAINTAINED AND NOT SUBJECT TO CONTAMINATION ABUSE MISUSE OR INAPPROPRIATE MODIFICATION OR REPAIR SUITABILITY FOR USE THE PRODUCTS CONTAINED IN THIS DOCUMENT ARE NOT SAFETY RATED THEY ARE NOT DESIGNED OR RATED FOR ENSURING SAFETY OF PERSONS AND SHOULD NOT BE RELIED UPON AS A SAFETY COMPO NENT OR PR...

Страница 5: ... other reasons It is our practice to change model numbers when published ratings or features are changed or when significant construction changes are made However some specifications of the product may be changed without any notice When in doubt special model numbers may be assigned to fix or establish key specifications for your application on your request Please consult with your OMRON represent...

Страница 6: ...is a risk of minor injury from electrical shock or other source if the product is disassembled This product is not designed or rated for ensuring safety of persons Do not use it for such purposes The Sensor emits visible light which may adversely affect the eyes in rare instances Do not look directly into the light emitted from the Sensor When the subject is a specular reflective object protect yo...

Страница 7: ...ive and negative terminals of the Battery Do not use the Touch Finder in an environment that exceeds the operating temperature range of the Battery If the Touch Finder is used at temperatures that exceed the operating temperature range the protective device may activate and prevent charging Do not connect the Battery directly to a power supply or car cigarette lighter socket Do not use the Touch F...

Страница 8: ... of this product as industrial waste Connect the special products Sensor Touch Finder Cables The product might break down or malfunction if you use a part not included in the special products If you notice an abnormal condition such as a strange odor extreme heating of any product or smoke immediately stop using the product turn OFF the power and consult your dealer The Sensor surfaces become hot ...

Страница 9: ...he special mounting brackets within the dotted lines in the following figure The front panel plate may become fogged from the inside 2 Power Supply Connection and Wiring When using a commercially available switching regulator make sure that the FG terminal is grounded If surge currents are present in the power lines connect surge absorbers that suit the operating environment Before turning ON the ...

Страница 10: ...ended time remove the power plug from the outlet Do not bend the power cable past its natural bending radius Do not use the AC Adapter with other than the specified products If a voltage higher than 380 V is applied there is a risk that the capacitor will be damaged the pressure valve will open and vaporized gas will be emitted If there is a possibility that a voltage higher than 380 V will be app...

Страница 11: ...mounts 34 Installation Precautions 38 Mounting to DIN Track 39 Mounting to a Control Panel 39 Using the Touch Finder as a Portable Device with Battery 40 Mounting to DIN Track 41 2 4 Wiring 42 I O Signal Circuit Diagrams 43 Power Supply Specifications When a Switching Regulator Is Connected 43 Attaching the LED Warning Label 43 2 5 Setting Up Ethernet 53 Connecting to Sensors from the Touch Finder...

Страница 12: ...ng Up Inspections 4 1 Inspection Item Selection Guide 90 4 2 Setup Procedure for Inspection Items 93 4 3 Configuring Inspection Items 94 Adding New Inspection Items 94 Modifying Existing Inspection Items 95 Deleting Inspection Items 95 4 4 Reading and Verifying Character Strings 96 Character String Recognition 96 Characters That Can Be Recognized 96 Setup Procedure for Character Recognition 97 Set...

Страница 13: ...nd Calculations 127 Measurement Data That Can Be Logged 2D Code 127 Errors 127 4 7 Reading DPM 2D Codes 128 2D Codes DPM 128 Setup Procedure for 2D code DPM 128 Detailed Parameters 133 Outputting Read Characters to an External Device 134 Changing the Character String That Is Output for Read Errors 135 Measurement Data That Can Be Used for External Outputs and Calculations 135 Inspection Data that ...

Страница 14: ...162 Setup Procedure for Edge Position 162 Reflect in Total Judgement 164 Changing Edge Detection Conditions Sensors with Monochrome Cameras Only 164 Unstable Edge Position Results 164 Increasing Processing Speed for Edge Position 167 Measurement Data That Can Be Used for External Outputs and Calculations 167 Measurement Data That Can Be Logged for Edge Position 167 Errors 168 4 12 Inspecting with ...

Страница 15: ...ection Item 182 Setup Procedure for Area 182 Reflect in Total Judgement 184 Unstable Area Results 184 Changing the Area Detection Conditions 186 Increasing Processing Speed for Area 186 Measurement Data That Can Be Used for External Outputs and Calculations 187 Measurement Data That Can Be Logged for Area 187 Errors 187 4 16 Inspecting with the Labeling Inspection Item 188 Labeling 188 Setup Proce...

Страница 16: ...2 6 Operation 6 1 Starting Operation 224 Run Mode Display 224 Moving to Run Mode 224 6 2 Configuring the Run Mode Display 226 6 3 Checking the Trend of Measurement Results with Graphs 228 Trend Monitor 228 Histograms 229 6 4 Adjusting Judgement Parameters during Operation 231 Preparations 231 Changing the Judgement Parameters in Run Mode 231 7 Convenient Functions 7 1 Changing the Scene to Change ...

Страница 17: ...ory 263 7 8 SD Card Operations 264 Inserting and Removing SD Cards 265 Checking the Available Space on the SD Card 266 Formatting an SD Card 266 7 9 Convenient Functions for Operation 267 Setting a Password to Prevent Unwanted Changes 267 Capturing the Displayed Image 268 Saving the Currently Displayed Camera Image 268 Setting the Startup Run Display Pattern 269 Specifying the Sensors to Connect C...

Страница 18: ...gger 302 Setting Output Data 303 Aligning the Data Output Timing with the External Device 308 Changing the Settings of the I O Signals 316 Controlling Operation from an External Device 317 9 Connecting through Ethernet 9 1 Introduction 328 9 2 Outputting Data and Controlling Operation through EtherNet IP 329 Introduction to EtherNet IP 329 FQ2 Communications for EtherNet IP Connections 331 Setting...

Страница 19: ... Communications 447 Setting Up No protocol Communications 448 Setting the Data To Output Automatically after Measurements 449 Controlling the Sensor from an External Device Procedure for No protocol Command Response Communications 449 11 Troubleshooting 11 1 Error Histories 452 11 2 Error Messages 454 11 3 Basic Troubleshooting 455 12 Appendices 12 1 Menu Tables 458 Image Tab Page 458 Inspect Tab ...

Страница 20: ...ons and Dimensions 550 Sensor 550 Touch Finder 557 Sensor Data Units 561 System Requirements for PC Tool for FQ 564 Options 564 12 4 Updating the Software 569 Step 1 Update the software for the PC Tool or Touch Finder 569 Step 2 Update the software for the Sensor 569 12 5 Connecting a Previous Touch Finder FQ D30 D31 to the FQ2 S Sensor 570 12 6 LED Safety 575 Warning Label 575 12 7 Requirements f...

Страница 21: ...1 Introduction Introduction 1 1 FQ2 S4 series Vision Sensors 20 1 2 Measurement Process 21 1 3 Startup Display and Display Elements 22 1 4 Basic Operational Flow 24 ...

Страница 22: ...e also Sensors with C mounts that allow you to change the lens and Sensors with Built in Lighting The differences are given in the following table Pixels 350 000 760 000 1 300 000 Type Sensors with Built in Lighting Sensors with C mounts Model FQ2 S4 FQ2 S4 M FQ2 S4 08 FQ2 S4 08M FQ2 S4 13 FQ2 S4 13M Partial input Horizontally only Horizontally and vertically Lens mount C mount Image process ing m...

Страница 23: ...ing to the trigger The image is measured to see if it matches the configured settings You can also perform calculations based on the measurement results from inspection items The overall judgement of all inspection items are output using OR logic You can output detailed measurement result from the inspection items Measurement data and image data can be logged in memory in the Sensor or in an SD ca...

Страница 24: ...r and then press Auto connect If the Sensor is still not detected after pressing Auto Connect refer to the following information The Sensor cannot be detected p 455 2 When the Sensor is detected the following display will appear The Setup Mode will appear if a Sensor that has not been set up is connected The Run Mode will appear if a Sensor that has been set up is connected When the Touch Finder i...

Страница 25: ...emory with Log Image Button is displayed Tool Button Used to call functions such as saving data or select scenes Capture Button Used to capture the current screen to the SD card This button menu is always displayed Image Used to adjust the image In Out Used to set the I O Run Used to switch to Run Mode Test Used to test and adjust the set measurements Inspect Used to set the inspection items The s...

Страница 26: ...rs Test Measurement and Results Verification Testing Test Tab Page Output Settings In Out Tab Page Setup Evaluation 1 Setting Judgement Parameters Inspection Setup Inspect Tab Page Teaching Registering Inspection Items Image Setup Image Tab Page Starting the Sensor Inspection Retry Details Inspect Tab Page Section 2 Installation and Connections Section 1 1 3 Startup Display and Display Elements Se...

Страница 27: ...2 Installation and Connections Installation and Connections 2 1 System Configuration 26 2 2 Part Names and Functions 29 2 3 Installation 33 2 4 Wiring 42 2 5 Setting Up Ethernet 53 ...

Страница 28: ... Setup Tool Touch Finder or PC Tool FQ2 S4 FQ2 S4 Sensor control PLC I O control PLC Trigger sensor Sensor control PLC 24 V power supply 24 V power supply FL STC Lighting Controller RS 232C Interface Sensor Data Unit FQ2 S4 FQ2 S4 I O control PLC Trigger sensor 24 V power supply FL STC Lighting Controller FL series External Lighting RS 232C Serial Connection Setup Tool Touch Finder or PC Tool 24 V...

Страница 29: ...easurements from inspection items and the results of expressions with parallel communications RS 232C Interface Sensor Data Unit FQ SDU2 You can connect a Sensor Data Unit to the I O cable connector on the Vision Sensor and connect the RS 232C Interface Sensor Data Unit to an external device This allows you to use no protocol communications to send and receive commands inspection item parameters a...

Страница 30: ...nter face 2 EtherNet IP No Yes Yes Yes Yes Yes PLC Link on Ethernet No Yes Yes Yes Yes Yes TCP no protocol communi cations on Ethernet Yes Yes No No Yes Yes FINS TCP no protocol com munications on Ethernet Yes Yes No No Yes Yes RS 232C 1 Yes Yes No No Yes No Parallel communi cations Sensor s stan dard parallel communica tions Yes Yes Yes Yes No No Parallel Inter face 2 Yes Yes Yes Yes No No Connec...

Страница 31: ... Focus adjustment screw Used to adjust the focus of the image 6 Operation indicators OR Lights orange when the overall judgement output OR signal turns ON ETN Lights orange during Ethernet communications ERROR Lights red when an error occurs 11 1 Error Histories p 452 BUSY Lights green when the Sensor is executing a process You can change the BUSY indicator to a RUN indicator This indicator is set...

Страница 32: ...USY Lights green when the Sensor is executing a process You can change the BUSY indicator to a RUN indicator This indicator is set by default to a BUSY indicator but if you change it to a RUN indicator it will light green during operation Changing the Sensor s BUSY Indicator p 278 5 Mounting holes These mounting holes for M3 screws are used to mount the Camera and to mount to the base There are mo...

Страница 33: ... card slot An SD card can be inserted 4 Battery cover 1 The Battery is inserted behind this cover Remove the cover when mounting or removing the Battery 5 Power supply switch Used to turn the Touch Finder ON and OFF 6 Touch pen holder The touch pen can be stored here when it is not being used 7 Touch pen Used to operate the touch panel 8 DC power supply connector Used to connect a DC power supply ...

Страница 34: ...g a process SENSOR Lights yellow when the Sensor is connected OR OK Lights green when the overall judgement result is OK OR NG Lights red when the overall judgement result is OFF or an error occurs 232C_COM Lights yellow during RS 232C communications Provided only on the FQ SDU2 5 DIN Track mounting section Mounts the Data Unit to a DIN Track 6 Slider Used to secure the Data Unit to a DIN Track 7 ...

Страница 35: ...d at the correct position Tightening torque M4 1 2 N m Mounting Bracket 6 8 10 12 14 0 20 40 60 50 130 210 0 100 200 300 35 45 55 200 600 1 000 200 400 0 0 400 Horizontal field of view mm Horizontal field of view mm Installation distance L mm Installation distance L mm FQ2 S4 050F FQ2 S4 100N Horizontal field of view mm Horizontal field of view mm Installation distance L mm Installation distance L...

Страница 36: ...ade screwdriver between the Mounting Brack et and the Sensor case on either side and remove the Mounting Bracket 1 Mount the Sensor with M3 screws Tightening torque 0 54 N m Effective depth of mounting holes 4 mm Refer to the dimension drawings in the appendix for the positions of the screw holes 1 You can attach the mounting base to the bottom top left or right surface Recommended mounting screw ...

Страница 37: ... SV 0614H 3Z4S LE SV 0814H SV 1214H SV 1614H SV 2514H SV 3514H SV 5014H SV 7525H SV 10028H t0 t5 t10 t15 t20 t25 t30 t40 t50 t0 t5 t10 t15 t20 t25 t30 t0 t2 t5 t10 t15 t2 t5 t0 t1 t2 t0 t0 5 t1 t0 t0 5 t50 t40 t25 t15 t10 t5 t0 t50 t40 t30 t20 t25 t15 t10 t0 t5 t30 t20 t0 Camera installation distance mm t Macro ring Examples t0 Macro ring is not required t5 A 5 mm macro ring is required Y axis of ...

Страница 38: ...kness to be used is given as for example t5 0 on the graphs t0 means that a macro ring is not required t5 0 means that you must use a 5 mm macro ring Lens Models and Dimensions Field of view Y X 1 The Y axis in the optical charts represents the height of the field of view Macro ring t mm Camera Camera lens Measurement object Camera installation distance mm Field of view mm Example If you use an 3Z...

Страница 39: ... 5 P0 5 3Z4S LE SV 5014H 50 0 mm F1 4 44 mm 57 5 mm M40 5 P0 5 3Z4S LE SV 7525H 75 mm F2 5 36 mm 49 5 mm M34 0 P0 5 3Z4S LE SV 10028H 100 mm F2 8 39 mm 66 5 mm M37 5 P0 5 Lens model Focal length Brightness Maximum out side diameter Total length Filter size 3Z4S LE SV 0614V 6 20 mm F1 4 29 mm 30 0 mm M27 P0 5 3Z4S LE SV 0813V 8 05 mm F1 3 28 mm 34 0 mm M25 5 P0 5 3Z4S LE SV 1214V 12 43 mm F1 4 29 m...

Страница 40: ...sipation Do not mount it in the following orientations To improve ventilation leave space on both sides of the Touch Finder The distance between the Touch Finder and other devices should be at least that shown in the following diagram Make sure that the ambient temperature is 50 C or lower If it exceeds 50 C install an cooling fan or an air condi tioner and maintain the temperature at 50 C or lowe...

Страница 41: ...mounted very securely Removal Procedure Mounting to a Control Panel The Touch Finder can be mounted on a panel using the FQ XPM Panel Mounting Adapter Always turn OFF the Touch Finder power before attaching or detaching the Panel Mount Adapter Attaching or detaching with the power turned ON may cause a failure 1 Press the slider on the Touch Finder to the top 2 Hook the clip at the top of the Touc...

Страница 42: ... attaching the Mini strap on the left and on the right of the Touch Finder 2 Press the slider up on the Touch Finder 3 Create holes in the panel for mounting Refer to the following page for hole dimensions p 560 4 Connect the cable to the Touch Finder 5 Mount the Touch Finder with the Panel Mount Adapter from the front of the panel 6 Hook the hooks on the Mounting Bracket in the four holes of the ...

Страница 43: ...f the lower clip is hooked on first the Touch Finder will not be mounted very securely Removal Procedure 1 Lock the sliders at the top and bottom of the Sensor Data Unit 2 Press the slider on the Sensor Data Unit to the top 3 Hook the clip at the top of the Sensor Data Unit on to the DIN Track 4 Press the Sensor Data Unit onto the DIN Track until the bot tom clip clicks into place 1 Pull down on t...

Страница 44: ...OUT0 OR By default this is the OR output signal overall judgement The assignment can be changed to RUN READY an individual judgement signal from OR0 to OR31 the STGOUT strobe trigger output or an expression judgement from 0 to 31 OUT1 BUSY By default this is the BUSY output signal The assignment can be changed to RUN READY an individual judgement signal from OR0 to OR31 the STGOUT strobe trigger o...

Страница 45: ...safety extra low voltage circuit If UL certification is required for the overall system use a UL Class II DC power supply Attaching the LED Warning Label Attach the enclosed LED warning label to the cable or other location The LED warning label must be attached to a location that is readily visible from the Sensor 12 6 LED Safety p 575 Item Description FQ2 S4 FQ2 S4 Power supply voltage 24 VDC 21 ...

Страница 46: ...or the Vision Sensor the influence of electromagnetic induction may cause the Sensor to malfunction or may damage it Do not allow the load current to exceed 50 mA The output circuit may be damaged if the load current exceeds 50 mA Power supply 0 V Frame ground This is the frame ground terminal Connect it to the ground wire FQ2 S4 Sensors with Built in Lighting or Sensors with C mounts Power supply...

Страница 47: ...RESET IN Reset input 7 D4 OUT Data output 37 IN0 IN Command input 8 D5 OUT Data output 38 IN1 IN Command input 9 D6 OUT Data output 39 IN2 IN Command input 10 D7 OUT Data output 40 IN3 IN Command input 11 D8 OUT Data output 41 IN4 IN Command input 12 D9 OUT Data output 42 IN5 IN Command input 13 D10 OUT Data output 43 IN6 IN Command input 14 D11 OUT Data output 44 IN7 IN Command input 15 D12 OUT D...

Страница 48: ...duct as the wiring for the Vision Sensor the influence of electromagnetic induction may cause the Sensor to malfunction or may damage it Do not allow the load current to exceed 50 mA The output circuit may be damaged if the load current exceeds 50 mA Power supply 0 V Frame ground This is the frame ground terminal Connect it to the ground wire FQ2 S4 Sensors with Built in Lighting or Sensors with C...

Страница 49: ...Measurement trigger input 5 IN4 IN Command input 20 NC 1 6 IN5 IN Command input 21 NC 1 7 NC 1 22 RESET IN Reset input 8 NC 1 23 NC 1 9 NC 1 24 ACK OUT Command execution completed flag 10 NC 1 25 RUN OUT ON during measurement mode 11 NC 1 26 BUSY OUT ON during process execution 12 NC 1 27 OR OUT Overall judgement result 13 NC 1 28 ERROR OUT ON during error 14 NC 1 29 STGOUT OUT Strobe trigger outp...

Страница 50: ... with the screws on both sides of the connector Turn OFF the power supply before connecting or disconnecting a Cable Peripheral devices may be damaged if the cable is connected or disconnected with the power ON Use a shielded cable Controller Pin No External device to be connected RS CS control cannot be used Pin No 2 3 5 Signal name RD SD GND Signal name RD SD GND Important ...

Страница 51: ...ly that meets the following specifications They are sold separately Supply power from a DC power supply for which measures have been applied to prevent high voltages e g a safety extra low voltage circuit If UL certification is required for the overall system use a UL Class II DC power supply NPN PNP Item Description FQ2 S4 connection FQ2 S4 connection Power supply voltage 24 VDC 21 6 to 26 4 V Re...

Страница 52: ...using a Phillips screwdriver 2 Attach crimp terminals to the power lines Secure the positive and negative lines as indicated using M3 screws Power supply tightening torque 0 54 N m 3 In environments where there is excessive noise at tach a ferrite core ZCAT1730 0730 from TDK or the equivalent to the power supply cable 1 Remove the cover from the power switch on the left side of the Touch Finder 2 ...

Страница 53: ... and open the battery cover 2 Face the rounded side of the battery toward the back of the Touch Finder and insert the battery Do not insert the battery in the wrong orientation 3 Close the battery cover slide the battery cover in the direc tion of the arrow and tighten the screw on the battery cov er 4 Attach the AC adapter to the Touch Finder to start changing the battery The CHARGE indicator wil...

Страница 54: ...ve circuit may activate and stop the Touch Finder The battery complies with the following recycling regulation California regulations concerning perchlorate This product is a lithium battery that contains perchlorate which is regulated by the State of California Please com ply with these regulations For details see the following URL www dtsc ca gov hazardouswaste perchlorate Important EU Li ion00 ...

Страница 55: ...ork Set the IP addresses with one of the following methods Setting Fixed IP Addresses Sensor Setup Mode Sensor settings Network Ethernet IP address setting 1 Press Fixed 2 Set the IP address and subnet mask according to the network settings Touch Finder Setup Mode TF settings Ethernet AUTO 1 Press OFF 2 Set the IP address and subnet mask according to the network settings Using a DHCP Server Sensor...

Страница 56: ...l Configurations Consisting of Only Sensors and a Computer PC Tool If the configuration consists only of Sensors and a Touch Finder set the network settings on the computer as described below No IP address settings are required on the Sensors The following procedure is for Windows XP If you connect OMRON CS CJ series PLCs to the Ethernet the following default IP addresses are assigned to the PLCs ...

Страница 57: ...r the IP address settings in the Sensors 4 On the General Tab Page double click Internet Proto col TCP IC 5 Select the Use the following IP address Option and en ter the following IP address and subnet mask IP address 10 5 5 101 Subnet mask 255 255 255 0 6 Click the OK Button This completes the settings If you connect the PC Tool to a Sensor on a different network through a router set fixed IP add...

Страница 58: ...Setting Up Ethernet 56 FQ2 S4 User s Manual MEMO ...

Страница 59: ...king Images 3 1 Selecting a Sensor for Configuration 58 3 2 Setting Conditions for Taking Images 59 3 3 Adjusting Image Quality 60 3 4 Adjusting the Timing of Taking Images 67 3 5 Adjusting the Images That Were Taken 69 ...

Страница 60: ... der for showing more than one Sensor is fixed Even if the system configuration is changed to reduce the number of Sensors the pre vious display location will remain for Sensors that were removed To update displays of multiple Sensors to the current connection sta tus press Auto connect on the right of the display in step 2 to automatically reconnect 3 Press Sensor settings to return to Setup Mode...

Страница 61: ... the white balance so that the colors match those of the actual measurement object Improving the Image Quality of Metallic and Other Shiny Surfaces HDR Make adjustments for shiny objects or metallic surfaces For a Sensor with built in lighting attach a polarizing filter to cut specular reflections Adjusting the Images That Were Taken Image Adjustment Filtering the Images Filter Items Apply filters...

Страница 62: ...as a numerical value The higher the value the better the focus 2 Adjust the focus of the Sensor while checking the im age and focus value on the Touch Finder For a Sensor with Built in Lighting manually adjust the focus using the focus adjustment screw on the Sensor In the default settings the field of view is set to the nar rowest setting For a Sensor with a C mount use the fo cus ring on the len...

Страница 63: ... speed line check that the images are not blurred under actual operating conditions Brightness Correction Mode FQ2 S4 FQ2 S4 M If the brightness changes inconsistently with each image turn ON the Brightness Correction Mode When HDR is ON Brightness Brightness correction When HDR is OFF Gain Brightness correction When the Brightness Correction Mode is ON the brightness will be consistent but the ti...

Страница 64: ... noise component in the images will stand out Select a suitable factor for the inspection 1 Press Shutter speed on the right of the dis play 2 Move the bar to the left or right to adjust the shutter speed Moving it to the left will make the shutter speed slower and the image brighter Moving it to the right will make the shutter speed faster and the image darker 3 Press OK If you cannot obtain the ...

Страница 65: ...ter the image Image Camera setup Parameter Setting Description Shutter speed Range For FQ2 S4 1 1 to 1 60 000 For FQ2 S4 08 1 1 to 1 60 000 1 250 to 1 60 000 for Cameras with Built in Lighting FQ2 S4 or FQ2 S4 M only 1 1 to 1 50 000 1 250 to 1 50 000 for Cameras with Built in Lighting Default 1 250 If the shutter speed is slow the image will be bright If the shutter speed is fast the image will be...

Страница 66: ...decreasing the shutter speed In HDR Mode set the brightness value to a low setting Relationship between Shutter Speed and the Brightness Adjustment Value in HDR Mode Refer to the following page for the setting methods for the shutter speed and brightness Adjusting the Brightness p 61 100 0 1 60 000 1 250 Moving speed Slow Fast Shutter speed Brightness ...

Страница 67: ... function only for objects that are not moving to avoid image blurring Several images are taken with different shutter speeds and combined If the object moves while the image is being taken the image will become blurred Images with different brightnesses are combined so the resulting image will have a lower degree of con trast Image Camera setup Function Description HDR High Dynamic Range If objec...

Страница 68: ...xternal lighting is used the image may appear as having different colors than the actual object If this is the case adjust the white balance If the lighting built in to the Sensor is used the white balance is already adjusted No setting is required in this case Image Camera setup 1 Hook the filter in the hole at the top of the Sensor 2 Using the top section as a pivot point pull down the filter so...

Страница 69: ...moving objects If the object position varies in the image this delay cannot be used to make the object position more stable When you use a trigger delay with external lighting you will also need to adjust the timing to turn ON external lighting Image Trigger setup Trigger delay 1 A TRIG signal is input Images are input continuously 2 Select the image with the measurement object in the center using...

Страница 70: ...he other Sensors This is called mutual interference This kind of interference can be prevented offsetting the image input timing of each Sensor from when the trigger signal is received Example A trigger i e the TRIG signal is input to Sensor 0 and Sensor 1 at the same time The delay time for preventing mutual interference must be longer than the shutter time When the lighting built into the Sensor...

Страница 71: ... was taken You can use a total of up to eight filter and position compensation items combined Flow of Image Adjustment The image that is taken by the Camera called the Camera image is adjusted in the order that the filter and position compensation items are registered You can specify the order of image adjustment by registering the items in the desired order but you cannot change the order of the ...

Страница 72: ...as Converts an image that was input from a Color Camera to a monochrome image Example You can extract an image that contains only a specific color Extracting an Image That Contains Only Red Weak Smoothing Used when there are minor irregularities in the measurement object The image is feathered to reduce unevenness Strong Smoothing Dilate Used when there is dark noise Dark noise is removed by dilat...

Страница 73: ...nverted to 255 levels to enhance the contrast 1 Press an unused number and then press Add filter 2 Press the filter item to use 3 Make any detailed settings as required for the filter Refer to the detailed settings for each of the following fil ter items 4 Press OK 5 Press Back 6 Make any the following settings as required for each filter item Setting the Source Image for Filtering p 71 Setting th...

Страница 74: ...plied To fine tune the region press Console on the right of the display to display the console This will allow you to change the coordinates of the rectangle at the pix el level 1 Press Filter type on the right of the display 2 Set the filter type to either RGB or HSV 3 Press Filter settings on the right of the display 4 Make the detailed filter settings RGB Select the type of color filter to use ...

Страница 75: ...ngs Red filter default Green filter Blue filter Cyan filter Magenta filter Yellow filter Brgt F brightness filter R G B Brgt F brightness filter R 2G B Custom filter These filters achieve the same effect as when using the selected optical filter R Range 0 0001 to 9 9999 Default 0 3000 These are the RGB gain settings for a custom filter Increase the gain to increase the density of that color compon...

Страница 76: ...fied range will be reset to be tween 0 and 255 3 Press OK 4 Press Back 1 Press Suppression level on the right of the display 2 Press RGB setting on the right of the display 3 Select the method to use to specify the brightness range This setting applies to Sensors with Color Cameras only Common RGB Settings Set the upper and lower limit values of the brightness range The same limits will be used fo...

Страница 77: ...mits will be used for all RGB colors The range from the specified lower to upper limits is converted to 0 to 255 Individual individual RGB settings Range 0 to 255 Defaults Lower limit 0 Upper limit 255 Set the upper and lower limit values of the background suppres sion level for each RGB color The range from the specified lower to upper limits is converted to 0 to 255 Brightness range for Sensors ...

Страница 78: ... ment object is not at an angle The position needs to be corrected to the midpoint between two edges There is a characteristic pattern The measure ment object is at an angle The position is corrected in either the X or Y direction The position is corrected at the same time in both the X and Y directions The positions of two edges are detected and then the coordinates of the midpoint between those ...

Страница 79: ... that is taken by the Camera This setting is used when filter items or other position compensation items have been used specifically for the position compensation item Using Filter Items for Processing with Position Compensation Items p 77 Prev previous image default This setting is used when the processing results of the current position item are to be applied to the image that results from previ...

Страница 80: ...e settings for teaching and the judgement conditions in the same way as for the Search item 4 8 Inspecting with the Search Inspection Item p 137 Also the following settings are included only in the Shape Search Position Compensation Item Rotation This setting is used to enable rotating the image to correct Image Image adjustment Shape Sear pos comp Modify 1 Press Details Model parameter 2 Set Rota...

Страница 81: ...create smoother images None Position compensation is performed at the pixel level Expression text string Data name Description Data range JG Judgement This is the judgement result 2 No judgement not measured 0 Judgement is OK 1 Judgement is NG DX Scroll X This is the amount of position compen sation for the X coordinate 99 999 9999 to 99 999 9999 DY Scroll Y This is the amount of position compen s...

Страница 82: ...olation p 78 Measurement Data That Can Be Used for External Outputs and Calculations The following values can be used as measurement data and output to external devices via Ethernet or used in calculations 2 Press Model Search position comp 3 Make any detailed settings as required for the position compensation processing Refer to Detailed Settings for Search Position Compensation below 4 Press OK ...

Страница 83: ...e following settings are included only in the Edge Position Compensation Item Source Image You can select the image to which to apply the results of position compensation processing Applying the Results of Position Compensation p 76 Interpolation You can select the precision of position compensation If you select Bilinear the precision of position compensation will increase Image Image adjustment ...

Страница 84: ...9 9999 DY Scroll Y This is the amount of position com pensation for the Y coordinate 99 999 9999 to 99 999 9999 X Position X edge position X This is the X coordinate of the mea sured edge position 99 999 9999 to 99 999 9999 Y Position Y edge position Y This is the Y coordinate of the mea sured edge position 99 999 9999 to 99 999 9999 SX Reference X This is the X coordinate of the edge position whe...

Страница 85: ...f you select Bilinear the precision of position compensation will increase Image Image adjustment 2Edge position comp Modify Details Interpolation The settings are the same as those for the Shape Search Position Compensation item Interpolation p 78 Measurement Data That Can Be Used for External Outputs and Calculations The following values can be used as measurement data and output to external dev...

Страница 86: ...s the Y coordinate of the mea sured edge 0 position 99 999 9999 to 99 999 9999 X1 Edge 1 position X This is the X coordinate of the mea sured edge 1 position 99 999 9999 to 99 999 9999 Y1 Edge 1 position Y This is the Y coordinate of the mea sured edge 1 position 99 999 9999 to 99 999 9999 SX0 Edge0 ref position X edge 0 reference position X This is the X coordinate of the edge 0 position when it ...

Страница 87: ...e You can select the image to which to apply the results of position compensation processing Applying the Results of Position Compensation p 76 Interpolation You can select the precision of position compensation If you select Bilinear the precision of position compensation will increase Image Image adjustment 2ed midp comp Modify Details Scroll parameter Interpolation The settings are the same as ...

Страница 88: ... of the mea sured edge midpoint position 99 999 9999 to 99 999 999 SX0 Edge0 ref position X edge 0 reference position X This is the X coordinate of the edge 0 position when it was registered 99 999 9999 to 99 999 9999 SY0 Edge0 ref position Y edge 0 reference position Y This is the Y coordinate of the edge 0 position when it was registered 99 999 9999 to 99 999 9999 SX1 Edge1 ref position X edge 1...

Страница 89: ...Ref angle on the right of the display and set the angle Source Image You can select the image to which to apply the results of position compensation processing Applying the Results of Position Compensation p 76 Interpolation You can select the precision of position compensation If you select Bilinear the precision of position compensation will increase Image Image adjustment 2Edge position comp Mo...

Страница 90: ...tion X This is the X coordinate of the edge 0 position when it was registered 99 999 9999 to 99 999 9999 SY0 Edg0 ref pos Y edge 0 reference position Y This is the Y coordinate of the edge 0 position when it was registered 99 999 9999 to 99 999 9999 SX1 Edg1 ref pos X edge 1 reference position X This is the X coordinate of the edge 1 position when it was registered 99 999 9999 to 99 999 9999 SY1 E...

Страница 91: ...pection Item 137 4 9 Inspecting with the Shape Search II Inspection Item 147 4 10 Inspecting with the Sensitive Search Inspection Item 155 4 11 Inspecting with the Edge Position Inspection Item 162 4 12 Inspecting with the Edge Width Inspection Item 169 4 13 Inspecting with the Edge Pitch Inspection Item 173 4 14 Inspecting with Color Data Inspection Item 178 4 15 Inspecting with the Area Inspecti...

Страница 92: ...ion Checking printed consume by dates OCR p 96 Judging according to bar code Checking product information Bar code p 112 Judging according to 2D code Checking product information 2D code p 120 Judging according to DPM 2D code Reading 3D codes for direct part marking 2D code DPM p 128 Judging according to shapes Judging if there is a mark Search or Shape Search II p 137 p 147 Detecting positions wi...

Страница 93: ...ring the width between lead wires Edge Width p 169 Judging according to the features of parts of a shape Judging the number of pins Edge Pitch p 147 Judging according to colors Detecting parts Color Data p 178 Judging according to sizes Judging if there is silver paste Area p 182 Inspection Example Inspection items used Refer ence LED RADIATION DO NOT STARE INTO BEAM CLASS 2 LED PRODUCT JIS C 6802...

Страница 94: ...Inspection Item Selection Guide 92 FQ2 S4 User s Manual Judging according to shapes and quantities Judging the number of labels Labeling p 188 Inspection Example Inspection items used Refer ence OK NG ...

Страница 95: ...anual 93 4 2 Setup Procedure for Inspection Items The basic steps for setting up inspection items are shown below If measurements are unstable Step 3 Step 2 Step 1 Setting Judgement Parameters Teaching Configuring Inspection Items Step 5 Step 4 Re teaching Setting Detailed Items ...

Страница 96: ... unused inspection item number 3 Press Add item on the menu 4 Select an inspection item such as Search When registering multiple inspection items press the inspection item number after 1 and set it in the same way If more than seven inspection items are set drag the icon at the bottom of the menu upward to display the next inspection item numbers Note ...

Страница 97: ...tion Items 1 Press the number of the inspection item to be set 2 Press Modify on the menu 1 Press the number of the inspection item to be delet ed 2 Press Delete on the menu Executing Similar Measurements in Different Places Copy an inspection item that is already registered Copy Change the name of an inspection item Rename Note ...

Страница 98: ...2D code or 2D code DPM inspection item that was executed before the current inspection item Characters That Can Be Recognized 1 Any symbols other than those that are listed above cannot be recognized 2 Normally only uppercase letters can be recognized Lowercase letters can be recognized if model dictionaries are used Each lowercase letter must be registered individually Model Dictionaries p 105 It...

Страница 99: ...alphanumeric characters or symbols etc Measurement region Detailed parameters to recognize characters These are set automatically Settings are made to check whether the characters that were read from the workpiece were recognized correctly Differences between the references that were taught for character recognition and the actual result of reading the characters are detected and conditions are se...

Страница 100: ...press OK The measurement region will be set 4 The characters that were read with the initial param eters will be displayed above each line You set the format of the characters to recognize to pre vent reading similar characters incorrectly This display will not appear if the character format is already regis tered Number of characters to read in the character string 1 Types of characters letters n...

Страница 101: ...at line from the software keyboard that is displayed Enter the character format for each line and press the OK Button Press ABC to enter alphanumeric characters 6 Press TEACH on the lower right of the display The detailed parameters for character recognition will be set automatically according to the specified character for mat Measurement Parameters That Are Automati cally Set by Teaching p 103 7...

Страница 102: ...Con tinuous measurements will be performed for the images that are displayed You can change measurement values that appear on the display on the Display Settings Display Press Display setting on the right of the display to switch to the Display Settings Display You can automatically adjust the judgement conditions by using OK and NG workpieces Test Measurements p 219 Press Auto adjustment on the r...

Страница 103: ...1 Press Verification 2 Press Master data regist 3 Press the character string to register in the master data 4 You can use any of the following three methods to register character strings in the master data from the menu display Auto A character string is read from an image and registered in the master data The procedure is essentially the same as the procedure for teaching in step 2 Manual A chara...

Страница 104: ...ting Description Verif master data OFF default All master data Master data 0 to 31 Sets whether to verify the read character string against a character string that is registered in the master data To verify the read character string against the master data select the character string to use for verification Master data regist Registers a character string in the master data Auto teach No OFF defaul...

Страница 105: ... Recognition performance will improve for positive numbers but noise will increase causing instability Noise filter size 60 to 440 default 0 Larger values eliminate wide areas of noise Small values eliminate nar row areas of noise Boundary correction ON OFF default If boundary correction is turned ON dark areas at the edges of the mea surement region will be considered to be noise and removed from...

Страница 106: ...ize Char thick th Rotation compensation Slant compensation Boundary correction Changing the Output Code for Errors Default NG You can change the character string that is output for read errors The output code must be no more than 20 characters Inspect Inspection OCR Details Tab Page Output parameter Error string Troubleshooting Unstable Read Results The read results may be unstable if the contrast...

Страница 107: ...ctly with the built in dictionary You can create model dictionaries to enable reading special characters You can register characters that are 30 30 pixels or larger Use the following procedures to create and set model dictionaries Creating a Dictionary 1 Press the Tool Button and then Model dictionary 2 Press the dictionary in which to register characters 3 Press Modify on the menu 4 Press Add ...

Страница 108: ... Extraction reg on the right of the dis play 7 Specify the region to extract and press OK The measurement region can contain character strings on up to four lines Each line can contain up to 32 characters 8 Press Extraction 9 The extracted characters will be displayed on the up per left of the display 10 Press OK to register the characters ...

Страница 109: ...haracters that are 30 30 pixels or larger in the dictionary Change the settings of the Sensor to increase the size of the characters Extraction error The characters could not be extracted Correct the measurement data settings or the read region Excess char num An attempt was made to register more than 10 characters Delete the data that does not need to be registered Displaying Registered Character...

Страница 110: ...n the display to add and edit characters press Individual reg on the right of the display 2 Select the region to delete and press the Delete But ton 3 Press the OK Button 1 On the right of the display to add characters press Meas Parameter to enable changing the mea surement parameters 1 To extract characters based on a specified character format press Modify chara on the right of the display ...

Страница 111: ...ion Add item OCR Details Tab Page 2 Press a line to enter the character format for that line from the software keyboard that is displayed Enter the character format for each line 1 Press Dictionary param 2 Press Dictionary ref and select the dictionary to use 3 Press Individual char and select the letter or num ber to use 4 Press Back ...

Страница 112: ...ent is OK 1 Judgement is NG 13 Teaching not performed error 14 Figure not registered error 15 Out of range error 16 Measurement timeout error 17 Format not entered error IN Index This is the verification result i e the master data number 2 Verification OFF or reading error 1 Verification is NG 0 to 31 Master data No N Number of read characters This is the total number of charac ters that were read...

Страница 113: ...igure not registered error 15 Out of range error 16 Measurement timeout error 17 Format not entered error This is the judgement result Similarity 0 to 100 This is the lowest similarity of the read characters Stability 0 to 100 This is the lowest stability of the read characters Number of read characters on line 1 0 to 32 This is the number of characters that were read on line 1 Number of read char...

Страница 114: ... A CC B GS1 DataBar is a code in which the name has been changed from the previous RSS Reading will end in error if the barcode type is incorrectly set Set the barcode type before starting reading When teaching is performed the captured barcode is read and the following items can be set Code type Detailed Parameters p 116 Direction for Pharma only Detailed Parameters p 116 Reverse decode for Pharm...

Страница 115: ...uring Inspection Items p 94 1 Press Teach 2 Input an image of the barcode 3 Move the rectangle so that it surrounds the barcode 4 Press the OK Button 5 Press TEACH on the lower right of the display 6 The result of reading the barcode that was displayed will be displayed along with a confirmation dialog box for registration in the master data 7 Press Yes to register the barcode read result in the m...

Страница 116: ...o adjust the settings that resulted from teaching Camara setup You can adjust the Camera focus brightness and other factors to input a better image Adjusting Image Quality p 60 Meas Parameter You can change the type of code to read the read settings etc Detailed Parameters p 116 Continuous test You can start test measurements of displayed images for the settings that were taught Performing Test Me...

Страница 117: ... registered in the master data To verify the read character string against the master data select the char acter string to use for verification All master data Master data 0 to 31 Partial verif on off No default value The number of digits in the read results to be verified with the master data can be limited When Partial verification is set to ON set the first and last compared digit positions Up ...

Страница 118: ...ct Detail Settings Inspect Inspection Add item Bar code Details Tab Page Press Meas parameter Set the measurement parameters Be sure to always specify the code type Specify other items as necessary If master data is automatically registered the code type the composite codes on off setting and the read direction are automatically set The following table shows the ASCII codes that can be used for ma...

Страница 119: ...or not to support composite codes This item is enabled only when the following barcode types are selected Code128 GS1 128 GS1 DataBar Yes Check digit on off No default value Selects whether or not to insert a check digit This item is enabled only when the following barcode types are selected Codebar Code39 ITF Interleaved 2 of 5 JAN EAN UPC or Code93 When the other codes are selected this item is ...

Страница 120: ...G Sets the text string to be output when a read error occurs ASCII code table p 116 Display setting Description Num of char Displays the number of characters that were read Characters Displays the character string that was read Expression text string Data name Description Data range JG Judgment This is the judgment result 2 No judgment not measured 0 Judgment is OK 1 Judgment is NG 13 Teaching not...

Страница 121: ...played If bar codes cannot be read during an automatic registration The reading may be unstable due to low contrast Adjust the brightness to improve the contrast of the bar code Adjusting the Brightness p 61 Measured item Range of value Description Judgement 2 No judgement not measured 0 Judgement is OK 1 Judgement is NG 13 Teaching not performed error 14 Figure not registered error 15 Out of rang...

Страница 122: ... reading When teach ing is performed the captured 2D code is read and the following items can be set Code type Detailed Parameters p 125 Mirror Detailed Parameters p 125 Specifying the Code Color Data Matrix QR Code or Micro QR Code only Detailed Parameters p 125 Shape Data Matrix QR Code or Micro QR Code only Detailed Parameters p 125 Note Setup Measurement Measurement region One 2D barcode is re...

Страница 123: ...onfiguring Inspection Items p 94 1 Press Teach 2 Input an image of the 2D code 3 Move the rectangle so that it surrounds the 2D code 4 Press the OK Button 5 Press TEACH on the lower right of the display 6 The result of reading the 2D code that was displayed will be displayed along with a confirmation dialog box for registration in the master data 7 Press Yes to register the read result in the mast...

Страница 124: ...ng Image Quality p 60 Meas Parameter You can change the type of code to read the read settings etc Detailed Parameters p 125 Continuous test You can start test measurements of displayed images for the settings that were taught Performing Test Measurements p 214 1 Press Verification 2 Press Master data regist 3 Press the character string to register in the master data 4 You can use any of the follo...

Страница 125: ...ing Value Description Verif master data OFF default value Sets whether to verify the character string that was read from the bar code against a character string that is registered in the master data To verify the read character string against the master data select the char acter string to use for verification All master data Master data 0 to 31 Partial verif on off No default value The number of ...

Страница 126: ... 124 FQ2 S4 User s Manual ASCII code table The following table shows the ASCII codes that can be used for manual registration of master data and also for registering characters of Limits Note Upper 4 bits Lower 4 bits ...

Страница 127: ...er strings are output after outputting the output data output data settings 0 to 31 such as the inspection item parameters and calculation result Refer to the description for the communications format for the setting procedure and output specifications to output the character string Outputting Character Strings EtherNet IP p 346 PLC Link p 383 TCP No protocol Communications p 408 Setup Item Settin...

Страница 128: ...mprove the contrast of the 2D code Adjusting the Brightness p 61 The read character string is output after the other output data data 0 to 31 in the output data settings after the mea surement such as the inspection item parameters and calculation results Refer to the following section for the loca tion of the output area for the character string and other details Order in Which Data Is Written Wh...

Страница 129: ...1 Expression text string Data name Description Data range JG Judgment This is the judgment result 2 No judgment not measured 0 Judgment is OK 1 Judgment is NG 13 Teaching not performed error 14 Figure not registered error 15 Out of range error 16 Measurement timeout error IN Index The verification result master data No is out put 2 Verification OFF or reading error 1 Verification is NG 0 to 31 Mas...

Страница 130: ...atrix ECC200 and QR Codes Setup Procedure for 2D code DPM Step 1 Select the Inspection Item Inspect Modify Inspection image When the inspection region is set the code image is displayed and teaching is executed the code type and detailed parameters are automatically set Inspection image One 2D code is scanned in one inspection region If there are multiple 2D codes in the inspection region the firs...

Страница 131: ...Settings Tab Page 1 Press Teach 2 Display the image of the 2D code 3 Move the rectangle so that it surrounds the 2D code 4 Press the OK Button 5 Press TEACH on the lower right of the display 6 The result of reading the 2D code that was displayed will be displayed along with a confirmation dialog box for registration in the master data 7 Press Yes to register the read result in the master data The ...

Страница 132: ...on the right of the display to switch to the Display Settings Display You can automatically adjust the judgement conditions by using OK and NG workpieces 5 3 Adjusting the Judgement Parameters p 219 Press Auto adjustment on the right of the display to switch to the Auto adjustment Display Parameter Setting Description Contrast Range 0 to 100 Defaults Lower limit 0 Upper limit 100 Adjust the upper ...

Страница 133: ...he menu display Auto Registers a character string from an actual 2D code in the master data The procedure is es sentially the same as the procedure for teach ing in step 2 Manual A character string is entered directly in the master data You can use a software key board to register a character string with up to 32 characters Item ref Select this item to use the immediately pre ceding read results a...

Страница 134: ...s whether to verify the read character string against a character string that is registered in the master data To verify the read character string against the master data select the character string to use for verification Master data regist Registers a character string in the master data Auto teach No OFF default Master data 0 to 31 Sets the character string in which to automatically register the...

Страница 135: ...ast mode When ON the scanning time is shorter For certain work the scanning time may be longer when Fast mode is ON Please use after performing test measurements and verifying the scanning speed Shape DataMatrix only Square Rectangle Auto default Sets the code shape QR Code Model QR Code only Model 1 Model 2 Auto default Sets the QR Code model Error Correction Level QR Code only L 7 M 15 Q 25 H 30...

Страница 136: ...l device The character strings are output after outputting the output data output data settings 0 to 31 such as the inspection item parameters and calculation result Refer to the description for the communications format for the setting procedure and output specifications to output the character string Outputting Character Strings EtherNet IP p 346 PLC Link p 383 TCP No protocol Communications p 4...

Страница 137: ...d 0 Judgment is OK 1 Judgment is NG 13 Teaching not performed error 14 Figure not registered error 15 Out of range error 16 Measurement timeout error IN Index The verification result master data No is output 2 Verification OFF or reading error 1 Verification is NG 0 to 31 Master data No N Num of characters The number of characters read is output 0 to 1024 E Cell recognition rate Outputs the cell r...

Страница 138: ...ccurs If a teaching error occurs If scanning of the 2D code fails a teaching error message appears It is likely that low contrast caused unstable scanning Adjust the brightness to increase the contrast of the 2D code Increasing the Brightness of the Image p 61 ...

Страница 139: ... image pattern that is registered in advance is called the model The degree to which the image matches the model is called the correlation Setup Procedure for the Search Inspection Item Step 1 Selecting the Inspection Item Inspect Inspection 1 Press an unused inspection item number and press Add item 2 Press Search Registering inspection items p 94 Drag the arrow at the bottom of the menu upward t...

Страница 140: ...he im ages that are taken 3 Press OK to accept the value 4 Press Back to end making the setting Parameter Setting Description Correlation Range 0 to 100 Defaults Lower limit 60 Upper limit 100 Adjust the upper and lower limits of the correlation for an OK judge ment Position X Range 99 999 9999 to 99 999 9999 Defaults Lower limit 99 999 9999 Upper limit 99 999 9999 Adjust the upper and lower limit...

Страница 141: ...he conditions by which to sort the detected results You can output the results in the sort order that you se lected Selection item Setting Description Sorting method Corr ascending order ascending order of correlation value Sorts the results in order from the smallest correlation to the largest Corr descending order descending order of correlation value Sorts the results in order from the largest ...

Страница 142: ...s Extraction condition and adjust the candi date level so that only objects higher than a certain correlation are detected 2 If Multi point output is set to Yes you can specify the output conditions for more than one result Ex traction X Y and Detection count Extraction condi tion Range Description Candidate level 0 to 100 Outputs only objects with a correlation that is higher than the specified c...

Страница 143: ...ing range Correlation Is Inconsistent Due to Low Contrast Adjust the brightness to improve the contrast of the mark Adjust the brightness p 61 Correlation Is Inconsistent Due to Variations in the Measurement Object Inconsistent portions can be masked so that they are omitted from matching Model masking p 143 Increasing Processing Speed The following two methods can be used to reduce processing tim...

Страница 144: ...l registration region Other than rectangles circles and polygons can be set as the model registration regions Inspect Inspection Search Modify Settings Tab Page Teach Model region 1 Press Model region 2 Press Delete in the model registration editing display The rectangle will be deleted 3 Press Yes 4 Press Add in 5 Press the shape of the region that you want to use 6 Draw the region 7 Press OK Up ...

Страница 145: ...142 2 While the figure to be masked is selected press on the right of the display and then press OR NOT The selected area will be removed from the model Every time you press OR NOT the area will switch be tween being enabled and disabled OR Enabled range NOT Disabled range 1 Press Console on the right side of the display where you draw the region The console will appear 2 To adjust the position of...

Страница 146: ... The Insp region Display will appear 2 Adjust the size and position of the measurement re gion Change the size Press the frame at one corner The processing time can be shortened by making the region smaller Change the position Drag the figure to move it 1 Use one of the following methods to move the cross cursor to the desired position The position of the cross cursor will be the coordinate positi...

Страница 147: ...1 Position Y This is the Y coordinate where the Nth model was found 99 999 9999 to 99 999 9999 TH 0 to TH 31 Angle This is the angle in which the Nth model was found 180 to 180 SX Reference X This is the X coordinate of the position where the model was registered 99 999 9999 to 99 999 9999 SY Reference Y This is the Y coordinate of the position where the model was registered 99 999 9999 to 99 999 ...

Страница 148: ... in Teaching A teaching error message will appear if the contrast of the image within the model registration region is too low Select a region with a larger contrast between light and dark areas compared to the region that was registered as the model and re register it as the model ...

Страница 149: ...tern is used but in the Shape Search II a model that concentrates on the outline information is used This inspection item enables robust high speed high precision detection of models even when lighting is reflected from the workpieces when the shapes of the workpieces are inconsistent when the orientation of the workpieces change when noise is superimposed when part of the image is blocked or when...

Страница 150: ...formed for the im ages that are taken 3 Press OK to accept the value 4 Press Back to end making the setting Parameter Setting Description Correlation Range 0 to 100 Defaults Lower limit 60 Upper limit 100 Adjust the upper and lower limits of the correlation for an OK judge ment Position X Range 99 999 9999 to 99 999 9999 Defaults Lower limit 99 999 9999 Upper limit 99 999 9999 Adjust the upper and...

Страница 151: ...g Description Sorting method Corr ascending order ascending order of correlation value Sorts the results in order from the smallest correlation to the largest Corr descending order descending order of correlation value default Sorts the results in order from the largest correlation to the smallest Pos X ascending order ascending order of position X Sorts the results in order from the smallest meas...

Страница 152: ...e level so that only objects higher than a certain correlation are detected 2 Set the conditions for outputting the detected ob jects Extraction X Y and Detection Count Extraction con dition Range Description Candidate level 0 to 100 Defaults Lower limit 80 Upper limit 100 Outputs only objects with a correlation that is higher than the specified candidate level Extraction X 99999 9999 to 99999 999...

Страница 153: ...ameter 1 Set Rotation to Yes 2 Press Angle range and set the following range Searching for Other Locations If the model image consists of detailed graphic images similar models may be detected In that case set the model mode to Stable Inspect Inspection Shape Search II Modify Details Tab Page Model parameter Model mode Correlation Is Inconsistent Due to Low Contrast Adjust the brightness to improv...

Страница 154: ...easurement Region Changing the Model Regions This section describes how to edit the model regions You can edit the model region in the same way as for a search region Changing the Model Registration Region to a Shape Other Than a Rectangle p 142 If the model region is changed perform teaching again p 138 Changing the Measurement Region The region within which the model is searched can be changed I...

Страница 155: ... Y 31 Position Y This is the Y coordinate where the Nth model was found 99 999 9999 to 99 999 9999 TH 0 to TH 31 Angle This is the angle in which the Nth model was found 180 to 180 SX Reference X This is the X coordinate of the position where the model was registered 99 999 9999 to 99 999 9999 SY Reference Y This is the Y coordinate of the position where the model was registered 99 999 9999 to 99 ...

Страница 156: ...rrors in Teaching A teaching error message will appear if the contrast of the image within the model registration region is too low Select a region with a larger contrast between light and dark areas compared to the region that was registered as the model and re register it as the model ...

Страница 157: ... with a normal search Setup Procedure for the Sensitive Search Inspection Item Step 1 Selecting the Inspection Item Inspect Inspection 1 Press an unused inspection item number and press Add item 2 Press Sensitive Search Registering inspection items p 94 Drag the arrow at the bottom of the menu upward to display all of the inspection items Sample Settings Model desired image pattern Search region r...

Страница 158: ...ss OK to accept the value 4 Press Back to end making the setting Parameter Setting Description Correlation Range 0 to 100 Defaults Lower limit 60 Upper limit 100 Set the correlation range that is to be judged as OK If the correlation in the measurement results is 0 the judgement will be NG regardless of the setting of the lower limit Position X Range 99 999 9999 to 99 999 9999 Defaults Lower limit...

Страница 159: ...bjects detected with a correlation at the candidate level or higher Only the results that meet all the specified conditions are output Inspect Inspection Sensitive Search Modify Details Tab Page Meas Parameter You can change the output form for each measurement value to one of the following settings Press Result type on the right of the display Absolute value default The measured coordinates are o...

Страница 160: ...son if the object is at an angle the correlation is reduced and the image may be judged as NG To achieve an OK judgement for the same image pattern even when the object is at an angle the rotation range must be widened Inspect Inspection Sensitive Search Modify Details Tab Page Model parameter 1 Set Rotation to Yes 2 Press Angle range and set the following range Correlation Is Inconsistent Due to ...

Страница 161: ...or the model is performed Setting the angle range p 141 Editing the Model Regions and Measurement Region Changing the Model Regions This section describes how to edit the model regions You can edit the model region in the same way as for a search region Changing the Model Registration Region to a Shape Other Than a Rectangle p 142 If the model region is changed perform teaching again p 138 Changin...

Страница 162: ...99 RY Detection Y This is the Y coordinate of the detec tion point when the model was regis tered 999 999 999 9999 to 999 999 999 9999 SX Reference position X This is the X coordinate of the position where the model was registered This is the center of the model region 999 999 999 9999 to 999 999 999 9999 SY Reference position Y This is the Y coordinate of the position where the model was register...

Страница 163: ...ve search Correlation 0 to 100 Correlation D deviation 0 to 221 Density deviation Position X 99 999 9999 to 99 999 9999 This is the X coordinate of the position where the model was found Position Y 99 999 9999 to 99 999 9999 This is the Y coordinate of the position where the model was found Angle 180 to 180 This is the angle of the position where the model was found NG sub region 0 to 100 This is ...

Страница 164: ...ges greatly are called edges The positions of these edges are measured Setup Procedure for Edge Position Step 1 Selecting the Inspection Item Inspect Inspection 1 Press an unused inspection item number and press Add item 2 Press Edge position Registering inspection items p 94 Drag the arrow at the bottom of the menu upward to display all of the inspection items OK NG Edge search direction Color of...

Страница 165: ...yed next to the param eter name Continuous measurements will be performed for the images that are displayed 3 Press OK to enter the value Parameter Setting Description Position X Range 99 999 9999 to 99 999 9999 Defaults Lower limit 99 999 9999 Upper limit 99 999 9999 Adjust the upper and lower limits of edge position X for an OK judgement Position Y Range 99 999 9999 to 99 999 9999 Defaults Lower...

Страница 166: ...projection is formed based on the gray level and any position of intersection between the gray level value and the threshold edge level is detected as an edge This detection method is used when you must process an image with exces sive noise or when the edges are blurry Differentiation A differentiated waveform is created that represents the amount of change in gray level between neighboring pixel...

Страница 167: ... maximum and minimum color deviations and densities within the edge detection region are determined If the difference is less than the noise threshold it is assumed that there are no edges Normally there is no problem with the default value of 10 but if noise is mistakenly detected as an edge make this value higher Sensors with Color Camera Within the Region Max color change Min color change Noise...

Страница 168: ...will be extracted Only a rectangle can be used to specify the region 6 Press OK to enter the edge color 7 Press TEACH again 8 Press Back Item Parameter Description Detection mode Color IN Detects as an edge any position where the color changes from another color to the specified color Color OUT Detects as an edge any position where the color changes from the specified color to another color It is ...

Страница 169: ... Judgement is NG 13 Teaching not performed error 14 Figure not registered error 15 Out of range error X Position X This is the X coordinate of the mea sured edge position 99999 9999 to 99999 9999 Y Position Y This is the Y coordinate of the mea sured edge position 99999 9999 to 99999 9999 SX Ref position X reference position X This is the X coordinate of the edge position when a range is set 99999...

Страница 170: ...and try teaching again If there is an edge and it cannot be detected adjust the Noise level on the Details Tab Page and try teaching again Edge Not Found If an edge is not found the measurement result will be NG Perform the following If a color was specified make sure the color of the measurement object has not changed from the specified color Set the color again if necessary If there is an edge a...

Страница 171: ...een two edges is called the edge width Setup Procedure for Edge Width Inspection Item Step 1 Selecting the Inspection Item Inspect Inspection 1 Press an unused inspection item number and press Add item 2 Press Edge Width Registering inspection items p 94 Drag the arrow at the bottom of the menu upward to display all of the inspection items OK NG Color of edge to be found Measurement region Edges a...

Страница 172: ...ss Judgement 2 Set the D Width range for an OK judgement Continuous measurements will be performed for the im ages that are displayed The measured value is dis played beside the parameter name 3 Press OK to enter the value Item Parameter Setting Description Judgement parameters Edge width edge in width When the result type is set to relative values Range 99 999 9999 or 99 999 999 Default Upper lim...

Страница 173: ...e Used for External Outputs and Calculations The following values can be output to external devices or used in calculations as measurement data 4 17 Calculations and Judgements Using Inspection Item Data p 197 You can change the output form for each measurement value to one of the following settings Press Result type on the right of the display Absolute value default The measured edge width is out...

Страница 174: ...ls Tab Page and try teaching again If an edge is not detected when teaching 0 will be registered as the reference width If the result is OKed when there is not edge set the judgement parameters for a reference position of 0 Edge Not Found The measured edge width will be 0 Perform the following If a color was specified make sure the color of the measurement object has not changed from the specified...

Страница 175: ...t area are found and the number objects object width and pitch are output Setup Procedure for Edge Width Inspection Item Step 1 Selecting the Inspection Item Inspect Inspection 1 Press an unused inspection item number and press Add item 2 Press Edge Pitch Registering inspection items p 94 Drag the arrow at the bottom of the menu upward to display all of the inspection items Sample Settings Sample ...

Страница 176: ...ion p 144 1 Press Judgement 2 Press the parameters and set the range that is to be judged as OK Continuous measurements will be performed for the im ages that are displayed The measured value is dis played beside the parameter name 3 Press OK to enter the value The middle arrow is the direction for detecting an edge Moves the end point of the measurement region Changes the width of the measure men...

Страница 177: ... p 144 Item Parameter Setting Description Judgement Parameter Edge pitch Range 0 to 1000 Defaults Lower limit 0 Upper limit 1000 Set the range that is to be judged OK for each parameter Average pitch Range 0 0000 to 99 999 9999 Defaults Lower limit 0 0000 Upper limit 99 999 9999 Max pitch maximum pitch Range 0 0000 to 99 999 9999 Defaults Lower limit 0 0000 Upper limit 99 999 9999 Min pitch minimu...

Страница 178: ...f range error N Edge pitch This is the number of objects 0 to 999 P Average pitch This is the average pitch 0 to 99999 9999 PH Max pitch This is the maximum pitch 0 to 99999 9999 PL Min pitch This is the minimum pitch 0 to 99999 9999 W Average width This is the average width between edges 0 to 99999 9999 WH Max width This is the maximum width between edges 0 to 99999 9999 WL Min width This is the ...

Страница 179: ... as the reference width If the result is OKed when there is not edge set the judgement parameters for a reference position of 0 Edge Not Found The measured edge pitch will be 0 Perform the following If a color was specified make sure the color of the measurement object has not changed from the specified color Set the color again if necessary If there is an edge and it cannot be detected make sure ...

Страница 180: ...nd inspections are performed for the difference from the registered reference value density average and the variation within the measurement region density deviation If a Sensor with a Monochrome Camera is connected the average density in the measurement region is measured and the density deviation is used for judgements Setup Procedure for Color Data Inspection Item Step 1 Selecting the Inspectio...

Страница 181: ... when teaching has been completed 6 Press Back to end teaching Changing the measurement region p 144 Item Parameter Description Reference data Hue The hue to use as a reference is set automatically Saturation The saturation to use as a reference is set automatically Brightness The brightness to use as a reference is set automatically 1 Press Judgement 2 Press the parameters and set the range that ...

Страница 182: ...verage 0 0000 to 255 0000 Set the difference in the average value of the B blue component that is to be judged as OK Item Parameter Setting Description Judgement Parameter Density average 0 to 255 Set the judgement upper and lower limits for the average density in the measurement region Density deviat density deviation 0 0000 to 127 0000 Set the upper and lower limits for the deviation in the aver...

Страница 183: ... judgement results R average 0 to 255 This is the average value for the R red component G average 0 to 255 This is the average value for the G green component B average 0 to 255 This is the average value for the B blue component Color diff dens AV Color for Sensors with Color Cameras 0 to 442 This is the difference between the color that was registered as the reference and the measured color The a...

Страница 184: ... a number of pixels and it is called the area Setup Procedure for Area Step 1 Selecting the Inspection Item Inspect Inspection 1 Press an unused inspection item number and press Add item 2 Press Area Registering inspection items p 94 Drag the arrow at the bottom of the menu upward to display all of the inspection items OK NG Judges according to the number of pixels area of the specified color Spec...

Страница 185: ...r for which to measure the area The color occupying the larg est area will be automatically registered Setting Colors Manually p 184 Reference area The area to use as a reference is set automatically 1 Press Judgement 2 Press the parameters and set the range that is to be judged as OK The measured value is displayed beside the parameter name Continuous measurements will be performed for the images...

Страница 186: ...Range 999 999 999 9999 to 999 999 999 9999 Default Upper limit 999 999 999 9999 Lower limit 999 999 999 9999 Set the upper and lower limits of the range of gravity X that is to be judged as OK Gravity Y Range 999 999 999 9999 to 999 999 999 9999 Default Upper limit 999 999 999 9999 Lower limit 999 999 999 9999 Set the upper and lower limits of the range of the gravity Y that is to be judged as OK ...

Страница 187: ...play setting The following display patterns can be selected for the extracted color Measurement image All color image default Selected color image or Binary image Press Background color to change the display for colors other than the extraction color The color can be chosen from Black default White Red Green or Blue 1 Press Set color on the right of the display 2 Press Binary level 3 Specify the r...

Страница 188: ...rement region p 144 1 Press Fill profile and select Filling up holes or Fill Outline Item Parameter Setting Description Meas Parame ter measure ment parameter Fill profile Filling up holes Fill Outline None Default None None Holes are not filled Filling up holes Processes areas that are surrounded by the specified color like in the shape of a donut as the specified color Fill Outline Measures the ...

Страница 189: ...ment result 2 No judgement not measured 0 Judgement is OK 1 Judgement is NG 13 Teaching not performed error 14 Figure not registered error 15 Out of range error AR Area This is the area in the measurement region with the specified color 0 to 999999999 9999 X Gravity X This is the X coordinate of the center of the measurement area with the specified color 99999 9999 to 99999 9999 Y Gravity Y This i...

Страница 190: ... Color Camera is connected you can specify up to four colors to measure If a Sensor with Mono chrome Camera is connected the image is converted to a black and white binary image Then white pixels are measured 1 Press an unused inspection item number and press Add item 2 Press Labeling Registering Inspection Items p 94 Drag the arrow at the bottom of the menu upward to display all of the inspection...

Страница 191: ...ed and the resulting color information will be registered Item Parameter Description Reference data Reference area The area for label 0 to use as a reference is set automatically Reference position X The gravity position X for label 0 to use as a reference is set automatically Reference position Y The gravity position Y for label 0 to use as a reference is set automatically 1 Press Judgement 2 Pre...

Страница 192: ...Range 0 to 999 999 999 9999 Defaults Upper limit 999 999 999 999 Lower limit 0 Sets the upper and lower limits of the area for an OK judgement Gravity center X Range 99 999 999 to 99 999 999 Defaults Upper limit 99 999 999 Lower limit 99 999 999 Set the upper and lower limits of the gravity X for an OK judgement Gravity center Y Range 99 999 999 to 99 999 999 Defaults Upper limit 99 999 999 Lower ...

Страница 193: ...atterns can be selected for the extracted color Measurement image All color image default Selected color image or Binary image Press Background color to change the display for colors other than the extraction color The color can be chosen from Black default White Red Green or Blue 1 Press Binary level on the right of the display 2 Specify the range of brightness to detect and then press OK Specify...

Страница 194: ...Parameter Setting Description Filling up holes Yes No default Sets how to process areas surrounded by the specified color If Yes is set those areas are processed as the specified color Extract image Yes No default Select this option if there are areas of the specified color inside the measurement region that you do not want to measure If Yes is set all areas outside the measurement region are cut ...

Страница 195: ... Set the maximum number of labels to detect Area Range 0 to 999 999 999 9999 Defaults Upper limit 999 999 999 9999 Lower limit 0 Specify the area range to judge as a label Gravity X Range 99 999 999 9999 to 999 999 999 999 Defaults Upper limit 999 999 999 999 Lower limit 999 999 999 9999 Specify the gravity X position to judge as a label Gravity Y Range 999 999 999 9999 to 999 999 999 999 Defaults...

Страница 196: ...ect them Inspect Inspection Add item Labeling Details Tab Page Output parameter Editing the Measurement Region This section describes how to edit the measurement regions You can edit the measurement region in the same way as for a search region Changing the Model Registration Region to a Shape Other Than a Rectangle p 142 If the measurement region is changed perform teaching if required p 189 Meas...

Страница 197: ... 14 Figure not registered error 15 Out of range error L Number of labels This is the number of labels found 0 to 100 TAR Total label area This is the total area of all labels found 0 to 999 999 999 9999 AR 0 to AR 99 Area These are the areas of each individual label 0 to 999 999 999 9999 X 0 to X 99 Gravity X These are the X coordinates of the center of each label 99 999 9999 to 99 999 9999 Y 0 to...

Страница 198: ...eference area registered during teaching is 0 Perform the following If the color of the measurement object has changed from the specified color set the color again and try teaching again Measurement item Range of value Description Judgement 0 Judgement is OK 1 Judgement is NG 13 Teaching not performed error 14 Figure not registered error 15 Out of range error This is the measurement judgement resu...

Страница 199: ...ions You can also combine expressions You can use the following values in calculations Filter item and position compensation item data measurement data reference values and judgement results Inspection item data measurement data reference values and judgement results Constants Other calculation results Judgement Upper and lower limit values are used for the judgement of calculation results D0 to D...

Страница 200: ...nd lower limit judgement Calculation results D31 Calculation results D0 Calculation Process Data logging Reference values Upper and lower limit judgement Calculation judgement result J31 OR logic Expression 0 Expression 31 Ethernet output Touch Finder SD card Computer Judgement results Reference values Individual judgement results OR0 to OR31 Overall judgement result OR Data Overall judgement resu...

Страница 201: ...ction item 1 and calculates the distance between the two points Region 0 edge position coordinates of inspection item 0 I0 X I0 Y Region 1 edge position coordinates of inspection item 1 I1 X I1 Y Distance between two points DIST I0 X I0 Y I1X I1 Y Procedure Calculation Setting Expressions 1 Press Inspect Calculation 1 Press Expression on the Settings Tab Page 2 Press the expression number that you...

Страница 202: ...ut constants or a mathematical operator The following operators can be used addition subtraction multiplication and division Data Press this to use measurement data reference values and judgement results of other items Math Press this to use functions Performing Similar Calculations At Different Locations Rename The name of the calculation can be changed 16 characters max Copy Previously registere...

Страница 203: ...le between the straight line joining the centers of region 0 and region 1 and horizontal ATAN R1 Y R0 Y R1 X R0 X If the two arguments are both 0 the result is 0 and the judgement is NG AND Finds the logical AND If one of the arguments is 0 the calculation result is 0 Otherwise it is 1 AND argument_1 argument_2 OR Finds the logical OR If both of the arguments are 0 the calculation result is 0 Othe...

Страница 204: ... before calculating the remain der The remainder is the result of dividing integers Example MOD 13 4 Result 1 remainder when 13 is divided by 4 MOD 25 68 6 99 Result 5 remainder when 26 is divided by 7 SQRT Finds the square root If the argument is negative the result is 0 The judgement will be NG SQRT argument DIST Finds the distance between two points the center of gravity and the center of the m...

Страница 205: ...ons to the Overall Judgement Results You can specify whether to reflect the judgement results of a calculation in the overall judgement The default is to reflect them Inspect Calculation Details Tab Page Output parameter Reflect 1 Press Judgement on the Settings Tab Page 2 Press an expression between 0 to 31 and set the cor responding judgement parameters using the slider 3 Press the OK Button ...

Страница 206: ...99 9999 0 Reference Y SY 99999 9999 to 99999 9999 0 Reference angle ST 180 to 180 0 Correlation CR 0 to 100 0 Search position comp Judgement JG 2 No judgement not measured 0 Judgement is OK 1 Judgement is NG 2 Scroll X DX 99999 9999 to 99999 9999 0 Scroll Y DY 99999 9999 to 99999 9999 0 Position X X 99999 9999 to 99999 9999 0 Position Y Y 99999 9999 to 99999 9999 0 Reference X SX 99999 9999 to 999...

Страница 207: ...999 9999 0 2Edge midpoint comp Judgement JG 2 No judgement not measured 0 Judgement is OK 1 Judgement is NG 2 Scroll X DX 99999 9999 to 99999 9999 0 Scroll Y DY 99999 9999 to 99999 9999 0 Edge0 position X X0 99999 9999 to 99999 9999 0 Edge0 position Y Y0 99999 9999 to 99999 9999 0 Edge1 position X X1 99999 9999 to 99999 9999 0 Edge1 position Y Y1 99999 9999 to 99999 9999 0 Midpoint X MX 99999 9999...

Страница 208: ...gment not measured 0 Judgement is OK 1 Judgement is NG 13 Teaching not performed error 14 Figure not registered error 15 Out of range error 2 Index IN 2 Verification OFF or reading error 1 Verification is NG 0 to 31 Master data No 2 Number of read charac ters N 0 to 128 0 Similarity SIM 0 to 100 0 Stability STB 0 to 100 0 Number of read charac ters line 1 N1 N1 32 characters max 0 Number of read c...

Страница 209: ...g not performed error 14 Figure not registered error 15 Out of range error 2 Correlation CR 0 to CR 31 0 to 100 0 Position X X 0 to X 31 99999 9999 to 99999 9999 0 Position Y Y 0 to Y 31 99999 9999 to 99999 9999 0 Angle TH 0 to TH 31 180 to 180 0 Reference X SX 99999 9999 to 99999 9999 0 Reference Y SY 99999 9999 to 99999 9999 0 Reference angle ST 180 to 180 0 Detection X RX 99999 9999 to 99999 99...

Страница 210: ... X sub region position X DX 99999 9999 to 99999 9999 0 Sub region pos Y sub region position Y DY 99999 9999 to 99999 9999 0 Correlation sub region CRN 0 to CRN 80 0 to 100 0 Deviation sub region DVN 0 to DVN 80 0 to 221 0 Edge Position Judgement JG 2 No judgement not measured 0 Judgement is OK 1 Judgement is NG 13 Teaching not performed error 14 Figure not registered error 15 Out of range error 2 ...

Страница 211: ...rmed error 14 Figure not registered error 15 Out of range error 2 R average AR 0 to 255 0 G average AG 0 to 255 0 B average AB 0 to 255 0 Color diff dens Av color difference density average AD Color difference 0 to 442 Density average 0 to 255 0 Clr deviat color devia tion density deviation DV Color difference 0 to 221 Density deviation 0 to 217 0 Area Judgement JG 2 No judgement not measured 0 Ju...

Страница 212: ...sults of expression 31 Data 0 D00 This is the result of expression 0 Data 1 D01 This is the result of expression 1 Data 2 D02 This is the result of expression 2 Data 3 D03 This is the result of expression 3 Data 4 D04 This is the result of expression 4 Data 5 D05 This is the result of expression 5 Data 6 D06 This is the result of expression 6 Data 7 D07 This is the result of expression 7 Data 8 D0...

Страница 213: ...he result of expression 27 Data 28 D28 This is the result of expression 28 Data 29 D29 This is the result of expression 29 Data 30 D30 This is the result of expression 30 Data 31 D31 This is the result of expression 31 Parameter Setting Description J00 to J31 2 No judgement not measured 0 Judgement is OK 1 Judgement is NG This are the judgement results of expressions 0 to 31 Results 0 to 31 999999...

Страница 214: ...Calculations and Judgements Using Inspection Item Data 212 FQ2 S4 User s Manual MEMO ...

Страница 215: ...ng and Saving Settings 5 1 Performing Test Measurements 214 5 2 Shortening the Measurement Takt Time 216 5 3 Adjusting the Judgement Parameters 219 5 4 Checking a List of All Inspection Item Results 221 5 5 Saving Data to the Sensor 222 ...

Страница 216: ...ples Test Continuous test Performing Test Measurements with Saved Images Re measuring This Sensor can save measured images in the Sensor s built in memory or on an SD card Test measurements can be performed using these saved images This function is useful for adjusting the judgement parameters when objects are not available Test Continuous test Any display 1 Press Graphics Details 2 Input an image...

Страница 217: ...following Log Images that are logged in the Sensor s internal memory Logging image file Images that are logged in the SD card Camera image file Images that were saved as logged images with the Log Image Button 3 The display switches to the saved image and mea surements are taken again Saving images p 271 ...

Страница 218: ... or Run Mode display The measurement time is the time taken from when a trigger is input until when all measurement processes are executed During the measurement time this Sensor will not accept the next trigger This means that the measurement time is the basic measurement takt time Measurement time Display Measurement Image input File logging Measurement time Measurement takt time Inputting a tri...

Страница 219: ...e X axis by setting the X coordinate of the partial input start point and the X coordinate of the partial input end point 4 Press OK Parameter Setting Description X coordinate of the partial input start point Range 0 to 1 267 Default 0 Specify the partial input range along the X axis X coordinate of the partial input end point Range 15 to 1 279 Default 1 279 Y coordinate of the partial input start...

Страница 220: ...mage input mode perform teaching again The minimum input widths are 16 for the X axis and 8 for the Y axis The values of the monitor display positions are displayed for the coordinates in the measurement results The coordinate values will not change as a result of the partial input settings Parameter Setting Description Image Input Mode High speed or Standard Default for FQ2 S4 FQ2 S4 M High speed...

Страница 221: ...tically adjusted by using actual workpieces which are considered as good and faulty products Test Continuous test 1 Press Adjust judgement on the right of the display 2 Press the parameters and adjust the values of the judgment conditions for them 1 Move to the inspection item for which you want to au tomatically adjust the judgement parameters and press Adjust judgement on the right side of the d...

Страница 222: ...nt method 1 Threshold minimum The lower limit of the variations between OK object is used as the judgement condition 2 Threshold average The median value between the OK object variations and NG object variations is used as the judgement condition 3 Threshold maximum The upper limit of the variations between NG object is used as the judgement condition Note Measurement value Press OK Teach to regis...

Страница 223: ...lts Individual judgement results for all inspection items can be checked in a list The individual inspection items can be selected to change the judgement parameters Test Continuous test 1 Press All results region to display the list Judgement parameters can also be changed from this display Select an inspection item and press Adjust judgement Note ...

Страница 224: ...ettings and discard the new settings if desired but keep in mind that all settings that are not saved explicitly are replaced by the settings that are stored in the memory of the FQ2 Vision Sensor the next time you turn ON the FQ2 Vision Sensor Do not turn the power supply OFF while data is being saved The data that is being saved may become corrupted Test 1 Press Save data 2 Press Yes Scene data ...

Страница 225: ...peration Operation 6 1 Starting Operation 224 6 2 Configuring the Run Mode Display 226 6 3 Checking the Trend of Measurement Results with Graphs 228 6 4 Adjusting Judgement Parameters during Operation 231 ...

Страница 226: ...up Mode to Run Mode by using the following procedure 1 Press Run 2 Press Switch to Run mode 3 Press Yes If you press No the setting will not be saved and you will move to Run Mode The present display name Overall judgement Measurement processing time The time taken from when an image is input until all measurements have been completed Inspection results can be displayed in six formats such as in a...

Страница 227: ... and press Sensor settings Signal Status When Moving to Run Mode When moving to Run Mode the signal will change as shown below and data can be input from and output to an external device Note ON OFF The BUSY signal that was always ON will turn OFF BUSY signal Display Run Mode Setup Mode ...

Страница 228: ... data The currently measured image and history of the overall judgement results measurement count NG count and NG rate will appear Checking the Judgements of All Inspection Items in a List Displaying Measurement Result Histories All results region Standard Models and High resolution Models Only Trend monitor Histogram The judgement results of all inspection items can be checked in a list The stati...

Страница 229: ...easurement results of all connected Sensors Green display OK Red display NG Automatically changes to the display for any Sensor with an NG result You can set the scene to be displayed when the power supply is turned ON Setting the Startup Scene p 236 The following are also displayed in addition to the measurement results for each inspection item Filter item The results of a filter item is displaye...

Страница 230: ...d monitor Arranging the Trend Monitor Display The display range for the vertical axis and display conditions for the horizontal axis can be changed Disabling Automatic Selection of the Display Range 1 Press Auto display on the right of the trend monitor 2 Press OFF Changing the Display Range of the Vertical Axis 1 Press Display range on the right of the trend monitor 2 Set the minimum and maximum ...

Страница 231: ...t of the histogram 2 Select the maximum measurement value the minimum measurement value and the class Trend monitor data is held until the power supply is turned OFF You can select whether to display all data on the trend monitor or only data for which the overall judgement is NG Logging settings are applied to the trend monitor as well However they are not applied to trend monitor when it is disp...

Страница 232: ...e maximum number of data to display Histogram data is held until the power supply is turned OFF You can select whether to display all data in the histogram or only data for which the overall judgement is NG Logging settings are applied to the histogram as well However they are not applied to histograms displayed in Setup Mode Check recent measurement trends recent results logging p 258 Note ...

Страница 233: ...ON the function if you want to use it Setup Mode Sensor settings Adjustment mode in Run 1 Press ON Changing the Judgement Parameters in Run Mode This section describes how to change the judgement parameters without stopping measurement in Run Mode Run Mode 1 Select the inspection item for which you want to ad just the judgement parameters using the and Buttons 2 Press Adjust judgement 3 Press the ...

Страница 234: ...Adjusting Judgement Parameters during Operation 232 FQ2 S4 User s Manual MEMO ...

Страница 235: ...4 Monitoring the Signal I O Status 247 7 5 Connecting to More Than One Sensor 248 7 6 Logging Measurement Data and Image Data 252 7 7 Saving Sensor Settings 262 7 8 SD Card Operations 264 7 9 Convenient Functions for Operation 267 7 10 Convenient Functions for Setup 271 7 11 Setting the Retry Function 273 7 12 Functions Related to the System 277 ...

Страница 236: ...Vision Sensors you can create up to 32 scenes Settings Included with Scenes The following settings are changed when the scene is changed Camera image Image Tab Page and Inspection Items Inspect Tab Page The settings related to external I O specifications that are included in the output settings and the system settings for the overall Sensor are used for all of the scenes Refer to the following inf...

Страница 237: ...anging Scenes with a Parallel Input Command p 292 p 318 Changing Scenes with a PLC Link Command p 393 Changing Scenes with an EtherNet IP Command p 362 Changing Scenes with a TCP No protocol Command p 419 Changing Scenes with a FINS TCP No protocol Command p 438 1 Press the number of the scene to change to and then press Select 2 The scene will change Make the settings for the scene 1 Press the nu...

Страница 238: ...an be set Item Purpose Setting range Startup mode Select whether the startup scene number is set manually ON OFF The scene number when the settings were saved will be the startup scene number The star tup mode is set to OFF in the default settings Startup scene Set the scene number to use at startup Standard models 0 to 31 Single function models 0 to 8 Default 0 ...

Страница 239: ...libration Use the following procedure to set calibration 1 Set the conversion method to use for calibration Select the calibration method point specification reference or parameter and enter the actual coordi nates or other values that are suitable for the selected method You can register up to 32 calibration patterns Calibration type Description Reference Specify point point specifica tion Specif...

Страница 240: ...nates of up to 10 positions Different Magnifications in X and Y Directions Specify three positions Setup Mode Calibration You can set the calibration setting for each scene You can use the same calibration setting for different scenes or use a different calibration setting for each scene If two positions are set a lefthand coordinate system will be set i e clockwise is the positive direction If yo...

Страница 241: ...n the right of the display 8 Enter the actual X and Y coordinates and press OK 9 Repeat the above steps 4 to 8 to set the coordinates of the remaining positions 10 When you have finished setting the coordinates for all of the positions press Generate parameters You can enlarge the display Image Zoom p 244 You can fine tune the coordinates that are set Press Console on the right of the display to d...

Страница 242: ...tem Setting Description A Calculated value These are the calibration conversion values These values are used to convert the Camera coordinates to the actual coordinates The following formulas are used to convert to actual coordinates X Y Camera coordinates of measurement position Unit pixels X Y Converted coordinates actual coordinates X A X B Y C Y D X E Y F B Calculated value C Calculated value ...

Страница 243: ...frame to specify the model region 6 Press OK 7 Press a reference sample to get the Camera coordi nates 8 Enter the actual coordinates of the specified position Press Actual coord on the right of the display 9 Enter the actual X and Y coordinates and press OK 10 Repeat the above steps 4 to 8 to set the coordinates of the remaining positions You can edit the model region The procedure is the same as...

Страница 244: ...r point specification Parameter Setting Description Coordinate coor dinate system Righthand or Lefthand Default Lefthand Lefthand The positive direction is clockwise when coordinates are specified Righthand The positive direction is counterclockwise when coordinates are specified Origin Upperleft Lowerleft or Center Default Lowerleft Select the location of the origin of the coordinate system Magni...

Страница 245: ...ollowing parameters Coordinate Origin and Magnification 5 Press OK 6 The calibration parameters will be displayed The items in the calibration parameters are the same as those for point specification You can select the calibration pattern for each scene 1 Press Select calib data on the right of the dis play 2 Select the calibration pattern from Calibration data 0 to Calibration data 31 3 Press Bac...

Страница 246: ...playing a Live Image You can display a live image to check the image that is input by the Sensor in realtime Setup Mode Displaying a Frozen Image You can display a frozen image to stop image refreshing and display the last image that was input Setup Mode 4 1 Press 2 Press Camera 3 Press Live 4 Press the Back Button to return to the Display Dis play 1 Press 2 Press Camera 3 Press Freeze 4 Press the...

Страница 247: ...e display of the image and measurement results only when the measurement result is NG Run Mode 1 Press 2 You can select one of the following types of images to display Log Images that are logged in the Sensor s internal memory Logging image file Images that are logged in the SD card Camera image file Images that were logged with Logging Button Saving the Currently Displayed Camera Image p 268 3 Pr...

Страница 248: ...o Mode to turn OFF the LCD backlight and reduce the power consumed by the Touch Finder whenever there is no operation on the Touch Finder for 30 seconds or longer The LCD backlight will turn ON whenever any part of the touch panel is pressed Setup Mode or Run Mode TF settings LCD Backlight ECO mode Changing the Brightness of the Touch Finder The brightness of the LCD backlight can be changed to an...

Страница 249: ...Unit is connected the I O status of the following signals are displayed FQ SDU1 TRIG DSA RST IN0 to IN7 RUN OR BUSY ERR STG SHT ACK GATE and D0 to D15 FQ SDU2 TRIG RST IN0 to IN5 RUN OR BUSY ERR STG SHT and ACK Output Signals OUT0 OUT1 and OUT2 Signals that are displayed in red are currently being output from the Sensor to the external devices You can turn the signals ON and OFF by pressing them t...

Страница 250: ...order that it detects them The Touch Finder can detect up to 32 Sensors and it can connect to up to eight Sensors at the same time Set this parameter to OFF to connect to only a specific Sensor Setup Mode or Run Mode TF settings 1 Set Auto sensor detection to ON Registering the Sensors to Connect You can set any of the Sensors for connection to the Touch Finder and register them Run Mode Sensor mo...

Страница 251: ...hat you entered and then press Comm test to confirm that connection is possible 1 Press Specify sensor on the right of the dis play 2 Press the check boxes of the Sensors to connect to select them The Sensors that can be set are indicated by an asterisk before the Sensor name You cannot select the check box if a Sensor that was registered by the user cannot be detected The names of Sensors that ar...

Страница 252: ...ly p 250 If there are more than eight Sensors that can be connected select the Sensors to con nect from the list of Sensors Selecting the Sensors to Connect p 249 Register the Sensor to connect to display a specific Sensor Registering the Sensors to Connect p 248 NG sensor Of the connected Sensors displays the image from the Sensor that most recently had an NG result Single sensor Displays the ima...

Страница 253: ... settings for Dis play position are saved in the Touch Finder Therefore the next time the same Sensors are connected they will be displayed in the same positions If a previously connected Sensor is not detected either the display position will be blank or if Auto sensor detection is set to ON the Touch Finder will display another Sensor that it has detected If a previously connected Sensor is then...

Страница 254: ...log data Logged data Logged quantity Recent results logging 1 File logging Statistical data One value The average value of the mea surement results in the collected measure ment data is continuously updated Not possible Measurement data 1 000 measurement values max 2 Up to the capacity of the external memory Image data 20 images max Logging settings common settings for recent results logging and f...

Страница 255: ...to log data In Out Log setting Image Data Only the data for the Sensor that is currently being displayed will be logged even if more than one Sensor is con nected If multiple sensors are displayed or if the most recent NG sensor is displayed only the results of the sensor that was displayed before changing to the other sensor monitor screen will continue to be logged Simultaneous logging of the re...

Страница 256: ...No images will be logged default Data logging measurement data All All measurement data Measured values and calculation results will be logged regardless of the measurement results Only NG Only measurement data Measured values and calculation results for which the overall judgement was NG will be logged None No measurement data Measured values and calculation results will be logged default The log...

Страница 257: ... img_ at the beginning of the file name for logged data to another text string Measurement data You can add a character string to the beginning of the file name for logged data Setup Mode or Run Mode TF settings File format 1 Select the item for which to add to or change the file name and then press Logging image file or Logging data file 2 Press File name prefix 3 Enter the file name up to 15 alp...

Страница 258: ...Date 1 YYYY MM DD This is the date that the measurement data was obtained from the Sensor 2 Time 1 hh mm ss This is the time that the measurement data was obtained from the Sensor 3 Measurement ID This is the measurement ID information 4 Scene No Scene number 5 Judge Overall judgement 0 OK 1 NG 2 NC not measured 6 Inspection item region I inspection_item_number measure ment_item detection_point Ex...

Страница 259: ...n do not input the next trigger until the BUSY signal turns OFF In Out I O setting I O terminals Output Tab Page BUSY output Change the BUSY output parameter to Data logging To save logged data you must first select either All all data is saved or Only NG only NG data is saved in the logging parameters Setting Logging Conditions p 253 File logging cannot be used when performing continuous measurem...

Страница 260: ...e operations and settings are the same as for file logging Setting Logging Conditions p 253 Trend monitor p 228 Histogram p 229 Statistical data p 226 Item Description Statistical data Statistical data such as the number of measurements the number of NG overall judgements and the NG rate since the power supply was turned ON will be logged ON Statistical data will be displayed default OFF Statistic...

Страница 261: ...Selecting the Measurement Data To Log p 254 Starting Logging Logging will be started as soon as the conditions for logging have been set If the settings are saved logging will start automatically the next time the power supply is turned ON Checking the Results of Logging The results of logging can be checked using the trend monitors histograms or statistical data p 226 Use the following menu comma...

Страница 262: ...lder when the PC Tool is used My Documents OMRON FQ SDCard 2 You can add a character string to the beginning of the file name 3 You can change the img at the beginning of the file name 1 Press the data to save 2 The following display will appear if Logging image is pressed Select whether to save the most recently logged image or to save all of the image data that is logged in the Sensor Item Stora...

Страница 263: ...ts to files for the inspection item region and expression region in the file logging function File Logging Format Items 8 and 9 on p 256 The recent log data will be cleared if the scene is changed Changing the Format for Saving Measurement Data The output CSV file format can be changed according to the external device Changing the File Format p 256 The saved recent measurement data cannot be loade...

Страница 264: ...ings for all inspection items Order of inspection items Scene group data The file name extension is SGP sensor_name SGP All scene data is backed up Dictionary data The file name extension is DIC sensor_name DIC Dictionary data is backed up All dictionary data The file name extension is DGP sensor_name DGP All dictionary data is backed up Sensor system data The file name extension is SYD sensor_nam...

Страница 265: ... s Manual 263 7 Convenient Functions Restoring Data to the Sensor from External Memory Setup Mode Load from file 1 Press the data to be restored 2 The selected data will be read from external memory and displayed Press the file to load ...

Страница 266: ...ile name extension is DIC sensor_name DGP All dictionary data The file name extension is DGP sensor_name SYD Sensor system data The file name extension is SYD sensor_name BKD All sensor data The file name extension is BKD sensor_name CLB Calibration data The file name extension is CLB sensor_name CGP Calibration data The file name extension is CGP MSD Touch Finder data The file name extension is M...

Страница 267: ...le a message is being displayed saying that data is being saved to or read from the SD card The settings or system data may be corrupted 1 Open the cover to the SD card slot on the top of the Touch Finder 2 Insert the SD card with the back of the SD card facing the front of the Touch Finder and press it in until it clicks into place 3 Close the cover to the SD card slot 1 Open the cover to the SD ...

Страница 268: ...llowing display to make sure that there is sufficient space available on the SD card Setup Mode or Run Mode TF settings SD card SD card information Formatting an SD Card Setup Mode or Run Mode TF settings SD card Format The following information in the SD card inserted in the Touch Finder can be checked Press Yes to start formatting ...

Страница 269: ... characters and press OK Clearing the Password Setup Mode Sensor settings Password settings Press Password on off and press OFF Entering the password when switching from Run Mode to Setup Mode This password restricts only the operation to switch from Run Mode to Setup Mode It does not restrict other operations If you forget the password contact your OMRON representative for the procedure to clear ...

Страница 270: ...ave the Camera image that is displayed on the Touch Finder or computer Setup Mode Log Image Button The Camera image that is being displayed when the Button is pressed is saved in external memory Storage Location and File Names Make sure an SD card is inserted in the Touch Finder before capturing display images Storage location File name CAPTURE YYYY_MM_DD HH_MM_SS_MS BMP Example The following name...

Страница 271: ... Set Specify sensor to ON 2 Set Sensor selection to the IP address of the Sensor Monitoring and Setting Up a Sensor from Two Touch Finders You can monitor and set up the same Sensor from two Touch Finders You can simultaneously monitor the Sensor from both Touch Finders You can set up the Sensor only from one of the two Touch Finders at any one time If the Touch Finder cannot connect to the specif...

Страница 272: ...the display When Run Mode operations are possible again Run Mode will be displayed in the initial status Logging Monitoring or setup Logging including file logging and recent results logging can be performed by only one of the Touch Finders If logging is enabled on both of the Touch Finders logging will be performed only on the Touch Finder that was connected to the Sensor first An error will be d...

Страница 273: ... Data p 258 Saving Images in the Sensor to an SD Card The images that are temporarily saved inside the Sensor can be saved to an SD card Setup Mode Save to file Logging Tab Page 1 Press Logging image 2 Select whether to save the most recently logged image or to save all of the data that is logged in the Sensor Saving Images in an SD Card The image data can be saved in the SD card each time measure...

Страница 274: ...p 272 FQ2 S4 User s Manual Displaying Image Data Images Saved in Internal Sensor Memory Setup Mode Log Image Files in a SD Card Setup Mode Logging image file or Camera image file Arranging the Display Displaying a Saved Image p 245 ...

Страница 275: ...ormal retry Scanning is repeated the specified number of times at the specified interval until the entire code is successfully scanned The maximum count and interval are set The settings are configured in the retry settings of each scene Exposure retry Scanning is repeated the specified number of times while varying the exposure when HDR is OFF the shutter time is varied until the entire code is s...

Страница 276: ... details Setup Mode Sensor settings Retry details Set the brightness shutter speed step increment count and decrement count Inspect Retry details 1 Press Normal retry for the retry mode 2 Press OK 1 Set the maximum count and interval Parameter Settings Description Max count 0 to 20 default 4 Sets the maximum number of retries Interval 32 to 999 default 100 Sets the capture interval msec 1 Press Ex...

Страница 277: ...count 0 to 10 default 2 Sets the brightness shutter speed decrement count 1 Press Scene retry for the retry mode 2 Set the switch order 3 Set the scenes that are switched through Parameter Settings Description Switch Order Auto default Fixed Sets the scene switching order Auto Switches through the scenes in the order of highest frequency of use Fixed Switches through the scenes in the order that t...

Страница 278: ...just mode is entered Setting trigger retry Set the retry mode to Trigger retry in Retry details Setup Mode Sensor settings Retry details To use trigger retry the I O input mode must be set to expanded mode In Out I O setting I O terminals Input tab Input mode Press Expanded mode 1 Press Trigger retry for the retry mode Scan condition of immediately previous successful scan Scene 1 Success count 25...

Страница 279: ...Simplified Chinese or Korean Setup Mode or Run Mode TF settings Language Press the language to be displayed Setting the Time on the Touch Finder You can set the date and time Setup Mode or Run Mode TF settings Time settings Initializing the Sensor and Touch Finder Initializing the Sensor Setup Mode Sensor settings Initialize Initializing the Touch Finder Setup Mode or Run Mode TF settings Initiali...

Страница 280: ...ailable in the Sensor Setup Mode Sensor settings Information Memory state Correcting the Touch Screen Positions of the Touch Finder Use this function to correct the touch screen positions if they are offset from the opposite position Setup Mode TF settings Touch screen calib Setting the Resolution of Measurement Objects Displayed on the PC Tool Use this function to set the resolution of measuremen...

Страница 281: ...Connection ControllingOperationandOutputtingDatawithaParallelConnection 8 1 Controlling Operation and Outputting Data with the Sensor s Standard Parallel Connection 280 8 2 Controlling Operation and Outputting Data with a Parallel Interface Sensor Data Unit 302 ...

Страница 282: ...performed 1 Measurement trigger input 3 Judgement results output Trigger Sensor FQ2 Vision Sensor External device 3 Judgement results output overall judgement OR signal Retained until the next judgement results are output Turned ON when overall judgement is NG 2 Executing measurement processing BUSY signal This signal stays ON until the next measurement trigger can be input You can confirm if meas...

Страница 283: ... a Parallel Interface Sensor Data Unit to enable using other signals and increase the number of sig nals that you can use with parallel communications And in addition to outputting OR judgement results you can also use a Parallel Interface Sensor Data Unit to output the judgement results of judgement conditions that you set for parallel output called parallel judgement output and the results of me...

Страница 284: ... You can also set the signal to be turned OFF after data logging image logging or displaying results in the BUSY output When the Brightness Correction Mode is ON the timing when images are taken is delayed Timing Chart When the Brightness Correction Mode Is ON p 61 Color Signal Description The signals shown at the left are used Refer to the following information for signal wiring Wiring p 42 Pink ...

Страница 285: ...ed while a continuous measurement command is input with the IN0 to IN5 signals Signal Address Output signals OUT0 OR signal CIO 0 00 OUT1 BUSY signal CIO 0 01 Input signals TRIG CIO 1 00 This function can be used only when the input mode is set to Expanded Mode SET TRIG W0 00 OUT1 0000 2 TRIG TMHH RSET TRIG T0000 RSET W0 00 L 1000 L 1002 OUT0 OUT0 OUT1 Single measure ment command bit BUSY signal W...

Страница 286: ...ion The signals shown at the left are used Refer to the following informa tion for signal wiring Wiring p 42 Gray IN0 OFF Command parameters for continu ous measurements Green IN1 OFF Red IN2 OFF White IN3 OFF Purple IN4 OFF Yellow IN5 ON Command input for continuous measurements Black OUT0 OR Overall judgement default assign ment Orange OUT1 BUSY Processing in progress default assignment OFF ON O...

Страница 287: ... CIO 1 10 IN3 CIO 1 11 IN4 CIO 1 12 IN5 CIO 1 15 MOV 0000 Q 1 W0 00 0000 5 TMHH SET IN5 T0000 OUT1 W0 00 RSET W0 00 RSET IN5 W0 01 RSET W0 00 Continuous measurement command bit Continuous measurement command bit BUSY signal Continuous measurement stop bit When the continuous measurement command bit W0 00 turns ON the command parameter for continuous measurements 00000 is output to Q 1 IN0 to IN4 I...

Страница 288: ...dgement Using Calculation Results without Applying Them to the Overall Judgement p 203 You can adjust the timing for outputting the OR signal and the ON time after judgement processing Adjust the Judgement Output Timing p 288 Color Signal Description The signals shown at the left are used Refer to the following information for signal wiring Black OUT0 OR Overall judgement default assignment 2 4 Wi...

Страница 289: ...d ERROR signal assigned as the default settings will no longer be output The timing for updating the OR signal and the ON time after judgement processing can be adjusted Adjusting the judgement output timing p 288 Output terminal Default assignment Output signals that can be assigned OUT0 OR Total judgement Control signals OR BUSY ERROR READY and RUN STG strobe trigger Item judgements OR0 Item 0 j...

Страница 290: ...e output timing of the OR signal or OR0 to OR31 signals can be selected from two modes depending on the external device Selecting the OFF Timing Level output default The status of the output OR signal is held until the next OR signal is output OFF ON OFF ON OR1 signal Turned ON when individual judgement is NG OR output ON for NG OR0 signal Turned ON when individual judgement is NG OR output ON for...

Страница 291: ...ting I O setting Output 1 Press Output mode and press Level output or One shot output 2 Press Output delay and set the one shot output de lay 3 Press OK 4 Press Output time and set the one shot output time 5 Press OK OFF ON OFF ON OFF ON NG OK Turns OFF One shot output time Overall judgement OR output ON for NG OR signal ON while measurements are being processed depends on BUSY output conditions B...

Страница 292: ...fault setting If you change the polarity of the BUSY signal take this into consideration when reading the timing charts Item Description Output mode One shot output After the measurement results are finalized if the judgement output ON condition is met the OR signal is turned ON for the one shot output time It is then turned OFF once the specified time has expired Level output default The judgemen...

Страница 293: ...Sensor from the list of Sensors on the Touch Finder before you disconnect the cable Changing the Polarity of the Output Signals You can change the polarity of the output signals that are assigned to OUT0 to OUT3 regardless of what signal is assigned to the output Settings In Out I O setting I O setting Output OUT0 Polarity OUT1 Polarity or OUT2 Polarity Item Description BUSY output Measurement def...

Страница 294: ...lor This command re registers the judgement references for measurement when lev els are changed p 295 Clearing an error This command turns the ERROR signal OFF p 297 Continuous measurement Continuous measurement is performed while this command is input p 283 Clearing measurement values This command clears the measurement values p 298 Saving data in the Sensor This command saves the settings data t...

Страница 295: ...the scene number with the IN0 to IN4 signals Standard Mode 2 Turn ON the IN5 signal while the BUSY signal is ON to change the scene to the specified scene 3 The BUSY signal turns ON while the scene is being switched Even in Expanded Mode you can use menu commands or Ethernet no protocol commands to change to scenes 0 to 31 OFF ON OFF ON 1 In Expanded Mode specify scene numbers 0 to 15 using the IN...

Страница 296: ... 1 08 IN1 CIO 1 09 IN2 CIO 1 10 IN3 CIO 1 11 IN4 CIO 1 12 IN5 CIO 1 15 The BUSY signal will be ON while the scene it being changed MOV 1100 Q 1 TMHH 0000 5 TMHH 0001 2 SET IN5 RSET IN5 SET W0 01 W0 00 T0000 IN5 OUT1 BUSY W0 00 RSET W0 00 T0001 BUSY Scene change bit Scene change bit When the scene change bit W0 00 turns ON the scene number is input to IN0 to IN3 and IN4 is turned ON If the BUSY sig...

Страница 297: ...the Run Mode If the parameter is applicable to more than one inspection item it will be re registered for all inspection items Color Signal State Description The signals shown at the left are used Refer to the following information for signal wiring 2 4 Wiring p 42 Gray IN0 OFF Command parameter for registering the model again Green IN1 OFF Red IN2 OFF White IN3 ON Purple IN4 OFF Yellow IN5 ON Com...

Страница 298: ...CIO 1 11 IN4 CIO 1 12 IN5 CIO 1 15 The BUSY signal will be ON while the model is being re registered MOV 800 Q 1 TMHH 0000 5 TMHH 0001 2 SET IN5 RSET IN5 SET W0 01 W0 00 T0000 IN5 OUT1 BUSY W0 00 RSET W0 00 T0001 BUSY Model re register bit Model re register bit When the mode re register bit W0 00 turns ON IN3 is turned ON If the BUSY signal is OFF 5 ms after IN3 turns ON the command input for regi...

Страница 299: ...executed correctly Settings In Out I O setting I O setting Input Input mode Press Expand mode Wiring Timing Chart This function can be used in Run Mode only Color Signal State Description The signals shown at the left are used Refer to the following information for signal wiring 2 4 Wiring p 42 Gray IN0 OFF Command parameter for clearing errors Green IN1 OFF Red IN2 ON White IN3 OFF Purple IN4 OFF...

Страница 300: ...ignal State Description The signals shown at the left are used Refer to the following information for signal wiring 2 4 Wiring p 42 Gray IN0 ON Command parameter for clearing mea surement values Green IN1 OFF Red IN2 ON White IN3 OFF Purple IN4 OFF Yellow IN5 ON Command input for clearing measure ment values Orange OUT1 BUSY Processing in progress default 1 Turn ON IN0 and IN2 and turn OFF IN3 and...

Страница 301: ...Description The signals shown at the left are used Refer to the following information for signal wiring 2 4 Wiring p 42 Gray IN0 ON Command parameters for saving data to the Sensor Green IN1 OFF Red IN2 OFF White IN3 OFF Purple IN4 OFF Yellow IN5 ON Command input for saving data to the Sensor Orange OUT1 BUSY Processing in progress default 1 Turn ON IN0 and turn OFF IN1 to IN4 2 Turn ON the IN5 si...

Страница 302: ... items Color Signal State Description The signals shown at the left are used Refer to the following information for signal wiring 2 4 Wiring p 42 Gray IN0 ON Command parameter for external teaching Green IN1 OFF Red IN2 OFF White IN3 ON Purple IN4 OFF Yellow IN5 ON Command input for external teaching Orange OUT1 BUSY Processing in progress default 1 Turn ON IN0 and IN3 and turn OFF IN1 IN2 and IN4...

Страница 303: ...CIO 1 09 IN2 CIO 1 10 IN3 CIO 1 11 IN4 CIO 1 12 IN5 CIO 1 15 The BUSY signal will remain ON while external teaching is being executed MOV 900 Q 1 TMHH 0000 5 TMHH 0001 2 SET IN5 RSET IN5 SET W0 01 W0 00 External teaching bit T0000 IN5 OUT1 BUSY W0 00 External teaching bit RSET W0 00 T0001 BUSY When the external teaching bit W0 00 turns ON IN0 and IN3 are turned ON If the BUSY signal is OFF 5 ms af...

Страница 304: ... can be chosen from the following two types Single measurement One measurement is performed for each external trigger Continuous measurement Measurements are performed continuously Refer to the following page for data output timing and signal status after measurement trigger execution Aligning the Data Output Timing with the External Device p 308 Performing One Measurement for Each External Trigge...

Страница 305: ...all judgement result The results is output with the OR signal Parallel judgement output Judgement results of the judgement conditions that are set for parallel output The results are assigned to and output with D0 to D15 Parallel data output Measurement values for inspection items and results from expressions The data is output as 16 bit data on D0 to D15 You can also turn ON the overall judgement...

Страница 306: ...ems to judge and the judgment conditions 1 Setting the Items to Judge You can assign the parameters from the inspection items to the data output signals D0 to D15 The following procedure shows how to assign the measured position X of 0 Search to D0 In Out I O setting Output data set Par Jdg Output Basic Tab Page 2 Setting the Judgement Conditions In Out I O setting Output data set Par Jdg Output B...

Страница 307: ...ou can output the following data as 16 bit data by setting them as the output data data 0 to data 31 measurement data from inspection items that can be output and the calculation results from the expression settings Setting the Data to Output You can individually assign the parameters of the inspection items to output data data 0 to data 31 The following procedure shows how to assign the measured ...

Страница 308: ...lues can be output Binary data 32768 to 32768 BCD data 999 to 999 If the measurement value is out of range the actual measurement value is not output and the minimum or maximum value of the range is output instead 5 If the inspection item allows multi point output press the number 0 to 31 of the inspection result for which to output the data from the list of inspec tion results To register somethi...

Страница 309: ...l the next measurement is per formed The values will continue to be output even after all measurements have been completed However if you set the output timing of the OR signal to One shot output in the Output mode parameter the OR signal will turn OFF after the specified output time has elapsed Note Parallel judgement output D0 Parallel data output data 0 Parallel judgement output D1 Parallel dat...

Страница 310: ...s valid when the measurements are completed i e when the BUSY signal changes from ON to OFF D These signals output the parallel judgement output data and the calculation results of the expressions that are set for parallel data output You can set whether the signal turns ON for an OK or for an NG judgement in the Judgment output condi tion output setting Changing the Signal Specifications p 291 GA...

Страница 311: ...s longer than the measurement interval the output timing will become delayed as measurements are repeated GATE ON delay 1 0 to 1 000 0 ms 1 0 ms default Set the time from when the result is output to the parallel interface until the GATE signal turns ON This is the time to wait until the data output stabilizes Set a value that is longer than the delay time of the external device Output time 1 0 to...

Страница 312: ...ettings has elapsed 2 6 The GATE signal is turned ON and then the GATE signal is turned OFF when the time that is set in the Output time parameter in the communications settings has elapsed 2 2 Set the GATE ON delay and output time for the GATE signal so that the total time does not exceed the output period Data Output Time and TRIG Signal Input Interval Set the input interval for the TRIG signal ...

Страница 313: ...is set in the Output time parameter in the communications settings has elapsed 1 1 Set the GATE ON delay and output time for the GATE signal so that the total time does not exceed the output period 5 Continuous measurements end when the IN7 signal is turned OFF The ERROR signal will turn ON if the input command is not executed normally Set at least one data output for parallel judgement output and...

Страница 314: ...R is output even if the DSA signal is not output by the external device DSA Signal The DSA signal is used by the external device to request the next data transmission The Sensor will not output data until the DSA signal is turned ON Turn ON the DSA signal at the following time When the external device is ready to receive data When the Sensor has completed measurements The BUSY signal will be ON wh...

Страница 315: ...DSA signal is turned OFF the GATE signal turns OFF 3 3 If you do not turn OFF the DSA signal within the specified timeout time after the GATE signal turns ON a timeout error will occur This is timeout time 2 7 If more than one data item is being output for one measurement and you do not turn ON the DSA signal within the specified timeout time after the GATE signal turns OFF a timeout error will oc...

Страница 316: ...ize the output timing of the measurement results and the discharge timing of NG products that are detected If you set the Number of delay parameter to 4 the measurement result output is delayed by four TRIG signals With synchronized output the number of times that the TRIG signal turns ON is counted Therefore use synchro nized output only when only one measurement result is output for each measure...

Страница 317: ...ement result D0 for the second time that the TRIG signal turned ON is output and the GATE signal is also output at this time 5 Each time the TRIG signal turns ON after that the measurement result D0 from when the TRIG signal turned ON two times previously is output Result not output The results for 1 is output when the TRIG signal turns ON the third time Result for 1 Result for 2 Result for 3 Resu...

Страница 318: ...ON OFF output polarity of the output signals In Out I O setting I O Output 1 Press Output polarity and select the ON OFF polarity for all output signals Setting the Output Time of the ACK Signal You can set the output time of the normal execution completion signal for parallel commands In Out I O setting I O Output ACK signal ON period The ACK signal is not output for normal completion of continuo...

Страница 319: ...put until the external lighting is lit Strobe output time 0 to 65 535 µs default 1 000 µs Set the pulse width of the output signal STGOUT that tells the external lighting when to light Operation Description Reference Switching the scene This command changes the scene when the line process changes p 318 Clearing measurement values This command clears the measurement values The OR signal and D signa...

Страница 320: ...ode It will be OFF in Setup Mode BUSY This signal indicates that the Sensor is currently changing the scene Do not input the next command while the BUSY signal is ON The process that is currently being executed and the com mand that is input will not be executed correctly ACK When the command has been completed normally this signal is turned ON for the time that is set for the ACK output time IN7 ...

Страница 321: ...e the command is being executed Execution Command Input example IN7 IN6 IN5 IN4 IN3 IN2 IN1 IN0 1 1000000 11000000 Signal Function RUN This signal is ON while the Sensor is in Run Mode It will be OFF in Setup Mode BUSY This signal does not change while clearing measurement values ACK When the command has been completed normally this signal is turned ON for the time that is set for the ACK output t...

Страница 322: ... IN5 IN4 IN3 IN2 IN1 IN0 1 1000001 11000001 ON for 1 ms min OR signal OFF ON BUSY signal OFF ON OFF ON RUN signal OFF ON TRIG signal OFF ON Run Mode entered Setup Mode entered D signals Measurements executed GATE signal OFF ON OFF ON Output time GATE ON delay ERROR signal OFF ON OFF ON OFF ON IN0 to IN6 signals IN7 signal OFF ON Data TRIG is input ACK signal ACK output time 1000001 Allow 5 ms min ...

Страница 323: ... not clear an error while the BUSY signal is ON The command will not be executed correctly OR This signal does not change while clearing errors D0 to D15 These signals do not change while clearing errors GATE This signal does not change while clearing errors ACK When the command has been completed normally this signal is turned ON for the time that is set for the ACK output time Signal Function IN...

Страница 324: ... Color Data Reference color hue saturation and brightness Edge Position Edge Width Edge Pitch Area and Labeling None Execution Command Input example IN7 IN6 IN5 IN4 IN3 IN2 IN1 IN0 1 1001000 11001000 Signal Function RUN This signal is ON while the Sensor is in Run Mode It will be OFF in Setup Mode BUSY This signal is ON during re registration of the model and reference color ACK When the command h...

Страница 325: ... reference color Set the IN0 to IN6 signals wait for at least 5 ms and then turn ON the IN7 signal The BUSY signal will be ON while the command is being executed Execution Command Input example IN7 IN6 IN5 IN4 IN3 IN2 IN1 IN0 1 1001001 11001001 Signal Function RUN This signal is ON while the Sensor is in Run Mode It will be OFF in Setup Mode BUSY This signal is ON while teaching is being executed ...

Страница 326: ... the IN0 to IN6 signals wait for at least 5 ms and then turn ON the IN7 signal The BUSY signal will be ON while the command is being executed Execution Command Input example IN7 IN6 IN5 IN4 IN3 IN2 IN1 IN0 1 1000010 11000010 ON for 1 ms min TRIG is input OR signal BUSY signal OFF ON OFF ON RUN signal OFF ON TRIG signal OFF ON Run Mode entered Setup Mode entered D signals Measurements executed GATE...

Страница 327: ...tly OR If this signal was ON it will be turned OFF D0 to D15 If these signals were ON they will be turned OFF GATE This signal does not change while clearing the OR and D signals However do not clear the OR and D signals while the GATE signal is ON The command will not be executed correctly Also the D and GATE outputs may not function correctly ACK When the command has been completed normally this...

Страница 328: ...Setup Mode BUSY This signal will be ON while data is being saved in the Sensor ACK When the command has been completed normally this signal is turned ON for the time that is set for the ACK output time Signal Function IN1 to IN3 Turn OFF IN4 Turn ON IN5 Turn OFF IN6 Turn ON IN7 This signal is the trigger for saving data in the Sensor Set the IN0 to IN6 signals wait for at least 5 ms and then turn ...

Страница 329: ...n 328 9 2 Outputting Data and Controlling Operation through EtherNet IP 329 9 3 PLC Link Connections 372 9 4 Controlling Operation and Outputting Data with TCP No protocol Communications 401 9 5 Controlling Operation and Outputting Data with FINS TCP No protocol Commands 430 ...

Страница 330: ... you turn ON the Command Execution Bit at a specific memory address in the PLC a command in a specified memory area e g the DM Area or CIO Area in the PLC is read and sent to the Sensor The results of executing the command are written to specified words in the memory of the PLC These words are specified in advance You can use this method when the external device is a PLC p 372 EtherNet IP 2 tag da...

Страница 331: ...d Communications Cycle for Each Application Regardless of the Number of Nodes Tag data links cyclic communications operate at the cyclic period that is specified for each application regardless of the number of nodes Data is exchanged over the network at the refresh cycle that is set for each connection The communications refresh cycle will not increase even if the number of nodes is increased i e...

Страница 332: ...ts the connection is called the originator and the node that receives the request is called the target Data Exchange Memory Locations The memory locations that are used to exchange data across a connection are specified as tags You can specify memory addresses or variables for tags A group of tags consists of an output tag set and an input tag set Vision Sensor Connection PLC Output tag set name B...

Страница 333: ...This allows you to control the operation of the Vision Sensor e g perform continuous measurements or change the scene without using special communications instructions Input Connection to Sensor PLC to Vision Sensor The commands that are stored in the I O memory of the PLC are sent to the Vision Sensor Output Connection to PLC Vision Sensor to PLC Responses from the Vision Sensor to the control co...

Страница 334: ...st specify in advance the data to output up to 64 items after the measurements are executed To output character strings that are read with the OCR and other inspection items the character strings to output are also specified in advance You must also specify in advance the output area i e I O memory addresses or variable for the input tag to store the data in the PLC After a single measurement or c...

Страница 335: ...put area This is the area to which the Vision Sensor writes output data for measurements after an inspection is performed 1 Command area PLC Control inputs Command code Command parameters 2 Response area 3 Output area Control outputs Command code Response code Response data Output data 0 to 64 Character string to output Vision Sensor Execution After measurements Output Tag Set Input Tags 1 Output ...

Страница 336: ... Controller Models Series CPU Unit Interface Built in port in CPU Unit EtherNet IP Unit SYSMAC NJ NJ501 or NJ301 Compatible CJ1W EIP21 SYSMAC CJ2 CJ2H or CJ2M Compatible model with built in port only CJ1W EIP21 SYSMAC CJ1 CJ1H or CJ1G CJ1W EIP21 CJ1M CJ1W EIP21 SYSMAC CS CS1H CS1D or CS1G CS1W EIP21 ...

Страница 337: ... following section for details 2 5 Setting Up Ethernet p 53 To use EtherNet IP communications do not automatically assign an IP address to the Vision Sensor Set a specific IP address and do not change it Initial Settings for EtherNet IP Communications Setup Mode Sensor settings Data output Link data output 1 Press Communication type 2 Press EtherNet IP 3 Set the EtherNet IP communications paramete...

Страница 338: ...d Set the communications cycle for cyclic tag data link communications for the Vision Sensor Set the same value as you set for the requested packet interval RPI on the Network Configura tor Set this parameter to the same value as you set for the requested packet interval RPI in the PLC This parameter is necessary for the FQ2 to synchronize with the communications cycles of the cyclic tag data link...

Страница 339: ... 0 s default 10 s Data output period This parameter is displayed and can be set only when Handshake setting is set to No Set the period for outputting measurement results Set a value that is longer that the GATE ON output time and shorter than the measurement interval of the Sensor 2 to 5 000 ms default 40 ms GATE signal ON period This parameter is displayed and can be set only when Handshake sett...

Страница 340: ...figurator Download the EDS file from the OMRON website After tag data links are set the Vision Sensor will automatically be restarted to enable the settings Tags Tag Sets and Connection Settings The communications areas in the PLC are set as tag data link connections as shown in the following table Tag and Tag Set Settings in the PLC 1 Specify the I O memory address of the first word in the respon...

Страница 341: ... version set one of the following as the total data size for the output area data output size and the response area 16 bytes 48 bytes default 80 bytes 144 bytes 272 bytes 2 Although the data size can be set as high as 502 bytes with the current version use the default setting of 20 bytes 3 The packet interval RPI is set in the connection settings between the PLC and the Sensor No setting is requir...

Страница 342: ...changes unless addresses in the CIO Area which are main tained are specified The following assembly object is required to specify instances when the EDS file is not used Assembly Object Settings Parameter Setting Originator device PLC Input tag set PLC_tag_set_name Byte This is the total size of the response area and output area that you set Connection type Any default multi cast connection 1 Outp...

Страница 343: ...racter Strings You can output a character string for each of the inspection items that reads a character string such as the OCR inspection item Also when reading the character string fails you can output a specific character string that is set in advance Outputting Read Character Strings p 346 Assigning Inspection Results to Output Data You can individually assign the parameters of the inspection ...

Страница 344: ...escription Expression Register the expression to use to output multiple data Examples LPR 0 3 I0 X I0 Y LPC 0 I0 C I0 X I0 Y Const Used to insert numbers and symbols into the expression Data Used to select the inspection items for which to output data and insert the parameters to output into the expression Example Selecting Parameters for the Search Item at Inspection Item 0 Inspection item I0 Sea...

Страница 345: ...nt Output data 3 4 bytes I0 SY 0 Reference SY 1st point Output data 4 4 bytes I0 X 1 Position X 2nd point Output data 5 4 bytes I0 Y 1 Position Y 2nd point Output data 6 4 bytes I0 SX 1 Reference SX 2nd point Output data 7 4 bytes I0 SY 1 Reference SY 2nd point Output data 8 4 bytes I0 X 2 Position X 3rd point Output data 9 4 bytes I0 Y 2 Position Y 3rd point Output data 10 4 bytes I0 SX 2 Referen...

Страница 346: ... upper value parameter setting the remaining data will be discarded Example Output data size 328 bytes Output data size setting 256 bytes Data Output Settings Data 0 Output data Setting Data 1 Data 2 I0 X 0 Inspection item 0 Position X for Search I0 Y 0 Inspection item 0 Position Y for Search LPC 0 30 I1 X I1 Y Inspection item 1 Position X 1st point for Shape Search II Inspection item 1 Position X...

Страница 347: ...ition Y for Search 4 5 Inspection item 1 Position X 1st point for Shape Search II 62 63 Inspection item 1 Position X 30th point for Shape Search II 64 65 Inspection item 1 Position Y 1st point for Shape Search II 122 123 Inspection item 1 Position Y 30th point for Shape Search II 124 125 Inspection item 2 Position X 1st point for Shape Search II 126 127 Inspection item 2 Position Y 1st point for S...

Страница 348: ...en here for two inspection items In Out I O setting Output data set Link data output Output data set 1 Select the inspection item for which to output the character string 2 Set the following items on the setting display Item Description Setting range Output form Set the output form for numerical data Floating point or fixed point default Floating point Parameter Setting Description String output O...

Страница 349: ...for the above Endian Little endian data is output Code Conversion The converted codes are outputted for the following character codes Increment from first address in output area Output data Assigned output data 0 Data 0 4 bytes Inspection item 0 Number of characters 1 2 Data 1 4 bytes Inspection item 1 Number of characters 3 4 A Inspection item 0 Characters ABC 5 B 6 C 7 0 Inspection item 1 Charac...

Страница 350: ...this signal from the PLC to send a control com mand for the Vision Sensor to execute Set the control command code and parameters before you turn ON this signal Command response com munications Turn OFF the EXE signal from the PLC when the Control Command Completed FLG signal from the Vision Sen sor turns ON TRIG Execute Measure ment Turn ON this signal from the PLC to send a command to execute a m...

Страница 351: ...er the control command code response code and response data have been stored Command response com munications This signal automatically turns OFF when the Control Command Execution Bit EXE is turned OFF by the user PLC BUSY Command Execu tion Active This signal is ON while the Vision Sensor cannot execute a control command Command response com munications This signal is OFF while the Vision Sensor...

Страница 352: ...ta Data output after measure ments If Handshake setting is set to Yes this signal automati cally turns OFF when the Data Output Request Bit DSA signal from the PLC turns OFF If Handshake setting is set to No this signal turns OFF after the data output period has elapsed Command code Command code This I O port returns the command code that was exe cuted Command response com munications Response cod...

Страница 353: ...ts 23 38 DATA 15 Output data 15 32 bits 39 70 DATA 31 Output data 31 32 bits 71 134 DATA 63 Output data 63 32 bits 135 Signal Signal name Function Application DATA0 63 Output data 0 to 63 These I O ports output the output data that is specified for the data output method The data that can be output is determined by the set value of the Output data size setting as follows 32 bytes Output data 0 to ...

Страница 354: ...ignal Access First define a BOOL array data type to access the control signals and status signals Here a data type called U_EIPFlag is defined Name of data type U_EIPFlag Type of derivative data type Union 2 Defining Data Types for Communications Area Access Data types are defined to access the communications areas with one data type for the command area and another data type for the response and ...

Страница 355: ...nd Param1 Command Param2 Command Param3 Bits 15 14 13 12 11 10 9 8 7 6 5 4 3 2 1 0 ERCLR TRIG EXE DSA Name of data type Data type S_EIPInput STRUCT StatusFlag U_EIPFlag The data type that was defined above 1 CommandCodeEcho DWORD 32 bit bit string data ResponseData DINT 32 bit integer data OutputData ARRAY 0 7 OF DINT Specifies an array of DINT data from 0 to 7 ResponseCode UDINT 32 bit integer da...

Страница 356: ...he following table 5 Accessing the Communications Areas from the User Program The defined variables are used to access the communications areas for the Sensor using the following notation Command Area Variable Variable type Network Publish attribute Data type Application EIPOutput Global variable Output S_EIPOutput For data links to the command area EIPInput Global variable Input S_EIPInput For da...

Страница 357: ... variables with AT specifications to the I O memory addresses that are assigned in the communi cations areas as shown below Setting Examples Variable a AT specification D0 0 Variable b AT specification D0 1 Variable c AT specification D0 15 Variable d AT specification D1 0 3 Setting Connections Set the connections as shown in the following table Signal name Variable name FLG EIPInput StatusFlag F ...

Страница 358: ...and system data p 359 00104010 Re register Model Registers the model again for registered Search Position Compensation Shape Search II Position Compensation Search Shape Search II or Sensitive Search inspec tion items p 360 00104020 Teach Executes teaching for all inspection items p 360 0010F010 Reset Resets the Vision Sensor p 361 00205000 Get Latest Error Information Acquires the latest error in...

Страница 359: ...compen sation item or filter item p 363 00401020 Get Inspection Item Data Acquires the inspection item data p 364 00501020 Set Inspection Item Data Sets the inspection item data to the specified data p 365 00403000 Get Software Version Informa tion Acquires the software version p 365 First word of command area Bits Contents 12 to 15 8 to 11 4 to 7 0 to 3 2 0001 0000 0010 0000 Command code 3 0000 0...

Страница 360: ...ntents 12 to 15 8 to 11 4 to 7 0 to 3 2 0001 0000 0011 0000 Command code The command code for which the response applies is stored 3 0000 0000 0001 0000 4 0000 0000 0000 0000 Response code Command execution result 0 OK FFFFFFFF NG 5 0000 0000 0000 0000 First word of command area Bits Contents 12 to 15 8 to 11 4 to 7 0 to 3 2 0010 0000 0001 0000 Command code 3 0000 0000 0001 0000 First word of resp...

Страница 361: ...rea Bits Contents 12 to 15 8 to 11 4 to 7 0 to 3 2 0010 0000 0010 0000 Command code The command code for which the response applies is stored 3 0000 0000 0001 0000 4 0000 0000 0000 0000 Response code Command execution result 0 OK FFFFFFFF NG 5 0000 0000 0000 0000 First word of command area Bits Contents 12 to 15 8 to 11 4 to 7 0 to 3 2 0011 0000 0001 0000 Command code 3 0000 0000 0001 0000 First w...

Страница 362: ...o 11 4 to 7 0 to 3 2 0100 0000 0001 0000 Command code The command code for which the response applies is stored 3 0000 0000 0001 0000 4 0000 0000 0000 0000 Response code Command execution result 0 OK FFFFFFFF NG 5 0000 0000 0000 0000 First word of command area Bits Contents 12 to 15 8 to 11 4 to 7 0 to 3 2 0100 0000 0010 0000 Command code 3 0000 0000 0001 0000 First word of response area Bits Cont...

Страница 363: ...area Bits Contents 12 to 15 8 to 11 4 to 7 0 to 3 2 1111 0000 0001 0000 Command code 3 0000 0000 0001 0000 First word of response area Bits Contents 12 to 15 8 to 11 4 to 7 0 to 3 There is no response for a reset operation First word of command area Bits Contents 12 to 15 8 to 11 4 to 7 0 to 3 2 0101 0000 0000 0000 Command code 3 0000 0000 0010 0000 First word of response area Bits Contents 12 to ...

Страница 364: ...mand code for which the response applies is stored 3 0000 0000 0010 0000 4 0000 0000 0000 0000 Response code Command execution result 0 OK FFFFFFFF NG 5 0000 0000 0000 0000 6 0000 0000 0000 0000 Response data Acquired scene number 7 0000 0000 0000 0000 First word of command area Bits Contents 12 to 15 8 to 11 4 to 7 0 to 3 2 0001 0000 0000 0000 Command code 3 0000 0000 0011 0000 4 0000 0000 0000 0...

Страница 365: ...number 7 0000 0000 0000 0000 First word of response area Bits Contents 12 to 15 8 to 11 4 to 7 0 to 3 2 0001 0000 0001 0000 Command code The command code for which the response applies is stored 3 0000 0000 0100 0000 4 0000 0000 0000 0000 Response code Command execution result 0 OK FFFFFFFF NG 5 0000 0000 0000 0000 6 0000 0000 0000 0000 Acquired data 1 000 times the value 7 0000 0000 0000 0000 Fir...

Страница 366: ... result 0 OK FFFFFFFF NG 5 0000 0000 0000 0000 First word of command area Bits Contents 12 to 15 8 to 11 4 to 7 0 to 3 2 0001 0000 0010 0000 Command code 3 0000 0000 0100 0000 4 0000 0000 0000 0000 Inspection item number 5 0000 0000 0000 0000 6 0000 0000 0000 0000 Data number 7 0000 0000 0000 0000 First word of response area Bits Contents 12 to 15 8 to 11 4 to 7 0 to 3 2 0001 0000 0010 0000 Comman...

Страница 367: ...mes the value 9 0000 0000 0000 0000 First word of response area Bits Contents 12 to 15 8 to 11 4 to 7 0 to 3 2 0001 0000 0010 0000 Command code The command code for which the response applies is stored 3 0000 0000 0101 0000 4 0000 0000 0000 0000 Response code Command execution result 0 OK FFFFFFFF NG 5 0000 0000 0000 0000 First word of command area Bits Contents 12 to 15 8 to 11 4 to 7 0 to 3 2 00...

Страница 368: ...nt TRIG signal Command Execution Active BUSY signal 1 Measurement starts when the TRIG signal turns ON while the BUSY signal is OFF 2 The BUSY signal turns ON when measurement begins 3 The TRIG signal turns OFF when the BUSY signal turns ON 4 The OR of the measurement results is output when measurements are completed 5 The BUSY signal turns OFF when the BUSY output condition is met Command Area ON...

Страница 369: ...he Controller turns ON the Control Command Execution Bit EXE signal The execution command is sent to the Vision Sensor 3 When the Vision Sensor receives the execution command the Command Execution Active BUSY signal turns ON the READY signal turns OFF and the command is executed 4 The command code response code and response data are set when the Vision Sensor completes execution of the command 5 T...

Страница 370: ...ntrol Command Execution Bit EXE signal The execution command is sent to the Vision Sensor 3 When the Vision Sensor receives the execution command the Command Execution Active BUSY signal turns ON the READY signal turns OFF and the command is executed Continuous measurements start at this time 4 The command code response code and response data are set when the Vision Sensor completes execution of t...

Страница 371: ...DSA signal 4 When the Vision Sensor detects that the Data Output Request DSA signal is OFF it automatically turns OFF the Data Output Completed GATE signal 5 The Data Output Request Bit DSA signal is turned ON from the PLC and a request is made to output the data 1 If the data output request signal is not manipulated within the control timeout time 100 to 120 000 ms in the EtherNet IP settings and...

Страница 372: ...ditions a considerable leeway is required in the measurement interval to enable stable communications On a network to which many devices are connected performance may drop e g responses may be delayed or packets lost or communications errors may occur when there is temporarily high traffic on the network Test the operation under actual conditions before you start actual operation of the system If ...

Страница 373: ... will also be ON Therefore no EtherNet IP commands will be executed Any EtherNet IP commands will be executed after execution of the parallel commands You can also use a EtherNet IP to perform measurements and output data with the paral lel I O measurement trigger signal TRIG Sets the lower word of the Clear Measurement Values command MOV 2010 MOV 0010 SET RSET Sets the upper word of the Clear Mea...

Страница 374: ...thernet The Vision Sensor executes the control command and sends a response back to the PLC via Ethernet The PLC stores the response in the specified Response Area in I O memory Data Output after Measurements Immediately after a single measurement or continuous measurements the Vision Sensor will automatically output to the specified I O memory in the PLC the data for measurements that are specifi...

Страница 375: ...e area This is the area to which the Vision Sensor writes the results of control commands executed from the Command Area Data output after mea surements 3 Output area This is the area to which the Vision Sensor writes output data for measurements after an inspection is performed A PLC Link uses three link areas to perform communications the Command Area Response Area and Output Area A PLC Link is ...

Страница 376: ...CS1W ETN21 SYSMAC CP1 CP1L CP1W CIF41 CP1H CP1W CIF41 SYSMAC One NSJ Supported Built in port only NSJW ETN21 Series Model name CPU name CPU Interface Built in port in CPU Unit Ethernet Unit MELSEC QnU Universal model QnUDECPU Q03UDECPU Q04UDECPU Q06UDECPU Q10UDECPU Q13UDECPU Q20UDECPU Q26UDECPU Supported QJ71E71 100 Q71E71 B2 QJ71E71 B5 QnUDCPU Q03UDCPU Q04UDCPU Q06UDCPU Q10UDCPU Q13UDCPU Q20UDCPU...

Страница 377: ...IP address of the PLC to connect to assign the Command Area Response Area and Output Area and make other settings to perform PLC Link communications Setup Mode Sensor settings Data output Link data output MELSEC QnAS Q2ASCPU Q2ASCPU S1 Q2ASHCPU Q2ASHCPU S1 A1SJ71QE71N3 T 1 Press Communication type 2 Press PLC link SYSMAC or PLC link MELSEC depending on the PLC that is connected 3 Press Area settin...

Страница 378: ...for the output area Same as for the Command Area Address Set the first address of the output area in the PLC 0 to 99 999 Default 200 4 Set the communications protocol Comm type to PLC Link communications Item Description Setting range Output handshake Enables or disables handshaking Yes Data is output when the DSA signal from the PLC turns ON No Data is output regardless of the signal state from t...

Страница 379: ... Data That Can Be Used for External Outputs and Calculations for each inspection item Assigning Detection Results to Output Data p 377 Assigning More Than One Detection Result to Output Data p 378 Outputting Character Strings You can output a character string for each of the inspection items that reads a character string such as the OCR inspection item Also when reading the character string fails ...

Страница 380: ...f the inspection item allows multi point output press the number 0 to 30 of the inspection result for which to output the data from the list of inspec tion results To register something to data 1 and higher repeat this process The settings will be enabled after you restart the Sen sor 1 Press 0 Data 0 2 Press Multi data 3 Set the following items on the display to set expres sions Item Description ...

Страница 381: ...der Format LPR start_number number_of_data data_1 data_2 data_5 You can omit data 2 to data 5 LPC function order of the detection points Data is output for each detected measurement point Format LPC start_number number_of_data data_1 data_2 data_5 You can omit data 2 to data 5 To register something to data 1 and higher repeat this process The settings will be enabled after you restart the Sensor I...

Страница 382: ...ference SY 1st point Output data 4 4 bytes I0 X 1 Position X 2nd point Output data 5 4 bytes I0 Y 1 Position Y 2nd point Output data 6 4 bytes I0 SX 1 Reference SX 2nd point Output data 7 4 bytes I0 SY 1 Reference SY 2nd point Output data 8 4 bytes I0 X 2 Position X 3rd point Output data 9 4 bytes I0 Y 2 Position Y 3rd point Output data 10 4 bytes I0 SX 2 Reference SX 3rd point Output data 11 4 by...

Страница 383: ...utput data upper value setting 256 bytes Data Output Settings The output data that is assigned is output to the output area as shown below Any output data that exceeds the set value of the Max output data number of output data upper value parameter setting 256 bytes is discarded Data 0 Output data Setting Data 1 Data 2 I0 X 0 Inspection item 0 Position X for Search I0 Y 0 Inspection item 0 Positio...

Страница 384: ...s Output data 81 4 bytes Inspection item 0 Position X for Search 2 3 Inspection item 0 Position Y for Search 4 5 Inspection item 1 Position X 1st point for Shape Search II 62 63 Inspection item 1 Position X 30th point for Shape Search II 64 65 Inspection item 1 Position Y 1st point for Shape Search II 122 123 Inspection item 1 Position Y 30th point for Shape Search II 124 125 Inspection item 2 Pos...

Страница 385: ...r string is output after the data Example Read result 1 ABC Read result 2 0123 Data output Data 0 3 Number of characters 1 Data output Data 1 4 Number of characters 2 The following information will be output for the above Parameter Setting Description String output ON OFF OFF default Yes Sets whether to output the character string that results from reading Partial output ON OFF No default Yes Sets...

Страница 386: ...d output data 0 Data 0 4 bytes Inspection item 0 Number of characters 1 2 Data 1 4 bytes Inspection item 1 Number of characters 3 4 A Inspection item 0 Characters ABC 5 B 6 C 7 0 Inspection item 1 Characters 0123 8 1 9 2 10 3 11 00 Filled with zeros Only when the character string length is not a multiple of 4 ...

Страница 387: ... PLC to send a control command for the Vision Sensor to execute Command response commu nications Turn OFF the EXE signal from the PLC when the Control Command Completed FLG signal from the Vision Sensor turns ON Set the control command code and parameters before you turn ON this sig nal DSA Data Output Request Bit Turn ON this signal from the PLC to request data output When this signal turns ON th...

Страница 388: ...e response code and response data have been stored BUSY Command Execution Active This signal is ON while the Vision Sensor is executing a control command It is OFF while the Vision Sensor is not execut ing a control command READY Ready This signal turns ON when the Vision Sensor can execute a command Command response commu nications This signal turns OFF when the Vision Sensor cannot execute a com...

Страница 389: ...Output data 63 32 bits 129 512 DATA 255 Output data 255 32 bits 513 Signal Signal name Function Application DATA0 255 Output data 0 to 255 These I O ports output the output data that is specified for the data output method The range of the data that can be output is determined by the set value of the Max output data number of output data upper value parameter setting as follows Minimum setting 32 ...

Страница 390: ...easure ments Ends continuous measurements p 390 First word of com mand area hex Command name Function Reference 2 3 2010 0010 Clear Measurement Values Clears all measurement result values p 391 3010 0010 Save Data in Sensor Saves the current system data and scene groups in the Sensor p 391 4010 0010 Re register Model Registers the model again p 391 4020 0010 External Teaching Performs reteaching p...

Страница 391: ...em data to the specified data p 396 3000 0040 Get Software Version Informa tion Acquires the software version p 396 5000 0020 Get Latest Error Information Acquires the latest error information p 397 First word of command area Bits Contents 12 to 15 8 to 11 4 to 7 0 to 3 2 0001 0000 0001 0000 Command code 4 byte binary data 3 0000 0000 0001 0000 First word of response area Bits Contents 12 to 15 8 ...

Страница 392: ...stored 3 0000 0000 0001 0000 4 0000 0000 0000 0000 Response code Command execution result 0 OK FFFFFFFF NG 5 0000 0000 0000 0000 The measurement results are written to the output area if data output is set The measurement results are not output if data output is not set Setting the Data To Output Automatically after Measurements p 377 First word of command area Bits Contents 12 to 15 8 to 11 4 to ...

Страница 393: ... 0010 0000 0001 0000 Command code The command code for which the response applies is stored 3 0000 0000 0001 0000 4 0000 0000 0000 0000 Response code Command execution result 0 OK FFFFFFFF NG 5 0000 0000 0000 0000 First word of command area Bits Contents 12 to 15 8 to 11 4 to 7 0 to 3 2 0011 0000 0001 0000 Command code 3 0000 0000 0001 0000 First word of response area Bits Contents 12 to 15 8 to 1...

Страница 394: ...cution result 0 OK FFFFFFFF NG 5 0000 0000 0000 0000 First word of command area Bits Contents 12 to 15 8 to 11 4 to 7 0 to 3 2 0100 0000 0010 0000 Command code 3 0000 0000 0001 0000 First word of response area Bits Contents 12 to 15 8 to 11 4 to 7 0 to 3 2 0100 0000 0010 0000 Command code The command code for which the response applies is stored 3 0000 0000 0001 0000 4 0000 0000 0000 0000 Response...

Страница 395: ...code for which the response applies is stored 3 0000 0000 0010 0000 4 0000 0000 0000 0000 Response code Command execution result 0 OK FFFFFFFF NG 5 0000 0000 0000 0000 6 0000 0000 0000 0000 Response data Acquired scene number 7 0000 0000 0000 0000 First word of command area Bits Contents 12 to 15 8 to 11 4 to 7 0 to 3 2 0001 0000 0000 0000 Command code 3 0000 0000 0011 0000 4 0000 0000 0000 0000 S...

Страница 396: ...ord of response area Bits Contents 12 to 15 8 to 11 4 to 7 0 to 3 2 0001 0000 0001 0000 Command code The command code for which the response applies is stored 3 0000 0000 0100 0000 4 0000 0000 0000 0000 Response code Command execution result 0 OK FFFFFFFF NG 5 0000 0000 0000 0000 6 0000 0000 0000 0000 Acquired data 1 000 times the value 7 0000 0000 0000 0000 First word of command area Bits Content...

Страница 397: ... 0000 0000 0000 0000 First word of command area Bits Contents 12 to 15 8 to 11 4 to 7 0 to 3 2 0001 0000 0010 0000 Command code 3 0000 0000 0100 0000 4 0000 0000 0000 0000 Inspection item number 5 0000 0000 0000 0000 6 0000 0000 0000 0000 Data number 12 2 External Reference Parameters p 491 7 0000 0000 0000 0000 First word of response area Bits Contents 12 to 15 8 to 11 4 to 7 0 to 3 2 0001 0000 0...

Страница 398: ...0000 0000 0000 0000 First word of response area Bits Contents 12 to 15 8 to 11 4 to 7 0 to 3 2 0001 0000 0010 0000 Command code The command code for which the response applies is stored 3 0000 0000 0101 0000 4 0000 0000 0000 0000 Response code Command execution result 0 OK FFFFFFFF NG 5 0000 0000 0000 0000 First word of command area Bits Contents 12 to 15 8 to 11 4 to 7 0 to 3 2 0011 0000 0000 000...

Страница 399: ...2 0101 0000 0000 0000 Command code 3 0000 0000 0010 0000 First word of response area Bits Contents 12 to 15 8 to 11 4 to 7 0 to 3 2 0101 0000 0000 0000 Command code The command code for which the response applies is stored 3 0000 0000 0010 0000 4 0000 0000 0000 0000 Response code Command execution result 0 OK FFFFFFFF NG 5 0000 0000 0000 0000 6 0000 0000 0000 0000 Response data Latest error code E...

Страница 400: ...mand code response code and response data are set when the Vision Sensor completes execution of the command 6 When the PLC detects that the Control Command Completed FLG signal is ON it turns OFF the Control Command Execution Bit EXE signal 7 When the Vision Sensor detects that the Control Command Execution Bit EXE signal is OFF it turns OFF the Control Command Completed FLG signal and the Command...

Страница 401: ... turns OFF the Data Output Request Bit DSA signal 4 When the Vision Sensor detects that the Data Output Request DSA signal is OFF it automatically turns OFF the Data Output Completed GATE signal If the Data Output Request Bit DSA signal is not turned OFF within the time that is set for the retry interval in the PLC Link settings the Data Output Completed GATE signal is forced OFF and data output i...

Страница 402: ...xecution for the parallel measure ment trigger input TRIG signal Execute PLC Link commands while the Command Execution Active BUSY paral lel communications signal is OFF You can also perform measurements with the measurement trigger input TRIG signal in parallel I O and use PLC Link communications to output data First RUN Period Flag Control Command Completed FLG Execution condition Control Comman...

Страница 403: ...e external device sends a command as an ASCII string e g MEASURE for a single measurement The Vision Sensor then returns a response such as OK NG or some value Data Output after Measurements Immediately after a single or continuous measurement the Vision Sensor will automatically output to an external device e g a PLC the data for measurements that are specified for output in advance This enables ...

Страница 404: ... no protocol communications the port number of the Sensor will always be 9876 for TCP no protocol communications 1 Press No protocol TCP 2 Set Connection mode to either TCP server or TCP client When you are finished press Back 3 If you set Connection mode to TCP client set the following parameters Item Description Setting range IP address Set the IP address of the external device at the connection...

Страница 405: ...output a character string that contains up to 1 024 characters for each of the inspection item that reads a character string such as the OCR inspection item Also when reading the character string fails you can output a specific character string that is set in advance Outputting Read Character Strings p 408 Assigning Inspection Results to Output Data You can individually assign the parameters of th...

Страница 406: ...em Description Expression Register the expression to use to output multiple data Examples LPR 0 3 I0 X I0 Y LPC 0 I0 C I0 X I0 Y Const Used to insert numbers and symbols into the expression Data Used to select the inspection items for which to output data and insert the parameters to output into the expression Example Selecting Parameters for the Search Item at Inspection Item 0 Inspection item I0...

Страница 407: ...ion results will be output according to the sorting method that is set for multi point output for the inspection item Output order 1 Assigned data 1 I0 X 0 Position X 1st point 2 I0 Y 0 Position Y 1st point 3 I0 SX 0 Reference SX 1st point 4 I0 SY 0 Reference SY 1st point 5 I0 X 1 Position X 2nd point 6 I0 Y 1 Position Y 2nd point 7 I0 SX 1 Reference SX 2nd point 8 I0 SY 1 Reference SY 2nd point 9...

Страница 408: ...its in the integer part of the number 1 to 10 digits Default 6 digits Digits of decimal Set the number of digits in the integer part 0 to 4 digits Default 4 digits Negative Sets the way to express negative numbers or 8 Default 0 Sup pressed Sets whether to use zero suppression Yes or No Default No Field sepa rator Sets the field separator OFF comma tab space CR LF or CR LF Default OFF Record separ...

Страница 409: ...hen 999 999 999 9999 is output The following values are output if JG Judge is set OK 0 NG 1 When Output Format Is Binary Set the numerical expression Select either fixed decimal or floating point decimal Output Format The measurement data multiplied by 1 000 is output continuously at 4 bytes per data Negative numbers are output as two s complements Measured value of data 0 Measured value of data 1...

Страница 410: ...tput Output data set 1 Select the inspection item for which to output the character string 2 Set the following items on the setting display Binary output does not use data separators i e field separators or record separators These separators are used only for ASCII output Data that is output after measurement is output until the last data even after the measurement is finished Data out put is not ...

Страница 411: ...ction describes the command format for no protocol communications Commands defined in the command list can be used Set commands and parameters in ASCII If the command has an argument parameter set the parameter after inserting a space 0x20 If it has multiple parameters insert a space before each parameter Place a delimiter at the end of the command No space is required before the delimiter The del...

Страница 412: ...t the end of the response The delimiter is always CR Command Execution Result Parameter If the command is not processed normally the command execution result is NG Command Execution Result An error occurs in the following cases A non existent command was specified The number of parameters is incorrect The parameter range is incorrect The parameter content is incorrect Operation could not be perfor...

Страница 413: ...mands POSITIONDATA Item_number External_reference_data_nu mber PD Item_number External_reference_data_nu mber Acquires data from a position compensation item or filter item p 420 POSITIONDATA Item_number External_reference_data_nu mber Setting PD Item_number External_reference_data_nu mber Setting Sets data for a position com pensation item or filter item p 420 ITEMDATA Inspection_item_number Exte...

Страница 414: ...he measurement is performed and the result is returned as response data Command Format Response Format When the Command Is Processed Normally When the Command Is Not Processed Normally Parameter Descriptions Measurement result The measurement result is output as the response when data output is set The measurement result is not output when data output is not set Setting the Data To Output Automati...

Страница 415: ...ponse data Command Format Response Format When the Command Is Processed Normally When the Command Is Not Processed Normally Parameter Descriptions Measurement result The measurement results corresponding to the number of measurements made are out put when data output is set The measurement result is not output when data output is not set Setting the Data To Output Automatically after Measurements ...

Страница 416: ...essed Normally When the Command Is Not Processed Normally Set the data output to output measurement results If data output is not set only the command response is output Setting the Data To Output Automatically after Measurements p 403 A S M E CR U R E E Delimiter CR M E Delimiter or CR O K Delimiter CR Measurement result CR O K CR Delimiter Measurement result Data returned for the number of conti...

Страница 417: ...Connecting through Ethernet 9 Utility commands CLRMEAS Clear Measurement Values This command clears the measurement values Command Format Response Format When the Command Is Processed Normally When the Command Is Not Processed Normally C L CR R M A S E Command Delimiter CR O K Delimiter CR E R Delimiter ...

Страница 418: ...t When the Command Is Processed Normally When the Command Is Not Processed Normally DATASAVE Save Settings This command saves the current system data and scene groups to the Sensor Command Format Response Format When the Command Is Processed Normally When the Command Is Not Processed Normally C L CR R E R R Command Delimiter CR O K Delimiter CR E R Delimiter D A CR T A A S E V Command Delimiter CR...

Страница 419: ...Response Format When the Command Is Processed Normally When the Command Is Not Processed Normally RESET Resets the Sensor This command resets the Sensor Command Format Response Format When the Command Is Processed Normally If process is completed normally the Sensor is restarted There is therefore no response When the Command Is Not Processed Normally M O CR D E L Command Delimiter CR O K Delimite...

Страница 420: ...t When the Command Is Processed Normally When the Command Is Not Processed Normally Scene Control Commands SCENE or S Acquire Scene Number This command acquires the scene number currently being used Command Format Response Format When the Command Is Processed Normally T E CR A C H Command Delimiter CR O K Delimiter CR E R Delimiter S C CR E N E Delimiter CR S Delimiter or CR CR O K Delimiter Delim...

Страница 421: ...mand changes the scene number to use Command Format Response Format When the Command Is Processed Normally When the Command Is Not Processed Normally Parameter Descriptions Scene number The acquired scene number currently used scene number is returned Scene number Specifies the scene number 0 to 31 to change to CR E R Delimiter S C CR E N E 0 CR K O CR S C CR E N E or Scene number 2 digits max Del...

Страница 422: ...s Inspection item number Specifies the item number of the position compensation item or of the filter item External reference data number Specifies the external reference data number 12 2 External Reference Parameters p 491 Acquired value Returns the image adjustment data or threshold value 12 2 External Reference Parameters p 491 P O O N D A T A CR S I I T External reference data 4 digits max Com...

Страница 423: ...tion item number Specifies the item number of the position compensation item or of the filter item External reference data number Specifies the external reference data number 12 2 External Reference Parameters p 491 Set value Specifies the set value 12 2 External Reference Parameters p 491 P O O N D A T A CR S I I T External reference data 4 digits max Set value Command Space 0x20 Space 0x20 Delim...

Страница 424: ... Specifies the inspection item number 0 to 31 External reference data number Specifies the external reference data number 0 to 9999 12 2 External Reference Parameters p 491 Acquired value Returns the data for the specified inspection item 12 2 External Reference Parameters p 491 I T D A T A CR E M Inspection item number 2 digits max Command Space 0x20 Space 0x20 Delimiter Command or D I CR Delimit...

Страница 425: ...spection item number 0 to 31 External reference data number Specifies the external reference data number 0 to 9999 12 2 External Reference Parameters p 491 Acquired value Returns the data for the specified inspection item 12 2 External Reference Parameters p 491 I T D A T A Setting CR E M Inspection item number 2 digits max Command Space 0x20 Space 0x20 Space 0x20 Delimiter Setting Delimiter Exter...

Страница 426: ...umber 0 to 31 External reference data number Specifies the external reference data number 0 to 999 Refer to 12 2 External Reference Parameters p 491 for details Acquired text string Returns the text string data for the specified inspection item Refer to 12 2 External Reference Parameters p 491 for details I T D A T A 2 CR E M Inspection item number 2 digits max External reference data number 3 dig...

Страница 427: ...ternal reference data number Specifies the external reference data number 0 to 999 Refer to 12 2 External Reference Parameters p 491 for details Text string data Specifies the text string data for the specified inspection item Refer to 12 2 External Reference Parameters p 491 for details I T D A T A 2 Text string data CR E M Inspection item number 2 digits max External reference data number 3 digi...

Страница 428: ...ommand Is Processed Normally When the Command Is Not Processed Normally Parameter Descriptions Software version Returns the software version Example When the software version is 1 60 the response is 1 60 Date Returns the date Example When the date is 13 May 2012 the response is 2012 05 13 V E S CR R G T E Parameter Command Space 0x20 Delimiter 1 1 2 6 0 2 0 5 2 4 0 Date Software version Space 0x20...

Страница 429: ...es the Sensor model Command Format Response Format When the Command Is Processed Normally When the Command Is Not Processed Normally Parameter Descriptions Model Returns the model Example When the model is FQ2 S40010F the response is FQ2 S40010F V E H CR R G T E Parameter Command Space 0x20 Delimiter F Q 1 0 F CR 2 S 0 0 4 Delimiter Model CR O K Delimiter CR E R Delimiter ...

Страница 430: ...de from the Sensor Command Format Response Format When the Command Is Processed Normally When the Command Is Not Processed Normally Parameter Descriptions Error code Returns the latest error code If there is no error history the response is 00000000 11 1 Error Histories p 452 E R CR R G T E Command Delimiter 0 0 0 CR 0 0 0 0 0 Delimiter Model CR O K Delimiter CR E R Delimiter ...

Страница 431: ...no protocol command from a terminal application is shown below Example 1 Changing Scenes Scene number 1 is specified Example 2 Acquiring inspection item data Acquires the judgement result for a search registered to inspection item 10 Example 3 Measurement when Data Output Is Not Set Example 4 Measurement when Data Output Is Set M OK M OK 1 0000 0 0000 0 0000 306 0000 M OK 2 0000 0 0000 0 0000 0 00...

Страница 432: ...n the same Ethernet network The FQ2 can send responses to the received commands to the CPU Unit that sent the commands The FQ2 cannot receive FINS commands from any networks other than Ethernet or from devices on networks to which the FQ2 is not directly connected Sending FINS Commands A special instruction for sending commands the CMND instruction is used to send FINS commands from the CPU Unit I...

Страница 433: ...d code Example Command Code for a Single Measurement Command Setting Up Communications FINS TCP Communications are set up in the same way as for TCP no protocol communications Setting Up No protocol Communications p 402 Control data item Setting Destination network address 00 hex Local network The FINS commands must be sent to the local network Destination node address Specify the last two digits ...

Страница 434: ... indicator p 434 280F 00103010 Saves the settings data to the Sensor p 435 280F 00104010 Re registers the models for registered Search and Color Data inspection items p 435 280F 0010F010 Restarts the Sensor p 436 280F 00104020 Executes teaching for all applicable inspection items p 436 Scene control com mands 280F 00201000 Acquires the current scene number p 437 280F 00301000 Changes the scene num...

Страница 435: ...eter Descriptions MRC 1 byte SRC 1 byte Vision Sensor command code 4 bytes 28 0F 00101010 MRC 1 byte SRC 1 byte MRES 1 byte SRES 1 byte Vision Sensor command code 4 bytes Measurement result 1 024 bytes 28 0F End code 00101010 Measurement result End code hex Meaning 0000 Command execution ended normally FFFF Command execution ended in an error Measurement result Returns the measurement result as th...

Страница 436: ...d Codes MRC 1 byte SRC 1 byte Vision Sensor command code 4 bytes 28 0F 00102010 MRC 1 byte SRC 1 byte MRES 1 byte SRES 1 byte Vision Sensor command code 4 bytes 28 0F End code 00102010 End code hex Meaning 0000 Command execution ended normally FFFF Command execution ended in an error MRC 1 byte SRC 1 byte Vision Sensor command code 4 bytes 28 0F 00102040 MRC 1 byte SRC 1 byte MRES 1 byte SRES 1 by...

Страница 437: ...lor Data inspection items Format Response Format End Codes MRC 1 byte SRC 1 byte Vision Sensor command code 4 bytes 28 0F 00103010 MRC 1 byte SRC 1 byte MRES 1 byte SRES 1 byte Vision Sensor command code 4 bytes 28 0F End code 00103010 End code hex Meaning 0000 Command execution ended normally FFFF Command execution ended in an error MRC 1 byte SRC 1 byte Vision Sensor command code 4 bytes 28 0F 0...

Страница 438: ...ternal Teaching 280F 00104020 This command performs teaching for all applicable inspection items Format Response Format End Codes MRC 1 byte SRC 1 byte Vision Sensor command code 4 bytes 28 0F 0010F010 MRC 1 byte SRC 1 byte Vision Sensor command code 4 bytes 28 0F 00104020 MRC 1 byte SRC 1 byte MRES 1 byte SRES 1 byte Vision Sensor command code 4 bytes 28 0F End code 00104020 End code hex Meaning ...

Страница 439: ...rmat End Codes Parameter Descriptions MRC 1 byte SRC 1 byte Vision Sensor command code 4 bytes 28 0F 00201000 MRC 1 byte SRC 1 byte MRES 1 byte SRES 1 byte Vision Sensor command code 4 bytes Scene number 4 bytes 28 0F End code 00201000 Scene number that was acquired 2 digits max End code hex Meaning 0000 Command execution ended normally FFFF Command execution ended in an error Scene number Returns...

Страница 440: ... Parameter Descriptions MRC 1 byte SRC 1 byte Vision Sensor command code 4 bytes Scene number 4 bytes 28 0F 00301000 Scene number to change to 2 digits max MRC 1 byte SRC 1 byte MRES 1 byte SRES 1 byte Vision Sensor command code 4 bytes 28 0F End code 00301000 End code hex Meaning 0000 Command execution ended normally FFFF Command execution ended in an error Scene number Specifies the scene number...

Страница 441: ...1010 Position compensation item filter item number 0 to 7 1 digit max External reference number MRC 1 byte SRC 1 byte MRES 1 byte SRES 1 byte Vision Sensor command code 4 bytes Acquired value 4 bytes 28 0F End code 00401010 Acquired value End code hex Meaning 0000 Command execution ended normally FFFF Command execution ended in an error Position compensation item number Specifies the number of the...

Страница 442: ... bytes Set value 4 bytes 28 0F 00501010 Position compensation item filter item number 0 to 7 1 digit max External reference number Setting MRC 1 byte SRC 1 byte MRES 1 byte SRES 1 byte Vision Sensor command code 4 bytes 28 0F End code 00501010 End code hex Meaning 0000 Command execution ended normally FFFF Command execution ended in an error Position compensation item number Specifies the number o...

Страница 443: ...020 Inspection item number from 00 to 1F 2 digits max External reference number MRC 1 byte SRC 1 byte MRES 1 byte SRES 1 byte Vision Sensor command code 4 bytes Acquired value 4 bytes 28 0F End code 00401020 Acquired value 1 000 times the actual value End code hex Meaning 0000 Command execution ended normally FFFF Command execution ended in an error Inspection item number Specifies the number of t...

Страница 444: ...ytes Set value 4 bytes 28 0F 00501020 Inspection item number from 00 to 1F 2 digits max External reference number Set value 1 000 times the actual value MRC 1 byte SRC 1 byte MRES 1 byte SRES 1 byte Vision Sensor command code 4 bytes 28 0F End code 00501020 End code hex Meaning 0000 Command execution ended normally FFFF Command execution ended in an error Inspection item number Specifies the numbe...

Страница 445: ... SRC 1 byte MRES 1 byte SRES 1 byte Vision Sensor command code 4 bytes Software version text string 4 bytes 28 0F End code 00403000 Software version 1 000 times the actual value End code hex Meaning 0000 Command execution ended normally FFFF Command execution ended in an error Software version text string Returns the software version Example When the software version is 1 20 the response is 1200 4...

Страница 446: ...Controlling Operation and Outputting Data with FINS TCP No protocol Commands 444 FQ2 S4 User s Manual MEMO ...

Страница 447: ...Connecting with RS 232C 10 10 1 Introduction to RS 232C Connections 446 10 2 Controlling Operation and Outputting Data with RS 232C No proto col Communications 447 Connecting with RS 232C ...

Страница 448: ...ethods of the RS 232C Interface Sensor Data Unit p 32 p 561 and Wiring Sensor Data Units p 44 Parallel Input Signals for an RS 232C Interface Sensor Data Unit If you make a parallel connection through the parallel I O connector on the Sensor Data Unit the specifications of the parallel I O signals will change as given below in respect to the standard parallel communications of the Sensor Output Si...

Страница 449: ... or change the scene The external device sends a command as an ASCII string e g MEASURE for a single measurement The Vision Sensor then returns a response such as OK NG or some value Data Output after Measurements Immediately after a single or continuous measurement the Vision Sensor will automatically output to an external device e g a PLC the data for measurements that are specified for output i...

Страница 450: ... will communi cate with 2400 4800 9600 19200 38400 57600 or 115200 default 38400 Data length bits Set the same data length as the external device that you will communi cate with 7 bits or 8 bits default 8 bits Parity Sets the parity Set the same setting as the one in the PLC communica tions specifications None Odd or Even default none Stop bit Set the number of stop bits Set the same value as the ...

Страница 451: ... the Data To Output Automatically after Measurements p 403 Data Output Time and TRIG Signal Input Interval Set the input interval for the TRIG signal so that it is equal to or greater than the data output time If the input interval for the TRIG signal is shorter than the data output time the output data buffer will eventually overflow and output data will be discarded Setting the Output Format Set...

Страница 452: ...Controlling Operation and Outputting Data with RS 232C No protocol Communications 450 FQ2 S4 User s Manual MEMO ...

Страница 453: ...11 Troubleshooting Troubleshooting 11 1 Error Histories 452 11 2 Error Messages 454 11 3 Basic Troubleshooting 455 ...

Страница 454: ... contrast Check the image to see if the contrast is too low to register the model Increase the image contrast and try again to register the model Logging Error Error code 02160702 or 02160703 Some data was not saved when logging data to files on an SD card Check to see if the BUSY output parameter is set to Measurement Set a sufficiently long measure ment interval or set the BUSY output condition ...

Страница 455: ...ing the History of Errors That Were Detected in the Sensor Setup Mode Sensor settings Error history Delete history Deleting the History of Errors That Were Detected in the Touch Finder Setup Mode or Run Mode TF settings Error history Delete history You cannot check the error codes from the Touch Finder Use the command to acquire the most recent error infor mation for the connection method EtherNet...

Страница 456: ... For these errors the ERR indicator on the Sensor will not light the ERROR signal will not be output and the error will not be recorded in the error history Follow the instructions that are given in the error message If the following messages appear the hardware may be faulty Contact your OMRON representative System error Application system error Please reboot Failed to startup ...

Страница 457: ...ame network as the Sensor dis connect the other devices from the network and check the update speed If the update speed returns to normal check the specifications of the disconnected devices and take suitable measures If there are power lines running in parallel with the Ethernet cable or if there are inverters or other sources of noise near the communications cable separate the communications cab...

Страница 458: ...Basic Troubleshooting 456 FQ2 S4 User s Manual MEMO ...

Страница 459: ...491 12 3 Specifications and Dimensions 550 12 4 Updating the Software 569 12 5 Connecting a Previous Touch Finder FQ D30 D31 to the FQ2 S Sensor 570 12 6 LED Safety 575 12 7 Requirements from Regulations and Stan dards 576 12 8 Detailed EtherNet IP Communications Specifications 580 ...

Страница 460: ...p 63 HDR Suppresses reflections and differences in brightness OFF default Level 1 to Level4 Scene p 65 Brightness correc tion Use to stabilize the brightness ON or OFF default Scene p 66 White balance Corrects differences in coloring between the image and the actual object AUTO R 0 001 to 7 999 G 0 001 to 7 999 B 0 001 to 7 999 Scene p 66 Partial input Used to make the image input range smaller FQ...

Страница 461: ...can specify the ranges of colors to which the Color Gray Filter item is applied RGB default HSV Scene p 72 Filter settings Select the type of color filter to use Red filter default Green filter Blue filter Cyan filter Magenta filter Yellow filter Brgt F R G B Brgt F R 2G B Custom filter Scene p 72 Source image You must set the image to which the filter is to be applied Camera Prev default Scene p ...

Страница 462: ...ection point You can specify which part of the model to detect as coordinates during inspec tions Scene for Edge Position Compensation Insp region Adjusts the size and position of the mea surement region changes the measure ment direction etc Scene Color ON OFF Sets whether to specify an edge color ON or OFF default Scene Set color Specifies the color of the image for edge detection i e the border...

Страница 463: ...and Edge Rotation Position Compensation Almost the same as for the Edge Position inspection item Scene Details Meas Parameter Shape Search II Position Compensation Item and Search Position Compen sation Item Almost the same settings as for the Search inspection item However the Sub pixel and Multi point output settings of the Search inspection item do not exist Edge Position Compensation Two edge ...

Страница 464: ...ndicate thinner characters Positive numbers indicate thicker characters 255 to 255 default 0 Scene Noise fil ter size Sets the size of the filter Larger values eliminate wide areas of noise Small values eliminate narrow areas of noise 60 to 440 default 0 Scene Bound ary cor rection Treats dark areas at the edges of the measurement region as noise and removes them from the read candi dates ON or OF...

Страница 465: ...ene Timeout Sets the timeout time for read pro cessing 1 to 9999 ms default 9999 Scene Continuous test Same as Continuous test on the Test Tab Page Scene for 2D code Insp region Moves the measurement region or adjusts the size of the measurement region Camera setup Same as Camera adjustments on the Image Tab Page Scene Meas Parameter Code type Sets the type of code to read DataMatrix default OR Co...

Страница 466: ...1 25 25 29 29 33 33 37 37 41 41 45 45 49 49 53 53 57 57 or Auto defalut For square data matrices 10 10 12 12 14 14 16 16 18 18 20 20 22 22 24 24 26 26 32 32 36 36 40 40 44 44 48 48 52 52 64 64 or Auto default For rectangular data matrices 8 18 8 32 12 26 12 36 16 36 16 48 or Auto Scene Auto length Except for when the num ber of cells is set to auto matic for data matrices or QR codes Sets whether ...

Страница 467: ... 166 Set color Specifies the color of the image for edge detection i e the border between the measurement object and background R 0 to 255 B 0 to 255 G 0 to 255 Scene Color palette Displays a palette for color specifica tion for Area Labeling Insp region Adjusts the size and position of the measurement region Scene p 186 p 194 Set color The color for which to find the area is specified Scene p 184...

Страница 468: ...ere read Scene Characters Displays the character string that was read Scene Search Shape search II Sensitive search Detection No If you enabled the output of multiple results you can specify the results to display Scene p 138 p 148 p 156 Correlation Sets the correlation OK range 0 to 100 Defaults Lower limit 0 Upper limit 100 Scene Position X Sets the position OK range Defaults Lower limit 99 999 ...

Страница 469: ...9 9999 Lower limit 0 0000 Scene p 184 Gravity X Set the upper and lower limits of the range of gravity X that is to be judged as OK Range 999 999 999 9999 to 999 999 999 9999 Default Upper limit 999 999 999 9999 Lower limit 999 999 999 9999 Scene Gravity Y Set the upper and lower limits of the range of the gravity Y that is to be judged as OK Range 999 999 999 9999 to 999 999 999 9999 Default Uppe...

Страница 470: ...ne p 139 p 149 p 157 p 164 p 171 p 175 Display setting You can change the parameters of the judgement conditions The names of the judgement conditions are displayed Scene p 138 p 148 p 156 p 163 p 170 p 174 p 179 p 183 Auto adjustment Except for Labeling and Edge Pitch Automatically adjusts the judgement parameters by using actual work pieces which are considered as good or faulty products OK Teac...

Страница 471: ...to teach No Sets the character string in the master data in which to automatically register the read result for teaching from an external device OFF or Master data 0 to 31 Scene Bar code 2D code 2D code DPM Verif master data Sets whether to verify the read charac ter string against a character string that is registered in the master data Sets the character string to use to ver ify the read charact...

Страница 472: ...Scene Output parameter Reflect Specifies whether to reflect the judge ment results of an inspection item in the overall judgement Yes default or No Scene Error string Sets the character string that is output for read errors 20 alphanumeric characters default NG Scene 2D code Meas Parameter Same as Teach Meas Parameter under Modify or Inspection Scene Output parameter Reflect Specifies whether to r...

Страница 473: ... are output only for objects with a measured Y coordinate that is within this range 999 999 999 9999 to 999 999 999 9999 Scene Detection count Sets the maximum number of detec tion results to output 1 to 32 Scene Multi point out put Sets whether to output only the result with the highest correlation or to out put all results that meet the specified extraction conditions OFF default or ON Scene p 1...

Страница 474: ...t parameter Reflect You can specify whether to reflect the judgement results of an inspection item in the overall judgement No Yes default Scene p 150 Model parameter Rotation Sets the angle range for the registered model No default Yes Scene p 158 Angle range 180 to 180 Scene p 158 Sub model num ber You can change the number of divi sions of the registered model 3 3 5 5 default or 9 9 Scene p 152...

Страница 475: ...raction con dition Scene p 193 Number of labels Set the maximum number of labels to detect Range 1 to 100 Default 100 Scene Area Specify the area range to judge as a label Range 0 to 999 999 999 9999 Defaults Upper limit 999 999 999 9999 Lower limit 0 Scene Gravity X Specify the gravity X position to judge as a label Range 99 999 999 9999 to 999 999 999 999 Defaults Upper limit 999 999 999 999 Low...

Страница 476: ...e retry interval msec 32 to 999 Default 100 Scene Brightness step or Shutter speed step Exposure retry Sets the exposure time step msec Brightness step 1 to 20 Default 2 shutter speed step 0 01 to 1 00 Default 1 00 Scene Increment count Exposure retry Sets the increment count for the brightness shutter speed step 0 to 10 2 default Scene Decrement count Exposure retry Sets the decrement count for t...

Страница 477: ...ocessing is completed until when the OR signal turns ON 0 to 1 000 ms default 0 ms System Output time When one shot output mode is selected this parameter sets the time that the OR signal is ON 1 to 1 000 ms default 5 ms System BUSY output Specifies when to turn OFF the BUSY signal after starting measurement pro cessing Measurement default Data logging Image logging or Result display System p 291 ...

Страница 478: ...s con nected 0 5 to 120 0 s 10 0 s default System p 309 Number of delay Set the number of times to ignore the TRIG signal turning ON between when the TRIG signal turns ON and the mea surement results are output Only when the FQ SDU1 is con nected 1 to 15 default System p 309 ACK signal ON period Sets the output time of the normal execu tion completion signal for parallel com mands Only when the FQ...

Страница 479: ...y Scene p 406 When output format is ASCII Digits of inte ger Sets the digits of the integer part including the sign However is not out put for positive numbers Example Setting 4 digit data 5963 is output as 999 1 to 10 Default 6 Scene Digits of dec imal Sets the output digits for the decimal part If it is set to 0 the decimal part is rounded off before the data is output 0 to 4 default 4 Scene Neg...

Страница 480: ... The same as for no protocol data output above Scene p 346 p 382 Output format Scene Par Jdg Output Only when the FQ SDU1 is connected Basic Settings Data0 to Data15 Scene Settings Sets the data from the inspection item to judge Inspection item text strings Scene p 304 Rename Changes copies or clears the data Scene Copy Scene Delete Scene Judgement condition Data 0 to Data 15 Sets the range of the...

Страница 481: ...O monitor Used to check I O connections p 247 Menu command Description Setting range Data Refer ence Continuous test Used to check the individual judgement results for the inspection items and to adjust the judgement parameters p 214 Graphic Displays the input image Graphics Details Displays the inspection item individual judgement results and measurement val ues All results Region Displays the in...

Страница 482: ...o auto matically adjust the judgement parame ters Threshold minimum Threshold aver age default or Threshold maximum Auto display trend monitor and histo gram only Same as the trend monitor and histogram for Run Mode p 228 p 229 Display range trend monitor and histo gram only Number of data trend monitor only p 228 Number of data histogram only p 229 Erase display Save data Saves scene data Calibra...

Страница 483: ...etting the model region for a Search inspection item Calibra tion data p 241 Insp region Changes the size and position of the measurement region Calibra tion data Actual coord Sets the Camera coordinates and the actual coordinates Point coordinate 0 to 9999 Actual coordinate 0 to 99999 9999 Calibra tion data Generate parameters Used to create calibration parameters Calibra tion data Parameter Coor...

Страница 484: ...data Saves all dictionary data with a DGP file name extension Sensor system data Saves system data with an SYD file name extension All Sensor data Saves all Sensor data with a BKD file name extension Touch Finder data Saves Touch Finder data with an MSD file name extension Logging Statistical data Saves statistical data with a CSV file name extension p 253 p 254 Logging image Saves image data with...

Страница 485: ... 15 characters max Retry details Timeout Sets the timeout time during measure ments 100 to 30000 ms default 30000 ms System Retry mode Sets the type of retry for measurements Normal retry Expose retry Scene retry Trigger retry or None default System Switch Order for Scene retry only Sets the method for changing scenes Auto default or Fixed System Retry scene for Scene retry only Changes the order ...

Страница 486: ...Odd Even default None System p 448 Stop bit Sets the number of stop bits 1bit 2bit default 1bit System p 448 Flow con trol Sets the controls for the flow of commu nications with the software None Xon Xoff default None System p 448 Delimiter Set the delimiter to add to the end of commands and responses CR LF or CR LF default CR System p 448 Interval timeout text Timeout s Set the time in seconds to...

Страница 487: ...set to a PLC Link ON or OFF default System p 376 Retry interval Sets the interval for retrying communica tions This setting is enabled only when Retry details is set to ON This can be set only when the communi cations type is set to a PLC Link 0 to 2 147 483 647 ms default 10 000 ms System p 376 Max output data Sets the upper limit of the number of out put data to use for PLC Link outputs Any outp...

Страница 488: ...me to turn ON the GATE signal This parameter is displayed and can be set only when Handshake setting is set to No This can be set only when the communi cations type is set to EtherNet IP 1 to 1 000 ms default 20 ms System p 337 Communication mode This parameter is displayed and can be set only when Comm type is set to PLClink MELSEC TCP server default or TCP client System Initialize Initializes th...

Страница 489: ...Field sep arator None Comma default Tab Space Colon Semicolon CR or CR LF Decimal symbol None Point default or Comma Record separator None Comma Tab Space Colon Semicolon CR or CR LF default SD card SD card informa tion Displays the capacity and remaining memory in the SD card p 266 Format Formats an SD card p 266 Startup dis play Startup screen type You can select the display to appear on the Tou...

Страница 490: ...han one Sen sor or if there is Sensor that is not in the subnet You can change this IP address and subnet mask This setting is valid only when automatic setting of the Sen sor s IP address is OFF Auto sensor detection The Touch Finder can detect Sensors and automatically connect to them in the order that it detects them ON default OFF p 248 Logging setting You must enable file logging before you c...

Страница 491: ... Except for statistical data Adjusts judgement parameters without stopping measurements p 231 Auto display trend monitor and histo gram only Automatically sets the display range according to the measurement results OFF or ON default p 228 p 229 Display range trend monitor and histo gram only Changes the display range of measure ment values 999 999 999 to 999 999 999 p 228 p 229 Number of data tren...

Страница 492: ... Menu command Description Setting range Data Refer ence Only image Button Hides text and displays only the image p 246 Dis play Button Zoom in Button Enlarges the image display p 244 Zoom out Button Reduces the image display FIT Button Fits the image to the display size Display But ton Changes the image display method Setup Mode Camera Live Freeze Log Logging image file or Camera image file Run Mo...

Страница 493: ...ition 0 Filtering OFF 1 Filtering ON 1 122 Filter type Setting Acqui sition Filter type 0 RGB 1 HSV 0 123 Color filter type Setting Acqui sition Color Filter Type 0 Red filter 1 Green filter 2 Blue filter 3 Cyan filter 4 Magenta filter 5 Yellow filter 6 Gray filter R G B 7 Gray filter R 2G B 8 Gray filter user set 0 124 Color gray filter type Setting Acqui sition Color Gray Filter Type 0 High spee...

Страница 494: ...ogged data Judgement parameter 0 Mea sure ment result Judgement Acquisition only 2 No judgement not mea sured 0 Judgement is OK 1 Judgement is NG 13 Teaching not performed error 14 Figure not registered error 15 Out of range error 2 JG 120 Mea sure ment condi tions Source image Setting Acqui sition 0 Camera image 1 Previous image 1 121 Setting method Setting Acqui sition 0 Filtering OFF 1 Filterin...

Страница 495: ... Judgement is NG 13 Teaching not performed error 14 Figure not registered error 15 Out of range error 2 JG 120 Mea sure ment condi tions Source image Setting Acqui sition 0 Camera image 1 Previous image 1 121 Setting method Setting Acqui sition 0 Filtering OFF 1 Filtering ON 1 External refer ence number Category Data name Setting Acqui sition Data range Default Expres sion text string Logged data ...

Страница 496: ...n 0 to 255 0 125 Common color upper limit Setting Acqui sition 0 to 255 255 126 R lower limit Setting Acqui sition 0 to 255 0 127 R upper limit Setting Acqui sition 0 to 255 255 128 G lower limit Setting Acqui sition 0 to 255 0 129 G upper limit Setting Acqui sition 0 to 255 255 130 B lower limit Setting Acqui sition 0 to 255 0 131 B upper limit Setting Acqui sition 0 to 255 255 132 Grayscale lowe...

Страница 497: ...uisition only Measurement angle 0 TH Logged data 11 Reference X Acquisition only 0 to 9 999 0 SX Logged data 12 Reference Y Acquisition only 0 to 9 999 0 SY Logged data 13 Reference angle Acquisition only 180 to 180 0 ST Logged data 14 Correlation Acquisition only 0 to 100 0 CR Logged data 120 Mea sure ment condi tions Position compensation precision Setting Acqui sition 0 None 1 Bilinear 0 121 Se...

Страница 498: ...9 999 9999 to 99 999 9999 99 999 9 999 Adjust judge ment 169 Position compensation X lower limit Setting Acqui sition 99 999 9999 to 99 999 9999 99 999 9 999 Adjust judge ment 170 Position compensation Y upper limit Setting Acqui sition 99 999 9999 to 99 999 9999 99 999 9 999 Adjust judge ment 171 Position compensation Y lower limit Setting Acqui sition 99 999 9999 to 99 999 9999 99 999 9 999 Adju...

Страница 499: ...only 2 No judgement not mea sured 0 Judgement is OK 1 Judgement is NG 13 Teaching not performed error 14 Figure not registered error 15 Out of range error 2 JG Logged data 5 Scroll X Acquisition only 99 999 9999 to 99 999 9999 0 DX Logged data 6 Scroll Y Acquisition only 99 999 9999 to 99 999 9999 0 DY Logged data 8 Position X Acquisition only 99 999 9999 to 99 999 9999 0 X Logged data 9 Position ...

Страница 500: ... ON 0 312 Data logging switch for scroll X Setting Acqui sition 0 Data logging OFF 1 Data logging ON 0 313 Data logging switch for scroll Y Setting Acqui sition 0 Data logging OFF 1 Data logging ON 0 315 Data logging switch for position X Setting Acqui sition 0 Data logging OFF 1 Data logging ON 0 316 Data logging switch for position Y Setting Acqui sition 0 Data logging OFF 1 Data logging ON 0 32...

Страница 501: ...re not registered error 15 Out of range error 2 JG Logged data 5 Scroll X Acquisition only 99 999 9999 to 99 999 9999 0 DX Logged data 6 Scroll Y Acquisition only 99 999 9999 to 99 999 9999 0 DY Logged data 7 Edge position X Acquisition only 99 999 9999 to 99 999 9999 0 X Logged data 8 Edge position Y Acquisition only 99 999 9999 to 99 999 9999 0 Y Logged data 9 Standard position X Acquisition onl...

Страница 502: ...Acqui sition Monochrome Cameras 0 Projection 1 Differentia tion 0 180 Judge ment condi tions Edge position X upper limit Setting Acqui sition 99 999 9999 to 99 999 9999 99 999 9999 Adjust judge ment 181 Edge position X lower limit Setting Acqui sition 99 999 9999 to 99 999 9999 99 999 9999 Adjust judge ment 182 Edge position Y upper limit Setting Acqui sition 99 999 9999 to 99 999 9999 99 999 9999...

Страница 503: ...ing Acqui sition 0 Data logging OFF 1 Data logging ON 0 315 Data logging switch for detected edge position Y Setting Acqui sition 0 Data logging OFF 1 Data logging ON 0 700 Display settings Position compensation X display Setting Acqui sition Position compensation X display 0 ON 1 OFF 0 701 Position compensation Y display Setting Acqui sition Position compensation Y display 0 ON 1 OFF 0 702 Detect...

Страница 504: ...Logged data 7 Detected edge position X0 Acquisition only 99 999 9999 to 99 999 9999 0 X0 Logged data 8 Detected edge position Y0 Acquisition only 99 999 9999 to 99 999 9999 0 Y0 Logged data 9 Detected edge position X1 Acquisition only 99 999 9999 to 99 999 9999 0 X1 Logged data 10 Detected edge position Y1 Acquisition only 99 999 9999 to 99 999 9999 0 Y1 Logged data 11 Standard position X0 Acquisi...

Страница 505: ...g Acqui sition 0 to 442 5 153 Monochrome density change 0 Setting Acqui sition Monochrome Cameras 0 Light to Dark 1 Dark to Light 0 157 Measurement method 0 Setting Acqui sition Monochrome Cameras 0 Projection 1 Differentia tion 0 160 Edge color specifica tion 1 Setting Acqui sition 0 No edge color specifica tion 1 Edge color specification 0 161 Edge color R1 Setting Acqui sition 0 to 255 255 162 ...

Страница 506: ...it Setting Acqui sition 99 999 9999 to 99 999 9999 99 999 9999 Adjust judge ment 192 Position compensation Y upper limit Setting Acqui sition 99 999 9999 to 99 999 9999 99 999 9999 Adjust judge ment 193 Position compensation Y lower limit Setting Acqui sition 99 999 9999 to 99 999 9999 99 999 9999 Adjust judge ment 310 Logging condi tions Data logging switch for entire unit Setting Acqui sition 0 ...

Страница 507: ...d error 15 Out of range error 2 JG Logged data 5 Scroll X Acquisition only 99 999 9999 to 99 999 9999 0 DX Logged data 6 Scroll Y Acquisition only 99 999 9999 to 99 999 9999 0 DY Logged data 7 Detected edge position X0 Acquisition only 99 999 9999 to 99 999 9999 0 X0 Logged data 8 Detected edge position Y0 Acquisition only 99 999 9999 to 99 999 9999 0 Y0 Logged data 9 Detected edge position X1 Acq...

Страница 508: ...a tion 1 Edge color specification 0 141 Edge color R0 Setting Acqui sition 0 to 255 255 142 Edge color G0 Setting Acqui sition 0 to 255 255 143 Edge color B0 Setting Acqui sition 0 to 255 255 147 Density change 0 Setting Acqui sition 0 Color IN 1 Color OUT 0 149 Edge level 0 Setting Acqui sition 0 to 100 Monochrome Cameras 50 150 Noise level 0 Setting Acqui sition 0 to 442 5 153 Monochrome density...

Страница 509: ... Setting Acqui sition 99 999 9999 to 99 999 9999 99 999 9999 Adjust judge ment 188 Edge position Y lower limit 1 Setting Acqui sition 99 999 9999 to 99 999 9999 99 999 9999 Adjust judge ment 190 Edge midpoint position X upper limit Setting Acqui sition 99 999 9999 to 99 999 9999 99 999 9999 Adjust judge ment 191 Edge midpoint position X lower limit Setting Acqui sition 99 999 9999 to 99 999 9999 9...

Страница 510: ...ion Y1 Setting Acqui sition 0 Data logging OFF 1 Data logging ON 0 318 Data logging switch for detected edge mid point position X Setting Acqui sition 0 Data logging OFF 1 Data logging ON 0 319 Data logging switch for detected edge mid point position Y Setting Acqui sition 0 Data logging OFF 1 Data logging ON 0 700 Display settings Position compensation X display Setting Acqui sition 0 ON 1 OFF 0 ...

Страница 511: ...9 999 9999 0 X1 Logged data 9 Detected edge position Y1 Acquisition only 99 999 9999 to 99 999 9999 0 Y1 Logged data 10 Detected edge angle Acquisition only 180 to 180 0 TH Logged data 11 Standard position X0 Acquisition only 99 999 9999 to 99 999 9999 0 SX0 Logged data 12 Standard position Y0 Acquisition only 99 999 9999 to 99 999 9999 0 SY0 Logged data 13 Standard position X1 Acquisition only 99...

Страница 512: ...ting Acqui sition Monochrome Cameras 0 Projection 1 Differentia tion 0 160 Edge color specifica tion 0 Setting Acqui sition 0 No edge color specifica tion 1 Edge color specification 0 161 Edge color R1 Setting Acqui sition 0 to 255 255 162 Edge color G1 Setting Acqui sition 0 to 255 255 163 Edge color B1 Setting Acqui sition 0 to 255 255 167 Density change 1 Setting Acqui sition 0 Color IN 1 Color...

Страница 513: ...t Setting Acqui sition 180 to 180 180 Adjust judge ment 192 Theta position compen sation upper limit Setting Acqui sition 360 to 360 360 Adjust judge ment 193 Theta position compen sation lower limit Setting Acqui sition 360 to 360 360 Adjust judge ment 310 Logging condi tions Data logging switch for entire unit Setting Acqui sition 0 Data logging OFF 1 Data logging ON 0 311 Data logging switch fo...

Страница 514: ...s OK 1 Judgement is NG 13 Teaching not performed error 14 Figure not registered error 15 Out of range error 16 Measurement timeout error 2 JG Logged data 5 Index No Acquisition only 2 Verification OFF or reading error 1 Verification is NG 0 to 31 Master data No 2 IN 6 Num of characters Acquisition only 0 to 1024 0 N Logged data 7 1 Characters Acquisition only 32 characters max 0 103 Output parame ...

Страница 515: ...ings Acquisition 1 to 31 0 152 Auto master data num ber Setting Acqui sition 0 to 31 Master data num ber 1 OFF 1 170 Output parame ter String output ON OFF memory link Setting Acqui sition 0 OFF 1 ON 0 171 NG error code output memory link Setting Acqui sition 0 OFF 1 ON 1 172 Partial output ON OFF memory link Setting Acqui sition 0 OFF 1 ON 0 173 Output end digit mem ory link Setting Acqui sition ...

Страница 516: ...to 1024 0 N Logged data 7 1 Characters Acquisition only 32 characters max 0 103 Output parame ter Reflect Setting Acqui sition 0 Yes 1 No 0 121 Verifica tion con dition Verified master data Settings Acquisition 1 OFF 0 Verify all master data 1 Verify master data 0 2 Verify master data 1 0 122 Partial verif on off Settings Acquisition 0 None 1 Enable 0 123 Last compared digit Settings Acquisition 1...

Страница 517: ...ror code output memory link Setting Acqui sition 0 OFF 1 ON 1 172 Partial output ON OFF memory link Setting Acqui sition 0 OFF 1 ON 0 173 Output end digit mem ory link Setting Acqui sition 1 to 128 128 174 Output beginning digit memory link Setting Acqui sition 1 to 128 1 202 3N N 0 to 31 1 Verifica tion con dition Master data N Settings Acquisition 32 characters max None 300 N N 0 to 31 Reference...

Страница 518: ...ing not executed error 14 Figure not registered error 15 Outside region error 16 Inspection timeout error 2 JG Logged 5 Num of char Acquired only 0 to 1024 0 N Logged 6 1 Characters Acquired only Text string 8 Cell Recog Rate Acquired only 0 to 100 0 E Logged 9 Contrast Acquired only 0 to 100 0 C Logged 10 Focus Acquired only 0 to 100 0 F 17 Index number Acquired only 2 Verification OFF or read in...

Страница 519: ...el 1 2 Model 2 0 130 Error Correction Level Set acquired 0 Auto 1 M 15 2 L 7 3 H 30 4 Q 25 0 131 Mea sure ment result Timeout time ms Setting Acqui sition 1 to 9999 9999 132 Fast mode Set acquired 0 OFF 1 ON 0 133 Output parame ter String output on off Set acquired 0 OFF 1 ON 0 134 Partial output on off Set acquired 0 OFF 1 ON 0 135 Output end digit Set acquired 1 to 1024 1024 136 Output starting ...

Страница 520: ...tion 163 Contrast threshold upper limit Setting Acqui sition 0 to 100 100 Judgement condition 164 Contrast threshold lower limit Setting Acqui sition 0 to 100 100 Judgement condition 165 Focus threshold upper limit Setting Acqui sition 0 to 100 100 Judgement condition 166 Focus threshold lower limit Setting Acqui sition 0 to 100 100 Judgement condition 170 Output parame ter String output ON OFF me...

Страница 521: ... Contrast display Setting Acqui sition 0 OFF 1 ON 1 504 Focus display Setting Acqui sition 0 OFF 1 ON 1 External refer ence number Category Data name Setting Acquisition Data range Default Expres sion text string Logged data Judge ment parame ter 0 Measurement result Judgement Acquisition only 2 No judgement not measured 0 Judgement is OK 1 Judgement is NG 13 Teaching not performed error 14 Figure...

Страница 522: ...ity judge ment lower limit Setting Acquisition 0 to 100 60 Judge ment condition 134 Stability judgement upper limit Setting Acquisition 0 to 100 100 Judge ment condition 135 Stability judgement lower limit Setting Acquisition 0 to 100 10 Judge ment condition 136 Output parame ter Line delimiter Setting Acquisition 0 None 1 Comma 2 Space 0 138 String output ON OFF Setting Acquisition 0 OFF 1 ON 0 1...

Страница 523: ...logging OFF 1 Data logging ON 1 311 Data logging switch judgement Setting Acquisition 0 Data logging OFF 1 Data logging ON 1 312 Data logging switch minimum similar ity Setting Acquisition 0 Data logging OFF 1 Data logging ON 1 313 Data logging switch minimum stability Setting Acquisition 0 Data logging OFF 1 Data logging ON 1 314 Data logging switch number of charac ters 1 Setting Acquisition 0 D...

Страница 524: ...splay 0 1001 Reference unit number 0 Setting Acquisition 1 OFF 0 to 31 1 1002 N 2 N 0 to 3 Verification end digit 0N Setting Acquisition 1 to 32 32 1003 N 2 N 0 to 3 Verification begin ning digit 0N Setting Acquisition 1 to 32 1 1011 N 2 N 0 to 3 1 Master data 0N Setting Acquisition 32 characters max 1021 Reference unit number 1 Setting Acquisition 1 OFF 0 to 31 1 1022 N 2 N 0 to 3 Verification en...

Страница 525: ...1083 N 2 N 0 to 3 Verification begin ning digit 4N Setting Acquisition 1 to 32 1 1091 N 2 N 0 to 3 1 Master data 4N Setting Acquisition 32 characters max 1101 Reference unit number 5 Setting Acquisition 1 OFF 0 to 31 1 1102 N 2 N 0 to 3 Verification end digit 5N Setting Acquisition 1 to 32 32 1103 N 2 N 0 to 3 Verification begin ning digit 5N Setting Acquisition 1 to 32 1 1111 N 2 N 0 to 3 1 Maste...

Страница 526: ...x 1201 Reference unit number 10 Setting Acquisition 1 OFF 0 to 31 1 1202 N 2 N 0 to 3 Verification end digit 10N Setting Acquisition 1 to 32 32 1203 N 2 N 0 to 3 Verification begin ning digit 10N Setting Acquisition 1 to 32 1 1211 N 2 N 0 to 3 1 Master data 10N Setting Acquisition 32 characters max 1221 Reference unit number 11 Setting Acquisition 1222 N 2 N 0 to 3 Verification end digit 11N Setti...

Страница 527: ...303 N 2 N 0 to 3 Verification begin ning digit 15N Setting Acquisition 1 to 32 1 1311 N 2 N 0 to 3 1 Master data 15N Setting Acquisition 32 characters max 1321 Reference unit number 16 Setting Acquisition 1 OFF 0 to 31 1 1322 N 2 N 0 to 3 Verification end digit 16N Setting Acquisition 1 to 32 32 1323 N 2 N 0 to 3 Verification begin ning digit 16N Setting Acquisition 1 to 32 1 1331 N 2 N 0 to 3 1 M...

Страница 528: ...421 Reference unit number 21 Setting Acquisition 1 OFF 0 to 31 1 1422 N 2 N 0 to 3 Verification end digit 21N Setting Acquisition 1 to 32 32 1423 N 2 N 0 to 3 Verification begin ning digit 21N Setting Acquisition 1 to 32 1 1431 N 2 N 0 to 3 1 Master data 21N Setting Acquisition 32 characters max 1441 Reference unit number 22 Setting Acquisition 1 OFF 0 to 31 1 1442 N 2 N 0 to 3 Verification end di...

Страница 529: ...523 N 2 N 0 to 3 Verification begin ning digit 26N Setting Acquisition 1 to 32 1 1531 N 2 N 0 to 3 1 Master data 26N Setting Acquisition 32 characters max 1541 Reference unit number 27 Setting Acquisition 1 OFF 0 to 31 1 1542 N 2 N 0 to 3 Verification end digit 27N Setting Acquisition 1 to 32 32 1543 N 2 N 0 to 3 Verification begin ning digit 27N Setting Acquisition 1 to 32 1 1551 N 2 N 0 to 3 1 M...

Страница 530: ...o 32 1 1631 N 2 N 0 to 3 1 Master data 31N Setting Acquisition 32 characters max 2000 Measurement result Number of read characters on line 1 Acquisition only 0 to 32 0 2001 Number of read characters on line 2 Acquisition only 0 to 32 0 2002 Number of read characters on line 3 Acquisition only 0 to 32 0 2003 Number of read characters on line 4 Acquisition only 0 to 32 0 2100 Read character string o...

Страница 531: ...0 0 TH 0 to TH 31 Logged data 9 Reference X Acquisition only 99 999 9999 to 99 999 9999 0 SX 10 Reference Y Acquisition only 99 999 9999 to 99 999 9999 0 SY 11 Reference angle Acquisition only 180 to 180 0 ST 12 Detection coordinate X Acquisition only 99 999 9999 to 99 999 9999 0 RX 13 Detection coordinate Y Acquisition only 99 999 9999 to 99 999 9999 0 RY 14 Count Acquisition only 0 to 32 0 C Log...

Страница 532: ... sure ment condi tions Sort condition Setting Acqui sition For Multiple Searches 0 Ascending order of corre lation value 1 Descending order of cor relation value 2 Ascending order of posi tion X 3 Descending order of position X 4 Ascending order of posi tion Y 5 Descending order of position Y 1 148 Judge ment condi tions Judgement upper limit for detection count Setting Acqui sition 0 to 32 32 Adj...

Страница 533: ...g OFF 1 Data logging ON 1 321 Data logging switch for detection count Setting Acqui sition 0 Data logging OFF 1 Data logging ON 1 700 Display settings Correlation display Setting Acqui sition 0 Display 1 Do not display 0 701 Position X display Setting Acqui sition 0 Display 1 Do not display 0 702 Position Y display Setting Acqui sition 0 Display 1 Do not display 0 703 Measurement angle display Set...

Страница 534: ...99 to 99 999 9999 0 Y Logged data 9 Angle Acquisition only 180 to 180 0 TH Logged data 10 Detection X Acquisition only 99 999 9999 to 99 999 9999 0 RX Logged data 11 Detection Y Acquisition only 99 999 9999 to 99 999 9999 0 RY Logged data 12 Reference position X Acquisition only 99 999 9999 to 99 999 9999 0 SX Logged data 13 Reference position Y Acquisition only 99 999 9999 to 99 999 9999 0 SY Log...

Страница 535: ...gement upper limit for correlation Setting Acqui sition 0 to 100 100 Adjust judge ment 143 Judgement lower limit for correlation Setting Acqui sition 0 to 100 60 Adjust judge ment 145 Density deviation upper limit Setting Acqui sition Color Cameras 0 to 221 Monochrome Cameras 0 to 127 Color Cam era 221 Monochrome Camera 127 Adjust judge ment 146 Density deviation lower limit Setting Acqui sition C...

Страница 536: ...itch for sub region number X Setting Acqui sition 0 Data logging OFF 1 Data logging ON 1 325 Data logging switch for sub region number Y Setting Acqui sition 0 Data logging OFF 1 Data logging ON 1 326 Data logging switch for measurement position X sub region Setting Acqui sition 0 Data logging OFF 1 Data logging ON 1 327 Data logging switch for measurement position Y sub region Setting Acqui sitio...

Страница 537: ...999 9999 0 X 0 to X 31 Logged data 7 Position Y Acquisition only 99 999 9999 to 99 999 9999 0 Y 0 to Y 31 Logged data 8 Angle Acquisition only 180 to 180 0 TH 0 to TH 31 Logged data 9 Reference X Acquisition only 99 999 9999 to 99 999 9999 0 SX 10 Reference Y Acquisition only 99 999 9999 to 99 999 9999 0 SY 11 Reference angle Acquisition only 180 to 180 0 ST 12 Detection coordinate X Acquisition o...

Страница 538: ...9 999 9999 to 99 999 9999 99 999 9999 Adjust judge ment 143 Judgement lower limit for search coordinate X Setting Acqui sition 99 999 9999 to 99 999 9999 99 999 9999 Adjust judge ment 144 Judgement upper limit for search coordinate Y Setting Acqui sition 99 999 9999 to 99 999 9999 99 999 9999 Adjust judge ment 145 Judgement lower limit for search coordinate Y Setting Acqui sition 99 999 9999 to 99...

Страница 539: ...ogging OFF 1 Data logging ON 1 321 Data logging switch for detection count Setting Acqui sition 0 Data logging OFF 1 Data logging ON 1 700 Display settings Correlation display Setting Acqui sition 0 Display 1 Do not display 0 701 Position X display Setting Acqui sition 0 Display 1 Do not display 0 702 Position Y display Setting Acqui sition 0 Display 1 Do not display 0 703 Measurement angle displa...

Страница 540: ...Setting Acqui sition 0 No edge color specifica tion 1 Edge color specification 0 132 Mea sure ment condi tions Edge level Setting Acqui sition 0 to 100 50 133 Noise level Setting Acqui sition 0 to 442 5 136 Judge ment condi tions Edge position X upper limit Setting Acqui sition 99 999 9999 to 99 999 9999 99 999 9999 Adjust judge ment 137 Edge position X lower limit Setting Acqui sition 99 999 9999...

Страница 541: ...i sition 0 Display 1 Do not display 1 800 Detected edge position X display pattern Setting Acqui sition 0 Display 1 Do not display 1 801 Detected edge position Y display pattern Setting Acqui sition 0 Display 1 Do not display 1 External refer ence number Category Data name Setting Acqui sition Data range Default Expres sion text string Logged data Judgement parameter 0 Mea sure ment result Judgeme...

Страница 542: ... number Category Data name Setting Acqui sition Data range Default Expres sion text string Logged data Judgement parameter 0 Mea sure ment result Judgement Acquisition only 2 No judgement not mea sured 0 Judgement is OK 1 Judgement is NG 13 Teaching not performed error 14 Figure not registered error 15 Out of range error 2 JG Logged data 5 Edge pitch Acquisition only 0 to 999 0 N Logged data 6 Ave...

Страница 543: ...udge ment 134 Pitch upper limit Setting Acqui sition 0 to 99 999 9999 99 999 9 999 Adjust judge ment 135 Pitch lower limit Setting Acqui sition 0 to 99 999 9999 0 Adjust judge ment 136 Average width upper limit Setting Acqui sition 0 to 99 999 9999 99 999 9 999 Adjust judge ment 137 Average width lower limit Setting Acqui sition 0 to 99 999 9999 0 Adjust judge ment 138 Width upper limit Setting Ac...

Страница 544: ...logging switch for minimum width Setting Acqui sition 0 Data logging OFF 1 Data logging ON 1 700 Display settings Edge pitch display Setting Acqui sition 0 Display 1 Do not display 0 701 Average pitch display Setting Acqui sition 0 Display 1 Do not display 0 702 Pitch display Setting Acqui sition 0 Display 1 Do not display 0 703 Average width display Setting Acqui sition 0 Display 1 Do not display...

Страница 545: ...or binary threshold Setting Acqui sition 0 to 255 0 143 Mea sure ment condi tions Binary image display Setting Acqui sition Monochrome Cameras 0 No binary image display 1 Binary image display 1 144 Image type Setting Acqui sition 0 Measurement image 1 Color extraction image 2 Selected color image 3 Binary image after extraction 1 145 Enable disable multiple selection Setting Acqui sition 0 Enabled...

Страница 546: ...elative value 0 External refer ence number Category Data name Setting Acqui sition Data range Default Expres sion text string Logged data Judgement parameter 0 Mea sure ment result Judgement Acquisition only 2 No judgement not mea sured 0 Judgement is OK 1 Judgement is NG 13 Teaching not performed error 14 Figure not registered error 15 Out of range error 2 JG 5 R average Acquisition only 0 to 255...

Страница 547: ...tting Acqui sition 0 Data logging OFF 1 Data logging ON 1 311 Judgement logging switch Setting Acqui sition 0 Data logging OFF 1 Data logging ON 1 312 Average deviation den sity average logging switch Setting Acqui sition 0 Data logging OFF 1 Data logging ON 1 313 Color deviation density deviation logging switch Setting Acqui sition 0 Data logging OFF 1 Data logging ON 1 314 R average logging swit...

Страница 548: ... performed error 14 Figure not registered error 15 Out of range error 2 JG Logged data 5 Number of labels Acquisition only 0 to 100 0 L Logged data 6 Area Acquisition only 0 to 999 999 999 9999 0 AR 0 to AR 99 Logged data 7 Gravity center X Acquisition only 99 999 9999 to 99 999 9999 0 X 0 to X 99 Logged data 8 Gravity center Y Acquisition only 99 999 9999 to 99 999 9999 0 Y 0 to Y 99 Logged data ...

Страница 549: ...Color extraction image 2 Selected color image 3 Binary image after extraction 1 152 Mea sure ment condi tions External reference label number Setting Acqui sition 0 to 100 0 156 Extraction condition detection count Setting Acqui sition 0 to 100 100 160 N 10 N 0 to 3 Set color Registered color usage flag N Setting Acqui sition 0 Not used 1 Used 1 161 N 10 N 0 to 3 Registered color exclu sion flag N...

Страница 550: ...f labels Setting Acqui sition 1 to 100 100 603 Judgement lower limit for number of labels Setting Acqui sition 1 to 100 0 612 Judgement upper limit for label area Setting Acqui sition 0 to 999 999 999 9999 999 999 999 999 9 613 Judgement lower limit for label area Setting Acqui sition 0 to 999 999 999 9999 0 622 Judgement upper limit for area Setting Acqui sition 0 to 999 999 999 9999 999 999 999 ...

Страница 551: ...Acqui sition 0 ON 1 OFF 0 702 Area display Setting Acqui sition 0 ON 1 OFF 0 703 Gravity X display Setting Acqui sition 0 ON 1 OFF 0 704 Gravity Y display Setting Acqui sition 0 ON 1 OFF 0 705 Master angle display Setting Acqui sition 0 ON 1 OFF 0 External reference number Category Data name Setting Acqui sition Data range Default Expres sion text string Logged data Judgement parameter ...

Страница 552: ...Monochrome Image filter High dynamic range HDR image adjustment polarizing filter attachment and white balance Sen sors with Color Cameras only Image elements 1 3 inch color CMOS 1 3 inch Mono chrome CMOS 1 2 inch color CMOS 1 2 inch Mono chrome CMOS 1 2 inch color CMOS 1 2 inch Monochrome CMOS Shutter Built in lighting lit 1 250 to 1 50 000 Built in lighting not lit 1 1 to 1 50 000 Built in light...

Страница 553: ... and FQ WU Touch Finder and computer 1 cable FQ WN Indications BUSY indicator BUSY green Judgement result indicator OR orange error indicator ERROR red Ethernet communications indicator ETN orange Note The assignment of the BUSY indicator can be changed to a RUN indicator display color green Ratings Power supply voltage 21 6 to 26 4 VDC including ripple Insulation resis tance Between all lead wire...

Страница 554: ... EN 61326 1 2006 and IEC 61010 1 350 000 pixel Models Field of view H V 1 Installation dis tance Num ber of LEDs Weight NPN PNP FQ2 S40010F FQ2 S45010F 7 5 4 7 to 13 8 2 mm 38 to 57 mm 4 Approx 160 g FQ2 S40050F FQ2 S45050F 13 8 2 to 53 33 mm 56 to 215 mm 4 FQ2 S40100F FQ2 S45100F 53 33 to 240 153 mm 220 to 970 mm 8 Approx 150 g FQ2 S40100N FQ2 S45100N 29 18 to 300 191 mm 32 to 380 mm 8 760 000 pi...

Страница 555: ...45050F S45010F M Unit mm FQ2 S40010F 08 S45010F 08 S40010F 08M S45010F 08M FQ2 S40050F 08 S45050F 08 S40050F 08M S45050F 08M 1 38 11 57 90 108 18 20 0 1 46 45 67 5 44 20 20 38 42 25 8 32 9 Optical axis Mounting hole dimensions Tightening torque 1 2 N m 4 M4 Depth 6 1 4 20UNC Depth 6 The mounting bracket can be attached to any side Two 4 5 dia ...

Страница 556: ...the diagram below when mounting bracket FQ XL2 is attached Unit mm 38 3 1 49 8 32 108 18 9 20 0 1 46 45 67 5 44 20 20 38 42 25 90 4 M4 1 4 20UNC Optical axis Mounting hole dimensions Tightening torque 1 2 N m Depth 6 Depth 6 Two 4 5 dia 38 41 49 t1 8 40 5 30 67 20 0 1 38 8 20 0 1 59 65 108 57 20 0 1 Plate Cushion Screw set double head Base Optical axis 4 M4 Depth 6 1 4 20UNC Depth 6 Mounting hole ...

Страница 557: ... 13M Unit mm Mounting screw recommended tightening torque 0 54 N m 1 The shape of opposite side isomorphous 29 dia Optical axis 4 M3 Depth 4 Mounting hole dimensions Four 3 4 dia 4 M3 Depth 4 1 6 M3 Depth 4 69 5 0 1 26 0 1 9 78 12 5 3 5 69 5 26 3 8 13 4 5 12 3 6 5 38 38 19 26 3 5 37 32 5 3 5 69 5 26 ...

Страница 558: ...l Mounting Base Unit mm Mounting screw recommended tightening torque 0 54 N m 80 5 34 18 7 2 20 2 23 5 65 20 Four M4 Depth 4 Two M3 Depth 4 1 4 20UNC Depth 4 9 3 6 20 2 0 1 16 3 0 1 18 0 1 20 0 1 57 8 0 1 Mounting Hole Dimensions Two 3 4 dia Four 4 5 dia ...

Страница 559: ...d Screen saver Provided The time setting can be changed Indicators Power indicator color green POWER Error indicator color red ERROR SD card access indicator color yellow SD ACCESS Power indicator color green POWER Error indicator color red ERROR SD card access indicator color yellow SD ACCESS Charge indicator color orange CHARGE Opera tion interface Touch screen Method Resistance film Life expect...

Страница 560: ...C Storage 25 to 65 C with no icing or condensation Operating 0 to 50 C when mounted to DIN Track or panel 0 to 40 C when operated on a Battery Storage 25 to 65 C with no icing or condensation Ambient humidity range Operating and storage 35 to 85 with no condensation Ambient atmosphere No corrosive gas Vibration resistance destruction 10 to 150 Hz single amplitude 0 35 mm X Y Z directions 8 min eac...

Страница 561: ...nd Dimensions FQ2 S4 User s Manual 559 Appendices 12 Dimensions FQ2 D30 D31 1 Provided on the FQ2 D31 only 1 15 13 5 23 8 14 8 11 11 95 44 5 70 33 3 52 9 85 35 5 35 5 27 9 12 1 19 2 17 3 27 10 20 30 70 30 82 1 Unit mm ...

Страница 562: ...Specifications and Dimensions 560 FQ2 S4 User s Manual Panel Mounting Adapter FQ XPM Panel cutout dimensions 133 4 8 1 2 3 5 116 95 85 116 31 6 36 9 Unit mm 111 1 111 1 ...

Страница 563: ... terminals and case 0 5 MΩ min at 250 VDC Current consumption 2 5 A max FQ2 S FQ SDU 0 4 A max FQ2 S4 FQ SDU 0 1 A max for FQ SDU Envi ron mental immu nity Ambient temperature range Operating 0 to 50 C Storage 20 to 65 C with no icing or condensation Ambient humidity range Operating and storage 35 to 85 with no condensation Ambient atmosphere No corrosive gas Vibration resistance destruction 10 to...

Страница 564: ...Specifications and Dimensions 562 FQ2 S4 User s Manual Dimensions FQ SDU10 SDU15 Unit mm 70 9 14 73 9 84 2 65 71 8 90 75 42 8 21 13 7 5 3 17 5 4 51 3 62 31 4 ...

Страница 565: ...Specifications and Dimensions FQ2 S4 User s Manual 563 Appendices 12 FQ SDU20 SDU25 Unit mm 70 9 14 70 7 73 9 65 54 1 90 75 21 13 7 5 3 17 5 4 49 3 62 51 3 42 8 67 9 18 4 84 2 ...

Страница 566: ...or higher 32 bit edition or 64 bit edition Hardware CPU Core 2 Duo 1 06 GHz or the equivalent or higher RAM 1 GB min HDD 500 MB min available space 1 Monitor 1 024 x 768 dots min Item Model FQ WD002 FQ WD010 FQ WD020 Cable length 2 m 10 m 20 m Cable type Robot cable Wire gauge Power line AWG24 AWG24 to AWG20 Other lines AWG28 Cable diameter 6 4 6 4 to 6 7 Minimum bending radius 41 4 mm Weight 100 ...

Страница 567: ...e Cable diameter 7 Minimum bending radius 35 mm Weight 200 g 400 g 800 g 1500 g Item Model FQ AC1 FQ AC2 FQ AC3 FQ AC4 FQ AC5 FQ AC6 Plug type A A A C BF O Certified standards PSE UL CSA CCC mark Input voltage 100 to 240 VAC 90 to 264 VAC Input current 0 4 A max 100 VAC 50 Hz when connected to maximum load Input frequency 47 to 63 Hz Output voltage 15 VDC 5 Output current 1 A max Ambient temperatu...

Страница 568: ...th is given in the following table Model L FQ WD002 2 m Unit mm 39 8 5000 50 0 100 100 5 35 L 1 6 4 dia 6 7 dia 15 6 dia 19 5 dia 1 The cable length is given in the following table Model L FQ WD010 10 m FQ WD020 20 m Unit mm 54 7 100 44 7 19 9 5 35 5 35 L 1 14 9 dia 6 5 dia 19 5 dia 19 5 dia 1 The cable lengths are given in the following table Model L FQ WN002 2 m FQ WN010 10 m FQ WN020 20 m Unit ...

Страница 569: ...10 5 19 5 dia 15 5 dia 6 8 dia 35 39 3 16 9 dia 52 2 12 pin round connector 100 L 1 1 The cable lengths are given in the following table Model L FQ WU002 2 m FQ WU005 5 m FQ WU010 10 m FQ WU020 20 m Unit mm 42 7 30 pin flat cable connector 16 1 6 1 7 1 L 1 1 The cable lengths are given in the following table Model L FQ VP1002 2 m FQ VP1005 5 m FQ VP1010 10 m Unit mm ...

Страница 570: ...el Cable for FQ SDU2 FQ VP2002 VP2005 VP2010 AC Adapter FQ AC1 24 9 30 pin flat cable connector 6 1 7 1 16 1 L 1 1 The cable lengths are given in the following table Model L FQ VP2002 2 m FQ VP2005 5 m FQ VP2010 10 m Unit mm 30 50 78 1 800 to 2 000 1 500 Unit mm ...

Страница 571: ...1 Place the update file that you obtained directly in the root folder of an SD card 2 Insert the SD card into the Touch Finder 3 Press Setup Mode TF settings Update Step 2 Update the software for the Sensor Updating from the PC Tool 1 Store the update file you obtained in the following directory My Documents OMRON FQ SDCard UPDATE SENSOR 2 To update the software in the Sensor press Setup Mode Sens...

Страница 572: ...Sensor If you connect the Touch Finder without doing this the Touch Finder may freeze as soon as it is connected or during operation Apart from the filter items position compensation items and inspection items you can use all of the functions of the Sensor Download the update file for the Touch Finder version 1 6 or higher and the FQ Item Selector from the member website and then use the following...

Страница 573: ...lector Perform the following procedure without starting the PC Tool for FQ If you start the PC Tool Sensor detection and overwriting the file will not be performed normally 1 Connect the Sensor to the PC 2 Select All Programs OMRON FQ Tool FQ Item Selector from the Windows Start Menu to start the FQ Item Selector 3 Select the language to display 4 Select the model of Touch Finder to use 5 Select t...

Страница 574: ...save the installation data 7 Click Install Exe Grayed out Inspection Items If selecting an inspection item would cause the total memory size to be exceeded that inspection item will be grayed out on the display Select the inspection items with the highest priority first The Touch Finder will be updated automatically Note ...

Страница 575: ... Select the Browse Button and select the file that was saved in step 6 above 9 Set the Sensor Find Method parameter to Local Auto 10 If there is more than one network card NIC installed in the PC select the NIC that is connected to the Sensor More than one NIC will be displayed for a PC with a wireless LAN ...

Страница 576: ...isplayed in the dialog box the data has been overwritten normally 13 Reset the Sensor Restoring Inspection Items to the Sensor It is not necessary to delete any inspection items to connect the FQ2 D30 D31 Touch Finder To connect the FQ2 D30 D31 Touch Finder after performing the above operation repeat the above operation but select all of the inspection items in step 5 to re register all of the ins...

Страница 577: ...afety standards are stipulated in respective countries Take necessary safety preventive measures according to the standards Warning Label Warning labels are supplied as accessories with products that comply with the Class 2 Laser Product Classification Attach them to appropriate positions near the Sensor where they can be easily noticed ...

Страница 578: ...oval of the panel until accessible emission values are below that for Class 3B Remote control Not required Permits easy addition of external interlock in laser installation Key control Not required Laser inoperative when key is removed Emission warning device Not required Give audible or visible warning when laser is switched on or if capacitor bank of pulsed laser is being charged For Class 3R on...

Страница 579: ...s FQ2 S4 User s Manual 577 Appendices 12 The maximum accessible emission level permitted within a particular class For your reference see ANSI Z136 1 1993 Section 2 Symbol and border black Background yellow Figure A Warning label Hazard symbol ...

Страница 580: ... Required Remote interlock Not required Connect to room or door cir cuits Key control Not required Remove key when not in use Beam attenuator Not required When in use prevents inad vertent exposure Emission indicator device Not required Indicates laser is ener gized for non visible wavelengths Indicates laser is energized Warning signs Not required Follow precautions on warn ing signs Beam path No...

Страница 581: ...provide adequate protection under reasonably foreseeable conditions of operation including the use of optical instruments for intrabeam viewing Class 2M Laser that emit visible radiation in the wavelength range from 400 nm to 700 nm where eye protection is normally afforded by aversion responses including the blink reflex However viewing of the output may be more hazardous if the user employs opti...

Страница 582: ...r revision 1 Minor Revision UINT Minor revision 1 7 Get Maximum ID Number Instance Attributes UINT Attribute ID of instance attributes 7 ID Access Name Data type Description Attribute value 1 Get Vendor ID UINT Vendor ID 47 2 Get Device Type UINT General device type 43 3 Get Product Code UINT Product code 1645 4 Get Revision Structure Revision of Identity object 1 1 Major Revision UINT Major revis...

Страница 583: ...type Description Attribute value 1 Get Revision UINT Revision of the object 1 2 Get Max Instance UINT Maximum instance number 1 3 Get Num Instance UINT Number of object instances 1 ID Access Name Data type Description Attribute value 1 Get Status DWORD Interface status 0x0002 Depends on the device 2 Get Configuration Capability DWORD Interface Function Flag 0x0002 Depends on the device 3 Get Set C...

Страница 584: ...tances Remarks 01 hex Get_Attribute_All No Yes 02 hex Set_Attribute_All No Yes 0E hex Get_Attribute_Single No Yes 10 hex Set_Attribute_Single No Yes ID Access Name Data type Description Attribute value 1 Get Revision UINT Revision of the object 1 2 Get Max Instance UINT Maximum instance number 1 3 Get Num Instance UINT Number of ports for which instances are created 1 ID Access Name Data type Desc...

Страница 585: ...value 3 Get Set Data BYTE array Byte data Data format is defined by application Refer to Memory Assignments input connection to Sen sor 4 Get Size UINT Number of bytes O to T data size Set before going online ID Access Name Data type Description Attribute value 3 Get Data BYTE array Byte data Data format is defined by application Refer to Memory Assignments input connection to Sen sor 4 Get Size U...

Страница 586: ...setup 60 capturing image 268 Cell 133 Cell Recog Rate 516 changing from BUSY indicator 278 changing line process using scenes 234 Character recognition 96 Characters 516 Check digit on off 117 checking the error histories 453 clearing the error histories 453 C mount cover 30 C mount lens mounting surface 30 Code color 133 Code type 133 Code type 2D code 125 Code type Bar code 117 color setting 166...

Страница 587: ...Touch Finder 31 exposure retry 274 external lighting 61 68 external trigger 282 Extract Edges 70 Extract Horiz Edges 70 Extract vertical edges 70 F Fast mode 133 field separator 256 file format 256 files logging 253 filter items 70 FINS commands 432 FINS TCP no protocol commands 430 Focus 516 focus 60 adjustment screw 60 formatting an SD Card 266 FQ Ethernet Cable 566 frame ground 44 46 frozen ima...

Страница 588: ...rings 38 masking 143 Master angle 190 Max count 274 Max pitch maximum pitch 175 Max width maximum pitch 175 measurement data logging 252 measurement images 185 191 measurement region 144 152 159 measurement time 216 measurements continuous 283 292 Median 70 Memory state 278 menus hiding 246 Min pitch minimum pitch 175 Min width minimum pitch 175 Model model position compensation 75 models 137 moun...

Страница 589: ...71 scene data saving 262 scene group data saving 262 scene retry 275 scenes changing 234 changing names 235 copying 235 deleting 235 switching 292 SD card available space 266 formatting 266 information 266 operations 265 slot 31 SD card formatting 266 search position compensation 79 searching inspection items 137 147 155 selected color images 185 191 sensitive search 155 Sensor connector 32 Sensor...

Страница 590: ...est measurements continuous test 214 performing 214 threshold average 220 maximum 220 minimum 220 time Touch Finder 277 Total label area 190 Touch Finder 557 information 277 model with AC DC battery power supply 557 model with DC power supply 557 time settings 277 Touch Finder data saving 262 trend monitor Auto display 228 Display range 228 Number of data 229 TRIG 45 TRIG0 47 trigger delay 67 68 t...

Страница 591: ...Index FQ2 S4 User s Manual 589 Index 12 ...

Страница 592: ...Revision History A manual revision code appears as a suffix to the catalog number at the bottom of the front and back covers of this manual Revision code Date Revised contents 01 October 2012 Original production Cat No Z330 E1 01 Revision code ...

Страница 593: ......

Страница 594: ... U S A Tel 1 847 843 7900 Fax 1 847 843 7787 Contact www ia omron com Tokyo JAPAN OMRON ASIA PACIFIC PTE LTD No 438A Alexandra Road 05 05 08 Lobby 2 Alexandra Technopark Singapore 119967 Tel 65 6835 3011 Fax 65 6835 2711 OMRON CHINA CO LTD Room 2211 Bank of China Tower 200 Yin Cheng Zhong Road PuDong New Area Shanghai 200120 China Tel 86 21 5037 2222 Fax 86 21 5037 2200 Regional Headquarters OMRON...

Отзывы: