background image

Adjusting the Images That Were Taken

FQ2-S/CH User’s Manual

111

 3 

Ta
ki

ng Ima

ges

• Measurement Data That Can Be Logged

The values below can be logged as measurement data.

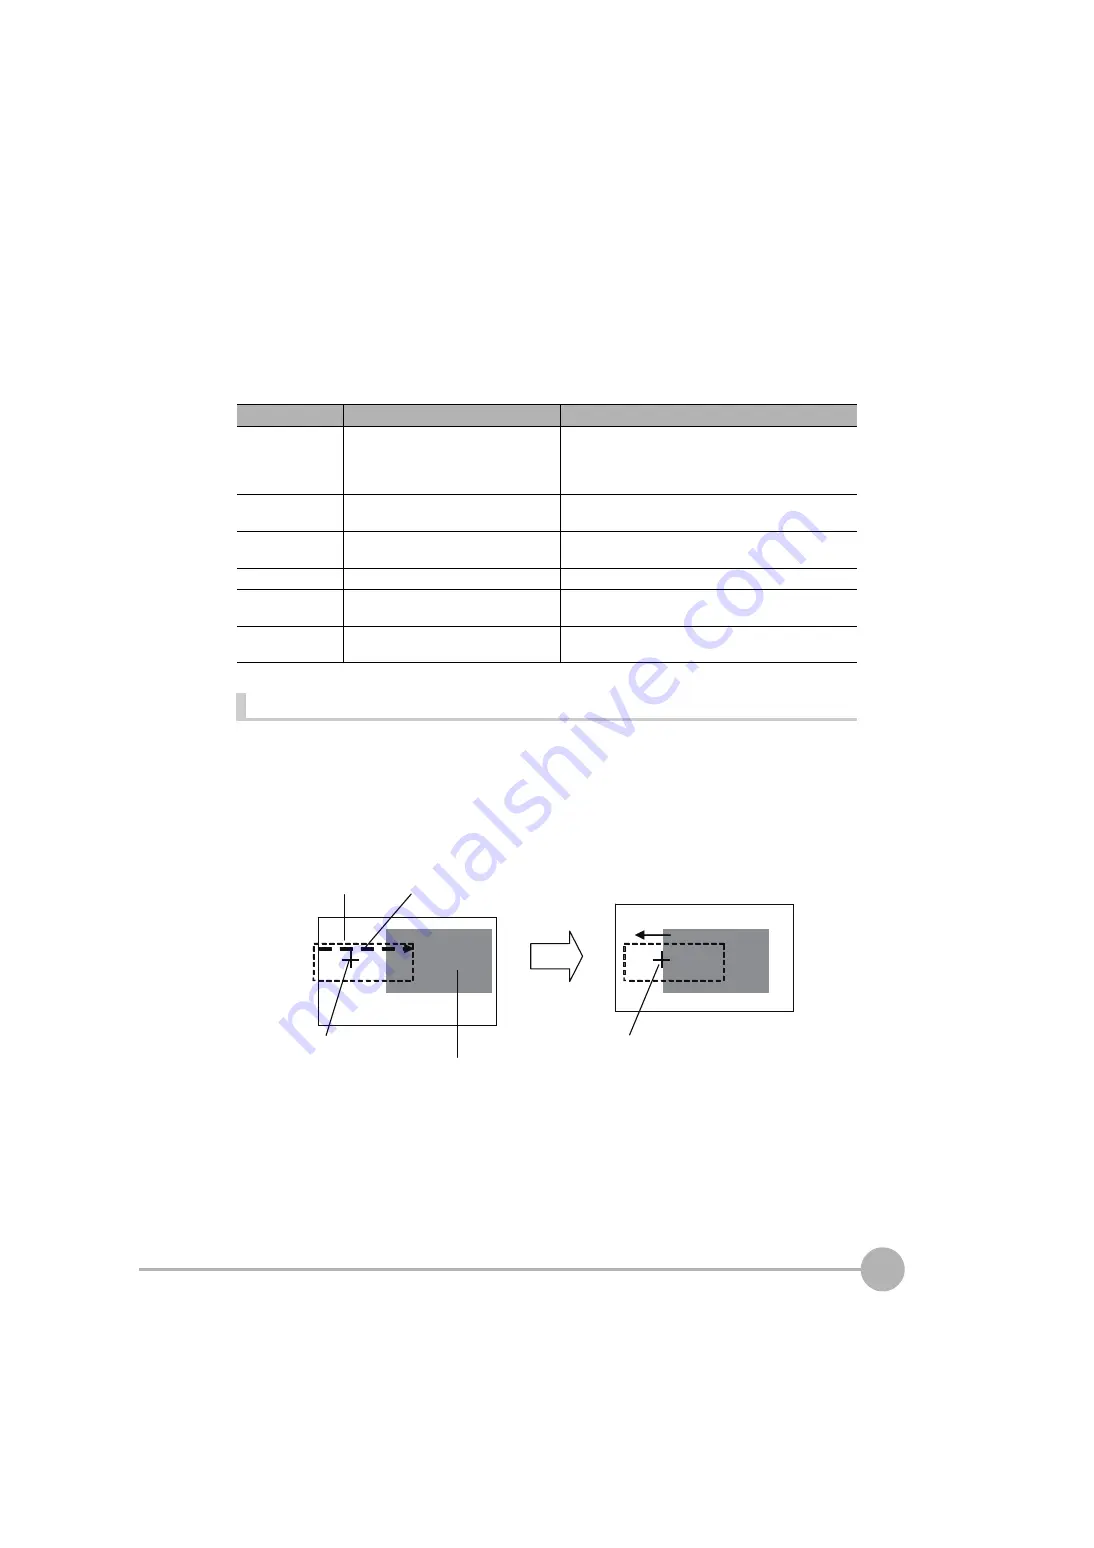
Edge Position Compensation

This position compensation item detects an edge in the set direction.
If the specified color is detected (or the specified density is detected for a Sensor with a Monochrome Camera),
it is recognized as an edge.
When an edge is recognized, the image is adjusted so that the edge appears at the position it was in when it
was registered.

Parameter

Setting

Description

Judgement

  -2: No judgement (not measured)
   0: Judgement is OK
  -1: Judgement is NG
-15: Out of range error

This is the judgment result.

Scroll X

-99,999.9999 to 99,999.9999

This is the amount of position compensation for the X 
coordinate.

Scroll Y

-99,999.9999 to 99,999.9999

This is the amount of position compensation for the Y 
coordinate.

Correlation

0 to 100

This is the correlation.

Position X

-99,999.9999 to 99,999.9999

This is the X coordinate of the position where the model 
was found.

Position Y

-99,999.9999 to 99,999.9999

This is the Y coordinate of the position where the model 
was found.

Edge search direction

Measurement region

Registered position of the edge

Color of edge to be found

The image is adjusted so that the edge 
appears at the position it was in when it 
was registered.

Содержание FQ2-S/CH Series

Страница 1: ...User s Manual Smart Camera FQ2 S CH Series Cat No Z337 E1 06...

Страница 2: ...Moreover because OMRON is constantly striving to improve its high quality products the information contained in this manual is subject to change without notice Every precaution has been taken in the p...

Страница 3: ...Smart Camera FQ2 S CH Introduction Installation and Connections Taking Images Setting Up Inspections Testing and Saving Settings Operation Convenient Functions Troubleshooting Appendices Terms and Co...

Страница 4: ...to the purchase price of the non complying Product provided that in no event shall Omron be responsible for warranty repair indemnity or any other claims or expenses regarding the Products unless Omro...

Страница 5: ...le Products Omron Companies shall not be responsible for the user s programming of a programmable Product or any consequence thereof Disclaimers Performance Data Data presented in Omron Company websit...

Страница 6: ...is a risk of minor injury from electrical shock or other source if the product is disassembled This product is not designed or rated for ensuring safety of persons Do not use it for such purposes The...

Страница 7: ...ive terminals of the Battery Do not use the Touch Finder in an environment that exceeds the operating temperature range of the Battery If the Touch Finder is used at temperatures that exceed the opera...

Страница 8: ...ty test of this product If the level of disturbance of the video is such that characters on the monitor are readable the test is a pass 7 Other Do not use this product in safety circuits associated wi...

Страница 9: ...r the special mounting brackets within the dotted lines in the following figure The front panel plate may become fogged from the inside 2 Power Supply Connection and Wiring When using a commercially a...

Страница 10: ...there is a risk that the capacitor will be damaged the pressure valve will open and vaporized gas will be emitted If there is a possibility that a voltage higher than 380 V will be applied use a prote...

Страница 11: ...performance such as operational precautions Indicates application procedures Indicates pages where related information can be found Important Note 2 2 Par FQ2 CH1 FQ2 S1 FQ2 S2 FQ2 S3 Shows the models...

Страница 12: ...10 FQ2 S CH User s Manual MEMO...

Страница 13: ...Q2 S Sensors with C mounts 41 Installation Precautions 46 Mounting to DIN Track 47 Mounting to a Control Panel 48 Using the Touch Finder as a Portable Device with Battery 50 Mounting to DIN Track 51 2...

Страница 14: ...s That Were Taken 91 Image Adjustment 91 Filtering the Images Filter Items 93 Compensating for Position Offset Position Compensation Items 102 4 Setting Up Inspections 4 1 Inspection Item Selection Gu...

Страница 15: ...ice 188 Measurement Data That Can Be Used for External Outputs and Calculations 188 Measurement Data That Can Be Logged Bar Code 189 Errors 189 4 6 Reading 2D codes 190 2D codes 190 Setup Procedure fo...

Страница 16: ...egions and Measurement Region 244 Measurement Data That Can Be Used for External Outputs and Calculations 245 Measurement Data That Can Be Logged 246 Errors 246 4 10 Inspecting with the Shape Search I...

Страница 17: ...dth Processing Speed 285 Measurement Data That Can Be Used for External Outputs and Calculations 286 Measurement Data That Can Be Logged for Edge Width 286 Errors 287 4 14 Inspecting with the Edge Pit...

Страница 18: ...he Processing Speed 320 Measurement Data That Can Be Used for External Outputs and Calculations 321 Measurement Data That Can Be Logged for Labeling 322 4 18 Calculations and Judgments Using Inspectio...

Страница 19: ...cene Names Copying Scenes and Deleting Scenes 367 Switching Scenes from an External Device 368 Setting the Startup Scene 368 7 2 Calibration 369 Calibration 369 Setting the Calibration Pattern 371 Sel...

Страница 20: ...NG from the multisensor display 419 7 10 Convenient Functions for Setup 420 Making Settings with Stored Images 420 7 11 Setting the Retry Function 422 Retry Function 422 7 12 Functions Related to the...

Страница 21: ...490 Two edge Position Compensation 492 Two edge Midpoint Compensation 495 Edge Rotation Position Compensation 498 Position Compensation Image Rotation Parameter 501 Linear Correction 502 OCR FQ2 S4 o...

Страница 22: ...its 564 System Requirements for PC Tool for FQ 567 Options 567 9 4 Updating the Software 573 Step 1 Update the software for the PC Tool or Touch Finder 573 Step 2 Update the software for the Sensor 57...

Страница 23: ...1 Introduction Introduction 1 1 FQ2 S CH series Sensors 22 1 2 Measurement Process 26 1 3 Basic Operational Flow 27 1 4 Startup Display and Display Elements 29...

Страница 24: ...on a stand alone basis 1 FQ2 S1 S2 S3 S4 series only 2 FQ2 S4 CH series only Sensor Simulation function in TouchFinder for PC version 2 00 or later The same functions as those that are provided by the...

Страница 25: ...le functional type are available Models Single function Standard High resolution Type Sensors with Built in Lighting Sensors with C mounts Model number FQ2 S1 FQ2 S2 M FQ2 S3 08 FQ2 S3 13 Number of si...

Страница 26: ...13M Number of simul taneous measure ments 32 Number of regis tered scenes 32 Partial input Horizontally only Horizontally and vertically Lens mount C mount Image processing method Real color Monochrom...

Страница 27: ...FQ2 S4 FQ2 CH Inspection item OCR Bar code 2D code 2D code DPM Search Sensitive Search Shape Search II Shape Search III Edge Position Edge Width Edge Pitch Area Color Data Labeling Main functions Par...

Страница 28: ...are taken according to the trigger The image is measured to see if it matches the configured settings You can also perform calculations based on the measurement results from inspection items The over...

Страница 29: ...ge Output Settings In Out Tab Page Setup valuation 1 Setting Judgement Parameters Inspection Setup Inspect Tab Page Teaching Registering Inspection Items Image Setup Image Tab Page Starting the Sensor...

Страница 30: ...signals and control output states using only communication commands The following commands are used for this purpose Run Mode settings Terminal information get set commands For details on each comman...

Страница 31: ...want to connect and press OK 2 Sensor connection processing takes place 3 If the Sensor is not detected press the Sensor List button to move to the Sensor List and check the con nection settings Selec...

Страница 32: ...e following display will appear The Setup Mode will appear if a Sensor that has not been set up is connected The Run Mode will appear if a Sensor that has been set up is connected When the Touch Finde...

Страница 33: ...on and Connections Installation and Connections 2 1 System Configuration 32 2 2 Part Names and Functions 35 2 3 Installation 39 2 4 Launching the Program for First Time 52 2 5 Wiring 54 2 6 Setting Up...

Страница 34: ...M Sensor control PLC I O control PLC Trigger sensor Sensor control PLC 24 V power supply 24 V power supply FL STC Lighting Controller RS 232C Interface Sensor Data Unit FQ2 S FQ2 S FQ2 CH1 M FQ2 S FQ...

Страница 35: ...RS 232C Interface Sensor Data Unit 1 FQ SDU2 You can connect a Sensor Data Unit to the I O cable connec tor on the Sensor and connect the RS 232C Interface Sensor Data Unit to an external device This...

Страница 36: ...Yes PLC Link on Ethernet No No Yes Yes Yes Yes Yes Yes PROFINET No No Yes Yes Yes Yes Yes Yes TCP no protocol com munications on Ethernet Yes Yes Yes No No No Yes Yes UDP no protocol com munications...

Страница 37: ...as PLCs the Touch Finder or computers 5 Focus adjustment screw Used to adjust the focus of the image 6 Operation indicators OR Lights orange when the overall judgment output OR signal turns ON ETN Lig...

Страница 38: ...32 BUSY Lights green when the Sensor is executing a process You can change the BUSY indicator to a RUN indicator This indicator is set by Default to a BUSY indicator but if you change it to a RUN indi...

Страница 39: ...n SD card can be inserted 4 Battery cover 1 The Battery is inserted behind this cover Remove the cover when mounting or removing the Battery 5 Power supply switch Used to turn the Touch Finder ON and...

Страница 40: ...process SENSOR Lights yellow when the Sensor is connected OR OK Lights green when the overall judgment result is OK OR NG Lights red when the overall judgment result is OFF or an error occurs 232C_CO...

Страница 41: ...bs on one side of the Mounting Brack et with the slot on the Sensor The FQ XL Mounting Bracket can be attached to the back side or front of the Sensor 2 Press the Mounting Bracket onto the Sensor unti...

Страница 42: ...1 000 200 400 0 0 400 Horizontal field of view mm Horizontal field of view mm Installation distance L mm Installation distance L mm FQ2 S 050F FQ2 CH1 050F M FQ2 S 100N FQ2 CH1 100N M Horizontal field...

Страница 43: ...54 N m Effective depth of mounting holes 4 mm Refer to the dimension drawings in the appendix for the positions of the screw holes 1 You can attach the mounting base to the bottom top left or right su...

Страница 44: ...4H SV 1214H SV 1614H SV 2514H SV 3514H SV 5014H SV 7525H SV 10028H t0 t5 t10 t15 t20 t25 t30 t40 t50 t0 t5 t10 t15 t20 t25 t30 t0 t2 t5 t10 t15 t2 t5 t0 t1 t2 t0 t0 5 t1 t0 t0 5 t50 t40 t25 t15 t10 t5...

Страница 45: ...en as for example t5 0 on the graphs t0 means that a macro ring is not required t5 0 means that you must use a 5 mm macro ring Lens Models and Dimensions Field of view Y X 1 The Y axis in the optical...

Страница 46: ...5 3Z4S LE SV 7525H 75 mm F2 5 36 mm 49 5 mm M34 0 P0 5 3Z4S LE SV 10028H 100 mm F2 8 39 mm 66 5 mm M37 5 P0 5 Lens model Focal length Brightness Maximum out side diameter Total length Filter size 3Z4S...

Страница 47: ...0 mm and 2 0 mm macro rings These sizes fit between the Lens and the threaded portion of other macro rings If two or more are stacked together the screw cannot be tightened securely The macro rings m...

Страница 48: ...ch Finder and other devices should be at least that shown in the following diagram Make sure that the ambient temperature is 50 C or lower If it exceeds 50 C install an cooling fan or an air condi tio...

Страница 49: ...dicated on previous page Always hook the clip at the top of the Touch Finder on the DIN Track first If the lower clip is hooked on first the Touch Finder will not be mounted very securely Removal Proc...

Страница 50: ...Touch Finder in the Panel Mount Adapter 2 Press the slider up on the Touch Finder 3 Create holes in the panel for mounting Refer to the following page for hole dimensions Dimensions p 562 4 Connect t...

Страница 51: ...h Finder with the Panel Mount Adapter from the panel 3 Take off a cable from the Touch Finder 4 Press down the look then you are able to unlock 5 There are four Snap fit parts on the back of the Touch...

Страница 52: ...rying it to prevent dropping it There are two types of straps FQ XH sold separately a Neck Strap and a Hand Strap 1 Attach the Mini strap to the Touch Finder There are a total of four holes for attach...

Страница 53: ...r clip is hooked on first the Touch Finder will not be mounted very securely Removal Procedure 1 Lock the sliders at the top and bottom of the Sensor Data Unit 2 Press the slider on the Sensor Data Un...

Страница 54: ...Language settings at the first launch of TouchFinder or TouchFinder for PC If you use Logging function or Calendar validation of OCR Time settings is also required Language settings The Language setti...

Страница 55: ...r TouchFinder uses Day and Time information of your PC Run Mode TF settings When you use the PC Tool If you want to change these perform the following procedure 1 Touch the Time settings of TouchFinde...

Страница 56: ...he command input terminals Outputs OUT0 OR By Default this is the OR output signal overall judgment The assignment can be changed to RUN READY an individual judgment signal from OR0 to OR31 the STGOUT...

Страница 57: ...ly Supply power from a DC power supply for which measures have been applied to prevent high voltages e g a safety extra low voltage circuit If UL certification is required for the overall system use a...

Страница 58: ...ce of elec tromagnetic induction may cause the Sensor to malfunction or may damage it Do not allow the load current to exceed 50 mA The output circuit may be damaged if the load current exceeds 50 mA...

Страница 59: ...ommand input 12 D9 Red OUT Data output 42 IN5 Red IN Command input 13 D10 Orange OUT Data output 43 IN6 Orange IN Command input 14 D11 Yellow OUT Data output 44 IN7 Yellow IN Command input 15 D12 Gree...

Страница 60: ...turn ON external lighting when an image is taken Connect this signal to external lighting 4 This signal is output to an external device when exposure of the imaging elements is completed If you want t...

Страница 61: ...es is placed together or in the same duct as the wiring for the Sensor the influence of elec tromagnetic induction may cause the Sensor to malfunction or may damage it Do not allow the load current to...

Страница 62: ...er input 5 IN4 Green IN Command input 20 NC 1 Yellow 6 IN5 Blue IN Command input 21 NC 1 Green 7 NC 1 Purple 22 RESET Blue IN Reset input 8 NC 1 Gray 23 NC 1 Purple 9 NC 1 White 24 ACK Gray OUT Comman...

Страница 63: ...items Wiring The maximum cable length is 15m RS 232C Manufacturer Model Socket OMRON Corporation XM3D 0921 Hood OMRON Corporation XM2S 0911 1 2 3 4 5 6 7 8 9 Pin No Signal name Function 1 NC Not conn...

Страница 64: ...e chattering is 100 s or longer a faulty input may occur Input signals of 99 s or shorter are ignored Signals of 100 s or longer are treated as input signals Use no contact output devices e g SSR or P...

Страница 65: ...Description When connected to FQ2 S or FQ2 CH1 M When connected to FQ2 S Power supply voltage 24 VDC 21 6 to 26 4 V Recommended Power Supplies S8VS 06024 24 VDC 2 5 A S8VS 03024 24 VDC 1 3 A External...

Страница 66: ...for the overall system use a UL Class II DC power supply When using the FQ2 D31 do not connect a switching regulator and AC Adapter FQ AC at the same time 1 Remove the cover from the power switch on t...

Страница 67: ...battery cover on the top of the Touch Finder slide the cover in the direction of the arrow and open the battery cover 2 Face the rounded side of the battery toward the back of the Touch Finder and in...

Страница 68: ...ry complies with the following recycling regulation California regulations concerning perchlorate This product is a lithium battery that contains perchlorate which is regulated by the State of Califor...

Страница 69: ...re a PLC or computer is already connected the Ethernet settings must be made compatible with the existing network Set the IP addresses with one of the following methods Sensor Setup Mode Sensor settin...

Страница 70: ...Cs Set the IP address of the Sensor according to the network where the external devices such as PLCs are connected Setup Mode Sensor settings Network Ethernet IP address setting 1 Press Fixed 2 Set th...

Страница 71: ...puter as described below No IP address settings are required on the Sensors The following procedure is for Windows 7 1 Select Control Panel from the Windows Start 2 Click Network and Internet on Contr...

Страница 72: ...on page 67 for the IP address settings in the Sensors 7 Select the Use the following IP address Option and enter the following IP address and subnet mask IP address 10 5 5 101 Subnet mask 255 255 255...

Страница 73: ...ettings Ethernet IP address 1 A list of the computer IP addresses that can be used by the PC Tool appears Touch the list to select an IP address 2 The Sensor List appears The connected sensor is tempo...

Страница 74: ...Setting Up Ethernet 72 FQ2 S CH User s Manual MEMO...

Страница 75: ...ing Images 3 1 Selecting a Sensor for Configuration 74 3 2 Setting Conditions for Taking Images 75 3 3 Adjusting Image Quality 76 3 4 Adjusting the Timing of Taking Images 87 3 5 Adjusting the Images...

Страница 76: ...play order for showing more than one Sensor is fixed Even if the system configuration is changed to reduce the number of Sensors the previous display location will remain for Sensors that were removed...

Страница 77: ...te Balance Adjust the white balance so that the colors match those of the actual measurement object Improving the Image Quality of Metallic and Other Shiny Surfaces HDR Make adjustments for shiny obje...

Страница 78: ...focus can be seen as a numerical value The higher the value the better the focus 2 Adjust the focus of the Sensor while checking the image and focus value on the Touch Finder For a Sensor with Built...

Страница 79: ...nual for Communications Settings Cat No Z338 Section 2 Controlling Operation and Outputting Data with a Parallel Connection Adjusting the Brightness You can adjust the shutter speed gain or the bright...

Страница 80: ...n 1 250 i e the exposure time is longer the image capture timing will be further delayed Make sure that appropriate images of the measured objects are captured when Brightness Correction Mode is ON FQ...

Страница 81: ...Clear Images of Moving Objects p 82 Increasing the gain will make the image brighter but it will also reduce image quality to the point that the noise component in the images will stand out Select a s...

Страница 82: ...gain Moving it to the right will increase the gain and make the image brighter Moving it to the left will reduce the gain and make the image darker 6 Press OK 7 Press Back Parameter Setting Descripti...

Страница 83: ...adjustment value the brighter the image Image Camera setup 1 Press Brightness on the right side of the display 2 Move the bar to the left or right to adjust the brightness Moving it to the right will...

Страница 84: ...Brightness Adjustment Value in HDR Mode Refer to the following page for the setting methods for the shutter speed and brightness Adjusting the Brightness p 77 The lower the shutter speed gain and brig...

Страница 85: ...e the HDR function only for objects that are not moving to avoid image blurring Several images are taken with different shutter speeds and combined If the object moves while the image is being taken t...

Страница 86: ...the Sensor Observe the following precautions The image will be darker compared to when no filter is used If the image becomes too dark adjust the brightness Adjusting the Brightness When HDR Is OFF p...

Страница 87: ...the actual object If this is the case adjust the white balance If the lighting built in to the Sensor is used the white balance is already adjusted No setting is required in this case Image Camera se...

Страница 88: ...0 You can rotate the Camera image by 180 This setting also applies to re measurement of logged images Image Camera setup Rotate 180 3 Press the Auto Button The Sensor will auto matically adjust the co...

Страница 89: ...g of the trigger signal A delay can be applied from when the trigger i e the TRIG signal is input until when the image is taken to synchronize the timing of image capture with the speed of moving obje...

Страница 90: ...and 3 Press the image 4 Press OK Setting item Setting value Description Trigger delay Range 0 to 163ms Default 0 Adjusts the time for opening the camera shutter after Trigger conditions are establish...

Страница 91: ...llel Connection Image Camera setup Lightning control Preventing Mutual Interference of Multiple Sensors When the same trigger signal is input to multiple Sensors the lighting from one Sensor may affec...

Страница 92: ...the lighting built into the Sensor is used the shutter time is 4 ms max Therefore make the delay at least 4 ms 1 Change to the setup for to Sensor 1 3 1 Selecting a Sensor for Configuration p 74 2 Pre...

Страница 93: ...rement Compensating for Position Offset Position Compensation Items These items compensate for offset in the position or orientation of the image You can combine several filter items and position comp...

Страница 94: ...on from position compensation is applied to the image to be measured For details refer to Using Filter Items for Processing with Position Compensation Items on page 106 The image that is taken by the...

Страница 95: ...he measurement object The image is feathered to reduce unevenness Strong Smoothing Dilate Used when there is dark noise Dark noise is removed by dilating bright places Erosion Used when there is brigh...

Страница 96: ...range is converted to 256 levels to enhance the contrast 1 Press an unused number and then press Add filter 2 Press the filter item to use 3 Make any detailed settings as required for the filter Refer...

Страница 97: ...ustment Add filter Filter item to select Parameter Setting Description Source image Camera camera image The filter is applied to the image that is taken by the Camera Prev previous image The filter is...

Страница 98: ...of the display 2 Set the filter type to either RGB or HSV 3 Press Filter settings on the right of the display 4 Make the detailed filter settings RGB Select the type of color filter to use If you sel...

Страница 99: ...f that color component You can set the gains only if Custom filter is selected in the filter settings G Range 0 0001 to 9 9999 Default 0 5900 B Range 0 0001 to 9 9999 Default 0 1100 Parameter Setting...

Страница 100: ...he range of the input brightness that is within the specified brightness range 0 to 255 is converted to 255 levels to enhance the contrast Background Suppression Input values from 0 to the lower limit...

Страница 101: ...ecify the location on the image to enhance the contrast Image Image adjustment Background Suppression Modify 1 Press Suppression level on the right of the display 2 Drag on the image to specify the lo...

Страница 102: ...od to use to specify the bright ness range This setting applies to Sensors with Color Cameras only Common RGB Settings Set the upper and lower limit values of the bright ness range The same limits wil...

Страница 103: ...round suppression level The same limits will be used for all RGB colors The range from the specified lower to upper limits is converted to 0 to 255 Individual individual RGB settings Range 0 to 255 De...

Страница 104: ...ype Description Model model position compensation A search is made for a characteristic pattern to detect and correct the position Shape Sear III pos comp Shape Search Position Compensation III Shape...

Страница 105: ...etect and correct the position An image pattern is recognized to detect and correct the position The positions of two edges are detected and the angle of the line that connects those positions is used...

Страница 106: ...cessing You can set the image for position compensation for each position compensation item Image Image adjustment Position compensation item name Modify 1 Touch Details Scroll parameter 2 Set the sou...

Страница 107: ...u select Bilinear the precision of position compensation will increase Image Image adjustment Search position comp Modify Details Scroll parameter Interpolation 1 Touch Details Scroll parameter Shape...

Страница 108: ...sing item Source image setting 1 0 Enhance edges Edge Enhancement filter item Source image Camera image Camera image image for processing Processed image results of processing 2 1 Search position comp...

Страница 109: ...Position Compensation item are almost the same as those for the Shape Search II inspection item Only the Sorting method settings of the Search item are not included in the settings of the Shape Searc...

Страница 110: ...Data name Description Data range JG Judgement This is the judgement result 2 No judgement not measured 0 Judgement is OK 1 Judgement is NG 10 Image inconsistency error 15 Out of range error DX Scroll...

Страница 111: ...he image to which to apply the results of position compensation processing Applying the Results of Position Compensation p 104 CR Correlation This is the correlation 0 to 100 Parameter Setting Descrip...

Страница 112: ...red when you select Bilinear None Default Position compensation is performed at the pixel level Expression text string Data name Description Data range JG Judgement 2 No judgement not measured 0 Judge...

Страница 113: ...No judgement not measured 0 Judgement is OK 1 Judgement is NG 15 Out of range error This is the judgment result Scroll X 99 999 9999 to 99 999 9999 This is the amount of position compensation for the...

Страница 114: ...You can select the image to which to apply the results of position compensation processing Applying the Results of Position Compensation p 104 Interpolation You can select the precision of position c...

Страница 115: ...is the X coordinate of the measured edge position 99 999 9999 to 99 999 9999 Y Position Y edge position Y This is the Y coordinate of the measured edge position 99 999 9999 to 99 999 9999 SX Referenc...

Страница 116: ...as in when it was registered Image Image adjustment 1 Press an unused number and then press Add pos comp 2 Press Edge 2Edge position comp 3 Make any detailed settings as required for the position comp...

Страница 117: ...and measurement directions for both edge 0 and edge 1 Image Image adjustment 2Edge position comp Modify Basic 1 Press Teach 2 Place the object that is to be used as the mea surement reference in front...

Страница 118: ...r the X coordinate 99 999 9999 to 99 999 9999 DY Scroll Y This is the amount of position compensation for the Y coordinate 99 999 9999 to 99 999 9999 X0 Edge 0 position X This is the X coordinate of t...

Страница 119: ...the amount of position compensation for the X coordinate Scroll Y 99 999 9999 to 99 999 9999 This is the amount of position compensation for the Y coordinate Edge 0 position X 99 999 9999 to 99 999 99...

Страница 120: ...were registered Image Image adjustment 1 Press an unused number and then press Add pos comp 2 Press Edge 2Edge midpoint comp 3 Make any detailed settings as required for the position compensation proc...

Страница 121: ...nt regions and measurement directions for both edge 0 and edge 1 Image Image adjustment 2Edge midpoint comp Modify Basic Teach The settings are the same as those for the Two edge Position Compensation...

Страница 122: ...is the Y coordinate of the measured edge 1 position 99 999 9999 to 99 999 9999 MX Midpoint X This is the X coordinate of the measured edge midpoint position 99 999 9999 to 99 999 999 MY Midpoint Y Thi...

Страница 123: ...the amount of position compensation for the Y coordinate Midpoint X 99 999 9999 to 99 999 999 This is the X coordinate of the measured edge midpoint position Midpoint Y 99 999 9999 to 99 999 999 This...

Страница 124: ...registered Image Image adjustment 1 Press an unused number and then press Add pos comp 2 Press Edge Edge rot pos Comp 3 Make any detailed settings as required for the position compensation processing...

Страница 125: ...surement directions for both edge 0 and edge 1 Image Image adjustment Edge rot pos Comp Modify Basic Teach The settings are the same as those for the Two edge Position Compensation item Teaching p 115...

Страница 126: ...ge 1 position X This is the X coordinate of the measured edge 1 position 99 999 9999 to 99 999 9999 Y1 Edge 1 position Y This is the Y coordinate of the measured edge 1 position 99 999 9999 to 99 999...

Страница 127: ...ment is OK 1 Judgement is NG 15 Out of range error This is the judgement result Scroll q 180 to 180 This is the amount of position compensation Angle edge angle 180 to 180 This is the measured angle E...

Страница 128: ...ion Image rotation Select to correct the position by rotating the image around the center of the screen Parameter Select to specify the amount of position compensation from the reference position and...

Страница 129: ...creen To rotate 90 counterclockwise enter 90 Reference position Reference X Range 99 999 to 99 999 Defaults 376 on the FQ2 S1 FQ2 S2 FQ2 S4 FQ2 S4 M FQ2 CH 640 on the FQ2 S3 08 FQ2 S4 08 FQ2 S3 13 FQ2...

Страница 130: ...e FQ2 S1 FQ2 S2 FQ2 S4 FQ2 S4 M FQ2 CH 640 on the FQ2 S3 08 FQ2 S4 08 FQ2 S3 13 FQ2 S4 13 Sets the measurement position Y Range 99 999 to 99 999 Defaults 240 on the FQ2 S1 FQ2 S2 FQ2 S4 FQ2 S4 M FQ2 C...

Страница 131: ...error DX Position correction X Amount of correction of X coordinate of position 99 999 9999 to 99 999 9999 DY Position correction Y Amount of correction of Y coordinate of position 99 999 9999 to 99...

Страница 132: ...Value Linear Corr 3 Press Meas position at the right of the screen to open the settings screen 4 Drag the vertices of the displayed figure to set the points to be used for correction 5 Press OK 6 Pre...

Страница 133: ...d position of the region for position correction To perform fine adjustment press Console at the right of the screen to open the fine ad justment console The coordinate values of the frame can be move...

Страница 134: ...s below as measurement data for external output and calculations Parameter Setting Description Source image Camera The results of processing the position compensation item is applied to the image that...

Страница 135: ...Shape Search III Inspection Item 230 4 10 Inspecting with the Shape Search II Inspection Item 247 4 11 Inspecting with the Sensitive Search Inspection Item 259 4 12 Inspecting with the Edge Position I...

Страница 136: ...OCR p 140 Judging according to bar code Checking product information Bar code p 179 Judging according to 2D code Checking product information 2D code p 190 Judging according to DPM 2D code Reading 3D...

Страница 137: ...parts of a shape Judging the number of pins Edge Pitch p 288 Judging according to colors Detecting parts Color Data p 293 Judging according to sizes Judging if there is silver paste Area p 300 Inspect...

Страница 138: ...tion Guide 136 FQ2 S CH User s Manual Judging according to shapes and quantities Judging the number of labels Labeling p 310 Inspection Example Inspec tion items used Compati ble mod els OK NG FQ2 S1...

Страница 139: ...sic steps for setting up inspection items are shown below If measurements are unstable Only one inspection item can be used on the FQ2 S1 Series A combination of up to 32 inspection items can be used...

Страница 140: ...2 FQ2 S3 FQ2 S4 FQ2 CH Adding New Inspection Items 1 Press Inspect Inspection 2 Press an unused inspection item number 3 Press Add item on the menu 4 Select an inspection item such as Search When regi...

Страница 141: ...at the bottom of the menu upward to display the next inspection item numbers 1 Press the number of the inspection item to be set 2 Press Modify on the menu 1 Press the number of the inspection item to...

Страница 142: ...ode DPM 1 or OCR inspection item that was registered before the inspection item number currently being set 1 FQ2 S4 series only 2 Up to 16 characters per line can be displayed in the result display Ch...

Страница 143: ...o recognize characters are made Character format number of characters alphanumeric characters or symbols etc Measurement region Detailed parameters to recognize characters These are set automatically...

Страница 144: ...olonization 3 Move the rectangle around the character string to read and then press OK The measurement region will be set 4 Select Character Color When the Cancel is touched the all settings will be d...

Страница 145: ...ect Simple Teach go to Step 8 Item Setting Item Description Teach Mode Simple Teach Correct String Simple Teach Specify the Region setting Character color and Printing type to execute OCR and then the...

Страница 146: ...parameters for OCR will be set automatically Measurement Parameters That Are Automatically Set by Teaching p 156 9 Character string that is successfully to recog nize is displayed Confirm the result...

Страница 147: ...to the character format string Each line can have a maximum of 32 characters There can be a maximum of four lines Characters must be input from line 1 You cannot skip line 1 and set the character form...

Страница 148: ...of the following parameters Continuous measurements will be performed for the images that are displayed You can change measurement values that appear on the display on the Display Settings Display Pr...

Страница 149: ...e first and second candidates is numerically expressed by the stability For example if the similarity of the first candidate is 90 and the simi larity of the second candidate is 25 then the stability...

Страница 150: ...ode Direct Input Direct Input the verification strings as a Master data A maximum of 32 types of registered Master data can be simultaneously verified The result is reflected to the external reference...

Страница 151: ...ata 1 Touch Verification 2 Touch Matching Mode and then select Direct Input 3 Touch Master data regist 4 Touch the master data to register 5 You can use any of the following three methods to register...

Страница 152: ...ter data 8 Touch Back Parameter Setting Description Matching mode Direct Input Default Calender Matching Code Matching Select your attempted Matching mode Verif master data OFF Default All master data...

Страница 153: ...th OCR FQ2 S CH User s Manual 151 4 Setting Up Inspections Specify the Verification String with Build in Calender 1 Touch Verification 2 Touch Matching Mode 3 Touch Calender Matching 4 Touch Master da...

Страница 154: ...Uppercase alphabetic character judg ment Numeric character judgment and Symbol judgment eR1 Coded hour 1 Numeric character judgment eN1 Coded minute 2 mYY Current year 2 digits eY2 Coded year 2 MYYYY...

Страница 155: ...anual 153 4 Setting Up Inspections Specify the Verification String in Code Matching Function Inspect Inspection Add item OCR Settings Tab Page 1 Touch Verification 2 Touch Matching Mode 3 Touch Code M...

Страница 156: ...eading with OCR 154 FQ2 S CH User s Manual 5 Touch Item ref and then select the Code Matchin items to refer 6 Touch Line number for verification 7 Set the Verification region as necessary 8 Touch Back...

Страница 157: ...fy the Processing item for the verification string Line for varif range Check Un check Default Select the line 1 4 for which to apply Calendar Matching L1 verif range 1 to 1024 Default Start Line 1 Fi...

Страница 158: ...rk areas at the edges of the measurement region will be considered to be noise and removed from the read candidates Rotation compensation ON OFF Default If rotation compensation is turned ON the image...

Страница 159: ...version can only be used with Scene data also created from the old software version If you touch Legacy Mode which is above the measurement parameters the following dialog appears Touching Yes will u...

Страница 160: ...more than 20 characters Inspect Inspection OCR Details Tab Page Output parameter Error string Troubleshooting Unstable Read Results The read results may be unstable if the contrast is low Adjust the b...

Страница 161: ...period from the current date Month Range 0 to 99 Default 0 Day Range 999 to 999 Default 0 Item Setting Description Zero suppress 0 Space Set how the tens digits of the month and day are displayed Calc...

Страница 162: ...t will be 2 1 The month end adjustment will not be applied since 2 31 exists A month is added to 2 1 and the result will be 3 1 Day Month A day is added to 1 31 and the result will be 2 1 The month en...

Страница 163: ...u First Update Updates the Sensor day and time information at the first launch Always update The date is updated when measurement is performed When the controller is kept running more than one day the...

Страница 164: ...ool from the OMRON website For registration of OMRON website confirm the SYSMAC ID that comes with Sensor The following explanation of settings is for the example of an October date encrypted as X Des...

Страница 165: ...it can most efficiently be used Save the Code Data Create an empty file for editing with PC If the Code data has already been set in Sensor a file having the settings will be saved Setup Save to file...

Страница 166: ...o use the item set 1 On the 3rd and following lines the code corresponding to each number appears The month and day start from 1 3 Enter file name and them touch OK Default file name code csv Code Yea...

Страница 167: ...Reading with OCR FQ2 S CH User s Manual 165 4 Setting Up Inspections Loading a Code File Setup Load from file 1 Touch Code data 2 Touch Code data number to load 3 Select the Code data 4 Touch Yes...

Страница 168: ...FQ2 S CH User s Manual Confirm the Code Data Name The current Code data name can be confirmed with the following steps Inspect Inspection Add item OCR Detail tab 1 Touch Code data 2 The Code data fil...

Страница 169: ...Sensor Setup Sensor settings Current Day Time When you re connect the TouchFinder to Sensor the day and time information is acquired If one more than Sensors are connected to the TouchFinder the day...

Страница 170: ...ensor restarts Setup Sensor settings Current Day Time Perform OCR with creating dictionary Model dictionary Characters in special fonts cannot be read correctly with the built in dictionary In this ca...

Страница 171: ...characters Extraction Check character registration Dictionary parameters Specify OCR inspection item and then acquire the measure ment region and measurement parameters Specify the cropped character...

Страница 172: ...S CH User s Manual Setup Procedure for Model Dictionary Creating a Dictionary 1 Press the Tool Button and then Model dic tionary 2 Press the dictionary in which to register characters 3 Press Modify...

Страница 173: ...spect item to acquire the measure ment range or measurement parameters 7 To change Extraction range press Extraction reg on the right of the display 8 Specify the region to extract and press OK The me...

Страница 174: ...Parameter at the right of the screen Setting the Measurement Parameters p 156 The model dictionary Printing type settings must match the inspection item OCR settings 11 Press Extraction The current fi...

Страница 175: ...ls or larger in the dictionary Change the settings of the Sensor to increase the size of the characters Extraction error Failed to extract the characters Check the measurement parameter settings and t...

Страница 176: ...tered Characters 1 To display the registered characters select the characters on the upper left of the display 2 The registered characters will be displayed 1 Select the character that you want to del...

Страница 177: ...ails Tab Page To apply the model dictionary settings be sure to perform Dictionary ref and Individual char 1 Touch Dictionary param 2 Touch Dictionary ref and select the dictionary to use 3 Touch Indi...

Страница 178: ...anual for Communications Settings Cat No Z338 Section 2 Controlling Operation and Outputting Data with a Parallel Connection Section 3 Controlling Operation and Outputting Data with an Ethernet Connec...

Страница 179: ...s is the lowest similarity of the read characters 0 to 100 STB Stability This is the lowest stability of the read characters 0 to 100 N1 Number of read characters line 1 N1 This is the number of read...

Страница 180: ...the lowest stability of the read char acters Number of read characters on line 1 0 to 32 This is the number of characters that were read on line 1 Number of read characters on line 2 0 to 32 This is...

Страница 181: ...ame has been changed from the previous RSS A Max 64 characters can be displayed on the result screen Max 16 characters per line and Max 4 lines can be displayed Reading will end in error if the barcod...

Страница 182: ...ar Code Step 1 Selecting the Inspection Item Inspect Inspection 1 Press an unused inspection item number and press Add item 2 Press Bar code 4 3 Configuring Inspection Items p 138 Drag the arrow at th...

Страница 183: ...de 3 Move the rectangle so that it surrounds the bar code 4 Press the OK Button 5 The result of reading the barcode that was dis played will be displayed along with a confirma tion dialog box for regi...

Страница 184: ...t to an external device External Reference Parameters p 477 Inspect Inspection Add item Bar code Settings Tab Page You can use the menu commands that are displayed for at the right of the display to a...

Страница 185: ...r a character string of 0 or more characters A wildcard for one character ASCII code table p 185 Item ref Select this item to use the immediately preceding read results as the verification character s...

Страница 186: ...set to Yes set the first and last compared digit positions Up to 32 characters can be set as the number of digits Example First compared digit 2 last compared digit 6 The text string used for verific...

Страница 187: ...he verification result of a barcode inspection item in the overall judgment The Default setting is Yes Inspect Inspection Add item Bar code Details Output parameter Reflect The following table shows t...

Страница 188: ...posite codes on off No Default Sets whether or not to support composite codes This item is enabled only when the following barcode types are selected Code128 GS1 128 GS1 DataBar Yes Check digit on off...

Страница 189: ...n Display Press Test Continuous test and then use Display setting on the Test Display Unstable Reading Results Reading Is Unstable Due to Low Contrast Adjust the brightness to improve the contrast of...

Страница 190: ...n 4 Controlling Operation and Outputting Data with an RS 232C Connection Measurement Data That Can Be Used for External Outputs and Calculations The read character string is output after the other out...

Страница 191: ...Teaching If 2D codes cannot be read during an automatic registration a teaching error message is displayed The reading may be unstable due to low contrast Adjust the brightness to improve the contras...

Страница 192: ...be displayed Reading will end in error if the 2D Code type is incorrectly set Set the code type before starting reading When teach ing is performed the captured 2D code is read and the following item...

Страница 193: ...ents that was read from the 2D code as a verification condition in the master data Step 3 Verification Conditions p 194 Inspect Inspection Add item 2D code Settings Tab Page 1 Press an unused inspecti...

Страница 194: ...gs 8 Press the master data in which the read characters will be registered 9 Press Back to end teaching You can use the menu commands that are displayed for at the right of the display to adjust the s...

Страница 195: ...ress Judgement 2 Press a setting item to set the OK range Set a range for each of the setting items below Continuous measurement of the displayed image is executed The measurement values that are disp...

Страница 196: ...ess Master data regist 3 Press the character string to register in the master data 4 You can use any of the following three methods to register character strings in the master data from the menu displ...

Страница 197: ...to verify the character string that was read from the barcode against a character string that is registered in the master data To verify the read character string against the master data select the ch...

Страница 198: ...Yes Inspect Inspection Add item 2D code Details Tab Page Output parameter Reflect Detail Settings When you execute TEACH the measurement parameters are automatically set corresponded read code Inspec...

Страница 199: ...Section 3 Controlling Operation and Outputting Data with an Ethernet Connection Section 4 Controlling Operation and Outputting Data with an RS 232C Connection Setup Item Setting Value Description Code...

Страница 200: ...1 in the output data settings after the mea surement such as the inspection item parameters and calculation results Refer to the following section for the loca tion of the output area for the characte...

Страница 201: ...verall quality of 2D code based on ISO IEC15415 The lowest grade of the indi vidual indices is the overall quality 0 to 4 GD1 Decode Evaluates whether decode was success ful 0 to 4 GD2 Cell contrast E...

Страница 202: ...the judgment result from the measurements Num of characters 0 to 1024 The number of characters read is output Overall quality 0 to 4 Outputs the evaluation value of overall quality Decode 0 to 4 Outpu...

Страница 203: ...rnally output Codes that can be scanned are Data Matrix ECC200 and QR Codes The print quality evaluation result defined in ISO IEC TR29158 can only be calculated for Data Matrix A Max 64 characters ca...

Страница 204: ...r 2D code DPM Step 1 Select the Inspection Item Inspect Modify 1 Press an unused inspection item number and press Add item 2 Press 2D code DPM 4 3 Configuring Inspection Items p 138 Drag the arrow at...

Страница 205: ...ication condition in the master data Step 4 Setting the Verification Conditions p 207 Inspect Inspection Add item 2D code DPM Settings Tab Page 1 Press Teach 2 Display the image of the 2D code 3 Move...

Страница 206: ...teaching You can use the menu commands that are displayed for at the right of the display to adjust the settings that resulted from teaching Insp region You can change the measurement region Camera se...

Страница 207: ...judgement conditions by using OK and NG workpieces 5 3 Adjusting the Judgment Parameters p 346 Press Auto adjustment on the right of the display to switch to the Auto adjustment Display Parameter Set...

Страница 208: ...ter the values You can specify whether to reflect the judgment result of the judgment conditions for character recognition in the overall judgment The Default is to reflect them Inspect Inspection Add...

Страница 209: ...communications command to output it to an external device 9 2 External Reference Parameters p 477 Inspect Inspection Add item 2D code DPM Settings Tab Page 1 Press Verification 2 Press Master data reg...

Страница 210: ...itions as required Parameter Setting Description Verif master data OFF Default All master data Master data 0 to 31 Sets whether to verify the read character string against a character string that is r...

Страница 211: ...er s Manual 209 4 Setting Up Inspections ASCII code table The following table shows the ASCII codes that can be used for manual registration of master data and also for registering characters of Limit...

Страница 212: ...hite Auto Default Sets the color of the code Grid correction ON OFF Default Set whether grid correction is ON or OFF You can set this for DataMatrix and for QR codes Fast mode Yes No Default Sets fast...

Страница 213: ...Rectangle 8 18 8 32 12 26 12 36 16 36 16 48 Auto Default Sets the number of code cells DPM print quality Data Matrix only ON OFF Default Sets print quality ON OFF Timeout 1 to 9999 ms Default value 9...

Страница 214: ...munications format for the setting procedure and output specifications to output the character string Vision Sensor FQ2 S CH Series User s Manual for Communications Settings Cat No Z338 Section 2 Ethe...

Страница 215: ...er When a code cannot be read the value is 0 F Focus 0 to 100 Indicates the focus of the image using the change of density at cell edges When out of focus the code cannot be read When the cell edges a...

Страница 216: ...cus 0 to 100 Outputs the focus Cell recognition rate 0 to 100 Outputs the cell recognition rate Num of char 0 to 1024 Outputs the number of characters that were detected Index 2 No verification patter...

Страница 217: ...nce The image pattern that is to be measured is registered in advance and measurements are performed to see if the pattern is present or if the shape is different The image pattern that is registered...

Страница 218: ...or the Search Inspection Item Step 1 Selecting the Inspection Item Inspect Inspection 1 Press an unused inspection item number and press Add item 2 Press Search Registering inspection items p 138 Drag...

Страница 219: ...reference in front of the camera 3 Move the rectangle to the location to be measured 4 Press OK 5 Press TEACH on the lower right of the display The basic settings will be registered when teaching has...

Страница 220: ...9 9999 Upper 99 999 9999 Adjust the upper and lower limits of measurement position X for an OK judgment Position Y Range 99 999 9999 to 99 999 9999 Defaults Lower 99 999 9999 Upper 99 999 9999 Adjust...

Страница 221: ...for each measurement value to one of the following settings Press Result type on the right of the display Absolute value Default The measured coordinates are output Relative value The difference from...

Страница 222: ...value of Judgment condition Measurement value will be zero if the correlating value is lower than Candidate level Corr descending order Default descending order of correlation value Sorts the results...

Страница 223: ...an one result Extraction X Y and Detection count Extraction condition Range Description Candidate level Range 0 to 100 Defaults Lower 70 Upper 100 Set the threshold to find Candidate Output the correl...

Страница 224: ...NG according to the correlation with a previously registered image pattern For this reason if the object is at an angle the correlation is reduced and the image may be judged as NG To achieve an OK j...

Страница 225: ...ferent Place If the measurement result does not stabilize change the stability and precision as needed For better detection accuracy the following two methods can be used Set Model mode to stable Incr...

Страница 226: ...ge setting Adjust the Angle range parameter to reduce the range in which a search for the model is performed Setting the angle range p 222 Increase the Candidate level value and limit the models Selec...

Страница 227: ...Other than rectangles circles and polygons can be set as the model registration regions Inspect Inspection Search Modify Settings Tab Page Teach Model region 1 Press Model region 2 Press Delete in th...

Страница 228: ...on 1 Draw the figure according to the section that you want to mask p 225 2 While the figure to be masked is selected press on the right of the display and then press OR NOT The selected area will be...

Страница 229: ...onsole on the right side of the display where you draw the region The console will appear 2 To adjust the position of the figure press within the frame To adjust the size of the figure press a corner...

Страница 230: ...Drag the cross cursor to move it Press Console on the right of the display to display the console You can use the cross cursor on the console to change the coordinate values one pixel at a time The de...

Страница 231: ...9 999 9999 to 99 999 9999 This is the Y coordinate of the position where the model was registered ST Reference angle 180 to 180 This is the angle when the model was registered RX Detection coordinate...

Страница 232: ...ereas in a normal search mode color and texture information are used It enables highly robust and fast detection robust to environmental variations including shadings reflections lightings shape defor...

Страница 233: ...edure for the Shape Search III Inspection Item Step 1 Selecting the Inspection Item Inspect Inspection 1 Press an unused inspection item number and press Add item 2 Press Shape Search III Registering...

Страница 234: ...ence in front of the camera 3 Move the rectangle to the location to be measured 4 Press OK 5 Press TEACH on the lower right of the display The basic settings will be registered when teaching has been...

Страница 235: ...dinate Positions p 228 Edge extraction When Edge cannot be detected at model region p 241 Display setting the following images can be selected Measurement image displays the Measurement image Measurem...

Страница 236: ...on for an OK judgment When the candidate level is higher than the judgment lower limit value of correlation the candidate level has priority If the correlation value is lower than the candidate level...

Страница 237: ...erence position is output as coordinates Display setting the following images can be selected Measurement image displays the Measurement image Measurement image Model image Default displays the detect...

Страница 238: ...ending order of position X Sorts the results in order from the smallest measure ment X position to the largest Pos X descending order descending order of position X Sorts the results in order from the...

Страница 239: ...tputting the detected objects Extraction X Y and Detection Count Extraction condition Range Description Candidate level 0 to 100 Default 50 Set the threshold to find Candidate Output only a value that...

Страница 240: ...determined by the correlation to the registered image pattern for the search Therefore there may be an NG judgment result for good workpiece if the correlation is low due to the angle being slanted I...

Страница 241: ...much Adjust the correlating value of target or increase the Candidate level Select the Results to Output p 221 1 Touch Edge level auto and then select OFF 2 Set Edge level Parameter Setting Descripti...

Страница 242: ...ate level If the mis detection occurs i e detects same shape with workpiece the targets can be detected too much Adjust the correlating value of target or increase the Candidate level Select the Resul...

Страница 243: ...lect this check box to adjust Edge level automatically If edges are not detected under the auto settings clear this check box and adjust value of Edge level Edge level 0 to 1024 Default 20 This settin...

Страница 244: ...ve the contrast of the mark Adjusting the Brightness p 77 Correlation Is Inconsistent Due to Variations in the Measurement Object Inconsistent portions can be masked so that they are omitted from matc...

Страница 245: ...is performed Select the Results to Output p 237 Raise Candidate level Raise Candidate level then processing time will be shortened Select the Results to Output p 221 Set the Model region as small as p...

Страница 246: ...This section describes how to edit the model regions You can edit the model region in the same way as for a search region Changing the Model Registration Region to a Shape Other Than a Rectangle p 22...

Страница 247: ...found X 0 to X 31 Position X 99999 9999 to 99999 9999 This is the X coordinate where the Nth model was found Y 0 to Y 31 Position Y 99999 9999 to 99999 9999 This is the Y coordinate where the Nth mode...

Страница 248: ...egion is too low Select a region with a larger contrast between light and dark areas compared to the region that was registered as the model and re register it as the model Parameter Range of value De...

Страница 249: ...of the measurement object and the angle of the measurement object For the normal Search inspection item a model that concentrates on the color and brightness of the image pattern is used but in the S...

Страница 250: ...e Shape Search II Inspection Item Step 1 Selecting the Inspection Item Inspect Inspection 1 Press an unused inspection item number and press Add item 2 Press Shape Search II Registering inspection ite...

Страница 251: ...surement reference in front of the camera 3 Move the rectangle to the location to be measured 4 Press OK 5 Press TEACH on the lower right of the display The basic settings will be registered when teac...

Страница 252: ...99 999 9999 to 99 999 9999 Defaults Lower 99 999 9999 Upper 99 999 9999 Adjust the upper and lower limits of measurement position X for an OK judgment Position Y Range 99 999 9999 to 99 999 9999 Defa...

Страница 253: ...alue of Judgment con dition Measurement value will be zero if the correlating value is lower than Candidate level Corr descending order Default descending order of correlation value Sorts the results...

Страница 254: ...cted objects Extraction X Y and Detection Count Extraction condition Range Description Candidate level 0 to 100 Default 80 Set the threshold to find Candidate point Output only a value that is higher...

Страница 255: ...ther an image is OK or NG according to the correlation with a previously registered image pattern For this reason if the object is at an angle the correlation is reduced and the image may be judged as...

Страница 256: ...Is Inconsistent Due to Low Contrast Adjust the brightness to improve the contrast of the mark Adjusting the Brightness p 77 Correlation Is Inconsistent Due to Variations in the Measurement Object Inc...

Страница 257: ...Reduce the range in which a shape search II is performed for the model Changing the Model Regions p 227 Reduce the angle range setting Adjust the Angle range parameter to reduce the range in which a...

Страница 258: ...for a search region Changing the Model Registration Region to a Shape Other Than a Rectangle p 225 If the model region is changed perform teaching again p 232 Changing the Measurement Region The regio...

Страница 259: ...to X 31 Position X 99999 9999 to 99999 9999 This is the X coordinate where the Nth model was found Y 0 to Y 31 Position Y 99999 9999 to 99999 9999 This is the Y coordinate where the Nth model was fou...

Страница 260: ...ation region is too low Select a region with a larger contrast between light and dark areas compared to the region that was registered as the model and re register it as the model Parameter Range of v...

Страница 261: ...f the divisions is output A sensitive search is suitable when the differences between the model image and measurement image are too small to produce differences in correlations with a normal search Sa...

Страница 262: ...e Sensitive Search Inspection Item Step 1 Selecting the Inspection Item Inspect Inspection 1 Press an unused inspection item number and press Add item 2 Press Sensitive Search Registering inspection i...

Страница 263: ...t is to be used as the measurement reference in front of the camera 3 Move the rectangle to the location to be measured 4 Press OK 5 Press TEACH on the lower right of the display The basic settings wi...

Страница 264: ...is to be judged as OK Set the range for each of the following parameters Continuous measurements will be performed for the im ages that are taken 3 Press OK to accept the value 4 Press Back to end mak...

Страница 265: ...direction that is to be judged as OK Position Y Range 99 999 9999 to 99 999 9999 Default Lower 99 999 9999 Upper 99 999 9999 Set the range of movement in the Y direction that is to be judged as OK An...

Страница 266: ...han the specified candidate level are output Inspect Inspection Sensitive Search Modify Details Tab Page Meas Parameter 1 Press Sub pixel and select Yes 1 Press Candidate level and adjust the candidat...

Страница 267: ...l parameter Sub model number Inspecting Plain Regions Density deviations are used to inspect sections that are set as plain regions during teaching Inspect Inspection Sensitive Search Modify Details T...

Страница 268: ...angle the rotation range must be widened Inspect Inspection Sensitive Search Modify Details Tab Page Model parameter 1 Set Rotation to Yes 2 Press Angle range and set the following range Correlation I...

Страница 269: ...ange in which a search is performed for the model Changing the measurement region p 227 Reduce the angle range setting Adjust the Angle range parameter to reduce the range in which a search for the mo...

Страница 270: ...for a search region Changing the Model Registration Region to a Shape Other Than a Rectangle p 225 If the model region is changed perform teaching again p 261 Changing the Measurement Region The regio...

Страница 271: ...999 999 9999 RY Detection Y This is the Y coordinate of the detection point when the model was registered 999 999 999 9999 to 999 999 999 9999 SX Reference position X This is the X coordinate of the...

Страница 272: ...to 127 Density deviation Position X 99 999 9999 to 99 999 9999 This is the X coordinate of the position where the model was found Position Y 99 999 9999 to 99 999 9999 This is the Y coordinate of the...

Страница 273: ...o inspect positions For example it can be used to see if a label is attached at the correct position or if a product is set in the correct position Places where the color changes greatly are called ed...

Страница 274: ...dure for Edge Position Step 1 Selecting the Inspection Item Inspect Inspection 1 Press an unused inspection item number and press Add item 2 Press Edge position Registering inspection items p 138 Drag...

Страница 275: ...camera 3 Move the rectangle to the location to be measured 4 Press OK 5 Press TEACH on the lower right of the display The basic settings will be registered when teaching has been completed 6 Press Bac...

Страница 276: ...999 9999 to 99 999 9999 Defaults Lower 99 999 9999 Upper 99 999 9999 Sets the upper lower limit range for the amount of edge position X considered to be OK Position Y Range 99 999 9999 to 99 999 9999...

Страница 277: ...on is formed based on the gray level and any position of inter section between the gray level value and the threshold edge level is detected as an edge This detection method is used when you must proc...

Страница 278: ...hreshold that is set for a color change If you change the edge level perform teaching again Edge Level When measuring by relative value of color difference width An edge is detected in the following w...

Страница 279: ...gion are determined If the difference is less than the noise threshold it is assumed that there are no edges Normally there is no problem with the Default value of 10 but if noise is mistakenly detect...

Страница 280: ...olor of the edge that you want to detect Inspect Inspection Edge Position Modify Settings Tab Page Teach 1 Press Color ON OFF on the right side of the display 2 Press ON 3 Press Set color on the right...

Страница 281: ...from another color to the specified color Color OUT Detects as an edge any position where the color changes from the specified color to another color It is also possible to check the extraction colors...

Страница 282: ...Teaching not performed error 14 Figure not registered error 15 Out of range error This is the judgment result X Position X 99999 9999to 99999 9999 This is the X coordinate of the measured edge positi...

Страница 283: ...l on the Details Tab Page and try teaching again Edge Not Found If an edge is not found the measurement result will be NG Perform the following If a color was specified make sure the color of the meas...

Страница 284: ...ween two edges is called the edge width Setup Procedure for Edge Width Inspection Item Step 1 Selecting the Inspection Item Inspect Inspection 1 Press an unused inspection item number and press Add it...

Страница 285: ...reference in front of the camera 3 Move the rectangle to the location to be measured 4 Press OK 5 Press TEACH on the lower right of the display The basic settings will be registered when teaching has...

Страница 286: ...e values Range 99 999 9999 or 99 999 999 Defaults Upper 99 999 9999 Lower 99 999 9999 When the result type is set to ratios Range 0 000 to 999 9999 Defaults Upper 999 9999 Lower 0 000 Set the upper an...

Страница 287: ...Total Judgment You can specify whether to reflect the judgment results of an inspection item in the overall judgment The Default is to reflect them Inspect Inspection Add item Edge Width Details Tab...

Страница 288: ...tion Data range JG Judgement 2 No judgement not measured 0 Judgement is OK 1 Judgement is NG 13 Teaching not performed error 14 Figure not registered error 15 Out of range error This is the judgment r...

Страница 289: ...in If there is an edge and it cannot be detected adjust the Noise level on the Details Tab Page and try teaching again If an edge is not detected when teaching 0 will be registered as the reference wi...

Страница 290: ...nt area are found and the number objects object width and pitch are output Setup Procedure for Edge Width Inspection Item Step 1 Selecting the Inspection Item Inspect Inspection 1 Press an unused insp...

Страница 291: ...asurement Region p 227 1 Press Judgement 2 Press the parameters and set the range that is to be judged as OK Continuous measurements will be performed for the im ages that are displayed The measured v...

Страница 292: ...ange that is to be judged OK for each parameter Average pitch Range 0 0000 to 99 999 9999 Defaults Lower 0 0000 Upper 99 999 9999 Max pitch maximum pitch Range 0 0000 to 99 999 9999 Defaults Lower 0 0...

Страница 293: ...measurement data 4 18 Calculations and Judgments Using Inspection Item Data p 323 Expression text string Data name Description Data range JG Judgement 2 No judgement not measured 0 Judgement is OK 1...

Страница 294: ...Tab Page is cor rect Edge level p 276 Measured item Range of value Description Judgement 2 No judgement not measured 0 Judgement is OK 1 Judgement is NG 13 Teaching not performed error 14 Figure not r...

Страница 295: ...urement region The average color within the measurement region is measured If a Sensor with a Monochrome Camera is connected the average density in the measurement region is found and inspections are...

Страница 296: ...Color Data Inspection Item Step 1 Selecting the Inspection Item Inspect Inspection 1 Press an unused inspection item number and press Add item 2 Press Color Data Registering inspection items p 138 Dr...

Страница 297: ...rence in front of the camera 3 Move the rectangle to the location to be measured 4 Press OK 5 Press TEACH on the lower right of the display The basic settings will be registered when teaching has been...

Страница 298: ...that is to be judged as OK The measured value is displayed beside the parameter name Continuous measurements will be performed for the images that are displayed You can change the parameters for judg...

Страница 299: ...0 to 221 Set the upper and lower limits of the range of the deviation in the region that is to be judged as OK R average 0 0000 to 255 0000 Set the difference in the average value of the R red compo n...

Страница 300: ...ror 20 Other error This is the judgment result AR R average 0 to 255 This is the average value of the R red compo nent AG G average 0 to 255 This is the average value of the G green com ponent AB B av...

Страница 301: ...the measurement judgment results R average 0 to 255 This is the average value for the R red compo nent G average 0 to 255 This is the average value for the G green compo nent B average 0 to 255 This...

Страница 302: ...ea Inspection Item This inspection item is used to measure sizes It measures the amount of a color within the measurement region The size is calculated as a number of pixels and it is called the area...

Страница 303: ...tions Setup Procedure for Area Step 1 Selecting the Inspection Item Inspect Inspection 1 Press an unused inspection item number and press Add item 2 Press Area Registering inspection items p 138 Drag...

Страница 304: ...tracted color will be automatically detected Information on the color that has the largest area in the measurement region is extracted and registered The color information is extracted only the first...

Страница 305: ...to 999 999 999 9999 Defaults Upper 999 999 999 9999 Lower 999 999 999 9999 When the result type is set to ratio Range 0 00000 to 999 9999 Defaults Upper 999 9999 Lower 0 0000 Set the upper and lower l...

Страница 306: ...parameter Unstable Area Results The Desired Color Cannot Be Detected Add a specific color or enlarge the color range You can change the output form for each measurement value to one of the following s...

Страница 307: ...ct Inspection Area Modify Settings Tab Page Teach Sensors with Color Cameras Only 1 Press Set color on the right of the dis play 2 Drag around the color for which you want to measure the area Areas wi...

Страница 308: ...lected color The Inv Check Box applies to all colors Select the Exclusion Check Box to exclude the selected color from extraction The order of exclusion is from the largest color palette number Making...

Страница 309: ...ify the range of brightness to convert to a bina ry image Measurement is performed after the im age taken by the camera in 256 color grayscale is converted to a binary image Then white pixels are meas...

Страница 310: ...g time Changing the measurement region p 227 1 Press Fill profile and select Filling up holes or Fill Outline Parameter Setting Description Fill profile None Default Fill Outline Filling up holes None...

Страница 311: ...region with the specified color X Gravity X 99999 9999 to 99999 9999 This is the X coordinate of the center of the measurement area with the specified color Y Gravity Y 99999 9999 to 99999 9999 This...

Страница 312: ...labels and size and position of a desired label If a Sensor with Color Camera is connected you can specify up to four colors to measure If a Sensor with Monochrome Camera is connected the image is co...

Страница 313: ...p Procedure for Labeling Inspection Item Step 1 Selecting the Inspection Item Inspect Inspection 1 Press an unused inspection item number and press Add item 2 Press Labeling Registering Inspection Ite...

Страница 314: ...be registered when teaching has been completed Information on the color that has the largest area in the measurement region is extracted and registered The color information is extracted only the fir...

Страница 315: ...Range 0 to 100 Default Set the upper and lower limits of the number of labels for an OK judgment Total label area Range 0 to 999 999 999 9999 Default Set the upper and lower limits of the total label...

Страница 316: ...lor for which to measure the labeling Inspect Inspection Area Modify Settings Tab Page Teach Sensors with Color Cameras Only 1 Press Set color on the right of the display 2 Drag around the color for w...

Страница 317: ...pplies to all colors Select the Exclusion Check Box to exclude the selected color from extraction The order of exclusion is from the largest color palette number Making the Extract Color Easier to Che...

Страница 318: ...ghtness to convert to a bina ry image Measurement is performed after the im age taken by the camera in 256 color grayscale is converted to a binary image Then white pixels are measured 3 Press OK 4 Pr...

Страница 319: ...select Yes Parameter Setting Description Filling up holes Yes No Default Sets how to process areas surrounded by the specified color If Yes is set those areas are processed as the specified color Ext...

Страница 320: ...e parameters for the extraction conditions Parameter Setting Description Number of labels Range 1 to 100 Default 100 Set the maximum number of labels to detect Area Range 0 to 999 999 999 9999 Default...

Страница 321: ...tion item in the overall judgment The Default is to reflect them Inspect Inspection Add item Labeling Details Tab Page Output parameter 1 Press Sorting method 2 Select the sorting method Parameter Set...

Страница 322: ...he measurement region in the same way as for a search region Changing the Model Registration Region to a Shape Other Than a Rectangle p 225 If the measurement region is changed perform teaching if req...

Страница 323: ...0 This is the number of labels found TAR Total label area 0 to 999 999 999 9999 This is the total area of all labels found AR 0 to AR 99 Area 0 to 999 999 999 9999 These are the areas of each individu...

Страница 324: ...nt 1 TH 7 6 Logging Measurement Data and Image Data p 392 Measurement item Range of value Description Judgement 0 Judgement is OK 1 Judgement is NG 13 Teaching not performed error 14 Figure not regist...

Страница 325: ...2 expressions You can also combine expressions You can use the following values in calculations Filter item and position compensation item data measurement data reference values and judgment results I...

Страница 326: ...Calculation results D31 Calculation results D00 Calculation Calculation Process Upper and lower limit judgement Calculation judgement result J31 OR logic Expression 0 Expression 31 Data logging Refere...

Страница 327: ...0 I0 X I0 Y Region 1 edge position coordinates of inspection item 1 I1 X I1 Y Distance between two points DIST I0 X I0 Y I1X I1 Y Example 2 Finding the lowest similarity of characters read with OCR in...

Страница 328: ...nts Using Inspection Item Data 326 FQ2 S CH User s Manual Procedure Calculation Setting Expressions 1 Press Inspect Calculation 1 Press Expression on the Settings Tab Page 2 Press the expression numbe...

Страница 329: ...cters in the expression Item Description Const Press this to input constants or a mathematical operator The following operators can be used addition subtraction multiplication and division Data Press...

Страница 330: ...mber Inspection item Enter I and the inspection item number Calculation settings data Enter Z0 Enter Z1 for the FQ2 S4 CH Text string corresponding to the item position correction data inspection item...

Страница 331: ...Otherwise it is 1 OR argument_1 argument_2 NOT Applies a logical NOT operation If the argument is 0 the calculation result is 1 Otherwise it is 0 NOT argument ABS Finds the absolute value ABS argumen...

Страница 332: ..._X second_position_Y Example Finding the distance between the centers of gravity of region 0 and region 1 DIST R0 X R0 Y R1 X R1 Y The following calculation is performed internally Finds the length of...

Страница 333: ...80 to 180 0 Position X X 99999 9999 to 99999 9999 0 Position Y Y 99999 9999 to 99999 9999 0 Angle TH 180 to 180 0 Reference X SX 99999 9999 to 99999 9999 0 Reference Y SY 99999 9999 to 99999 9999 0 Re...

Страница 334: ...Edge midpoint comp FQ2 S1 S2 S3 S4 CH Judgement JG 2 No judgement not measured 0 Judgement is OK 1 Judgement is NG 2 Scroll X DX 99999 9999 to 99999 9999 0 Scroll Y DY 99999 9999 to 99999 9999 0 Edge0...

Страница 335: ...OK 1 Judgement is NG 15 Out of range error 2 Position correction X DX 99999 9999 to 99999 9999 0 Position correction Y DY 99999 9999 to 99999 9999 0 Position correction DT 180 to 180 0 Measurement co...

Страница 336: ...ot measured 0 Judgement is OK 1 Judgement is NG 16 Measurement timeout error 2 Index No IN 2 Verification OFF or reading error 1 Verification is NG 0 to 31 Master data No 2 Num of char N 0 to 1024 0 O...

Страница 337: ...to 4 0 Fixed pattern damage GDA4 0 to 4 0 Axial nonuniformity GDA5 0 to 4 0 Grid nonuniformity GDA6 0 to 4 0 Unused err Corr GDA7 0 to 4 0 Search FQ2 S1 S2 S3 S4 only Judgement JG 2 No judgement not m...

Страница 338: ...erformed error 14 Figure not registered error 15 Out of range error 2 Correlation CR 0 to 100 0 Density DV Color image 0 to 221 0 Monochrome image 0 to 127 0 Position X X 99999 9999 to 99999 9999 0 Po...

Страница 339: ...to 99999 9999 0 Edge width W 0 to 99999 9999 0 Edge Pitch FQ2 S1 S2 S3 S4 only Judgement JG 2 No judgement not measured 0 Judgement is OK 1 Judgement is NG 13 Teaching not performed error 14 Figure n...

Страница 340: ...Y 99999 9999 to 99999 9999 0 Labeling FQ2 S1 S2 S3 S4 only Judgement JG 2 No judgement not measured 0 Judgement is OK 1 Judgement is NG 13 Teaching not performed error 14 Figure not registered error 1...

Страница 341: ...ng and Saving Settings 5 1 Performing Test Measurements 340 5 2 Shortening the Measurement Takt Time 342 5 3 Adjusting the Judgment Parameters 346 5 4 Checking a List of All Inspection Item Results 34...

Страница 342: ...can be performed Test measurements can be performed for through images Default or saved images Performing Test Measurements with Samples Test Continuous test 1 Press Graphics Details 2 Input an image...

Страница 343: ...se saved images This function is useful for adjusting the judgment parameters when objects are not available Test Continuous test Any display 1 Press 2 Select one of the following Log Images that are...

Страница 344: ...ked from the Setup or Run Mode display The measurement time is the time taken from when a trigger is input until when all measurement processes are executed During the measurement time this Sensor wil...

Страница 345: ...plays FQ2 S3 S4 Image Camera setup 1 Press Partial input on the right side of the display 2 Press Y and set the input range along the Y axis by setting the Y coordinate of the partial in put start poi...

Страница 346: ...3 FQ2 S Range 15 to 1 279 Default 1 279 Y coordinate of the partial input start point FQ2 S FQ2 S M Range 0 to 472 Default 0 FQ2 S 08 Range 98 to 918 Default 98 FQ2 S Range 0 to 1 016 Default 0 Specif...

Страница 347: ...put image to reduce image input time Image Camera setup Image input mode If you change the image input mode perform teaching again 1 Press Partial input on the right side of the display 2 Change the i...

Страница 348: ...Looking at Measurement Results If correct judgments are not possible you can move directly from the Setup Mode display to the judgment parameters display to make adjustments Test Continuous test Eith...

Страница 349: ...good and faulty products Test Continuous test 1 Move to the inspection item for which you want to automatically adjust the judgement pa rameters and press Adjust judgement on the right side of the di...

Страница 350: ...llowing three patterns as the judgment method 1 Threshold minimum The lower limit of the variations between OK object is used as the judgment condition 2 Threshold average The median value between the...

Страница 351: ...2 FQ2 S3 FQ2 S4 FQ2 CH Individual judgment results for all inspection items can be checked in a list The individual inspection items can be selected to change the judgment parameters Test Continuous t...

Страница 352: ...desired but keep in mind that all settings that are not saved explicitly are replaced by the settings that are stored in the memory of the FQ2 Sensor the next time you turn ON the FQ2 Sensor Do not tu...

Страница 353: ...eration 352 6 2 Configuring the Run Mode Display 354 6 3 Checking the Trend of Measurement Results with Graphs 358 6 4 Adjusting Judgement Parameters during Operation 362 6 5 Editing the Model Region...

Страница 354: ...ion of the Sensor can be monitored in the following ways Run Mode Display The present display name Overall judgement Measurement processing time The time taken from when an image is input until all me...

Страница 355: ...Yes If you press No the setting will not be saved and you will move to Run Mode Returning to Setup Mode Press and press Sensor settings Signal Status When Moving to Run Mode When moving to Run Mode t...

Страница 356: ...n items will appear Statistical data The currently measured image and history of the overall judgement results measurement count NG count and NG rate will appear Checking the Judgements of All Inspect...

Страница 357: ...connected Run Mode Sensor monitor When multiple sensors are connected switching from Sensor monitor to Single Sensor Multi sensor or NG sensor is possible Multi sensor NG sensor Displays the measureme...

Страница 358: ...be displayed when the power supply is turned ON Setting the Startup Scene p 368 The Default display setting for startup can be changed Selecting the Display When More Than One Sensor Is Connected p 3...

Страница 359: ...lear results Selecting the Displayed Image You can select the displayed image when you use the Area or Labeling Inspection items Run Mode Display Setting The selectable image will be changed depending...

Страница 360: ...he graph It becomes possible to predict when malfunctions may occur or to analyze the cause of the malfunction by checking the trends in the measurement values The most recent 1 000 measurement values...

Страница 361: ...end monitor 2 Set the minimum and maximum values of the measurement values Changing the Number of Values That Are Displayed 1 Press Number of data on the right of the trend monitor 2 Select the number...

Страница 362: ...er of measure ment values Switches the display to the next inspection item number Switches the display to the previous inspection item number Specifies the parameter to display on the histogram Used t...

Страница 363: ...nge of the Horizontal Axis 1 Press Display range on the right of the histogram 2 Select the maximum measurement value the minimum measurement value and the class Changing the Number of Data on the Ver...

Страница 364: ...the function if you want to use it Setup Mode Sensor settings Adjustment mode in Run 1 Press ON Changing the Judgment Parameters in Run Mode This section describes how to change the judgment paramete...

Страница 365: ...explained below The measurement region can be edited in the same way Preparations In the Default state this function is turned OFF to prevent accidental operation in Run Mode To use the function firs...

Страница 366: ...Editing the Model Region Measurement Region from Run Mode 364 FQ2 S CH User s Manual MEMO...

Страница 367: ...Monitoring the Signal I O Status 385 7 5 Connecting to More Than One Sensor 386 7 6 Logging Measurement Data and Image Data 392 7 7 Saving Sensor Settings 406 7 8 SD Card Operations 409 7 9 Convenien...

Страница 368: ...ng scenes are the Camera image Image Tab Page and Inspection Items Inspect Tab Page output data settings Settings related to external I O specifications and the system settings for the Sensor are used...

Страница 369: ...ttings Setup Mode Select scene Changing Scene Names Copying Scenes and Deleting Scenes Setup Mode Select scene 1 Press the number of the scene to change to and then press Select 2 The scene will chang...

Страница 370: ...ion Sensor FQ2 S CH Series User s Manual for Communications Settings Cat No Z338 3 4 Control and Output in No protocol TCP No protocol UDP Changing Scenes by FINS TCP No protocol Command Vision Sensor...

Страница 371: ...in the origin and coordinate system Calibration Conversion Methods There are the following three conversion methods for calibration Point specification You can enter the actual pixel coordinates of a...

Страница 372: ...to use from the calibration settings Selecting the Calibration Pattern to Use p 379 Calibration type Description Specify point point specification Specify from three to nine points and enter their ac...

Страница 373: ...ibration parameters are automatically calculated You can register the coordinates of up to nine positions Different Magnifications in X and Y Directions Specify three positions Setup Mode Calibration...

Страница 374: ...lected po sition You can enlarge the display Image Zoom p 380 You can fine tune the coordinates that are set Press Console on the right of the display to display the console Press the Cross Key on the...

Страница 375: ...displayed The items in the calibration parameters are listed in the following table Item Setting Description A Calculated value These are the calibration conversion values These values are used to con...

Страница 376: ...registered model the calibration parameters are calculated automatically The position resulting from the search is found at the subpixel level Setup Mode Calibration 1 Select the data region to set fr...

Страница 377: ...n You can edit the model region The procedure is the same as that for the search function Editing the Model and Measurement Regions p 224 6 Press OK 7 Press a reference sample to get the Camera coordi...

Страница 378: ...above steps 4 to 8 to set the coordi nates of the remaining positions 11 When you have finished setting the coordinates for all of the positions press Generate parame ters 12 The calibration parameter...

Страница 379: ...fthand Default Lefthand The positive direction is clockwise when coordinates are specified Righthand The positive direction is counterclockwise when coordi nates are specified Origin Upperleft Default...

Страница 380: ...ion data 0 to Calibration data 31 2 Press Modify 3 Press Parameter on the right of the dis play 4 Set the following parameters Coordinate Or igin and Magnification 5 Press OK 6 The calibration paramet...

Страница 381: ...ge Camera setup You can select the calibration pattern for each scene 1 Press Calibration on the right of the dis play 2 Select the calibration pattern from Calibration data 0 to Calibration data 31 3...

Страница 382: ...p Mode or Run Mode Press Back to end setting the display Displaying a Live Image You can display a live image to check the image that is input by the Sensor in realtime Setup Mode 1 Press 2 Press Came...

Страница 383: ...age You can display a frozen image to stop image refreshing and display the last image that was input Setup Mode 1 Press 2 Press Camera 3 Press Freeze 4 Press the Back Button to return to the Display...

Страница 384: ...Press 2 You can select one of the following types of im ages to display Log Images that are logged in the Sensor s internal memory Logging image file Images that are logged in the SD card Camera imag...

Страница 385: ...etup Mode or Run Mode TF Settings Startup display Display update mode 1 Press 2 Press Last NG image 3 Press Back 1 Press Last NG image If an operation to change the display is performed e g if the dis...

Страница 386: ...finder or on your computer If you press the icon again the menu will be displayed Setup Mode or Run Mode Turning ON OFF the Touch Finder Backlight You can use Eco Mode to turn OFF the LCD backlight a...

Страница 387: ...n the Sensor Data Unit is connected the I O status of the following signals are displayed FQ SDU1 TRIG DSA RST IN0 to IN7 RUN OR BUSY ERR STG SHT ACK GATE and D0 to D15 FQ SDU2 TRIG RST IN0 to IN5 RUN...

Страница 388: ...connect more than one Sensor to a Touch Finder Automatically Connecting Sensors The Touch Finder can detect Sensors and automatically connect to them in the order that it detects them The Touch Finder...

Страница 389: ...ng the Sensors to Connect You can set any of the Sensors for connection to the Touch Finder and register them Run Mode Sensor List 1 Press any line and then press Add 2 Enter the IP address 3 Press th...

Страница 390: ...before the sensor name The names of Sensors that are on the same network as the Touch Finder are given in parentheses If a sensor s IP address is abnormal will appear in front of the sensor name No re...

Страница 391: ...or Auto Only p 390 If there are more than eight Sensors that can be connected select the Sensors to con nect from the list of Sensors Selecting the Sensors to Connect p 388 Register the Sensor to con...

Страница 392: ...he list of display positions The display for the Sensor will be displayed in the posi tion that corresponds to the specified number The display positions that are set with Display position are cleared...

Страница 393: ...f individual sensors can be displayed in the Multi sensor display and the Switch sensor display OFF IP address or Sensor name can be selected for the information that is displayed The Default is IP ad...

Страница 394: ...owing table 1 For recent results logging the oldest data is overwritten when the maximum number of saved data items is exceeded 2 This limit is for one data item If more than one data item is logged a...

Страница 395: ...ing Setting the File Name for Logged Data Setting the Format for Saving Measurement Data Execution of file logging Change to Run Mode Change to Run Mode Enabling File Logging Starting and Stopping Log...

Страница 396: ...ation p 32 Only the data for the Sensor that is currently being displayed will be logged even if more than one Sensor is con nected If multiple sensors are displayed or if the most recent NG sensor is...

Страница 397: ...data All All images will be logged regardless of the measurement results Only NG Only images for which the overall judgment was NG will be logged None No images will be logged Default Data logging me...

Страница 398: ...ct the measurement data to log In Out Log setting Measurement data Select data 1 Press the measurement pre processing in spection item or calculation that has the pa rameter to be logged 2 Press the p...

Страница 399: ...g to the beginning of the file name for logged data Setup Mode or Run Mode TF settings File format 1 Select the item for which to add to or change the file name and then press Logging image file or Lo...

Страница 400: ...ent data was obtained from the Sensor 3 Measurement ID This is the measurement ID information 2 4 Scene No Scene number 5 Judge Overall judgment 0 OK 1 NG 2 NC not measured 6 Inspection item region I...

Страница 401: ...and Stopping Logging After logging is started i e set to ON the specified image data and measurement data will be saved in the SD card or computer hard disk each time measurements are performed Run Mo...

Страница 402: ...ls Output Tab Page BUSY output Change the BUSY output parameter to Data logging File logging cannot be used when performing continuous measurements If you use the PC Tool the logging time may vary by...

Страница 403: ...gged in external memory such as an SD card trends in measurement results can be easily checked on the Touch Finder However if the power supply is turned OFF this data will be lost Trend monitor Trend...

Страница 404: ...logging Selecting the Measurement Data To Log p 396 Starting Logging Logging will be started as soon as the conditions for logging have been set If the settings are saved logging will start automatica...

Страница 405: ...logged data can also be deleted without turning OFF the power supply Setup Mode In Out Log setting 1 Press Delete Log Saving Logged Recent Results Data in a File Although the logged recent results da...

Страница 406: ...of NGs OK rate NG rate delimiter Image data Image data is saved in a special format for OMRON Sensors The file name extension is IFZ Measurement data Measurement data is saved in CSV format 2 The fol...

Страница 407: ...NC means unmeasured 5 Inspection item region Inspection item No Measurement item Inspection point Example 1 When Search is executed with inspection item No 0 the second correlation value is I0 CR1 Exa...

Страница 408: ...sor This section describes how to back up the settings in and restore them from an SD card or other external memory Backing Up Settings in External Memory Setup Mode Save to file Setting Tab Page 1 Pr...

Страница 409: ...bration group data file name extension CGP sensor_name CGP All calibration data are backed up Dictionary data 2 The file name extension is DIC sensor_name DIC Dictionary data are backed up All diction...

Страница 410: ...08 FQ2 S CH User s Manual Restoring Data to the Sensor from External Memory Setup Mode Load from file 1 Press the data to be restored 2 The selected data will be read from external memory and displaye...

Страница 411: ...2 All dictionary data The file name extension is CSV sensor_name SYD Sensor system data The file name extension is SYD sensor_name BKD All sensor data The file name extension is BKD sensor_name CLB C...

Страница 412: ...Inserting an SD Card in the Touch Finder 1 Open the cover to the SD card slot on the top of the Touch Finder 2 Insert the SD card with the back of the SD card facing the front of the Touch Finder and...

Страница 413: ...the SD card The settings or system data may be corrupted Checking the Available Space on the SD Card Before saving data to the SD card use the following display to make sure that there is sufficient s...

Страница 414: ...SD Card Operations 412 FQ2 S CH User s Manual Formatting an SD Card Setup Mode or Run Mode TF settings SD card Format 1 Press Yes to start formatting...

Страница 415: ...Unwanted Changes A password can be set to prevent unwanted changes to settings If a password is set you cannot change from Run Mode to Setup Mode without entering the password Setting a Password Setu...

Страница 416: ...orget the password contact your OMRON representative for the procedure to clear the password The password is deleted when the Sensor is initialized 1 If a password is set and you try to change from Ru...

Страница 417: ...the PC Tool are saved in the computer s hard disk drive Setup Mode or Run Mode The image that is being displayed when the button is pressed is saved in external memory Storage Location and File Names...

Страница 418: ...pattern This only appears when Start screen type under Startup display is set to Single sensor Setup Mode or Run Mode TF settings Startup display Display pattern 1 Select from the following Graphics...

Страница 419: ...You can monitor and set up the same Sensor from two Touch Finders You can simultaneously monitor the Sensor from both Touch Finders You can set up the Sensor only from one of the two Touch Finders at...

Страница 420: ...of the dis play When Run Mode operations are possible again Run Mode will be dis played in the initial status Logging Monitoring or setup Logging including file logging and recent results logging can...

Страница 421: ...st display Setup Mode TF settings 1 Press the Multi sensor button in Display setting in Run mode 2 Switch sensor display 3 All results region display 1 Detailed results display 1 Press Multi sensor in...

Страница 422: ...meters can be set by using the following images Images saved in internal Sensor memory Image files in an SD card Saving Image Data Temporarily Saving Images in the Sensor The measured images can be te...

Страница 423: ...g Images in an SD Card The image data can be saved in the SD card each time measurements are performed Run Mode Logging Logging All Data File Logging p 394 You can also save the data in Setup Mode by...

Страница 424: ...ging interval These settings are set from Retry settings of each Scenes Exposure retry Scanning is repeated the specified number of times while varying the exposure when HDR is OFF the shutter speed i...

Страница 425: ...When normal retry exposure retry or scene retry is ON trigger retry is OFF Setting normal retry Set the retry mode to Normal retry in Retry details Setup Mode Sensor settings Retry details Specify the...

Страница 426: ...s 1 Press Exposure retry for the retry mode 1 Set the brightness shutter speed step incre ment count and decrement count Parameter Settings Description Brightness shutter speed step Brightness 1 to 20...

Страница 427: ...hrough Parameter Settings Description Switch Order Auto Default Fixed Sets the scene switching order Auto Switches through the scenes in the order of highest frequency of use Fixed Switches through th...

Страница 428: ...If the power is interrupted or the sensor is restarted the success counts are initialized when adjust mode is entered For the timing chart refer to the following manual FQ2 S CH Series User s Manual f...

Страница 429: ...of the following languages can be selected for display on the Touch Panel or PC Tool Japanese English German French Italian Spanish Traditional Chinese Simplified Chinese or Korean Setup Mode or Run M...

Страница 430: ...Mode TF settings Restart Checking Versions Checking the Sensor Version Setup Mode Sensor settings Information Checking the Touch Finder Version Setup Mode or Run Mode TF settings Information Checking...

Страница 431: ...sitions of the Touch Finder Use this function to correct the touch screen positions if they are offset from the opposite position Setup Mode TF settings Touch screen calib Setting the Resolution of Me...

Страница 432: ...Functions Related to the System 430 FQ2 S CH User s Manual MEMO...

Страница 433: ...8 Troubleshooting Troubleshooting 8 1 Error Histories 432 8 2 Error Messages 434 8 3 Basic Troubleshooting 435...

Страница 434: ...ered with an image with low contrast Check the image to see if the contrast is too low to register the model Increase the image contrast and try again to register the model Logging Error Error code he...

Страница 435: ...or Histories Deleting the History of Errors That Were Detected in the Sensor Setup Mode Sensor settings Error history Delete history Deleting the History of Errors That Were Detected in the Touch Find...

Страница 436: ...ar on the display For these errors the ERR indicator on the Sensor will not light the ERROR signal will not be output and the error will not be recorded in the error history Follow the instructions th...

Страница 437: ...Mode and Setup Mode dis plays at startup Sensor software version 1 91 or later This appears when the Touch Finder software version is older than the Sensor software version Functions not supported by...

Страница 438: ...signment will be performed for all sensors and reconnection will not take place nor mally The reassign IP address function is valid for Version 1 84 and later sensors 1 Configure the network settings...

Страница 439: ...Menu Tables 438 9 2 External Reference Parameters 477 9 3 Specifications and Dimensions 546 9 4 Updating the Software 573 9 5 Connecting a Previous Touch Finder FQ D30 D31 to the FQ2 S Sensor 574 Ind...

Страница 440: ...1 50 000 Built in lighting on 1 250 to 1 50 000 control by lighting emis sion time Default 1 250 Scene p 80 Gain Normal mode If the gain is high the image will be bright If the gain is low the image...

Страница 441: ...of the strobe output signal STGOUT 0 to 65 535 s Default 1 000 s Scene 1 Trigger setup Trigger delay Adjusts the time until the Camera shutter opens after the trigger signal is received Only valid fo...

Страница 442: ...he filter is to be applied Camera Prev Default Scene p 95 Suppression level for Background Suppression Item Only The range in which to enhance the con trast and the brightness range to extract are set...

Страница 443: ...nges the measure ment direction etc Scene Edge 0 clr ON OFF Edge 1 clr ON OFF Sets whether to specify an edge color ON OFF Default Scene Edge 0 set color Edge 1 set color Specifies the color of the im...

Страница 444: ...ge rotation Parameter Image rotation Select to correct the position by rotating the image around the center of the screen 180 to 180 Default 90 Scene p 126 Parameter Reference position Reference posit...

Страница 445: ...aracters Scene p 141 Camera setup Same as Camera adjustments on the Image Tab Page Scene p 76 Meas Parameter Reading Speed Set the Reading Speed Normal Default Fast Scene p 156 Character color Sets th...

Страница 446: ...arac ter to be read 0 to 9 999 Default 0 Scene Min Height Specify the min height of the character to be read 0 to 100 Default 50 Scene Reading Length If character strings with a variable number of cha...

Страница 447: ...whether grid correction is ON or OFF ON OFF Default Scene Shape for DataMatrix Only Sets the code shape Square Default Square Rect Scene Printquality Data Matrix only Sets print quality evaluation ON...

Страница 448: ...o automatic for data matrices or QR codes Sets whether the code size is detected automatically Yes Default No Scene p 210 Reverse Sets a normal or reverse image Normal Reverse Auto Default Scene Code...

Страница 449: ...e Setting Scene p 239 Mask size Select the pixel size to be used at 3 3 Default 5 5 7 7 Edge level auto The Edge level can be set automati cally by selecting ON If edge recogni tion results are not go...

Страница 450: ...set for the reference color Measurement Image All Color Image Default Selected Color Image Binary Image Scene Background color Specifies the background color of the extracted image Black Default Whit...

Страница 451: ...d lower limits of the contrast that is to be judged as OK 0 to 100 Defaults lower limit 0 upper limit 100 Scene p 205 Focus Sets the upper and lower limits of the focus that is to be judged as OK 0 to...

Страница 452: ...to 32 Default 0 Scene Edge position 2 Offset amount Edge position only Sets the upper lower limit range for the amount of position deviation consid ered to be OK 99 999 9999 to 99 999 9999 Defaults Lo...

Страница 453: ...ne B average Color images only Set the difference in the average value of the B blue component that is to be judged as OK 0 0000 to 255 0000 Defaults Lower limit 0 Upper limit 255 Scene Density averag...

Страница 454: ...d lower limits of the master angle for an OK judgement 180 to 180 Defaults upper limit 180 lower limit 180 Scene Result type Except for OCR 2D code DPM Edge Pitch and Label ing You can change the outp...

Страница 455: ...haracter string Scene L 1 verif range to L 4 verif range Sets the beginning and end characters to verify 1 to 1024 Defaults beginning 1 end 1024 Scene Copy Copies or clears registered master data Dele...

Страница 456: ...ing read results as a verification character string Scene Line 1 verif range to Line 4 verif range Sets the beginning and end characters to verify for each line 1 to 1024 Defaults beginning 1 end 1024...

Страница 457: ...rs 20 alphanumeric characters Default NG Scene p 158 Bar code 3 Meas Parameter Same as Teach Meas Parameter under Modify or Inspection Scene p 186 Output parameter Reflect Specifies whether to reflect...

Страница 458: ...999 999 9999 to 999 999 999 9999 Defaults Lower limit 999 999 999 9999 Upper limit 999 999 999 9999 Scene Extraction Y Results are output only for objects with a measured Y coordinate that is within t...

Страница 459: ...ethod Sets the sort condition to use when multiple measurement results meet the extraction conditions Corr ascending order Corr descending order Default Pos X ascending order Pos X descending order Po...

Страница 460: ...Color difference 0 to 100 Default 50 Color difference 0 to 442 Default 20 Scene p 275 p 266 p 276 Noise level Color image only Sets the color density level to treat as noise 0 to 442 Default 5 Scene p...

Страница 461: ...mum number of labels to detect Range 1 to 100 Default 100 Scene Area Specify the area range to judge as a label Range 0 to 999 999 999 9999 Defaults Lower limit 0 Upper limit 999 999 999 9999 Scene Gr...

Страница 462: ...ST distance between two points calculation symbols TJG Scene p 330 Rename Deletes copies the expression or changes the expression name Scene p 330 Copy Delete Judgement Specifies the parameters for ju...

Страница 463: ...ut OUT0 to OUT2 Control signal Specify the output signal to OUT0 to OUT2 When model FQ SDU is connected OUT0 to OUT2 are not displayed OR Total judgement Default assignment OUT0 BUSY ERROR Default ass...

Страница 464: ...1 is con nected 0 5 to 120 0 s 10 0 s Default System 1 Number of delay Set the number of times to ignore the TRIG signal turning ON between when the TRIG signal turns ON and the mea surement results a...

Страница 465: ...for the decimal part If it is set to 0 the decimal part is rounded off before the data is output 0 to 4 Default 4 Scene Negative Selects what to display as the sign when the number is negative Default...

Страница 466: ...999 999 9999 to 999 999 999 999 Defaults Upper limit 999 999 999 999 Lower limit 999 999 999 9999 Scene Details Output parameter Reflect You can specify whether to reflect the judgment results of an...

Страница 467: ...ne p 346 Result type Specifies the measurement result type Absolute value Default Relative value Ratio p 346 Continuous test Display setting Specifies whether to display individual inspection results...

Страница 468: ...tered calibration pattern Calibration data 0 to 31 Modify Used to edit calibration data Calibration data 0 to 31 Calibra tion data Specify point Sets the type of calibration data to set Specify point...

Страница 469: ...the parameter settings for the cali bration data Copy Copies the calibration data Rename Changes the name of the calibration data 15 alphanumeric characters max Calibra tion data Model dictionary 2 D...

Страница 470: ...Used to check the Sensor information 1 Model Used to check the model and software version of the connected Sensor System Version Name Displays the name of the connected Sen sor MAC address Used to ch...

Страница 471: ...subnet mask Valid only when the IP address setting is set to Fixed 0 0 0 0 to 255 255 255 255 Default 255 255 255 0 System p 67 Gateway Sets the Default gateway address When the IP address setting is...

Страница 472: ...0 Not monitored Default 0 s System 1 Link data output Communication type Sets the communications type to use for EtherNet IP outputs Invalid Default PLC link SYSMAC PLC link MELSEC System 1 Area set t...

Страница 473: ...layed and can be set only when Handshake setting is set to No 2 to 5 000 ms Default 40 ms System 1 GATE signal ON period Set the time to turn ON the GATE signal This parameter is displayed and can be...

Страница 474: ...ch Finder data p 428 Model Used to check the Touch Finder model Touch Finder data Version Used to check the software version of the Touch Finder p 428 MAC address Used to check the MAC address of the...

Страница 475: ...s I nputs the IP address of the Touch Finder Valid only when the IP address setting is set to Fixed a b c d a 1 to 223 b 0 to 255 c 0 to 255 d 0 to 255 Default 10 5 5 10 Touch Finder data p 67 Subnet...

Страница 476: ...item Select display image Area and Labeling only Changes the display method of the extracted color For Area and Labeling Measurement image Default Color extraction image Binary image after extraction...

Страница 477: ...p info Specifies the information displayed for the connected sensor OFF IP address Default Sensor name Touch Finder data NG sensor From multiple connected Sensors dis plays the image of only the Senso...

Страница 478: ...ize Live Switches the camera image between a live image and a frozen image Only in Setup Mode p 380 Freeze p 381 Display But ton Changes the image display method Setup Mode Camera Live Freeze Log Logg...

Страница 479: ...Set Get 0 Camera image 1 Previous image 1 121 Setting method Set Get 0 Filtering OFF 1 Filtering ON 1 122 Filter type Set Get Filter type 0 RGB 1 HSV 0 123 Color filter type Set Get Color Filter Type...

Страница 480: ...xt string Logged data Judgement parameter 0 Mea sure ment result Judgement Get only 2 No judgement not measured 0 Judgement is OK 1 Judgement is NG 13 Teaching not performed error 14 Figure not regist...

Страница 481: ...tering OFF 1 Filtering ON 1 External reference number Category Data name Set Get Data range Default Expression text string Logged data Judgement parameter 0 Measure ment result Judgement Get only 2 No...

Страница 482: ...31 Logged 6 Position X Get only 99 999 9999 to 99 999 9999 0 Y 0 to Y 31 Logged 7 Position Y Get only 99 999 9999 to 99 999 9999 0 Logged 8 Angle Get only 180 to 180 0 Logged 9 Reference X Get only 99...

Страница 483: ...o 99 999 9999 99 999 9999 Judgement condition 145 Judgement lower limit for search coordinate Y Set Get 99 999 9999 to 99 999 9999 99 999 999 9 Judgement condition 146 Judgement upper limit for search...

Страница 484: ...Data logging ON 1 700 Display settings Correlation display Set Get 0 Display 1 Do not display 0 701 Position X display Set Get 0 Display 1 Do not display 0 702 Position Y display Set Get 0 Display 1...

Страница 485: ...Logged data 11 Reference X Get only 0 to 9 999 0 SX Logged data 12 Reference Y Get only 0 to 9 999 0 SY Logged data 13 Reference angle Get only 180 to 180 0 ST Logged data 14 Correlation Get only 0 to...

Страница 486: ...999 to 99 999 9999 99 999 9999 Judgement condition 169 Position compensation X lower limit Set Get 99 999 9999 to 99 999 9999 99 999 9999 Judgement condition 170 Position compensation Y upper limit Se...

Страница 487: ...gging OFF 1 Data logging ON 0 318 Correlation display Set Get 0 Data logging OFF 1 Data logging ON 0 319 Position X display Set Get 0 Data logging OFF 1 Data logging ON 0 320 Position Y display Set Ge...

Страница 488: ...Get only 0 to 9 999 0 SX Logged data 12 Reference Y Get only 0 to 9 999 0 SY Logged data 13 Reference angle Get only 180 to 180 0 ST Logged data 14 Correlation Get only 0 to 100 0 CR Logged data 103 O...

Страница 489: ...condition 168 Position compensa tion X upper limit Set Get 99 999 9999 to 99 999 9999 99 999 999 9 Judgement condition 169 Position compensa tion X lower limit Set Get 99 999 9999 to 99 999 9999 99 99...

Страница 490: ...ON 0 700 Display settings Position compensa tion X display Set Get 0 Display 1 Do not display 0 701 Position compensa tion Y display Set Get 0 Display 1 Do not display 0 702 Theta position com pensat...

Страница 491: ...9 0 Y Logged data 11 Reference X Get only 99 999 9999 to 99 999 9999 0 SX Logged data 12 Reference Y Get only 99 999 9999 to 99 999 9999 0 SY Logged data 14 Correlation Get only 0 to 100 0 CR Logged d...

Страница 492: ...Set Get 0 Display 1 Do not display 0 703 Position X display Set Get 0 Display 1 Do not display 0 704 Position Y display Set Get 0 Display 1 Do not display 0 External reference number Category Data nam...

Страница 493: ...fferentiation 0 158 Edge level absolute value Monochrome Cameras Set Get 0 to 255 20 180 Judge ment condi tions Edge position X upper limit Set Get 99 999 9999 to 99 999 9999 99 999 9999 Judgement con...

Страница 494: ...fault Expres sion text string Logged data Judgement parameter 0 Mea sure ment result Judgement Get only 2 No judgement not measured 0 Judgement is OK 1 Judgement is NG 13 Teaching not performed error...

Страница 495: ...tion 1 Differentiation 0 158 Mea sure ment condi tions Edge level absolute value Monochrome Cameras Set Get 0 to 255 20 160 Edge color specifica tion 1 Set Get 0 No edge color specification 1 Edge col...

Страница 496: ...for entire unit Set Get 0 Data logging OFF 1 Data logging ON 0 311 Data logging switch for judgement Set Get 0 Data logging OFF 1 Data logging ON 0 312 Data logging switch for scroll X Set Get 0 Data...

Страница 497: ...Y1 Logged data 11 Detected edge mid point position X Get only 99 999 9999 to 99 999 9999 0 MX Logged data 12 Detected edge mid point position Y Get only 99 999 9999 to 99 999 9999 0 MY Logged data 13...

Страница 498: ...ty change 1 Set Get 0 Color IN 1 Color OUT 0 169 Edge level 1 Set Get 0 to 100 50 170 Noise level 1 Set Get 0 to 442 5 173 Monochrome density change 1 Set Get Monochrome Cameras 0 Light to Dark 1 Dark...

Страница 499: ...n 197 Position compensation Y lower limit Set Get 99 999 9999 to 99 999 9999 99 999 9999 Judgement condition 310 Logging condi tions Data logging switch for entire unit Set Get 0 Data logging OFF 1 Da...

Страница 500: ...ed error 15 Out of range error 2 JG Logged data 5 Position compensation TH Get only 99 999 9999 to 99 999 9999 0 DT Logged data 6 Detected edge position X0 Get only 99 999 9999 to 99 999 9999 0 X0 Log...

Страница 501: ...ge color specification 0 161 Edge color R1 Set Get 0 to 255 255 162 Edge color G1 Set Get 0 to 255 255 163 Edge color B1 Set Get 0 to 255 255 167 Density change 1 Set Get 0 Color IN 1 Color OUT 0 169...

Страница 502: ...et 0 Data logging OFF 1 Data logging ON 0 314 Data logging switch for detected edge position Y0 Set Get 0 Data logging OFF 1 Data logging ON 0 315 Data logging switch for detected edge position X1 Set...

Страница 503: ...Get only 180 0000 to 180 0000 0 DT 8 Position X Get only 99999 9999 to 99999 9999 0 X 9 Position Y Get only 99999 9999 to 99999 9999 0 Y 10 Angle Get only 180 0000 to 180 0000 0 TH 11 Reference X Get...

Страница 504: ...del mismatch error 13 Teaching not performed error 16 Measurement timeout error 17 Format not entered error 2 JG Logged data 5 Index number Get only 2 No verification pattern or read was NG 1 Verifica...

Страница 505: ...ON OFF Set Get 0 No 1 Yes 0 143 Output end digit Set Get 1 to 128 128 144 Output beginning digit Set Get 1 to 128 1 146 Mea sure ment condi tions Reading speed Set Get 0 Fixed 1 Variable 1 150 1 Form...

Страница 506: ...logging count Set Get 1 to 128 128 310 Data logging switch unit Set Get 0 Data logging OFF 1 Data logging ON 1 311 Data logging switch judgement Set Get 0 Data logging OFF 1 Data logging ON 1 312 Data...

Страница 507: ...ay settings Similarity display Set Get 0 Display 1 Do not display 0 701 Stability display Set Get 0 Display 1 Do not display 0 702 Number of read characters display Set Get 0 Display 1 Do not display...

Страница 508: ...et 1 to 1024 1024 1043 N 2 N 0 to 3 Verification beginning digit 2N Set Get 1 to 1024 1 1051 N 2 N 0 to 3 1 Master data 2N Set Get 32 characters max 1061 Reference unit number 3 Set Get 1 OFF 0 to 31...

Страница 509: ...Set Get 1 to 1024 1024 1143 N 2 N 0 to 3 Verification beginning digit 7N Set Get 1 to 1024 1 1151 N 2 N 0 to 3 1 Master data 7N Set Get 32 characters max 1161 Reference unit number 8 Set Get 1 OFF 0...

Страница 510: ...ication beginning digit 12N Set Get 1 to 1024 1 1251 N 2 N 0 to 3 1 Master data 12N Set Get 32 characters max 1261 Reference unit number 13 Set Get 1 OFF 0 to 31 1 1262 N 2 N 0 to 3 Verification end d...

Страница 511: ...ng digit 17N Set Get 1 to 32 1 1351 N 2 N 0 to 3 1 Master data 17N Set Get 32 characters max 1361 Reference unit number 18 Set Get 1 OFF 0 to 31 1 1362 N 2 N 0 to 3 Verification end digit 18N Set Get...

Страница 512: ...et Get 1 to 1024 1 1451 N 2 N 0 to 3 1 Master data 22N Set Get 32 characters max 1461 Reference unit number 23 Set Get 1 OFF 0 to 31 1 1462 N 2 N 0 to 3 Verification end digit 23N Set Get 1 to 1024 10...

Страница 513: ...it 27N Set Get 1 to 1024 1 1551 N 2 N 0 to 3 1 Master data 27N Set Get 32 characters max 1561 Reference unit number 28 Set Get 1 OFF 0 to 31 1 1562 N 2 N 0 to 3 Verification end digit 28N Set Get 1 to...

Страница 514: ...mode or code matching mode Set Get 1 to 1024 1 1711 N 2 N 0 to 3 to 1 Master data Nth line in calendar matching mode or code matching mode Set Get 32 characters max 1720 N 2 N 0 to 3 Verification lin...

Страница 515: ...dual similarity Get only 0 to 100 0 3500 N N 0 to 127 Individual stability Get only 0 to 100 0 External refer ence number Category Data name Set Get Data range Default Expres sion text string Logged d...

Страница 516: ...sure ment result Direction Set Get 0 Horizontal mode 1 Vertical mode 0 136 Reverse on off Set Get 0 None 1 Enable 0 141 Code color Set Get 0 Black 1 White 0 150 Verifica tion con dition Selected maste...

Страница 517: ...eout error 2 JG Logged data 5 Index No Get only 2 No verification pattern or reading error 1 Verification is NG 0 to 31 Master data No 2 IN 6 Num of characters Get only 0 to 1024 0 N Logged data 7 1 C...

Страница 518: ...0 Data Matrix 1 QR Code 2 MicroQR Code 3 PDF417 4 MicroPDF417 0 132 Timeout time ms Set Get 1 to 9999 9999 133 Reverse Data Matrix QR Code Micro QR Code only Set Get 0 Normal 1 Reverse 0 134 Code col...

Страница 519: ...for number of characters Set Get 0 Data logging OFF 1 Data logging ON 1 440 Data logging switch overall quality Set Get 0 Data logging OFF 1 Data logging ON 1 441 Data logging switch decode Set Get 0...

Страница 520: ...523 Display ON OFF cell modulation Set Get 0 ON 1 OFF 0 524 Display ON OFF fixed pattern damage Set Get 0 ON 1 OFF 0 525 Display ON OFF axial nonuniformity Set Get 0 ON 1 OFF 0 526 Display ON OFF gri...

Страница 521: ...only 0 to 100 0 E Logged 9 Contrast Get only 0 to 100 0 C Logged 10 Focus Get only 0 to 100 0 F 17 Index number Get only 2 No verification pattern or reading error 1 Verification is NG 0 to 31 Master...

Страница 522: ...0 Auto 1 Normal 2 Reverse 0 129 QR Code Model Set Get 0 Auto 1 Model 1 2 Model 2 0 130 Mea sure ment result Error Correction Level Set Get 0 Auto 1 M 15 2 L 7 3 H 30 4 Q 25 0 131 Timeout time ms Set G...

Страница 523: ...00 0 Judgement condition 165 Focus threshold upper limit Set Get 0 to 100 100 Judgement condition 166 Focus threshold lower limit Set Get 0 to 100 0 Judgement condition 167 Threshold upper limit for p...

Страница 524: ...ata logging switch overall quality Set Get 0 Data logging OFF 1 Data logging ON 1 441 Data logging switch decode Set Get 0 Data logging OFF 1 Data logging ON 0 442 Data logging switch cell contrast Se...

Страница 525: ...FF 0 520 Display ON OFF over all quality Set Get 0 ON 1 OFF 0 521 Display ON OFF decode Set Get 0 ON 1 OFF 0 522 Display ON OFF cell contrast Set Get 0 ON 1 OFF 0 523 Display ON OFF cell modulation Se...

Страница 526: ...coordinate Y Get only 99 999 9999 to 99 999 9999 0 RY 14 Count Get only 0 to 32 0 C Logged data 103 Output parame ter Reflect Set Get 0 Yes 1 No 0 121 Model region Rotation Set Get 0 Yes 1 No 0 122 R...

Страница 527: ...et Get 99 999 9999 to 99 999 9999 99 999 9999 153 Extraction condition X lower limit Set Get 99 999 9999 to 99 999 9999 99 999 9999 154 Extraction condition Y upper limit Set Get 99 999 9999 to 99 999...

Страница 528: ...or 14 Figure not registered error 15 Out of range error 2 JG Logged data 5 Correlation Get only 0 to 100 0 CR Logged data 6 Deviation Get only Color Camera 0 000 to 219 9705 Monochrome Camera 0 000 to...

Страница 529: ...t Get 99 999 9999 to 99 999 9999 99 999 9999 Judgement condition 138 Judgement upper limit for search coordinate Y Set Get 99 999 9999 to 99 999 9999 99 999 9999 Judgement condition 139 Judgement lowe...

Страница 530: ...for sub region correla tion Set Get 0 Data logging OFF 1 Data logging ON 1 322 Data logging switch for sub region density deviation Set Get 0 Data logging OFF 1 Data logging ON 1 323 Data logging swi...

Страница 531: ...d error 14 Figure not registered error 15 Out of range error 2 JG Logged data 5 Correlation Get only 0 to 100 0 CR 0 to CR 31 Logged data 6 Position X Get only 99 999 9999 to 99 999 9999 0 X 0 to X 31...

Страница 532: ...for search coordinate Y Set Get 99 999 9999 to 99 999 9999 99 999 9999 Judgement condition 145 Judge ment condi tions Judgement lower limit for search coordinate Y Set Get 99 999 9999 to 99 999 9999 9...

Страница 533: ...Do not display 0 704 Count display Set Get 0 Display 1 Do not display 0 800 Position X display pat tern Set Get 0 Absolute value 1 Relative value 0 801 Position Y display pat tern Set Get 0 Absolute...

Страница 534: ...ition X 4 Ascending order of position Y 5 Descending order of position Y 1 138 Judge ment condi tions Judgement upper limit for correlation Set Get 0 to 100 100 Judgement condition 139 Judgement lower...

Страница 535: ...ON 1 180 Acceptable distortion level Set Get 0 Low 1 Middle 2 High 2 181 Noise Removal Level Set Get 0 to 100 0 188 Model mode Set Get 0 Stable 1 Fast 0 229 Overlay judgement Set Get 0 No 1 Yes 0 230...

Страница 536: ...Judgement Get only 2 No judgement not measured 0 Judgement is OK 1 Judgement is NG 13 Teaching not performed error 14 Figure not registered error 15 Out of range error 2 JG Logged data 5 Edge positio...

Страница 537: ...to 99 999 9999 99 999 9999 Judgement condition 147 Mea sure ment condition Edge level absolute value Monochrome Cameras Set Get 0 to 255 20 310 Logging condi tions Data logging switch for entire unit...

Страница 538: ...Measurement method Set Get 0 Projection 1 Differentiation 0 131 Edge color red Set Get 0 to 255 255 132 Edge color green Set Get 0 to 255 255 133 Edge color blue Set Get 0 to 255 255 137 Edge level S...

Страница 539: ...103 Output parame ter Reflect Set Get 0 Yes 1 No 0 120 Mea sure ment condi tions Edge color red Set Get 0 to 255 255 121 Edge color green Set Get 0 to 255 255 122 Edge color blue Set Get 0 to 255 255...

Страница 540: ...um pitch Set Get 0 Data logging OFF 1 Data logging ON 1 315 Data logging switch for minimum pitch Set Get 0 Data logging OFF 1 Data logging ON 1 316 Data logging switch for average width Set Get 0 Dat...

Страница 541: ...ation Get only 999 999 999 9999 to 999 999 999 9999 0 DF Logged data 103 Output parame ter Reflect Set Get 0 Yes 1 No 0 127 Mea sure ment condi tions Background color Set Get 0 Black 1 White 2 Red 3 G...

Страница 542: ...67 N 10 N 0 to 3 Set color Registered color mini mum brightness N Set Get 0 to 255 0 310 Logging condi tions Data logging switch for entire unit Set Get 0 Data logging OFF 1 Data logging ON 1 311 Data...

Страница 543: ...21 The standard deviation of the den sity is displayed for a Monochrome Camera 0 DV 103 Output parame ter Reflect Set Get 0 Yes 1 No 0 124 Judge ment condi tions Color difference upper limit Set Get 0...

Страница 544: ...reference average Set Get 0 Data logging OFF 1 Data logging ON 1 318 Data logging switch for standard deviation Set Get 0 Data logging OFF 1 Data logging ON 1 319 Data logging switch for density avera...

Страница 545: ...9999 0 SY 15 Total label area Get only 0 to 999 999 999 9999 0 TAR Logged data 55 Master angle Get only 180 to 180 0 ATH 0 to ATH 99 Logged data 103 Output parame ter Reflect Set Get 0 Yes 1 No 0 127...

Страница 546: ...1 311 Data logging switch for judgement Set Get 1 312 Data logging switch for number of labels Set Get 1 313 Data logging switch for area Set Get 1 314 Data logging switch for gravity X Set Get 1 315...

Страница 547: ...633 Judgement lower limit for gravity X Set Get 99 999 9999 to 99 999 9999 99 999 9999 642 Judgement upper limit for gravity Y Set Get 99 999 9999 to 99 999 9999 99 999 9999 643 Judgement lower limit...

Страница 548: ...smoothing strong smoothing dilate erosion median extract edges extract horizontal edges extract vertical edges enhance edges and background suppression polarizing filter attachment white bal ance Sens...

Страница 549: ...ossible by connecting FQ SDU1 Sensor Data Unit 11 inputs and 24 outputs RS 232C Possible by connecting FQ SDU2 Sensor Data Unit Input specifica tions Refer to Table 2 Output specifi cations Connection...

Страница 550: ...moved IEC 60529 IP40 Materials Sensor PBT PC SUS Mounting Bracket PBT Polarizing Filter Attachment PBT PC Ethernet connector Oil resistance vinyl compound I O connector Lead free heat resistant PVC Co...

Страница 551: ...2 S25100F 53 33 to 240 153 mm 220 to 970 mm 8 Approx 150 g FQ2 S10100N FQ2 S15100N FQ2 S20100N FQ2 S25100N 29 18 to 300 191 mm 32 to 380 mm 8 High resolution models Field of view H V 3 Installation di...

Страница 552: ...s extract horizontal edges extract vertical edges enhance edges and background suppression polarizing filter attachment white bal ance Sensors with Color Cameras only and brightness correction Image e...

Страница 553: ...ossible by connecting FQ SDU2 Sensor Data Unit Input specifica tions Refer to Table 2 Output specifi cations Connection method Special connector cables Power supply and I O 1 cable FQ WD Touch Finder...

Страница 554: ...60529 IP40 Materials Sensor PBT PC SUS Mounting Bracket PBT Polarizing Filter Attachment PBT PC Ethernet connector Oil resistance vinyl compound I O connector Lead free heat resistant PVC Cover Zinc p...

Страница 555: ...970 mm 8 Approx 150 g FQ2 S40100N FQ2 S45100N 29 18 to 300 191 mm 32 to 380 mm 8 760 000 pixel Models Field of view H V 3 Installation dis tance Num ber of LEDs Weight NPN PNP FQ2 S40010F FQ2 S45010F...

Страница 556: ...achment and brightness correction Image elements 1 3 inch Monochrome CMOS Shutter Built in lighting lit 1 250 to 1 50 000 Built in lighting not lit 1 1 to 1 50 000 Processing resolution 752 480 Partia...

Страница 557: ...icator OR orange error indicator ERROR red Ethernet communications indicator ETN orange Note The assignment of the BUSY indicator can be changed to a RUN indi cator display color green Ratings Power s...

Страница 558: ...FQ2 CH15010F M 7 5 4 7 to 13 8 2 mm 38 to 57 mm 4 Approx 160 g FQ2 CH10050F M FQ2 CH15050F M 13 8 2 to 53 33 mm 56 to 215 mm 4 FQ2 CH10100F M FQ2 CH15100F M 53 33 to 240 153 mm 220 to 970 mm 8 Approx...

Страница 559: ...10F M CH10050F M FQ2 CH15010F M CH15050F M FQ2 S30010F 08 S35010F 08 S30010F 08M S35010F 08M FQ2 S30050F 08 S35050F 08 S30050F 08M S35050F 08M FQ2 S40010F 08 S45010F 08 S40010F 08M S45010F 08M FQ2 S40...

Страница 560: ...S35100N 08M FQ2 S40100F 08 S45100F 08 S40100F 08M S45100F 08M FQ2 S40100N 08 S45100N 08 S40100N 08M S45100N 08M See the diagram below when mounting bracket FQ XL2 is attached Unit mm 38 3 1 49 8 32 10...

Страница 561: ...pposite side isomorphous 29 dia Optical axis 4 M3 Depth 4 Mounting hole dimensions Four 3 4 dia 4 M3 Depth 4 1 6 M3 Depth 4 69 5 0 1 26 0 1 9 78 12 5 3 5 69 5 26 3 8 13 4 5 12 3 6 5 38 38 19 26 3 5 37...

Страница 562: ...etting can be changed Indicators Power indicator color green POWER Error indicator color red ERROR SD card access indicator color yellow SD ACCESS Power indicator color green POWER Error indicator col...

Страница 563: ...y Ambient temperature range Operating 0 to 50 C Storage 25 to 65 C with no icing or condensation Operating 0 to 50 C when mounted to DIN Track or panel 0 to 40 C when operated on a Battery Storage 25...

Страница 564: ...ons and Dimensions 562 FQ2 S CH User s Manual Dimensions FQ2 D30 D31 1 Provided on the FQ2 D31 only 1 15 13 5 23 8 14 8 11 11 95 44 5 70 33 3 52 9 85 35 5 35 5 27 9 12 1 19 2 17 3 27 10 20 30 70 30 82...

Страница 565: ...Specifications and Dimensions FQ2 S CH User s Manual 563 Appendices 9 Panel Mounting Adapter FQ XPM Panel cutout dimensions 133 4 8 1 2 3 5 116 95 85 116 31 6 36 9 Unit mm 111 1 111 1...

Страница 566: ...and case 0 5 M min at 250 VDC Current consumption 2 5 A max FQ2 CH FQ2 S FQ SDU 0 4 A max FQ2 S3 FQ SDU FQ2 S4 FQ SDU 0 1 A max for FQ SDU Envi ron mental immu nity Ambient temperature range Operatin...

Страница 567: ...Specifications and Dimensions FQ2 S CH User s Manual 565 Appendices 9 Dimensions FQ SDU10 SDU15 Unit mm 70 9 14 73 9 84 2 65 71 8 90 75 42 8 21 13 7 5 3 17 5 4 51 3 62 31 4...

Страница 568: ...Specifications and Dimensions 566 FQ2 S CH User s Manual FQ SDU20 SDU25 Unit mm 70 9 14 70 7 73 9 65 54 1 90 75 21 13 7 5 3 17 5 4 49 3 62 51 3 42 8 67 9 18 4 84 2...

Страница 569: ...ft Windows 10 Home Editionor higher 32 bit edition or 64 bit edition Hardware CPU Core 2 Duo 1 06 GHz or the equivalent or higher RAM 1 GB min HDD 500 MB min available space 1 Monitor 1 024 x 768 dots...

Страница 570: ...diameter 7 Minimum bending radius 35 mm Weight 200 g 400 g 800 g 1500 g Item Model FQ AC1 FQ AC2 FQ AC3 FQ AC4 FQ AC5 FQ AC6 Plug type A A A C BF O Certified standards PSE UL CSA CCC mark Input volta...

Страница 571: ...a 6 4 dia 19 5 dia 1 The cable length is given in the following table Model Cable length FQ WD002 2 m FQ WD005 5 m Unit mm 39 8 5000 50 0 100 100 5 35 L 1 2 6 4 dia 6 7 dia 15 6 dia 19 5 dia 1 The cab...

Страница 572: ...35 L 1 14 9 dia 6 5 dia 19 5 dia 19 5 dia 1 The cable lengths are given in the following table Model Cable length FQ WN002 2 m FQ WN005 5 m FQ WN010 10 m FQ WN020 20 m Unit mm 5 19 5 dia 15 5 dia 6 8...

Страница 573: ...anual 571 Appendices 9 Parallel Cable for FQ SDU1 FQ VP1002 VP1005 VP1010 42 7 30 pin flat cable connector 16 1 6 1 7 1 L 1 1 The cable lengths are given in the following table Model Cable length FQ V...

Страница 574: ...ble for FQ SDU2 FQ VP2002 VP2005 VP2010 AC Adapter FQ AC1 24 9 16 pin flat cable connector 6 1 7 1 16 1 L 1 1 The cable lengths are given in the following table Model Cable length FQ VP2002 2 m FQ VP2...

Страница 575: ...ch Finder 1 Place the update file that you obtained directly in the root folder of an SD card 2 Insert the SD card into the Touch Finder 3 Press Setup Mode or Run Mode TF settings Update Step 2 Update...

Страница 576: ...in the Sensor If you connect the Touch Finder without doing this the Touch Finder may freeze as soon as it is connected or during operation Apart from the filter items position compensation items and...

Страница 577: ...e following procedure without starting the PC Tool for FQ If you start the PC Tool Sensor detection and overwriting the file will not be performed normally 1 Connect the Sensor to the PC 2 Select All...

Страница 578: ...k the Create Button to save the installation data 7 Click Install Exe Grayed out Inspection Items If selecting an inspection item would cause the total memory size to be exceeded that inspection item...

Страница 579: ...d Method parameter to Local Auto When a sensor cannot be detected automatically or when connecting across routers use the File List function Sensors whose IP addresses are listed in the file can be de...

Страница 580: ...isplayed in the dialog box the data has been overwritten normally 13 Reset the Sensor Restoring Inspection Items to the Sensor It is not necessary to delete any inspection items to connect the FQ2 D30...

Страница 581: ...Connecting a Previous Touch Finder FQ D30 D31 to the FQ2 S Sensor FQ2 S CH User s Manual 579 Appendices 9 MEMO...

Страница 582: ...n 140 Characters 519 Check digit on off 186 checking the error histories 433 clearing the error histories 433 C mount cover 36 C mount lens mounting surface 36 Code color 210 Code type 210 Code type 2...

Страница 583: ...ing an SD Card 412 FQ Ethernet Cable 570 frame ground 56 59 frozen images 381 G G average 297 Gain 80 GATE 57 Graphics 354 Graphics Details 354 Gravity center X 313 Gravity center Y 313 Gravity X 303...

Страница 584: ...ompensation 102 models 215 mounting control panel 48 DIN Track 47 51 52 mounting base 36 41 Mounting Bracket 35 mounting holes 36 Multi point output 220 mutual interference prevention 89 N noise level...

Страница 585: ...try Function 422 setting up Ethernet 67 Shape 210 Shape Search II 230 247 shape search position compensation 104 107 SHTOUT 57 60 Shutter speed 80 Size 520 slider 38 sorting method 236 251 source imag...

Страница 586: ...Index 584 FQ2 S CH User s Manual width amount 284 wiring 54 Sensor 52 54 Sensor Data Units 56 Touch Finder 63 Z zooming 380...

Страница 587: ...Index FQ2 S CH User s Manual 585 Index 9...

Страница 588: ...position compensation item 03 April 2015 Corrected minor mistakes and added linear correction items etc Supports sensor version 2 0 04 August 2015 Additions corresponding to change of EN standard 05 J...

Страница 589: ......

Страница 590: ...9 U S A Tel 1 847 843 7900 Fax 1 847 843 7787 Contact www ia omron com Kyoto JAPAN OMRON ASIA PACIFIC PTE LTD No 438A Alexandra Road 05 05 08 Lobby 2 Alexandra Technopark Singapore 119967 Tel 65 6835...

Отзывы: