background image

M20011 REL-0000 (2103)

User Manual for Smart Manometer

16 of 60

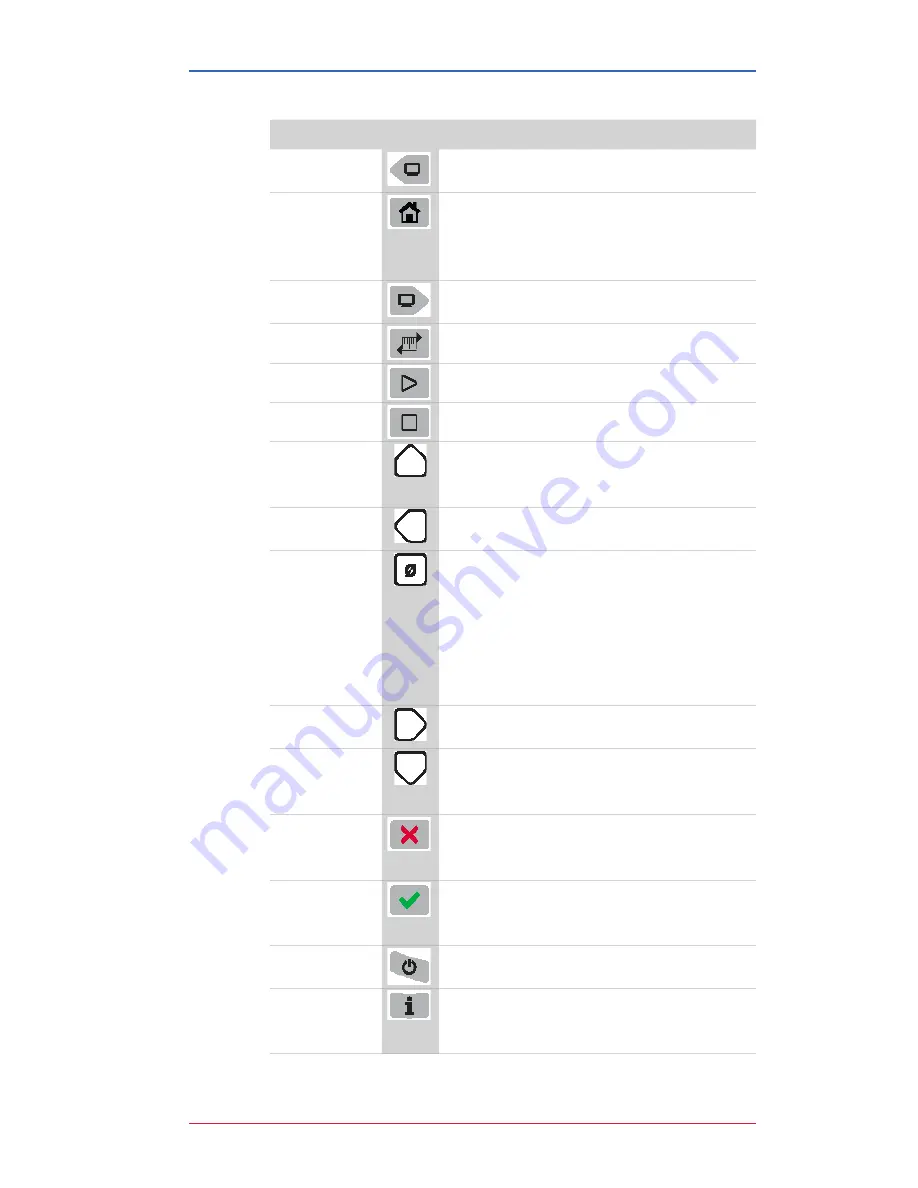
Keypad: Description of the keys

Name

Key

Description

Backward

•  It cycles backward through menu 

options.

Home

•  Home key returns you to the 

Measurement and Units

 screen.

•  Home key is disabled during tests 

and edits

Forward

•  It cycles forward through menu 

options.

Units

•  Select a measurement unit.

Start

•  Start key begins a test or data log.

Stop

•  Stop or Hold (Freeze) key. 

Up arrow

•  It increases digits by one. 
•  It switches between the P1 and P2 

sensors displays.

Left arrow

•  It moves the blinking cursor one 

space at a time to the left.

Zero & Tare

• 

Zero

 key resets pressure values to 

zero.

•  It resets min max values.
•  It sets edit values to zero.
•  It resets relief valve test.
•  As a 

Tare

 key, it turns off or turns on 

the Tare function.

Right arrow

•  It moves the blinking cursor one 

space at a time to the right.

Down Arrow

•  It decreases digits by one.
•  It switches between the P1 and P2 

sensors displays.

Cancel or Esc

• 

Cancel

 any editing or changes 

without saving. 

•  It also stops tests.

Accept

• 

Accept

 applies all editing and 

changes, and then saves them. 

•  It also stops tests.

Power

•  Turns the Smart Manometer on or off.

Information

•  Displays information about the Smart 

Manometer, internal sensor, attached  
sensor, and the firmware.

Содержание HHP400

Страница 1: ...www omega com info omega com 1 800 826 6342 Omega 2021 User Manual HHP452 Smart Manometer Smart Manometer and Sensors OMEGA Tethered Sensors HHP400 Suite Application...

Страница 2: ...13 Batteries 13 The display 15 Keypad Description of the keys 16 The backlight 18 Measurement units 19 Damping 20 Data Logging 21 Leak Test 22 Relief Valve Test 25 Differential displays 26 Auto Off Au...

Страница 3: ...M20011 REL 0000 2103 User Manual for Smart Manometer 3 of 60 Relative humidity 57 Vibration 57 Ingress specifications 57 Keypad 57 Media compatibility 58 EMC compliance 59 Weight 60 Enclosure 60...

Страница 4: ...button refers to an area in HHP400 Suite that you can tap or click to select functions Isolated The word isolated refers to the sensing element being separated from the media It is commonly used in t...

Страница 5: ...hrases Definitions or explanations Diff p2 p1 The displayed result of the internal pressure measurement subtracted from the external pressure measurement out out displays on the process readout when t...

Страница 6: ...l These symbols Identify potential hazards Warn you about hazards that could result in personal injury or equipment damage Safety symbols Explaining the symbols This is the Read directions before usin...

Страница 7: ...Fire or explosion hazard Do not use General Purpose versions in hazardous areas Do not use General Purpose versions in areas that may contain flammable gas or vapors combustible dusts or ignitable fib...

Страница 8: ...Smart Manometer 8 of 60 Do not exceed pressure limits Do not exceed the Pressure Limits listed in the Specifications section of this manual Failure to operate within the specified pressure limit coul...

Страница 9: ...tall or remove the 1 8 in NPT fitting Applying torque to the manifold can damage the plastic enclosure and voids the warranty Do not over tighten Carefully equalize the pressure Avoid these two issues...

Страница 10: ...r was last zeroed The Smart Manometer can be zeroed only if the new applied zero is within 1 FS of the original factory calibration zero This prevents accidental zeroing at atmospheric pressure or oth...

Страница 11: ...three messages On screen message Explanations TAP TO CHOOSE REF Tapping the Accept key selects the displayed reference ARROWS TO CHANGE REF Tapping an Arrow key changes the displayed reference X Canc...

Страница 12: ...ometer returns to the Home Measurement Units screen 4 If someone has turned on the Password Required For Future Access feature in HHP400 Suite the password feature does not prevent you from zeroing th...

Страница 13: ...to the power supplied by the USB cable The battery icon disappears from the bottom row When you press the information button it displays USB POWER Do not use the USB in hazardous locations Batteries R...

Страница 14: ...positive and negative battery polarity markings at the bottom of the compartment 4 Replace the battery cover 5 To secure the cover torque the screws clockwise 2 in lbs maximum 6 Do not over tighten To...

Страница 15: ...ns It ships with five display functions active they appear in bold below You can change which displays are active with HHP400 Suite Press the Forward or Backward in reverse order key to view these mod...

Страница 16: ...ves the blinking cursor one space at a time to the left Zero Tare Zero key resets pressure values to zero It resets min max values It sets edit values to zero It resets relief valve test As a Tare key...

Страница 17: ...ifferential All the following sensor information describes the sensor indicated by P1 P2 3 CAL DATE 4 USL is an abbreviation for upper sensor limit 5 LSL is an abbreviation for lower sensor limit 6 LT...

Страница 18: ...te backlight The white backlight has an automatic time out If you do not press any keys while the backlight is on it automatically turns off after 1 minute Note You can configure the backlight timeout...

Страница 19: ...you turn on the Smart Manometer it defaults to the last selected measurement unit or P2 Measurement units are stored on a sensor The HHP400 Suite application gives you the ability to configure specifi...

Страница 20: ...s 4 seconds from the time of the step change until the Smart Manometer displays the full value of the new pressure Damping types Select a Type Exponential Smart Quick Smart Normal or Smart Slow Use ad...

Страница 21: ...cimal points seconds are expressed in decimal points PTS CFG 100 when time is configured points is blank n a TIME CFG when points are configured time is blank n a Starting a data log 1 From the Home s...

Страница 22: ...Arrow key to move the blinking cursor to the first zero you want to change Note The on screen scrolling message reminds you to enter a number from 0 1 1440 1440 minutes is 24 hours 5 Press the Up Arr...

Страница 23: ...rate in units per minute 3 After the test has stopped press the Forward key to review the MIN value and then the MAX value and then you can select an out option to exit the test by pressing either th...

Страница 24: ...s down to zero the digits begin to blink to indicate the Leak Test has stopped 2 Press the Forward key to cycle through these options 1 MIN 2 MAX 3 OR X to EXIT TEST 3 Press the Home key to exit Leak...

Страница 25: ...ST P value MIN is the minimum pressure measured after reaching MAX and pressure starts releasing If a new MAX is reached MIN resets 4 Press the Forward key and you see out Note At this point you see o...

Страница 26: ...large characters while external sensor information displays in small characters Press the Up arrow and Diff P1 P2 scrolls with P1 Units internal measurement units Note Differential displays are not av...

Страница 27: ...ress and hold the Zero key to reset the MIN and MAX measurement However this does not zero the pressure measurement In Tare mode When the Tare is off T OFF press and hold the Zero key to turn on Tare...

Страница 28: ...ing requirements and Data Log Pro You can perform your own calibration You can update the Smart Manometer in the field HHP400 Suite and USB Drivers required First Install HHP400 Suite 1 Download the H...

Страница 29: ...Use only the supplied USB cable when you connect to the USB port Close HHP400 Suite first then turn off your Smart Manometer Do not turn off the power on the Smart Manometer while it is communicating...

Страница 30: ...Watch for a yellow dot on an active tab A yellow dot appears on a tab in HHP400 Suite to indicate that you have made changes to settings but you have not saved them yet See Figure 1 and Figure 2 belo...

Страница 31: ...uite application displays the date in year month day format For example 2016 04 22 YYYY MM DD Hours Minutes Seconds format The HHP400 Suite application displays the time in 24 hour format You may choo...

Страница 32: ...anual for Smart Manometer 32 of 60 Connection status Attached devices The HHP400 Suite application displays the figures of the Smart Manometer and tethered sensor Descriptions appear alongside both of...

Страница 33: ...Manometer 33 of 60 No attached devices The HHP400 Suite application displays no figure of devices on the right side See the figure below No tethered sensor attached Notice the figure of the Smart Mano...

Страница 34: ...unsaved settings It displays a yellow alert icon to indicate you have changed a setting and you have not yet saved the setting Passwords Overview of passwords Passwords are never required to use a Sm...

Страница 35: ...one window HHP400 Suite unlocks that Smart Manometer or sensor on its other windows as well Data Log Lite has no password HHP400 Suite does not use a password for Data Log Lite since it cannot make a...

Страница 36: ...ons to the device Read and Write Configurations Read and Write refer to reading configuration data from a Smart Manometer or sensor or writing new data to them Save your configuration changes before y...

Страница 37: ...he displayed value for linear type Damping No settings on the Smart Manometer You cannot set the Damp Rate on the Smart Manometer You have to click the Configuration button in HHP400 Suite to change t...

Страница 38: ...ibration Enabled displays the Live Reading with your current user calibration applied Without a check mark in the box it displays Live Reading without your user calibration Restore Factory Defaults Th...

Страница 39: ...0 of FS 2 5 point nominal values of 0 25 50 75 and 100 of FS 3 Restore factory default calibration For the 5 Point calibration points 2 3 and 4 can be adjusted within 1 of reading around the nominal v...

Страница 40: ...ttached to the computer with HHP400 Suite Data Log Lite The Data Log Lite button displays when you attach a Smart Manometer Data Log Lite is the free version of data logging It has no options Data Log...

Страница 41: ...han 10 it displays all of your samples Status and pressure for logs The Status symbols for pressure and temperature The symbol corresponds to readings that are within the calibrated range The and symb...

Страница 42: ...p a TSV file into a spreadsheet Drag and drop TSV files to open them The following steps are similar for these spreadsheet applications Microsoft Excel OpenOffice Calc and Google Sheets 1 Open File Ex...

Страница 43: ...Manometer 43 of 60 Upgrade tab The Upgrade tab provides you with an Enter Activation Key edit box and an Activate Device button to replace Lite with Pro Note The Activate Pro button remains unavailabl...

Страница 44: ...iew the list of logs on the Smart Manometer The Directory tab displays all the logs in the memory of the connected Smart Manometer Two ways to open a log Double click a log to open it in the Preview t...

Страница 45: ...ab Overview of the Preview tab When you double click a log in the Directory tab the Preview tab opens The Preview tab contains seven areas of information 1 Data Log Information list 2 Sensor Informati...

Страница 46: ...dicates the day and time the log ended 5 Interval is how often data is saved but the Internal does not display with the On Demand option 6 Duration displays how long the log actually recorded data Thi...

Страница 47: ...3 The symbol indicates readable data but it is out of range 4 The symbol indicates dashes on the Smart Manometer and no readable data 6 Navigation bar This bar provides you with buttons to jump to the...

Страница 48: ...ements over the intervals you selected It also saves the maximum and minimum measured values during the interval you saved It takes measurements every 200 ms 4 On Demand refers to manually recording a...

Страница 49: ...Save your configuration changes before you click the Read button After you click this button all changes on screen are replaced with the configuration that is on the Smart Manometer Note If the Smart...

Страница 50: ...able Update After clicking this button it displays the following message PLEASE BE ADVISED If you choose to install the update at this time you will lose unsaved configuration information or data log...

Страница 51: ...r each sensor that you attach to the Smart Manometer Update notifies you of available updates It displays a green alert icon to indicate an update is available for the firmware in the sensor or the Sm...

Страница 52: ...K 14 5 psi to 15 psi HHP452 Ll 14 5 psi to 50 psi HHPP452 C 14 5 psi to 100 psi Compound Isolated CI HHP452 D 14 5 psi to 15 psi HHP452 T 14 5 psi to 30 psi HHP452 U 14 5 psi to 50 psi HHP452 V 14 5...

Страница 53: ...HP452 L TS 14 5 psi to 50 psi HHP452 C TS 14 5 psi to 100 psi Compound Isolated CI HHP452 D TS 14 5 psi to 15 psi HHP452 T TS 14 5 psi to 30 psi HHP452 U TS 14 5 psi to 50 psi HHP452 V TS 14 5 psi to...

Страница 54: ...g from 0 to 110 of FS For Compound sensors only Vacuum 0 02 of FS Vacuum 14 5 psi Accuracy statements include the combined effects of linearity repeatability hysteresis and temperature over the specif...

Страница 55: ...e red backlight turns on automatically Above 120 the red backlight turns on and displays OVER RANGE in place of pressure reading Temperature Storage 20 C to 70 C 4 F to 158 F Operating 10 C to 50 C 14...

Страница 56: ...isolated sensors for use with gases and liquids compatible with 316LSS and Viton O rings CI Compound or Absolute pressure sensors for use with gases and liquids compatible with 316LSS AI Compound or...

Страница 57: ...eyond the published tolerance of each respective value being measured In the event of such a phenomenon occurring the operator should move away from or have removed any source of strong RF emissions s...

Страница 58: ...al for Smart Manometer 60 of 60 Weight Smart Manometer 1000 g 35 2 oz or 2 2 lb Omega Tethered Sensors pressure module 148 g or 0 33 lb Omega Tethered Sensors temperature module 92 5 g or 0 20 lb Encl...

Отзывы: