6-4 Calibration
NetScan User’s Manual
Using ScanCal
To use ScanCal, simply follow the four steps listed under the word Instructions in ScanCal’s Main Window.
The steps are repeated below, along with the proper tool icon and equivalent pull-down menu option.
Instructions for setting up calibration equipment are contained in specific sections of this chapter, for
example, the section Offset Calibration of Main Unit details how to use a calibration card and either of two
shorting methods.
Step
Instruction
Tool Icon
Pull-down Menu
1
Verify the interface parameters
Dip Switch
Icon
File menu
2
Click the inventory tool to perform a system inventory.
Inventory
Icon
Instrument menu
3
Select the desired devices from the inventory list.
Inventory
Icon
Instrument menu
4
Click the calibrate tool.
Calibrate
Icon
Calibrate menu
Note: The following text discusses the use of the tool icons. However, if desired, the pull-down menus
can be used instead.
Interface Parameters
If your data acquisition device interface is set up for Network (ethernet), you should
change the device interface to RS-232 serial communications prior to performing
calibration. Refer to your hardware setup chapter as needed.
1a.
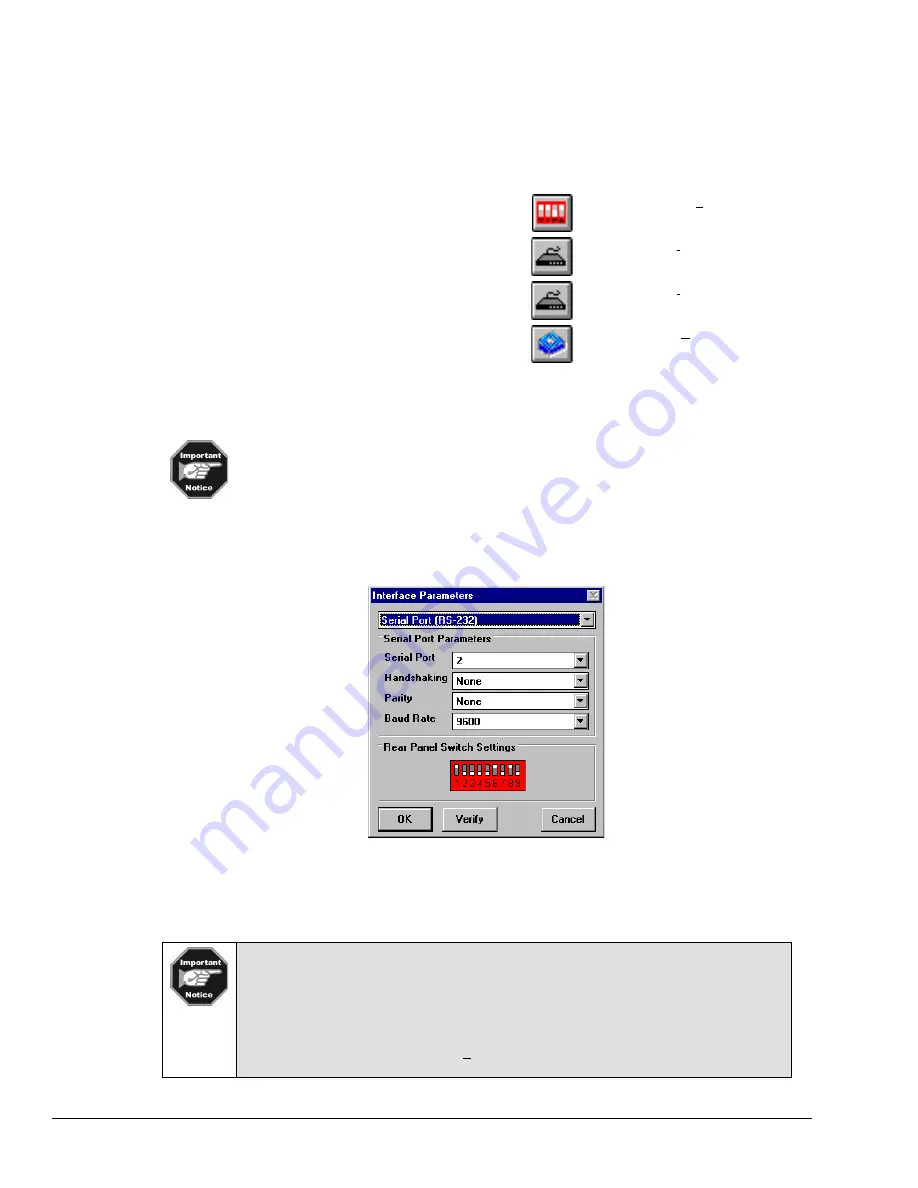
Select the DIP Switch toolbar icon to activate the Interface Parameters window. This allows you to
select and setup the communication interface used for your scanning system. Once the icon is selected,
an Interface Parameters window appears. The following example is from a ChartScan unit with
RS-232 Serial Port interface.
Example Screen Capture from a ChartScan System
1b.
Choose the desired interface by clicking the top pull-down triangle (
τ
) and then selecting the applicable
interface from the expanded interface list. Note that Rear Panel Switch Settings (shown in the window)
correspond to the chosen interface. Click the Verify box to make sure the settings are correct.
The Calibration Enable/Disable pushbutton (located on the main unit chassis rear panel) must be in
the indent (enable position) in order to calibrate the main chassis.
Early production ChartScan units (units that have no calibration pushbutton) must have DIP switch
#9 in the 1 (up) position.
After completing the prompt instructions, you can save the calibration settings by selecting the Save
Interface Parameters selection (from the File pull-down menu or toolbar). The settings and
constants will be stored in a file with a .CAL extension.
Содержание OMB-NETSCAN
Страница 6: ...iv NetScan User s Manual...
Страница 18: ...1 12 Configuring and Starting NetScan NetScan User s Manual Notes...
Страница 38: ...3 8 General Information and Specifications NetScan User s Manual Notes...
Страница 82: ...4 44 ChartView Software Reference NetScan User s Manual Notes...
Страница 111: ...NetScan User s Manual Calibration 6 13 1 Connect an applicable calibration harness to each card Refer to figure below...
Страница 118: ...6 20 Calibration NetScan User s Manual...
Страница 140: ...A ii NetScan User s Manual...
Страница 192: ...API Command Reference Appendix A A 52 NetScan User s Manual Notes...
Страница 237: ...Appendix D Registers Data Formats Queries NetScan User s Manual D 13...
Страница 244: ...NetScan Program Examples Appendix E E 2 NetScan User s Manual...
Страница 248: ...ASCII Code Summary Appendix F F 4 NetScan User s Manual Notes...
Страница 250: ...NetScan Error Messages Appendix G G 2 NetScan User s Manual Notes...
Страница 252: ...Abbreviations Appendix H H 2 NetScan User s Manual Notes...
Страница 254: ...NetScan User s Manual...


