background image

Printing with PictBridge-compatible printer

123

4

Pr

in

ting Pic

tu

res

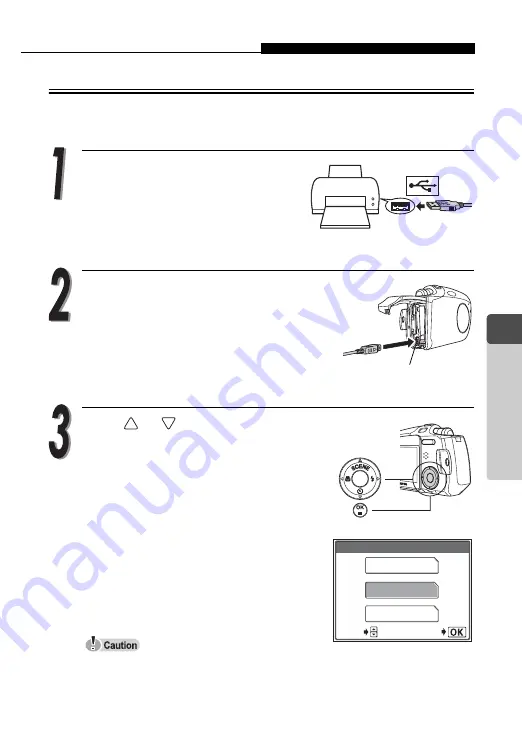
Connecting the camera to a printer

Use the USB cable provided to connect the camera to a PictBridge-
compatible printer.

Turn the printer on and plug the 
labeled end of the USB cable into 
the printer’s USB port.


For details of how to turn the printer 
on and locate the USB port, refer to the printer’s instruction manual.

Plug the other end of the USB cable 
into the Multi-connector on the camera.


The camera turns on automatically.


The camera’s monitor turns on and the 
screen for selecting the destination of the 
USB cable is displayed.

Press 

 or 

 to select [PRINT] and 

press the OK/MENU button.


[ONE MOMENT] is displayed, then the 
[PRINT MODE SELECT] screen is 
displayed on the monitor. Make the print 
settings using the camera’s monitor. 

g

Go to “Printing pictures” (P.124)


If [PC] is selected accidentally, unplug the USB cable and start over from step 1.


You may be able to print even with a non-PictBridge-incompatible printer. 
Contact the printer’s manufacturer for details.

Multi-connector

P C

PRINT

EXIT

USB

  GO

SELECT

Содержание Stylus Verve - Stylus Verve 4MP Digital...

Страница 1: ...DIGITAL CAMERA Advanced Manual 1 Taking Pictures 2 Viewing 3 Setting Up 4 Printing Pictures 5 Connecting Computer 6 Appendix...

Страница 2: ...a certain term use the index to find the page s where it is used Using the menu list gP 180 The camera s menus are laid out in the form of a tree diagram according to tab and show the setting options...

Страница 3: ...eral pictures at once This function lets you view several thumbnail pictures on the monitor at once It is useful when you are looking for a specific picture You can change the number of pictures displ...

Страница 4: ...lable F WB K MODE MENU m S ERASE INFO MODE MENU S ERASE INFO MODE MENU MOVIE PLAYBACK Shooting mode Playback mode still picture Playback mode movie WB GO AUTO SELECT ESP n CARD SET ISO DIGITAL ZOOM AF...

Страница 5: ...gital zoom 21 Using flash 23 Changing resolution and quality K 25 Picture quality modes for still pictures 25 Picture quality modes for movie 28 Selecting white balance according to surrounding lighti...

Страница 6: ...69 Creating black and white pictures 71 Creating sepia tone pictures 73 Changing the resolution Q 75 Protecting pictures 0 77 Erasing one picture S 79 Erasing all pictures R 80 3 Setting Up 83 Select...

Страница 7: ...NT mode 127 ALL PRINT mode 131 ALL INDEX mode PRINT ORDER mode 134 Exiting direct printing 136 5 Connecting Computer 137 Operational Sequence 138 Using provided OLYMPUS Master software 139 What is OLY...

Страница 8: ...LCD monitor 164 Error messages 165 If a problem arises 169 Green and red lamps and indicators 173 Camera maintenance 174 AC adapter sold separately 175 Names of parts 176 Monitor Display List 178 Men...

Страница 9: ...9 1 Taking Pictures This chapter describes how to take successive pictures movies and how to use the flash zoom etc To change the shooting settings refer to 3 Setting Up 1 Taking Pictures...

Страница 10: ...he same distance away as the subject Press the shutter button halfway When the green lamp lights steadily the focus exposure and white balance are locked When the green lamp blinks c You are too close...

Страница 11: ...e intended subject focus lock recompose your shot and then take the picture For details of the focus lock procedure refer to g P 10 If the subject has no vertical lines hold the camera vertically and...

Страница 12: ...nu Press or to select AF MODE Press to go to the AF mode settings SPOT The camera focuses on the subject in the AF target mark iESP Select the subject on the monitor that you would like to focus on Th...

Страница 13: ...Pictures Press or to select iESP or SPOT and press the OK MENU button The AF mode is set Press the OK MENU button again to exit the menu Take the picture using the monitor SPOT iESP CARD SET ESP n ISO...

Страница 14: ...tions Until you become familiar with the camera it is recommended that PROGRAM AUTO be used to take pictures Press l in shooting mode K The scene selection palette for selecting the shooting scene mod...

Страница 15: ...DSCAPE L Lets you take clear and sharp pictures of distant scenery Creates a very broad depth of field to keep the entire view in focus LANDSCAPE PORTRAIT K Suitable for taking pictures of both your s...

Страница 16: ...w Lets you take beautiful pictures of scenery with white sand or snow SELF PORTRAIT SELF TIMER N Lets you take pictures of yourself and the landscape BEHIND GLASS v Suitable for taking pictures of ite...

Страница 17: ...picture of candles preserving warm light of candles Picture quality mode can only be set to SQ2 1280 960 1024 768 and 640 480 SUNSET S Preserves the deep hues seen in sunsets and sunrises FIREWORKS y...

Страница 18: ...the POWER switch to turn the camera on When power is turned on the lens extends the monitor turns on and the camera enters shooting mode Position the AF target mark on the subject while looking at th...

Страница 19: ...me has been used up recording stops automatically To view the movie you have just taken see g Playing back movies q P 59 Press the POWER switch to turn off the camera The sound quality deteriorates te...

Страница 20: ...on a distant object Telephoto Press and hold the W side of the zoom button to zoom out and obtain a broader view Wide angle Shooting distance and shooting range Optical zoom up to 2 Optical zoom digi...

Страница 21: ...by the camera The area in the center of the image is cropped and magnified on the monitor Pictures taken with the digital zoom may appear grainy as a result Press the OK MENU button in shooting mode T...

Страница 22: ...m button to operate the digital zoom Pictures taken with the digital zoom may appear grainy Camera movement is likely to occur at higher magnifications Stabilize the camera with a tripod etc to avoid...

Страница 23: ...picture is taken Hold the camera firmly to avoid camera movement Effectiveness may be limited if the subject is not looking directly at the pre flashes or if the subject is too far from the camera Ind...

Страница 24: ...the flash is charging Example When is set the display shows indicator The flash setting mode display automatically turns off P a AUTO 2272 1704 2272 1704 11 11 11 HQ HQ AUTO P a 2272 1704 2272 1704 11...

Страница 25: ...picture is taken or a stored picture is erased Recording sound with still pictures reduces the number of pictures you can take Record mode Picture quality Resolution Usage examples SHQ Detailed 2272 1...

Страница 26: ...If the picture will be printed higher resolution larger number of pixels is recommended so that the picture will be clearer However higher resolution pictures make the file size amount of data larger...

Страница 27: ...ss or to choose a resolution and press the OK MENU button Press the OK MENU button The selected record mode and the number of shootable still pictures are displayed To save the selected picture qualit...

Страница 28: ...rding time shown in the above table are approximate Record mode Resolution Frames per second Recording time 16MB HQ 320 240 15 frames sec Approx 41 sec SQ 160 120 15 frames sec Approx 150 sec Record m...

Страница 29: ...ess the OK MENU button in the MOVIE n shooting mode The top menu is displayed Press to select K Press or to select HQ or SQ Press the OK MENU button The selected record mode and time remaining are dis...

Страница 30: ...white in the picture This adjustment function is called white balance Press the OK MENU button in shooting mode The top menu is displayed Press to select 0 AUTO The camera automatically adjusts the wh...

Страница 31: ...ce to 5 or 3 to capture a sunrise or sunset with beautiful reddish tones The white balance feature may not be effective under some special light sources such situations where multiple lights are used...

Страница 32: ...Adjusts towards to give a brighter picture Adjusts towards to give a darker picture Press the OK MENU button The selected exposure compensation value is set Often bright subjects such as snow will tu...

Страница 33: ...s to go to the CAMERA menu Press or to select ISO Press to go to the selected the ISO sensitivity setting AUTO The camera automatically compensates by raising or lower ing sensitivity depending on the...

Страница 34: ...he picture has The ISO sensitivities are measured based on silver halide films but the figures are approximate When ISO is set to AUTO and a picture is taken in a dark place without using the flash th...

Страница 35: ...E MENU Press or to select the CAMERA tab Press to go to the CAMERA menu Press or to select ESP n Press to go to the metering settings ESP no indication Meters the subject at the center of the monitor...

Страница 36: ...t metering is set Press the OK MENU button again to exit the menu Take the picture using spot metering c Position the subject in the center of the frame and press the shutter button halfway d Compose...

Страница 37: ...displayed on the monitor Take the picture using the monitor To cancel the macro mode select OFF You can take pictures of your subject at a distance of more than 50 cm 1 6 ft with the macro mode set t...

Страница 38: ...n the super macro mode When the super macro mode has been selected is displayed on the monitor Take the picture using the monitor To cancel the super macro mode set to OFF If you try to take a picture...

Страница 39: ...yed on the monitor Take the picture To cancel the self timer mode select YOFF The self timer lamp lights for approximately 10 seconds then starts blinking After blinking for approximately 2 seconds th...

Страница 40: ...tial shots you are recommended to use this mode when photographing a moving subject Press the OK MENU button in shooting mode K The top menu is displayed Press to go to MODE MENU Press or to select th...

Страница 41: ...exit the menu Take the pictures Press the shutter button fully and keep it pressed The camera will continue to take pictures until you release your finger from the shutter button Focus is set at the...

Страница 42: ...ontained in the CD ROM provided The panoramic mode is only available when using the Olympus xD Picture Card Press the OK MENU button in shooting mode K The top menu is displayed Press to go to MODE ME...

Страница 43: ...left to right Takes pictures from right to left Takes pictures from bottom to top Takes pictures from top to bottom Take the first picture Focus exposure and white balance are set by the first pictur...

Страница 44: ...taken so that they overlay part B Remember the picture in the frame so that you can compose the next picture The panoramic shooting is possible for up to 10 pictures When you have taken 10 pictures a...

Страница 45: ...single picture You can combine two different subjects in one picture Press the OK MENU button in shooting mode K The top menu is displayed Press to go to MODE MENU First picture Second picture Positi...

Страница 46: ...ake the second shot Once the second picture is taken the monitor automatically returns to the top menu To cancel shooting in mode before taking the first or second picture press the OK MENU button The...

Страница 47: ...ecorded after each picture is taken This is useful for adding an audio comment to the picture just taken Press the OK MENU button in shooting mode K The top menu is displayed Press to go to MODE MENU...

Страница 48: ...microphone toward the sound source The volume of the recorded sound can be adjusted during playback g Setting volume P 96 If the source of the sound you are recording is more than 1 m 3 3 ft away from...

Страница 49: ...49 2 Viewing This chapter describes how to play back the still pictures and movies To change the playback settings refer to 3 Setting Up 2 Viewing...

Страница 50: ...side of the zoom button in the playback mode The index display appears Use the arrow pad to select a picture Moves to the previous picture Moves to the next picture Jumps to the previous index displa...

Страница 51: ...or Press the OK MENU button in playback mode The top menu is displayed Press to go to MODE MENU Press or to select the SETUP tab Press to go to the SETUP menu Press or to select G Press to go to the i...

Страница 52: ...once G 52 2 Viewing Press or to choose the number of pictures 4 9 or 16 and press the OK MENU button The number of pictures in the index display is set Press the OK MENU button again to exit the menu...

Страница 53: ...Press the U side of the zoom button in the playback mode The picture is enlarged in steps 1 5 2 0 2 5 3 0 3 5 and 4 0 each time the U side of the zoom button is pressed When a picture is enlarged you...

Страница 54: ...e Press the OK MENU button The top menu is displayed Press to go to MODE MENU HQ HQ 20 20 04 12 18 15 30 04 12 18 15 30 100 0020 100 0020 HQ 20 20 04 12 18 15 30 04 12 18 15 30 100 0020 100 0020 HQ 20...

Страница 55: ...the OK MENU button The rotated picture is saved Press the OK MENU button again to exit the menu Protected pictures cannot be rotated Cancel the protection setting before rotating a protected picture...

Страница 56: ...how Pictures are displayed in sequence at approximately 3 second intervals Still pictures recorded with sound are displayed at in about 4 second intervals Press the OK MENU button to exit the slidesho...

Страница 57: ...g time for each picture is for about 4 seconds Play back the picture you wish to add sound to in playback mode Press the OK MENU button The top menu is displayed Press to go to MODE MENU Press or to s...

Страница 58: ...sound is recorded on the picture with sound previous sound will be erased and only newly recorded sound will be stored If the card has not enough memory space left cards which can show a warnig displ...

Страница 59: ...e with the n mark Press the OK MENU button The top menu is displayed Press to select MOVIE PLAYBACK The movie is played back The playing time and the total recording time are displayed on the monitor...

Страница 60: ...ayback while the button is pressed Displays the first frame Displays the last frame OK MENU button Displays the movie playback menu The movie playback menu is displayed when playback is finished Press...

Страница 61: ...ores as still pictures enabling you to see the content of the movie at a glance Select a movie with n and play it back Press the OK MENU button The top menu is displayed Press to select MODE MENU Pres...

Страница 62: ...w still pictures The index is stored as pictures in different record modes from the original movie The interval between the frames that are automatically selected for the index varies depending on the...

Страница 63: ...Japan PAL European countries China Press the OK MENU button in the playback mode The top menu is displayed Press to go to MODE MENU Press or to select the SETUP tab Press to go to the SETUP menu Pres...

Страница 64: ...enu Turn the camera and the TV off Plug the AV cable into the Multi connector on the camera Plug the yellow plug and the white plug of the AV cable into the TV video yellow and audio white input jacks...

Страница 65: ...ture is displayed on the TV Operate the camera in the same way as normal playback to display pictures on your TV When the pictures are played back on a TV we recommed you to use an AC adaptor and a po...

Страница 66: ...led shooting information is displayed To return to normal display repeat steps 1 and 2 Detailed information display Normal information display HQ HQ 20 20 04 12 18 15 30 04 12 18 15 30 9 H 5 SIZE SIZE...

Страница 67: ...cts you can change your picture to a vignette picture to give a fantastic atmosphere While in playback mode display the picture you want to convert into soft focus picture Press the OK MENU button The...

Страница 68: ...ss or to select SOFT FOCUS Press the OK MENU button to create the soft focus picture Once the soft focus picture is created it is stored as a new picture A new picture cannot be created if the card is...

Страница 69: ...ye view mode is selected the picture is transformed into a spherical picture While in playback mode display the picture you want to convert into fish eye pictures Press the OK MENU button The top menu...

Страница 70: ...Press or to select FISHEYE Press the OK MENU button to create the fish eye picture Once the fish eye picture is created it is stored as a new picture A new picture cannot be created if the card is fu...

Страница 71: ...es and store them as new pictures While in playback mode display the picture you want to convert into black and white pictures Press the OK MENU button The top menu is displayed Press to go to MODE ME...

Страница 72: ...or to select BLACK WHITE Press the OK MENU button to create the black and white picture Once the black and white picture is created it is stored as a new picture A new picture cannot be created if the...

Страница 73: ...res and store them as new pictures While in playback mode display the picture you want to convert into sepia color Press the OK MENU button The top menu is displayed Press to go to MODE MENU Press or...

Страница 74: ...s Press or to select SEPIA Press the OK MENU button to create the sepia tone picture Once the sepia tone picture is created it is stored as a new picture A new picture cannot be created if the card is...

Страница 75: ...e data such as when posting pictures on the Internet or attaching them to e mail You can choose from two resolutions 640 480 and 320 240 While in playback mode display the picture you want to resize P...

Страница 76: ...MENU button to create the resized picture Once the picture is resized it is stored as a new picture A new picture cannot be created if the card is full If the resolution is 640 480 when the picture i...

Страница 77: ...all frame erase function Formatting erases both unprotected and protected pictures g Formatting a card P 107 While in playback mode display the picture you want to protect Press the OK MENU button The...

Страница 78: ...n settings Press or to select ON To cancel protection select OFF Press the OK MENU button The selected picture is protected 9 is displayed on the screen y 0 0 R OFF CARD EDIT PLAY SET y 0 R CARD EDIT...

Страница 79: ...ctures R P 80 The protected pictures cannot be erased g Protecting pictures 0 P 77 Once erased pictures cannot be restored While in playback mode display the picture you want to erase Press the OK MEN...

Страница 80: ...ctures 0 P 77 Once erased pictures cannot be restored Press the OK MENU button in the playback mode The top menu is displayed Press to go to MODE MENU Press or to select the CARD tab Press to go to th...

Страница 81: ...Erasing all pictures R 81 2 Viewing Press to select YES and press the OK MENU button All pictures except for protected ones are erased R ALL ERASE CAUTION ERASING ALL YES NO GO SELECT...

Страница 82: ...82 MEMO 2 Viewing...

Страница 83: ...g Up Describes how to set operation modes and change settings 3 Setting Up When the same settings are available for Shooting mode and Playback mode the monitor displays for Shooting mode are used in t...

Страница 84: ...OK MENU button The top menu is displayed Press to go to MODE MENU Press or to select the SETUP tab Press to go to the SETUP menu Press or to select W Press to go to the language settings F WB K MODE M...

Страница 85: ...on where you purchased the camera Press the OK MENU button The selected language is set Press the OK MENU button again to exit the menu You can select other languages too The firmware for other langua...

Страница 86: ...pictures Press the OK MENU button The top menu is displayed Press to go to MODE MENU Press or to select the SETUP tab Press to go to the SETUP menu Press or to select X Press to go to the date time s...

Страница 87: ...te and time inputtings The time is displayed in 24 hour format For example 1 00 p m is displayed as 13 00 Press the OK MENU button For a more accurate setting press the OK MENU button when the time hi...

Страница 88: ...s displayed Press to go to MODE MENU Press or to select the SETUP tab Press to go to the SETUP menu Press or to select ALL RESET Press to go to the save on off settings ON All settings are reset to th...

Страница 89: ...83 for information about all the default settings the settings when shipped from the factory OFF ON W ALL RESET PW ON SETUP COLOR 8 CARD CAM SETUP The functions and settings to save or reset your sett...

Страница 90: ...next shot immediately without checking the previous picture set REC VIEW to OFF Press the OK MENU button in shooting mode K The top menu is displayed Press to go to MODE MENU Press or to select the SE...

Страница 91: ...t ON or OFF and press the OK MENU button Press the OK MENU button again to exit the menu For movie shooting mode REC VIEW cannnot be set For successive pictures mode the REC VIEW pictures do not appea...

Страница 92: ...ress the OK MENU button The top menu is displayed Press to go to MODE MENU Press or to select the SETUP tab Press to go to the SETUP menu Press or to select 8 Press to go to the beep sound settings F...

Страница 93: ...s or to select OFF LOW or HIGH To turn off the beep sound select OFF Press the OK MENU button The beep sound is set to the selected level Press the OK MENU button again to exit the menu W W LOW HIGH O...

Страница 94: ...button in shooting mode K The top menu is displayed Press to go to MODE MENU Press or to select the SETUP tab Press to go to the SETUP menu Press or to select SHUTTER SOUND Press to go to the shutter...

Страница 95: ...evel To turn off the sound select OFF Press or to select HIGH or LOW and then the OK MENU button Again press the OK MENU button twice to exit the menu The shutter sound is set The shutter sound level...

Страница 96: ...mode The top menu is displayed Press to go to MODE MENU Press or to select the SETUP tab Press to go to the SETUP menu Press or to select VOLUME Press to go to the volume setting F WB K MODE MENU W AL...

Страница 97: ...GH To disable the sound select OFF Press the OK MENU button The volume is set Press the OK MENU button again to exit the menu H is displayed on the monitor while recorded pictures with sound are playe...

Страница 98: ...ecording power on screen P 100 Press the OK MENU button The top menu is displayed Press to go to MODE MENU Press or to select the SETUP tab Press to go to the SETUP menu Press or to select PW ON SETUP...

Страница 99: ...is recorded no screen will be displayed when the camera is turned on Press or to select VOLUME and then press Press or to select OFF LOW or HIGH OFF cannot be selected for VOLUME when SCREEN is set t...

Страница 100: ...to go to the SETUP menu Press or to select SCREEN SETUP Press to go to the power on screen setting If a screen is already recorded the monitor displays the screen shown at right For recording the scr...

Страница 101: ...Press or to select OK and press the OK MENU button Press the OK MENU button again to exit the menu The recorded screen here is recorded at 3 of PW ON SETUP position g Setting power on screen and sound...

Страница 102: ...U button The top menu is displayed Press to go to MODE MENU Press or to select the SETUP tab Press to go to the SETUP menu Press or to select COLOR Press to go to the color settings F WB K MODE MENU W...

Страница 103: ...color 103 3 Setting Up Press or to select NORMAL BROWN BLUE or BLACK Press the OK MENU button The screen color is set Press the OK MENU button again to exit the menu NORMAL BROWN BLUE BLACK COLOR GO...

Страница 104: ...d folder numbers each time a card is inserted into the camera The file number returns to 0001 and the folder number returns to 100 This is useful for managing pictures on different cards AUTO The file...

Страница 105: ...to go to MODE MENU Press or to select the SETUP tab Press to go to the SETUP menu Press or to select FILE NAME Press to go to the file name settings F WB K MODE MENU W CARD ALL RESET PW ON SETUP COLO...

Страница 106: ...tting Up Press or to select RESET or AUTO Press the OK MENU button The file name is set to selected mode Press the OK MENU button again to exit the menu RESET AUTO SHUTTER SOUND FILE NAME PIXEL MAPPIN...

Страница 107: ...ures are also erased When formatting the cards with pictures stored pay special attention not to erase them accidently Press the OK MENU button The top menu is displayed Press to go to MODE MENU Press...

Страница 108: ...U button The BUSY bar is displayed while the card is being formatted Never open the card cover or connect or disconnect the battery AC adapter and power coupler during formatting Such action may rende...

Страница 109: ...n The top menu is displayed Press to go to MODE MENU Press or to select the SETUP tab Press to go to the SETUP menu Press or to select s Press to go to the brightness settings F WB K MODE MENU W CARD...

Страница 110: ...3 Setting Up While looking at the monitor press or to adjust the brightness Pressing brightens the monitor and pressing darkens it Press the OK MENU button The brightness is set Press the OK MENU butt...

Страница 111: ...pping function The camera was adjusted at the factory before shipment and does not need to be adjusted immediately after purchase Press the OK MENU button in shooting mode The top menu is displayed Pr...

Страница 112: ...Up Press the OK MENU button The BUSY bar is displayed during Pixel Mapping process and the camera is adjusted Press the OK MENU button again to exit the menu If you accidentally turn the camera off du...

Страница 113: ...ing Pictures Describes how to print pictures taken with the camera in two ways One is to print using the Digital Print Order Format DPOF and the other is using a PictBridge compatible printer 4 Printi...

Страница 114: ...s P 115 You can also print pictures directly with a PictBridge compatible printer Direct printing By connecting the camera to a PictBridge compatible printer with the USB cable you can print out recor...

Страница 115: ...116 g Single frame reservation P 118 What is DPOF DPOF is short for Digital Print Order Format DPOF is the format used to record information relating to which frames have been selected how many prints...

Страница 116: ...rame You cannot make print reservations for pictures with the n movie mark Press the OK MENU button in playback mode The top menu is displayed Press to go to MODE MENU Press or to select the PLAY tab...

Страница 117: ...re printed without the shooting date and time DATE The pictures are printed with the shooting date TIME The pictures are printed with the shooting time Press or to select SET and press the OK MENU but...

Страница 118: ...res with n movie mark Press the OK MENU button in playback mode The top menu is displayed Press to go to MODE MENU Press or to select the PLAY tab Press to go to the PLAY menu Press or to select Press...

Страница 119: ...rinted or not and press the OK MENU button NO The pictures are printed without the shooting date and time DATE The pictures are printed with the shooting date TIME The pictures are printed with the sh...

Страница 120: ...ation data stored on the card Press the OK MENU button in playback mode The top menu is displayed Press to go to MODE MENU Press or to select the PLAY tab Press to go to the PLAY menu Press or to sele...

Страница 121: ...ting Pictures Press or to select RESET and press the OK MENU button Press to return to the PLAY menu Press the OK MENU button to exit the menu PRINT ORDERED PRINT ORDER SETTING RESET KEEP GO SELECT CA...

Страница 122: ...nd printers of different manufacturers and printing out pictures directly What is STANDARD setting All printers that support PictBridge have standard print settings Selecting STANDARD on the settings...

Страница 123: ...lti connector on the camera The camera turns on automatically The camera s monitor turns on and the screen for selecting the destination of the USB cable is displayed Press or to select PRINT and pres...

Страница 124: ...ple layout format on one paper g PRINT mode MULTI PRINT mode P 127 ALL INDEX Prints an index of all the pictures stored on the card g ALL INDEX mode PRINT ORDER mode P 134 PRINT ORDER Prints the pictu...

Страница 125: ...ss or to select the paper size then press When the PRINT PAPER screen is not displayed SIZE BORDERLESS and PICS SHEET are set to STANDARD Go to step 4 Press or to select BORDERLESS or not and press th...

Страница 126: ...n Press or to select OK and press the OK MENU button Printing starts To return to the PRINT MODE SELECT screen select CANCEL and press the OK MENU button When printing is finished return to step 4 Whe...

Страница 127: ...ep 3 MULTI PRINT mode Go to step 4 When the PRINT PAPER screen is not displayed SIZE BORDERLESS and PICS SHEET are set to STANDARD Go to step 5 Press or to select BORDERLESS or not and press the OK ME...

Страница 128: ...INGLE PRINT Makes a single frame print reservation for the selected picture according to standard settings One copy is printed MORE Sets the number of prints of the selected picture in the print reser...

Страница 129: ...ted with the file name DATE and FILE NAME are not available in MULTI PRINT mode e When you have finished all the settings for MORE press the OK MENU button The screen displayed in step 5 appears To pr...

Страница 130: ...When printing is finished the monitor returns to the PRINT MODE SELECT screen g Using the direct printing function P 122 To cancel printing Pressing the OK MENU button during print data transfer disp...

Страница 131: ...the PRINT PAPER screen is not displayed SIZE and BORDERLESS are set to STANDARD Go to step 4 Press or to select BORDERLESS and press the OK MENU button OFF The picture is printed inside a blank frame...

Страница 132: ...f you select WITH pictures are printed with the file name Press the OK MENU button The PRINT screen is displayed Print the pictures Press or to select OK or CANCEL and press the OK MENU button OK Prin...

Страница 133: ...ictures To cancel printing Pressing the OK MENU button during print data transfer displays the screen for selecting whether to continue or cancel printing To cancel printing press or to select CANCEL...

Страница 134: ...displayed SIZE and BORDERLESS are set to STANDARD printer default settings Go to step 4 Press or to select BORDERLESS or not and press the OK MENU button OFF The picture is printed inside a blank fra...

Страница 135: ...MODE SELECT screen When printing is finished the monitor returns to the PRINT MODE SELECT screen g Exiting direct printing P 136 To cancel printing Pressing the OK MENU button during print data trans...

Страница 136: ...shed printing disconnect the camera from the printer With the PRINT MODE SELECT screen displayed press A message is displayed Unplug the USB cable from the camera The camera turns off Unplug the USB c...

Страница 137: ...r This chapter describes how to transfer pictures stored on the card to computer and how to use various functions of OLYMPUS Master For details refer to the on line Help and the manual of OLYMPUS Mast...

Страница 138: ...If the camera is connected to a computer via a USB hub reliable operation cannot be guaranteed If a malfunction should occur connect the camera directly to the computer without using the USB hub Utili...

Страница 139: ...related sections of this manual You can view the pictures and movies and you can also enjoy the slides show and play back the sound You can transfer the image data from the camera or media You can sor...

Страница 140: ...Home Edition is supported For Windows 2000 systems only Windows 2000 Professional is supported If you use Windows 98SE the USB driver is automatically installed If you install using Windows 2000 Prof...

Страница 141: ...ing operations be sure to eject the installed media by dragging into the trash Failure to do so may cause the computer to function unstably and require restarting unplugging the connection cable used...

Страница 142: ...es not display automatically double click the My Computer icon on your desktop and then click the CD ROM icon Select the language to be installed Click OLYMPUS Master The QuickTime installation window...

Страница 143: ...played review the agreement and click Yes When the user information window is displayed type in Name and the OLYMPUS Master Serial Number Then select your resident country and click Next The serial nu...

Страница 144: ...click Cancel and go to step 8 The Adobe Reader installation window appears Operate according to the window messages The installation completion window appears Click Finish The display returns to the...

Страница 145: ...click the CD ROM icon on the desktop labeled OLYMPUS Master Double click the installer icon Operate according to the window messages The installer of OLYMPUS Master is activated When the software lice...

Страница 146: ...omputer For the location of the USB port on your computer see the manual for the computer Connect the other end of the USB cable to the multi connector on the camera The camera turns on automatically...

Страница 147: ...the message The computer recognizes the camera as a Removable Disk Windows XP When the computer has been connected to the camera a window is displayed prompting you to select the operation for the im...

Страница 148: ...e main menu window appears automatically Macintosh Double click the OLYMPUS Master icon in the OLYMPUS Master folder The main menu window appears automatically The first time the computer is activated...

Страница 149: ...ing to OLYMPUS Master Plus e Browse Images button Use to display the browse image f Backup Images button Use to back up images g Create and Share button Use to display the enjoy menus h Print Images b...

Страница 150: ...YMPUS Master main menu click the Transfer Images button The transferring source selection menu window appears Click the From Camera button in the menu window The transferring source window appears The...

Страница 151: ...are being transferred Never open the card cover on the camera or disconnect or connect the battery AC adapter and power coupler Doing so may cause damage to the data in the card Disconnecting the cam...

Страница 152: ...intosh 1 Drag and drop the NO_NAME or Untitled icon on the desktop to TRASH Unplug the USB cable from the camera For Windows Me 2000 XP when the Eject Hardware menu is clicked a warning message saying...

Страница 153: ...ter main menu click the Browse Images button The Browse Window is displayed Double click the thumbnail of the still picture you want to view The display switches to view mode and the picture is enlarg...

Страница 154: ...of the other buttons is as follows Item Description 1 Playback Slider Moves the slider to select a desired frame 2 Time Display Displays elapsed time in playback 3 Playback Pause button Play backs the...

Страница 155: ...Images The Print Menu window is displayed Click the Photo button The Photo Print window is displayed Click Settings on the Photo Print window The Printer Settings dialog window is displayed Set to the...

Страница 156: ...puter Select the thumbnail of the picture you want to print and click Add The selected picture is displayed on the layout as a preview Set the number of prints Click Print To return to the main menus...

Страница 157: ...tee proper operation even if it is equipped with the USB connector Windows 95 NT 4 0 Up graded Windows 98 98SE from Windows 95 Mac OS 8 6 or prior only for Mac OS 8 6 originally equipped with USB conn...

Страница 158: ...158 5 Connecting Computer MEMO...

Страница 159: ...159 6 Appendix Troubleshooting Camera Maintenance Checking Functions and Specifications 6 Appendix...

Страница 160: ...ring the flash into their own eyes or those of another child Accidentally being injured by the moving parts of the camera Do not look at the sun or strong lights with the camera To avoid damaging your...

Страница 161: ...ch fire Do not use the charger or AC adapter if it is covered such as a blanket This could cause overheating resulting in fire Handle the camera with care to avoid getting a low temperature burn When...

Страница 162: ...eating or causing a fire or explosion use only batteries recommended for use with this product Insert the battery carefully as described in the operating instructions Never load the battery with its t...

Страница 163: ...ed in a nonvolatile semiconductor memory but it can be accidentally destroyed Do not expose the card to water or leave it where there is a lot of dust Avoid using or storing the card in places of high...

Страница 164: ...ure or damage to the monitor A strip of light may appear on the top bottom of the monitor but this is not a malfunction When a subject is viewed diagonally in the camera the edges may appear zigzagged...

Страница 165: ...is a problem with the card and it can not be used If the card cannot be formatted use another card Insert a new card Read only has been set using a computer Use the computer again to cancel the read...

Страница 166: ...n a computer If that cannot be done the image file is damaged Format the card g P 107 Close the card cover g See the separate Basic manual provided Set the date time g P 86 Charge the battery Monitor...

Страница 167: ...e printer has run out of ink Replace the ink cartridge in the printer The paper is jammed in the printer Remove the jammed paper The printer s paper tray has been removed or a similar action has been...

Страница 168: ...ages 168 6 Appendix There is a problem with the printer and or camera Turn off the camera and printer check the printer and then turn on both devices Monitor indication Corrective action PRINT ERROR C...

Страница 169: ...power the camera automatically enters the sleep mode Turn the cam era on again 1 t The camera is connected to a computer t The camera will not operate while it is connected to a computer The camera do...

Страница 170: ...The date and time are not set at the time of purchase P 86 o The camera has been left with the battery removed o Set the date and time again P 86 p The camera detected a prob lem in the power supply...

Страница 171: ...til the green lamp lights before pressing the shutter button fully P 173 1 r You did not use focus lock when the subject was outside the center of the frame r Use focus lock to obtain an accurate focu...

Страница 172: ...n affect the picture s colors n Adjust the white balance to suit the lighting P 30 o There was no white in the sub ject o Include something white in the picture or shoot using the P 23 p The white bal...

Страница 173: ...ntil the icon stops blinking Camera movement warning or inappropriate exposure warning when the shutter button is pressed halfway Pictures can be taken but may come out blurred or dark Hold the camera...

Страница 174: ...nly after the battery has been removed and the AC adapter and power coupler have been disconnected Mold may form on the lens surface if the lens is left dirty or wet Storing the camera If you do not i...

Страница 175: ...nternal settings or functions could be affected Do not insert or eject the card when the connecting cord plug of the AC adapter is plugged into the power coupler To insert or eject the card be sure to...

Страница 176: ...Names of parts Flash gP 23 Shutter button g 1 Microphone gP 48 Lens g 1 Card cover g 1 Multi connector gP 123 146 Mode dial g 1 Self timer lamp gP 39 Battery lock knob g 1 1 See the separate Basic ma...

Страница 177: ...tor cover g 1 Zoom button gP 20 50 53 Arrow pad Speaker Strap eyelet g 1 The Arrow pad can be used to set the macro mode flash mode and other settings It can also be used as directional keys g Menu op...

Страница 178: ...Drive P 40 9 Sound record R P 47 10 Record mode SHQ HQ SQ1 SQ2 SQ P 25 11 Resolution 2272 1704 2048 1536 1600 1200 1280 960 1024 768 640 480 P 25 12 Exposure compensation 2 0 2 0 P 32 13 Spot metering...

Страница 179: ...Q2 SQ P 25 7 Resolution 2272 1704 2048 1536 1600 1200 1280 960 1024 768 640 480 320 240 160 120 P 25 8 Exposure compensation 2 0 2 0 P 32 9 White balance 5 3 1 P 30 10 ISO ISO64 ISO100 ISO200 ISO400 P...

Страница 180: ...45 CARD FORMAT YES P 107 SETUP ALL RESET OFF P 88 W P 84 PW ON SETUP SCREEN OFF 2 3 VOLUME OFF HIGH P 98 COLOR BROWN BLUE BLACK P 102 8 OFF HIGH P 92 SHUTTER SOUND OFF 2 3 P 94 HIGH REC VIEW OFF P 90...

Страница 181: ...OFF 2 3 VOLUME OFF HIGH P 98 COLOR BROWN BLUE BLACK P 102 8 OFF HIGH P 92 FILE NAME AUTO P 104 PIXEL MAPPING P 111 s P 109 X P 86 VIDEO OUT NTSC PAL P 63 K SQ P 28 F 2 0 2 0 P 32 0 5 3 1 P 30 is the...

Страница 182: ...SCREEN OFF 2 3 VOLUME OFF HIGH P 98 SCREEN SETUP CANCEL P 100 COLOR BROWN BLUE BLACK P 102 VOLUME OFF HIGH P 96 8 OFF HIGH P 92 s P 109 X P 86 VIDEO OUT NTSC PAL P 63 G 4 16 P 51 m P 56 INFO P 66 SER...

Страница 183: ...PW ON SETUP SCREEN OFF 2 3 VOLUME OFF HIGH P 98 SCREEN SETUP CANCEL P 100 COLOR BROWN BLUE BLACK P 102 VOLUME OFF LOW P 96 8 OFF HIGH P 92 s P 109 X P 86 VIDEO OUT NTSC PAL P 63 G 4 16 P 51 MOVIE PLAY...

Страница 184: ...9 9 9 9 9 9 9 ESP n 9 9 9 9 9 9 9 9 9 ESP j 9 9 9 9 9 9 9 9 9 ISO 9 9 9 9 9 9 9 9 9 9 DIGITAL ZOOM 9 9 9 9 9 9 9 9 9 AF MODE 9 9 9 9 9 9 9 iESP 9 iESP R 9 9 9 9 9 9 9 9 9 9 9 9 9 9 9 PANORAMA 9 9 9 9...

Страница 185: ...9 9 QUICK VIEW 9 9 9 9 9 Optical zoom 9 9 9 9 2 K 1 1 9 9 9 F 9 9 9 9 9 0 9 9 9 9 9 ESP n 9 9 9 9 9 j 9 ISO 9 9 9 9 9 DIGITAL ZOOM 9 9 9 9 9 AF MODE 9 9 9 9 9 R 9 9 9 9 9 9 9 PANORAMA 9 9 9 9 9 9 9 9...

Страница 186: ...frames SQ2 1600 1200 24 frames 1280 960 38 frames 1024 768 58 frames 640 480 90 frames Movie Record mode Resolution Recording time HQ 320 240 15 frames sec Approx 41 sec SQ 160 120 15 frames sec Appro...

Страница 187: ...tiple connectors Automatic calendar system Automatic adjustment in range of 2000 to 2099 Weatherproof Type Equivalent to IEC Standard publication 529 IPX4 under OLYMPUS test conditions Meaning Camera...

Страница 188: ...rage Dimensions Approx 20 25 1 7 mm 0 8 1 0 0 07 Rated input AC100 to 240V 50 60Hz Rated output DC4 2V 550mA Charging time Approx 110 min Ambient temperature 0 to 40 C 32 to 104 F charging 25 to 65 C...

Страница 189: ...color 102 Brightness of monitor s 109 BROWN setting screen color 102 C Camera movement warning 173 CANDLE U 17 Card 107 Card cover 176 Clear sky 5 30 Cloudy 3 30 COLOR 102 Compression rate 26 CUISINE...

Страница 190: ...etting screen color 102 NTSC 63 Number of storable pictures 25 O OK MENU button 177 OLYMPUS Master 139 Optical zoom 20 P PAL 63 PANORAMA 42 PictBridge 122 Picture quality mode K 25 PIXEL MAPPING 111 P...

Страница 191: ...HUTTER SOUND 94 Single frame reservation 118 single frame shooting o 40 Slideshow m 56 SOFT FOCUS 67 Sound with still pictures R 47 Speaker 177 SPOT AF 12 Spot n 35 SQ 28 SQ1 25 SQ2 25 Stitching toget...

Страница 192: ...40 23 07 61 Goods delivery Bredowstrasse 20 22113 Hamburg Germany Letters Postfach 10 49 08 20034 Hamburg Germany European Technical Customer Support Please visit our homepage http www olympus europa...

Отзывы: