304
●
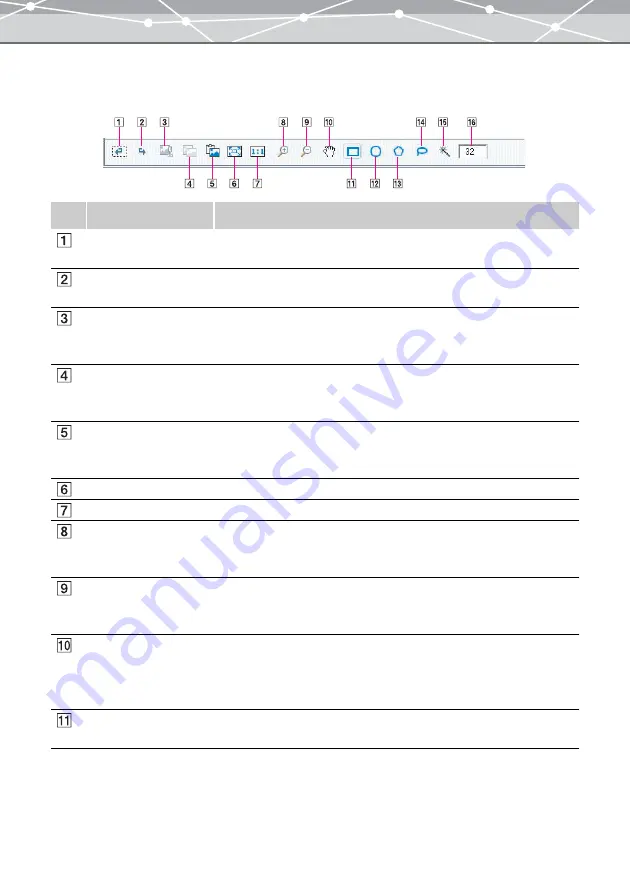
Tool Panel
The tool panel provides the following buttons that are common to editing operations.
No.
Item
Description
Undo
Undoes the last operation. You can undo a maximum of 10 successive
operations.
Redo
Restores the last operation removed by an undo. You can redo a maximum
of 10 successive operations.
Cut
Cuts out the selected area, and save it in the clipboard (temporary storage
space). If you copy or cut another selection to the clipboard, this data is
replaced by the new data.
Copy
Copies the selected area to the clipboard (temporary storage space). If you
copy or cut another selection to the clipboard, this data is replaced by the
new data.
Paste
Pastes the data from the clipboard (temporary storage space). When you
click [Paste], the data is pasted at the center of the image display area.
Drag the pasted image to the desired position.
Fit to Window
Resizes the image display to fit the image display area.
Actual Size
Displays the image at the actual size.
Zoom In
Switches to Zoom In mode that enlarges the image. In Zoom In mode,
clicking a point in the display area enlarges the image based on the point
you clicked. To cancel Zoom In mode, click another button.
Zoom Out
Switches to Zoom Out mode that shrinks the image. In Zoom Out mode,
clicking a point in the display area shrinks the image based on the point
you clicked. To cancel Zoom Out mode, click another button.
Scroll
Moves around the image within the display area by dragging with the
mouse. When the entire image is not displayed within the image display
area, click this button to switch to the scroll mode. To cancel the scroll
mode, click another button.
Rectangle
Defines a rectangular selection by dragging the mouse diagonally over the
image. The selection is shown by a broken line.
Содержание Master 1.1 Plus
Страница 1: ...Software for Editing and Managing Images Operating Instructions OLYMPUS Master 1 1 Plus ...
Страница 30: ...30 Main Menu The main menu has the following components ...
Страница 94: ...94 5 Click the OK button The shooting date and time is changed ...
Страница 109: ...109 4 Click the Find button Searching starts The search results are displayed in the image display area ...
Страница 136: ...136 6 Click the Transfer button The selected files are transferred to the camera album ...
Страница 163: ...163 3 Click the OK button The settings are applied to the calendar you created ...
Страница 245: ...245 5 Click the Save button The Save As dialog box appears g page 246 ...
Страница 255: ...255 Create button Launches the CD DVD writing software No Item Description ...
Страница 321: ...321 4 Click the Apply button The image in the image display area is resized ...
Страница 323: ...323 3 Click the Apply button The image in the image display area is cropped ...
Страница 332: ...332 5 Click the Apply button The hue saturation and lightness of the image in the image display area are adjusted ...
Страница 338: ...338 4 Click the Apply button The corrected image appears in the image display area ...
Страница 351: ...351 3 Click the Apply button The movie in the movie display area rotates according to the setting you made ...
Страница 355: ...355 6 Click the Apply button The specified section is removed from the movie ...
Страница 382: ...382 Wallpaper 209 Work file 168 176 Z Zoom In 308 Zoom Out 308 ...
Страница 383: ...VE898801 ...


