background image

5

EN

Refer to “Using the Menu” (p. 3) when adjusting the settings of these functions.

Menus for Shooting Functions

When the mode dial is set to a shooting mode (

h


K


I


A

), settings can be adjusted.

  The icon next to 

 indicates the position to adjust the mode dial to when setting functions.

  The default settings of the function are highlighted in 

.

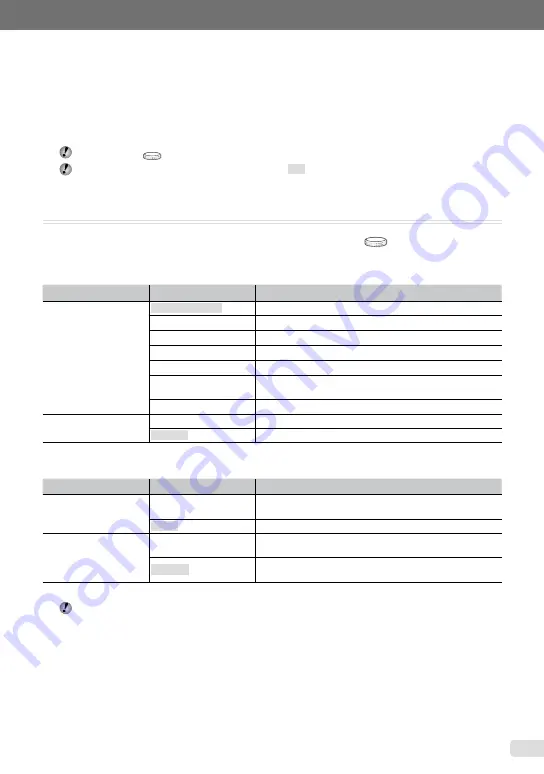
Selecting the appropriate image quality for your application [

A

 IMAGE QUALITY]

A

 IMAGE QUALITY

 : 

h


K


I


A

Still images

Submenu 1

Submenu 2

Application

IMAGE SIZE

12M (3968×2976) 

Suitable for printing pictures over A3 (11×17 in.).

5M (2560×1920) 

Suitable for printing pictures at A4 (8.5×11 in.).

3M (2048×1536) 

Suitable for printing pictures up to A4 (8.5×11 in.).

2M (1600×1200) 

Suitable for printing pictures at A5 (5×7 in.).

1M (1280×960) 

Suitable for printing pictures at postcard size.

VGA (640×480) 

Suitable for viewing pictures on a TV or using pictures on 

emails and web sites.

16:9 (1920×1080)

Suitable for viewing pictures on wide screen TV.

COMPRESSION

FINE

Shooting at high quality.

NORMAL

Shooting at normal quality.

Movies

Submenu 1

Submenu 2

Application

IMAGE SIZE

VGA

Sets image size to 640 × 480. Allows for full-screen television 

display.

QVGA 

Sets image size to 320 × 240.

FRAME RATE

N

 30fps

*1

Allows for a smoother image. For prioritizing image quality 

when shooting.

O

 15fps

*1 

Setting for shooting with standard image quality. For prioritizing 

movie length when shooting.

*1

  frames per second

  “Number of storable pictures (still pictures)/continuous recording length (movies) in the internal memory 

and xD-Picture Card” (p. 56)

Содержание M-5000

Страница 1: ...safe place for future reference We recommend that you take test shots to get accustomed to your camera before taking important photographs In the interest of continually improving products Olympus res...

Страница 2: ...Modes 17 Using Shooting Functions 19 Using Playback Features 23 Menus for Shooting Functions 25 Menus for Playback Editing and Printing Functions 32 Menus for Other Camera Settings 37 Printing 42 Usi...

Страница 3: ...ings E button Using the Menu Various camera settings can be accessed through the menus including functions used during shooting and playback and the date time and screen display Some menus may not be...

Страница 4: ...direct buttons Shutter button p 14 Zoom button p 19 F button exposure compensation p 20 button macro p 20 button flash p 19 Y button self timer p 21 q button playback p 32 g E button change informati...

Страница 5: ...p 41 1 A IMAGE QUALITY p 25 2 B CAMERA MENU WB p 26 ISO p 26 DRIVE p 26 FINE ZOOM p 26 DIGITAL ZOOM p 27 ESP n p 27 AF MODE p 27 R Sound recording p 27 IMAGE STABILIZER Still images DIS MOVIE MODE Mo...

Страница 6: ...arts 1 Self timer lamp p 21 2 Strap eyelet p 10 3 Flash p 19 4 Battery card compartment cover p 11 5 Multi connector p 41 42 47 Camera unit 1 2 3 4 7 6 8 9 5 6 Lens p 54 7 Microphone p 36 8 Tripod soc...

Страница 7: ...button change information display menu guide check date and time p 3 13 21 8 Mode dial p 3 9 q button playback p 32 10 E button OK FUNC p 3 22 11 Arrow pad p 3 F button exposure compensation p 20 butt...

Страница 8: ...stabilization movie p 28 5 Macro super macro p 20 6 Shadow Adjustment Technology p 22 28 7 Battery check p 10 8 Flash standby camera shake warning flash charge p 19 9 AF target mark p 14 10 Recording...

Страница 9: ...100 0004 2009 08 26 2009 08 26 12 30 12 30 MOVIE PLAY OK Still image Movie 1 Silent mode p 41 2 Print reservation number of prints p 45 3 Recording with sound p 18 27 36 4 Protect p 35 5 Battery chec...

Страница 10: ...charger Battery comes partially charged Before use be sure to charge the battery until the charging indicator light turns off for approx 2 hours If the charging indicator does not light or it blinks...

Страница 11: ...comes out slightly Then grasp the card and pull it out Loading the battery and the xD Picture Card sold separately into the camera Do not insert anything other than an xD Picture Card or the microSD A...

Страница 12: ...OK S MENU BACK GO SEL IMAGE T W SET OK CAMERA MENU MENU EXIT SET OK Operation guide Using the microSD card microSDHC card sold separately A microSD card or microSDHC card hereafter both will be refer...

Страница 13: ...file names date prints and other data 1 Press the K button to turn on the camera The date and time setting screen is displayed when the date and time are not set X Y M Y M D D TIME MENU CANCEL Date a...

Страница 14: ...The camera was unable to focus if the AF target mark flashes red Try focusing again Shutter speed Aperture value AF target mark Press halfway 1 400 F3 5 P Focusing p 51 Shooting with optimum aperture...

Страница 15: ...utton halfway down To shoot movies Shooting movies A mode p 18 Viewing images 1 Set the mode dial to q Playback image Frame number 1 IN 2009 08 26 12 30 2 Use ABCD to select an image Displays 10 frame...

Страница 16: ...frame frame advance While paused press A to display the first frame and press B to display the last frame Pressing C makes the camera play back in a reverse motion and pressing D makes the camera play...

Страница 17: ...om PORTRAIT LANDSCAPE NIGHT PORTRAIT SPORT and MACRO This is a fully automatic mode that allows you to take a picture suited to the scene by simply pressing the shutter button Camera menu settings are...

Страница 18: ...ot appear or may take some time to appear for some subjects In addition this function may have no visible effect on some subjects The IMAGE SIZE of the retouched image is limited to J or lower Shootin...

Страница 19: ...H OFF The flash does not fire Using the optical zoom Pressing the zoom button adjusts the shooting range Pressing the wide W button Pressing the telephoto T button Zoom bar 12M P 4 IN NORM 12M P 4 IN...

Страница 20: ...les the camera to focus and shoot subjects at close distances 1 Press the button P OK OK SET OFF OFF OFF 2 Use CD to select the setting option and press the E button to set Item Description OFF Macro...

Страница 21: ...ion display The display of shooting information on the monitor can be changed to best match the situation for example the information can be removed if there is a need for a clear view of the subject...

Страница 22: ...lowing menu functions can be quickly called and used PANORAMA p 29 SHADOW ADJ p 28 MULTI WINDOW p 22 1 Press the H button PANORAMA 2 Use CD to select the menu function and press the E button to set To...

Страница 23: ...lect an image in index view Use ABCD to select an image and press the E button to display the selected image in single image view To select images in calendar view Use ABCD to select a date and press...

Страница 24: ...ct a panorama image during playback Viewing images p 15 NORM 100 0003 2009 08 26 12 30 2 2 Press the E button Current viewing area To control panorama image playback Zoom in Zoom out Press the zoom bu...

Страница 25: ...o A4 8 5 11 in 2M 1600 1200 Suitable for printing pictures at A5 5 7 in 1M 1280 960 Suitable for printing pictures at postcard size VGA 640 480 Suitable for viewing pictures on a TV or using pictures...

Страница 26: ...the shutter button is held down DRIVE B CAMERA MENU DRIVE K Submenu 2 Application o One frame is shot each time the shutter button is pressed j 1 Take sequential shots using the focus and brightness...

Страница 27: ...ghting Selecting the focusing area AF MODE B CAMERA MENU AF MODE K Submenu 2 Application FACE DETECT 1 This is used for taking pictures of people The camera automatically detects a face and a frame ap...

Страница 28: ...by the camera and then press the shutter button to take the picture For some subjects the frame may not appear or may take some time to appear When set to ON ESP n p 27 is automatically fixed to ESP...

Страница 29: ...A G PANORAMA K Submenu 2 Application COMBINE IN CAMERA 1 1 Three frames are taken and combined by the camera The user only composes the shots so that the target marks and pointers overlap and the came...

Страница 30: ...g an image press the button If the shutter does not automatically release try COMBINE IN CAMERA 2 or COMBINE IN PC Taking pictures with COMBINE IN CAMERA 2 1 Use CD to specify at which edge the next p...

Страница 31: ...button when done When the g mark is displayed you cannot continue shooting any further Panorama shooting is possible for up to 10 frames Refer to the OLYMPUS Master 2 help guide for details on how to...

Страница 32: ...w The slideshow starts after confirming BGM settings and pressing the E button To stop the slideshow press the E button or the button Retouching images H PERFECT FIX H PERFECT FIX Edited or retouched...

Страница 33: ...ched image is saved as a separate image When CLEAR SKIN is selected Use AB to select the retouching level and press the E button CLEAR SKIN SOFT AVG HARD MENU BACK SET OK Changing the image size Q I E...

Страница 34: ...ng a calendar to an image CALENDAR I EDIT CALENDAR OK CALENDAR SET 1 Use CD to select an image and press the E button 2 Use CD to select a calendar Use AB to select the image orientation and then pres...

Страница 35: ...electing the first or last frame pressing AB moves to the first last frame of the movie 4 Use CD to select the last frame of the clip to be extracted and press the E button The extracted movie clip is...

Страница 36: ...internal memory do not insert the card into the camera When erasing pictures from the card insert a card into the camera in advance To individually select and erase images SEL IMAGE 1 Use AB to selec...

Страница 37: ...internal memory to the card NO Cancels the backup It takes some time to back up data Check that the battery has sufficient power before starting the backup Changing the display language W E SETUP W Ch...

Страница 38: ...cts the shutter sound and volume VOLUME OFF No sound LOW HIGH 8 OFF No sound LOW HIGH Adjusts the warning sound volume q VOLUME OFF No sound or 5 volume levels Adjusts the image playback volume To tur...

Страница 39: ...previous card This is useful for managing all image folder names and files names with sequential numbers 1 The number for the folder name is reset to 100 and the one for the file name is reset to 0001...

Страница 40: ...r 2009 08 26 12 30 X Y M Y M D D TIME MENU CANCEL Date order Setting the date and time for another time zone DUALTIME E SETUP DUALTIME When DUALTIME is set to ON the date and time set here are used in...

Страница 41: ...the camera to select the video signal format that matches that of the connected TV NTSC PAL 3 Turn on the TV and change INPUT to VIDEO an input jack connected to the camera For details on changing th...

Страница 42: ...refer to the printer s instruction manual 1 PictBridge is a standard for connecting digital cameras and printers of different makers and printing out pictures directly The printing modes paper sizes a...

Страница 43: ...T ORDER is available only when print reservations have been made Print Reservations DPOF p 45 4 Use AB to select SIZE Submenu 3 and press D If the PRINTPAPER screen is not displayed the SIZE BORDERLES...

Страница 44: ...ny file name on the image P Proceeds to the setting screen This selects a portion of the image for printing To crop an image P 1 Use the zoom button to select the size of the cropping frame use ABCD t...

Страница 45: ...igital cameras Print reservations can be set only for the images stored on the card Insert a card with recorded images before making print reservations DPOF reservations set by another DPOF device can...

Страница 46: ...elect L PRINT ORDER and press the E button 3 Use AB to select either or U and press the E button OK SET BACK MENU PRINT ORDER SETTING PRINT ORDERED RESET KEEP 4 Use AB to select RESET and press the E...

Страница 47: ...ktop Macintosh appears in the OLYMPUS Master 2 folder Browse window appears after starting the software When OLYMPUS Master 2 is started for the first time after installation Default Settings and Regi...

Страница 48: ...and save the image data on your computer while the camera and the computer are connected System requirements Windows Windows 2000 Professional XP Home Edition XP Professional Vista Macintosh Mac OS X...

Страница 49: ...increase resulting in automatic shutdown If this occurs remove the battery from the camera and wait until the camera has suffi ciently cooled The camera s external temperature may also increase durin...

Страница 50: ...to retouching software etc to view the image on a computer If the image still cannot be viewed the image file is corrupted r THE IMAGE CANNOT BE EDITED Problem with selected image Use photo retouching...

Страница 51: ...is also effective to compose the shot by holding the camera vertically to focus and then returning to the horizontal position to take the picture When objects are at different distances Fast moving ob...

Страница 52: ...ection Color hue Taking pictures that capture natural colors Taking pictures by selecting WB p 26 Best results in most environments can normally be obtained with the AUTO setting but for some subjects...

Страница 53: ...ges in the internal memory Loading the battery and the xD Picture Card sold separately into the camera p 11 Using the microSD card microSDHC card sold separately p 12 Editing Erasing the sound recorde...

Страница 54: ...charge varies with usage The supplied LI 41C battery charger is used only for LI 42B LI 40B battery Do not charge other type of battery with the supplied battery charger It might cause explosion leaki...

Страница 55: ...he contact area directly Cards compatible with this camera xD Picture Card 16MB to 2GB TypeH M M Standard Using a new card Before using a non Olympus card or a card that was used for another purpose i...

Страница 56: ...0 4 920 5 814 M 289 386 7 995 10 660 D 1920 1080 L 32 33 900 927 M 57 60 1 599 1 683 Movies IMAGE SIZE FRAME RATE Continuous recording length Internal memory Using a 1 GB xD Picture Card With sound Wi...

Страница 57: ...or microSD card Doing so may cause failure in reading the images When fingerprints or stains are found on the contact area wipe the area with a soft dry cloth SAFETY PRECAUTIONS CAUTION RISK OF ELECTR...

Страница 58: ...near flammable or explosive gases Do not use the flash and LED on people infants small children etc at close range You must be at least 1 m 3 ft away from the faces of your subjects Firing the flash...

Страница 59: ...nto contact with any metal objects such as jewelry pins fasteners etc Never store batteries where they will be exposed to direct sunlight or subjected to high temperatures in a hot vehicle near a heat...

Страница 60: ...ry cloth before use Always charge a battery when using it for the first time or if it has not been used for a long period When operating the camera with battery power at low temperatures try to keep t...

Страница 61: ...protection CE mark cameras are intended for sales in Europe This symbol crossed out wheeled bin WEEE Annex IV indicates separate collection of waste electrical and electronic equipment in the EU coun...

Страница 62: ...indirect or consequential loss or damage of any kind incurred or suffered by the customer due to a defect of the product and in particular any loss or damage caused to any lenses films other equipment...

Страница 63: ...Lens Olympus lens 6 3 to 31 5 mm f3 5 to 5 6 equivalent to 36 to 180 mm on a 35 mm camera Photometric system Digital ESP metering spot metering system Shutter speed 4 to 1 2000 sec Shooting range 0 6...

Страница 64: ...rements AC 100 to 240 V 50 60 Hz Output DC 4 2 V 600 mA Charging time Approx 2 hours when charging the supplied LI 42B battery Operating environment Temperature 0 C to 40 C 32 F to 104 F operation 20...

Страница 65: ...5 Index view p 23 Information display p 21 23 Internal memory p 11 56 A AF MODE p 27 AF target mark p 14 Aperture value p 14 A V cable p 2 41 B Backlight boost p 22 BACKUP p 37 Battery p 10 11 52 54 B...

Страница 66: ...DER p 36 45 Protecting images 0 p 35 PW ON SETUP p 37 R REC VIEW p 38 REDEYE p 19 REDEYE FIX p 32 RESET p 31 Resize Q p 33 Rotating images y p 35 S Saturation p 34 s SCENE MODE p 17 28 Self timer p 21...

Страница 67: ...VN145701...

Отзывы: