background image

41

6 Menu operations and functions

6.3

Using the thumbnail/retrieve screens

Menu items and functions

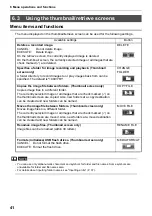
The menu displayed on the thumbnail/retrieve screen can be used for the following settings. 

NOTE

You can use only alphanumeric characters and symbols for folder and file names. Some symbols are 
unavailable for folder and file names also. 

For details about inputting folder names, see "Inputting a title" (P. 37). 

Available settings

Button

Deletes a recorded image. 

CANCEL: 

Do not delete image. 

EXECUTE: Delete 

image. 

On the retrieve screen, the currently displayed image is deleted. 
On the thumbnail screen, the currently selected image or all images that are 
check marked (

) are deleted. 

DELETE

Specifies a folder for image recording and playback. (Thumbnail 
screen only)

A folder directory to record images to or play images back from can be 
specified. The default is "100IV7R1". 

CHANGE 
FOLDER

Copies the image file between folders. (Thumbnail screen only)

Copies image files to a different folder. 
The currently selected image or all images that are check marked (

) on 

the thumbnail screen are copied. Also, new folders at a copy destination 
can be created and new folders can be named. 

COPY FILE

Moves the image file between folders. (Thumbnail screen only)

Moves image files to a different folder. 
The currently selected image or all images that are check marked (

) on 

the thumbnail screen are moved. Also, new folders at a move destination 
can be created and new folders can be named. 

MOVE FILE

Renames image files. (Thumbnail screen only)

Image files can be renamed (within 30 letters). 

RENAME FILE

Formats (initializes) USB flash drives. (Thumbnail screen only)

CANCEL:  Do not format the flash drive. 
EXECUTE: Format the flash drive. 

MEDIA FORMAT

Содержание IPLEX TX

Страница 1: ...INSTRUCTIONS INDUSTRIAL VIDEOSCOPE IPLEX TX ...

Страница 2: ...3 0914 Japan Telephone 81 3 6901 4038 48 Woerd Ave Waltham MA 02453 U S A Stock Road Southend on Sea Essex SS2 5QH U K Telephone 44 0 1702 616333 Telephone 1 781 419 3900 L43 Office Tower Langham Place 8 Argyle Street Mongkok Kowloon Hong Kong Telephone 852 2481 7812 ...

Страница 3: ......
Страница 4: ...unit and scope unit 13 Connecting the scope unit 14 3 2 How to initialize the scope 14 Initializing the scope 15 4 Pre observation pre operation preparation and inspection 16 4 1 Pre observation preparation 16 Preparing the power supply 16 4 2 Pre operation preparation 18 Turning on power 18 Checking the remaining battery level 19 Checking lighting of illumination at the distal end of the insertio...

Страница 5: ...haracter string as a preset title 39 Changing the display language 40 Setting the date and time 40 6 3 Using the thumbnail retrieve screens 41 Menu items and functions 41 6 4 Operations in the PDF file display screen 42 Menu items and functions 42 7 Storage and maintenance 44 7 1 Replacing the battery 44 7 2 Cleaning components 44 Cleaning the distal end 44 Cleaning the insertion tube 44 Cleaning ...

Страница 6: ...ation of devices required by this product and devices that can be used in combination with it see Appendix P 53 in the Appendix Note that use of this product in combination with options and separately available items not only creates the risk of abnormal operation it also can damage the product Important Information Please Read Before Use Marks used in this manual The following warnings are used t...

Страница 7: ... in electric shock Before stowing the instrument in its carrying case be sure to turn off the power and remove the battery Leaving the battery loaded during storage can cause it to become hot causing the risk of fire CAUTION Do not use this instrument in strongly radioactive environment or any other environment that does not conform to the specified operating environment Otherwise unexpected accid...

Страница 8: ...ould create the risk of personal injury Do not subject the insertion tube or other cables to strong pulling and do not move the main unit around by holding the cables Otherwise the insertion tube and or cables may be damaged Also the operator may fall over when the shoulder belt is used Do not allow any liquids other than water saltwater machine oil or diesel oil to come into contact with the inse...

Страница 9: ... the instrument from its carrying case Do not apply undue force when pulling the insertion tube from the slot in the cushion When removing the main unit do not lift it up by the insertion tube Otherwise the instrument may be damaged Note the following precautions whenever stowing the instrument in its carrying case Before stowing the instrument align the F mark on the angulation lock ring with the...

Страница 10: ...ter without rubbing Contact a physician immediately Do not use the battery charger outdoors Otherwise electric shock might occur or smoke emission and fire might occur causing damage to the charger The battery charger is designed for indoor use WARNING Do not cover the battery charger with clothing bedding or other material while charging After charging is complete always be sure to unplug the bat...

Страница 11: ...eral the battery performance drops as the ambient temperature drops Note that battery performance that degrades due to low temperatures recovers when the temperature rises to a normal level Contamination of battery electrodes with sweat or oil will cause contact failures When the battery is dirty wipe it clean with a dry cloth before use Use the battery correctly Otherwise battery fluid leakage ov...

Страница 12: ...ns and serial number are on stickers on parts of the main unit and the control unit If labels are missing or if their contents are illegible contact Olympus Model name serial number Caution Rating CAUTION Note that the surface of the distal end is hot Main ...

Страница 13: ...revent low temperature burns Serial number Caution both sides Caution CAUTION Do not grip the control unit for long periods while using it in very hot environments Doing so may lead to low temperature burns Wear gloves or do something to prevent low temperature burns Caution CAUTION Do not touch or subject the electric contacts to static electricity Caution CAUTION Do not touch or subject the elec...

Страница 14: ...ions IV8212T For details on other options see Appendix P 53 Name Count Base unit 1 USB flash drive 1 AC adapter 1 AC power cord 3 types For the UK Europe and one for both Japan and the US 1 of each 3P 2P adapter for Japan only 1 Protective cap 1 Cotton swab 10 Instructions IPLEX TX Instructions this document 1 AC adapter 1 Return Request Card for Japan only 1 Warranty Registration Card for Japan o...

Страница 15: ...e second No Name No Name 1 Handle 12 Lock release lever 2 Video connector cap 13 Tripod screw hole 3 Belt holder 14 BRT button 4 AC adapter connector cap 15 T button 5 Universal cable 16 BRT button 6 Belt bracket 17 W button 7 LIGHT button 18 ENT MENU button 8 Power button 19 FRZ REC button 9 Front panel 20 VIEW button 10 LCD monitor 21 LIVE WiDER button 11 Battery cover 22 Protective cap 1 2 3 3 ...

Страница 16: ...d state collectively as the control unit For details on attaching the scope unit to the base unit see 3 Mounting the scope unit P 13 No Name No Name 1 Protective cap 6 Angulation section 2 Fastening ring 7 Illumination 3 Angulation lever 8 Objective lens 4 Angulation lock lever 9 FRZ REC button 5 Bend stopper 1 2 3 4 5 6 7 Distal end Lower side Angulation control unit Insertion tube 8 9 Angulation...

Страница 17: ...ecording playback indicator 14 PDF indicator 15 Folder name 16 File name 17 Remaining media capacity 18 Thumbnail selection frame 19 MOVIE image indicator 20 Mark NOTE The displayed title is the title that was entered on the Live screen the last time the system was used Should you notice any dirt stains or other abnormalities on the LCD monitor see 7 Storage and maintenance P 44 1 3 2 4 5 6 7 8 9 ...

Страница 18: ...ent Do not drop or otherwise subject the scope unit to strong impact Do not apply excessive pulling pushing and twisting force Otherwise the instrument may be damaged After the scope unit is connected do not remove it except to replace it if it is damaged Foreign material sticking to the electric contacts or your hands touching them may cause a malfunction NOTE The scope unit can be replaced by th...

Страница 19: ...m and firmly tighten the fastening ring in the direction of the arrow as far it can go 3 2 How to initialize the scope Connect the AC adapter See P 17 Turn on power See P 18 Select the display language initial settings See P 40 Initialize the scope See P 15 Do pre operation operations See P 18 Button control unit Fastening ring Angulation control unit 1 2 3 3 4 5 ...

Страница 20: ...sertion tube into the shading hole in the cushion in the carrying case as far as it can go 2 Select SCOPE INITIALIZATION from SETUP in the menu 3 Select EXECUTE and then short press the ENT MENU button Initialization of the scope ends in about five minutes after which the Live screen is displayed NOTE It takes about five minutes to initialize the scope Do not remove the insertion tube from the sha...

Страница 21: ...ke sure the instrument is turned off before performing pre observation and pre operation preparation and inspection 4 1 Pre observation preparation Preparing the power supply Using the battery Slide the lock release lever to the side to open the battery cover Noting the orientation of the battery insert it terminals first from above the ribbon After inserting the battery correctly close the cover ...

Страница 22: ...ed by pulling the ribbon towards you If you find it difficult to remove the battery hook your finger directly onto the battery to remove it Using the AC adapter After connecting the AC power cord to the AC inlet of the AC adapter plug the plug end of the AC power cord securely into a 3P power outlet AC inlet ...

Страница 23: ...0 Check lighting of illumination at the distal end of the insertion tube See P 19 Adjust white balance See P 35 Check the angulation operation of the angulation section See P 19 Attach the USB flash drive See P 20 Set up the main unit and perform observation Set up the main unit on a flat surface See P 20 Hang the main unit See P 21 Set up the main unit on a tripod See P 21 Attach the shoulder bel...

Страница 24: ...y power shown on the LCD monitor is different from that shown on the POWER INDICATOR For details refer to the instruction manual of your battery Checking lighting of illumination at the distal end of the insertion tube Press the LIGHT button to light illumination at the distal end of the insertion tube The light indicator at the bottom right of the LCD monitor also is displayed Checking the angula...

Страница 25: ...e removed by moving the ejector in the direction of the arrow as shown in the figure on the right Setting up the main unit and performing observation Observation can be done with the main unit set up on a flat surface hung from something or on a tripod Set up the main unit on a flat surface When installing the main unit on a flat surface for observation use the handle as a stand Adjust the handle ...

Страница 26: ...ndle Set up the main unit on a tripod Attach the tripod platform to the main unit to use a tripod to do observations CAUTION When fixing the main unit to the tripod mount it so the tripod platform does not run up on the protrusion on the rear of the main unit Fixing the tripod with the platform installed at an angle may cause the main unit to fall off You can use a square platform that measures 45...

Страница 27: ...the two belt holders 2 Adjust the length of the belt by the length adjuster buckle and adjust the screen to an easy to view angle 3 Hang the shoulder belt on your shoulder and do observations Hang the main unit from your shoulder 1 Attach the shoulder belt hooks to the two belt brackets 2 Adjust the length of the belt by the length adjuster buckle 3 Hang the shoulder belt on your shoulder Detachin...

Страница 28: ...he distal end angulation section or insertion tube Never use the instrument while the distal end is loose Doing so creates the risk of loose parts fall ing off during use See 7 Storage and maintenance P 44 Any dirt or water droplets on the objective lens of the distal end Continued use in this condition creates the risk of the distal end becoming damaged Insertion tube broken or crushed If the ins...

Страница 29: ...t a point behind the angulation section Otherwise the angulation section may be damaged Carrying case Specialized carrying case used Use of a non designated carrying case creates the risk of the insertion tube or main unit becoming damaged or malfunctioning Contact Olympus Inspectionlocation Item If abnormality is discovered ...

Страница 30: ...ulation lock lever to unlock angulation and then draw out the insertion tube CAUTION Should you sense any abnormality do not try to force the operation and carefully withdraw the insertion tube Note the following precautions when withdrawing the insertion tube Do not try to withdraw from the observation object while angulation is locked or while the angulation section is bent If the insertion tube...

Страница 31: ...ily when the image returns to its original size Since images are zoomed using digital zoom the image may become slightly coarse when the zooming ratio is increased Adjusting image brightness Adjust image brightness by the BRT button The BRT button can be used to adjust brightness by changing the overall brightness of a live image during observation While a live image is displayed press the BRT but...

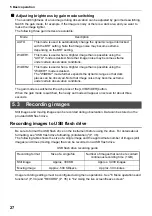
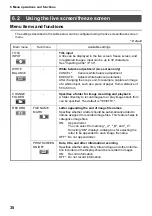
Страница 32: ...images still images and times moving image that can be recorded on a USB flash drive Image recording settings must be configured using menu operations See 6 Menu operations and functions P 34 and RECORD P 35 in 6 2 Using the live screen freeze screen Mode Description AUTO This mode is used to automatically change the dynamic range interlocked with the BRT setting Note that image noise may become e...

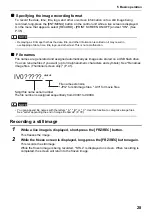
Страница 33: ...e You can rename files if you want up to 30 alphanumeric characters and symbols See Renames image files Thumbnail screen only P 41 NOTE You can append file names with the letters _A _B or _C Use this function to categorize image files See Letter appending the end of image file names P 35 Recording a still image 1 While a live image is displayed short press the FRZ REC button This freezes the image...

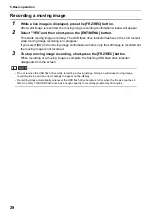
Страница 34: ... confirmation window only the still image is recorded but the moving image is not recorded 3 To stop moving image recording short press the FRZ REC button When recording of a moving image is complete the flashing USB flash drive indicator disappears from the screen NOTE Do not remove the USB flash drive while recording a moving image Doing so will cause moving image recording to stop and an error ...

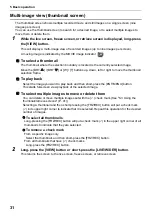
Страница 35: ...T W buttons to switch the image you want to play back T button Scrolls from the currently displayed image to the image before it in file name descending order When images are sorted in descending order performing this operation at the last image will return to the first image W button Scrolls from the currently displayed image to the image after it in file name ascending order When images are sort...

Страница 36: ...nt to play back and then short press the ENT MENU button This starts full screen view playback of the selected image To select multiple images to move or delete them You can delete or move multiple images set with the check mark See 6 3 Using the thumbnail retrieve screens P 41 Selecting a thumbnail and then short pressing the FRZ REC button will put a check mark in its upper right corner to indic...

Страница 37: ...f PDF files Select a file to display from the list of PDF files and short press the ENT MENU button to display the PDF document on the LCD monitor You can turn pages adjust the size and orienation of the display split the display of the PDF screen in the live screen freeze screen and other operations See 6 4 Operations in the PDF file display screen P 42 regarding operations and settings NOTE See ...

Страница 38: ...nd other information and audio also cannot be output to the monitor 5 7 Using recorded images on a PC IPLEX VIEWER PLUS can be used to make use of images recorded on this instrument Recorded images are loaded directly on the PC from the USB flash drive containing those images To use IPLEX VIEWER PLUS software download it from the Olympus website http www olympus ims com service and support downloa...

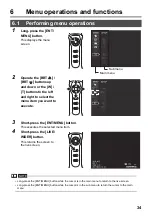
Страница 39: ...select the menu item you want to execute 3 Short press the ENT MENU button This executes the selected menu item 4 Short press the LIVE WiDER button This returns the screen to the live screen NOTE Long press the ENT MENU button while the cursor is in the main menu to return to the live screen Long press the ENT MENU button while the cursor is in the sub menu to return the cursor to the main menu Su...

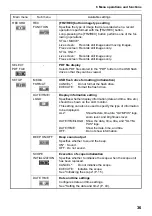
Страница 40: ...iece of paper from a distance of 50 to 60 mm CHANGE FOLDER Specifies a folder for image recording and playback A folder directory to record images to or play images back from can be specified The default is 100IV7R1 RECORD FILE NAME MARK Letter appending the end of image file names Specifies whether a letter should be automatically added to names assigned to recorded image files This feature helps...

Страница 41: ...at the flash drive DATE TIME LOGO Display information setting Specifies whether display information date and time title etc should be shown on the LCD monitor This setting can also be used to specify the type of information to be displayed ALL Showthedate time title OLYMPUS logo zoom level and brightness level DATE TIME LOGO Show the date time title and OLYM PUS logo DATE TIME Show the date time a...

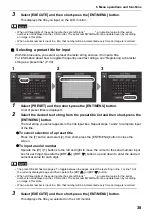
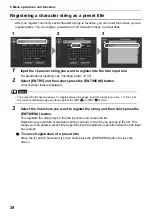
Страница 42: ... short press the ENT MENU button To insert characters Move the cursor to the location where you want to insert the character select the character in the on screen keyboard and then short press the ENT MENU button To input a space Move the cursor to the location where you want to input the space select the SPACE button and then short press the ENT MENU button To input a serial number Operate the W ...

Страница 43: ...MENU button The text string you select appears in the title input box Repeat steps 1 and 2 to complete input of the title To cancel selection of a preset title Press the T button and select x then short press the ENT MENU button to close the screen To input a serial number Operate the W T buttons to the left and right to move the cursor to the serial number input box for each digit Operate the BRT...

Страница 44: ...The preset title list has two pages To toggle between the pages select the text string in line 1 or line 10 of the currently displayed page and then operate the BRT or BRT button 3 Select the line where you want to register the string and then short press the ENT MENU button This registers the string input in the title input box and closes the list Registering a preset title overwrites anything cu...

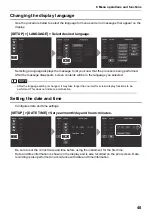
Страница 45: ...r the language setting is changed it may take longer than normal for screen display functions to be performed This does not indicate a malfunction Setting the date and time Configures date and time settings Be sure to set the correct date and time before using the instrument for the first time Date and time information is shown on the display and is also recorded on the print screen Data recording...

Страница 46: ...nly A folder directory to record images to or play images back from can be specified The default is 100IV7R1 CHANGE FOLDER Copies the image file between folders Thumbnail screen only Copies image files to a different folder The currently selected image or all images that are check marked on the thumbnail screen are copied Also new folders at a copy destination can be created and new folders can be...

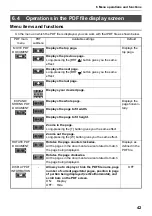
Страница 47: ...he whole page Displays the page horizon tally Displays the page to fit width Displays the page to fit height Zooms in the page Long pressing the T button gives you the same effect Zooms out the page Long pressing the W button gives you the same effect ROTATE PDF DOCUMENT Rotates the page counterclockwise All the pages in the document are also rotated to match the page being displayed Displays as d...

Страница 48: ...splay the PDF screen and live or freeze screen You can switch over between the PDF screen and the live or freeze screen by pressing the VIEW button held down for a short time ON Splits the display OFF Do not split the display OFF PDF main menu PDF submenu Available settings Default ...

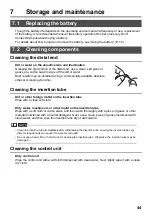
Страница 49: ...pyl alcohol Cleaning the insertion tube Dirt or other foreign matter on the insertion tube Wipe with a clean soft cloth Dirty water machine oil or other liquid on the insertion tube Wipe with a soft cloth or cotton swab and then wash thoroughly with a piece of gauze or other material moistened with a neutral detergent Next use a clean piece of gauze moistened with clean water and then wipe the ins...

Страница 50: ...l dirt water and other foreign matter from the battery cover video cap and the inside of the AC adapter terminal cap CAUTION Do not rinse the instrument with running water Otherwise it may be damaged 7 3 Replacing a damaged scope unit The scope unit on this instrument can be replaced by the user if it becomes damaged CAUTION Note the following precautions when detaching the scope unit Never touch ...

Страница 51: ...autions Store this product under normal room temperature and humidity CAUTION Never subject cables to severe bending pulling binding twisting or crushing forces Do not allow a cable to be exposed to heat which can melt its covering Otherwise the cable might be damaged which can lead to fire and electric shock 1 Turn off power and remove the battery or unplug the AC adapter 2 Unlock the angulation ...

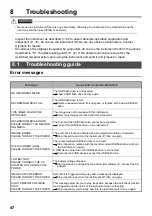
Страница 52: ...ded with this instrument RECORDING MEDIA ERROR PLEASE FORMAT THE RECORD ING MEDIA The format of the USB flash drive cannot be recognized Format the USB flash drive on the instrument IMAGER ERROR PLEASE TURN OFF THE POWER The self check function activated and prompted termination of operation Stop inspection and turn the instrument off then on again OVER CURRENT USB PLEASE TURN OFF THE POWER The re...

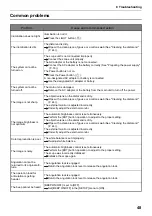
Страница 53: ...l end P 44 The external monitor is adjusted incorrectly Correctly adjust the external monitor The image brightness is not optimum The automatic brightness control is set erroneously Perform the BRT button operation to adjust to the proper setting The objective lens on the distal end is dirty Wipe with a clean piece of gauze or a cotton swab See Cleaning the distal end P 44 The external monitor is ...

Страница 54: ...at occur during the warranty period are done at no charge according to the warranty agreement Be sure to attach the warranty agreement when returning the instrument for repairs Repair will be charged if the warranty agreement is not attached The freight fees are paid by the user even if repairs are done free of charge All functions stopped dur ing moving image record ing The USB flash drive being ...

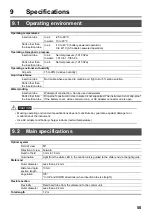
Страница 55: ...midity Liquid resistance Insertion tube No trouble when exposed to machine oil light oil or 5 saline solution Parts other than the insertion tube Waterproofing Insertion tube Waterproof construction Can be used underwater Parts other than the insertion tube Drip proof construction Use in water is not supported The instrument is not drip proof if the battery cover video connector cap or AC adapter ...

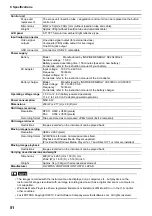
Страница 56: ...etails refer to the instruction manual of your battery AC adapter Input voltage 100 V to 240 V AC Frequency 50 60 Hz Output voltage 12 V For details refer to the instruction manual of the AC adapter Battery charger Model Manufactured by INSPIRED ENERGY CH5000C or CH5000X Input Voltage 90 V to 260 V AC Frequency 50 60 Hz For details refer to the instruction manual of the battery charger Operating v...

Страница 57: ...xpressly approved by the party responsible for compliance could void the user s authority to operate the equipment WEEE Directive The following applies to the mark to the left In accordance with European Directive 2002 96 EC on Waste Electri cal and Electronic Equipment this symbol indicates that the product must not be disposed of as unsorted municipal waste but should be collected separately Ref...

Страница 58: ...unit IPLEX VIEWER PLUS Downloadable from the Olympus website Computer commer cially available USB flash drive AC adapter Battery manufactured by INSPIRED ENERGY NC2040OL24 optional Battery charger manufactured by INSPIRED ENERGY CH5000C or CH5000X optional AC adapter for battery charger packaged with CH5000C or CH5000X optional Cotton swab Scope unit optional ...

Отзывы: