IPLEX TX Quick Guide
This instrument is intended for inspecting and observing the interior of machinery, equipment, materials, and other objects,
without damaging the object being inspected.
Carefully read and understand the information and follow the instructions in the IPLEX TX instruction manual
before using the instrument.
This quick guide is an introduction to the instrument's various basic functions and the indicators and menu
displays, and safety precautions excerpted from the IPLEX TX instruction manual.
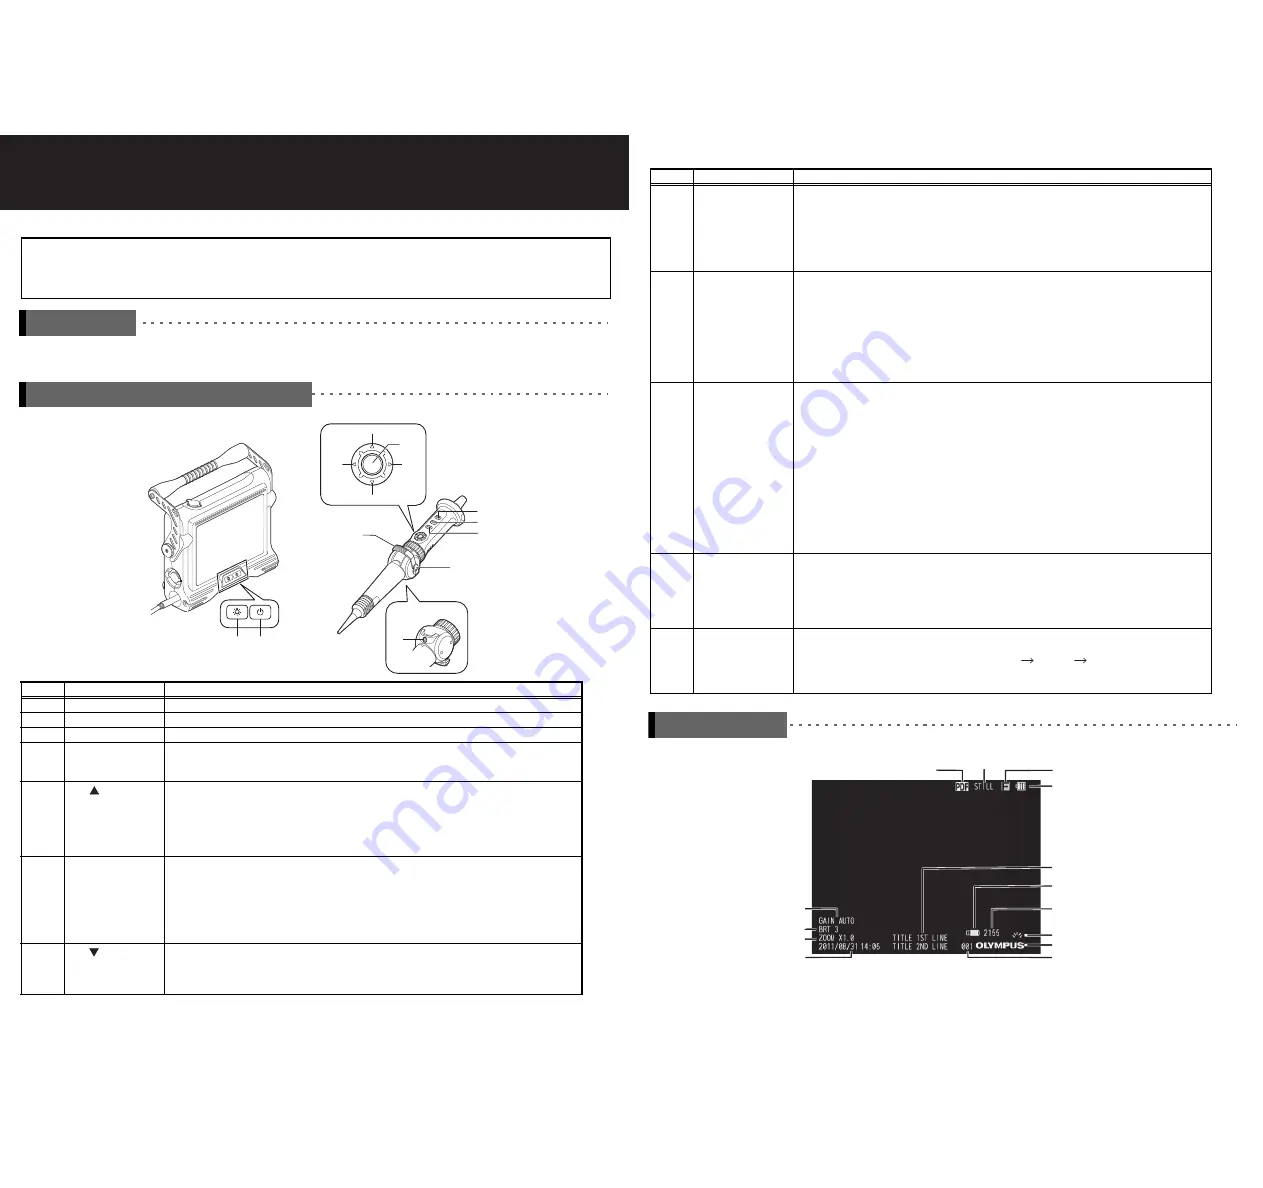
Number
Name
Description of function
1
Power button
Press for at least two seconds to turn the power on or off.
2
LIGHT button
Lights the illumination on the distal end of the insertion tube.
3
Angle lever
Allows you to bend the distal end in two directions.
4
Angle lock lever
If you want to hold the angle of the distal end while bending it, push the angle lock lever forward to fix
the angle of the angulation section. Fine adjustment of the angulation angle can be performed while
angulation is locked also.
5
BRT
button
Live screen
The entire screen brightens each time it is pushed. You can switch to high-sensitivity image display by
pressing the [BRT] button upwards until [BRT] (brightness) reaches its maximum setting (Level 8)
(monochrome boost).
Thumbnail screen/menu operation/title operation
Moves the selection frame upward.
6
T button
Live screen
You can zoom in to the image smoothly up to 2x by long-pressing this button. Zooming in stops at 1x,
and press again to continue for farther zooming.
Retrieve screen
Scrolls from the currently displayed image to the image before it (descending order of file name).
Thumbnail screen/menu operation/title operation
Moves the selection frame to the left.
7
BRT
button
Live screen
The entire screen darkens each time it is pushed.
Thumbnail screen/menu operation/title operation
Moves the selection frame upward.
Intended use
Instrument nomenclature and functions
6
7
4
5
10
8
3
2
1
Underside
11
9
12
13
8
W button
Live screen
You can zoom out of the image smoothly up to about 0.5x by long-pressing this button. Zooming out
stops at 1x, and press again to continue for farther zooming.
Retrieve screen
Scrolls from the currently displayed image to the image after it (ascending order of file name).
Thumbnail screen/menu operation/title operation
Moves the selection frame to the right.
9
ENT/MENU button
Live screen/freeze screen/retrieve screen/thumbnail screen
Long-pressing this button displays the menu screen. Short-pressing this button executes the selected
menu item.
Menu screen
Short-pressing this button executes the selected menu item.
If the cursor is in the main menu, long-pressing returns you to the live screen. If the cursor is in the sub
menu, long-pressing moves the cursor to the main menu.
Thumbnail screen
Short-pressing this button displays the retrieve screen.
10, 13
FRZ/REC button
Live screen
Short pressing this button freezes the image. Press it again to return to the live screen.
Long-pressing it after a still image is recorded, opens the video recording confirmation window. Select
"YES" and then short-press the [ENT/MENU] button to start recording a video. Short-pressing the [FRZ/
REC] button, stops video recording.
Freeze screen
Long-pressing this button records a still image.
Thumbnail screen
Short-pressing this button displays a (
) mark on the selected thumbnail image. Long-pressing this
button displays a (
) mark on all the thumbnail images.
Selecting thumbnail images on which the (
) mark is displayed, and short-pressing this button,
removes the (
) mark. By long-pressing this button you can remove the (
) mark from all the
thumbnail images.
11
VIEW button
Live screen/freeze screen/thumbnail screen
Short-pressing this button displays the most recently recorded image. Short-pressing it again returns
you to the previous screen.
Live screen/freeze screen/retrieve screen
Long-pressing this button displays the thumbnail screen. Long-pressing it again returns you to the
previous screen.
12
LIVE/WiDER button
Live screen
The brightness of the overall live image can be adjusted by changing the gain mode during observation.
Each time the button is pressed, it switches from AUTO
WiDER1
WiDER2.
Freeze screen/retrieve screen/thumbnail screen
Short-press it to return to the live screen.
Number
Name
Description of function
Indicator display
Number of images or length of time
that videos can be recorded
USB flash drive indicator
Battery indicator
Light indicator
Logo
Sequence number
Title
Date/time
Zoom level
Brightness level
Gain mode
Recording/playback indicator
Freeze indicator
PDF indicator
- 1 -
- 2 -


