background image

Menu operations

24 

EN

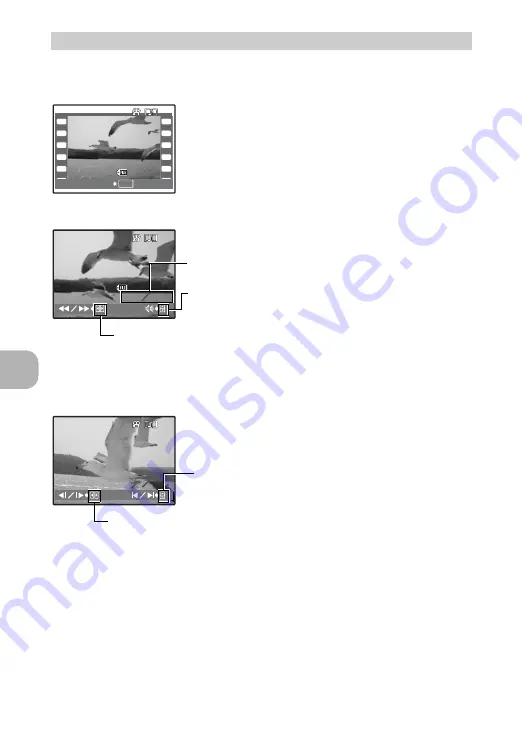
Select [MOVIE PLAY] from the top menu, and press 

Q

 to play back the movie. 

Another option is to select a picture with the movie icon (

n

), and press 

Q

 to 

play back the movie.

Operations during movie playback

• Press 

Q

 to pause the playback.

Operations during pause

• To resume the movie, press 

Q

.

• To cancel the playback of the movie in the middle of it or during pause, press  

m

.

MOVIE PLAY

Playing back movies

2

OK

12:30

12:30

'06.11.26

'06.11.26

100-0004

100-0004

4

[IN

IN]

MOVIE PLAY

12:30

12:30

'06.10.07

'06.10.07

100-0004

100-0004

00:00    00:36

00:00    00:36

[IN

IN]

HQ

HQ

320

320

×

240

240

O

: Increases the volume.

N

: Reduces the volume.

Y

: Fast forwards playback when pressed and held.

X

: Rewinds playback when pressed and held.

Playing time/Total recording time

00:05    00:36

00:05    00:36

[IN

IN]

O

: Displays the first frame.

N

: Displays the last frame.

Y

: Plays when pressed and held.

X

: Plays the movie in reverse when pressed and held.

Содержание FX-750

Страница 1: ...efully to enjoy optimum performance and a longer service life Keep this manual in a safe place for future reference We recommend that you take test shots to get accustomed to your camera before taking...

Страница 2: ...ate and time 6 Prepare the battery 4 Take a picture 8 Charge the battery 4 Review your pictures 9 Turn the camera on 5 Button operations 14 Getting to know your camera better 50 Menu operations 19 Pri...

Страница 3: ...does not come loose Digital Camera Strap Lithium Ion Battery LI 42B Battery Charger LI 40C USB Cable AV Cable OLYMPUS Master CD ROM Items not shown Advanced Manual this manual Basic Manual warranty ca...

Страница 4: ...the card please refer to Inserting and removing the card P 63 1 Red light on Charging Light off Charging complete Charging time Approx 300 minutes AC Wall Outlet Power Cable Battery Charger Lithium I...

Страница 5: ...g subject or camera movement when taking pictures B Suitable for taking pictures of people E Suitable for taking pictures of a landscape M Suitable for taking pictures of people at night f Select from...

Страница 6: ...ess the Y button c Press the O and NY buttons to select M About the date and time setting screen MENU TIME TIME D M Y CANCEL Y M Y M D Y M D Cancels the setting Hour Date formats Y M D M D Y D M Y Min...

Страница 7: ...to select Y M D j After all settings have been set press Q The time is displayed in the 24 hour format For a more accurate setting press Q when the time signal hits 00 seconds MENU 2006 2006 10 10 07...

Страница 8: ...l grip b Focus Shutter Button Press Halfway HQ HQ 2816 2816 2112 2112 IN IN 4 4 The green lamp indicates the focus and exposure are locked Place this mark over your subject The number of pictures that...

Страница 9: ...Press the S button c Press the O button select YES and press Q 12 30 12 30 06 10 07 06 10 07 100 0004 100 0004 4 HQ HQ IN IN 2816 2816 2112 2112 0 0 0 0 Arrow pad Displays the next image Displays the...

Страница 10: ...s 16 X button Shooting pictures close to the subject 17 NY button Self timer shooting 17 Y button Flash shooting 17 m button Displaying the top menu 17 S button Erasing pictures 17 Zoom button Zooming...

Страница 11: ...ting the image processing function 27 K q Turning on the camera with the K or q button 27 s Adjusting the monitor brightness 27 BEEP Adjusting the volume of operation sound when the buttons are presse...

Страница 12: ...been set 51 Shooting tips 51 Focusing on the subject 51 Subjects that are difficult to focus on 51 Taking pictures without blurring 52 Taking pictures without the flash 52 The picture is too grainy 52...

Страница 13: ...accessories 62 The card 62 Safety Precautions 65 General Precautions 65 Handling the Camera 66 Battery Handling Precautions 67 Caution for Usage Environment 68 Battery Handling Precautions 68 LCD Mon...

Страница 14: ...button to shoot a picture When the green lamp blinks the focus is not adjusted properly Try locking the focus again Recording movies Set the mode dial to n and lightly press the shutter button to lock...

Страница 15: ...Select from 10 scene modes according to the shooting conditions Press Q for setting The scene selection screen displays sample images and the shooting mode to best suit the situation To switch to a di...

Страница 16: ...he mode using the mode dial Use the arrow pad to select scenes playback picture and the items on the menus This button is used to confirm your selection Display a picture to print out in playback mode...

Страница 17: ...25 X button Shooting pictures close to the subject OFF MACRO OFF Cancels macro mode MACRO ON This mode lets you shoot from as close as 10 cm 3 9 in when the zoom is set for the zoom out angle and as...

Страница 18: ...area the digital zoom activates and the image is further enlarged 1 2 4 3 IN IN 2816 2816 2112 2112 0 0 0 0 12 30 12 30 06 10 07 06 10 07 100 0004 100 0004 4 HQ HQ IN IN 1 2 3 4 5 6 7 8 9 IN IN IN IN...

Страница 19: ...ut the menus Operation guide m button Q Arrow pad ONXY K button Shooting mode q button Playback mode OK MENU RESET PANORAMA SILENT MODE SET EXIT SETUP RESET PANORAMA SILENT MODE EXPOSURE EXPOSURE COMP...

Страница 20: ...menu item is set and the previous menu is displayed Press m repeatedly to exit the menu To cancel any changes and continue operating the menus press m without pressing Q Using the menus OK MENU RESET...

Страница 21: ...er This is useful for performing computer image processing such as contrast adjustment and red eye correction HQ 2816 2112 Standard compression SQ1 2048 1536 Standard compression This is useful for le...

Страница 22: ...norama shooting is possible for up to 10 pictures Press Q to exit panorama shooting Restore shooting functions back to default settings Functions for returning the settings to the original when the re...

Страница 23: ...rightness SILENT MODE Muting operational sounds OFF ON Playback mode menu q SLIDESHOW Playing back pictures automatically 4 OK MENU 2 0 2 0 2 0 BACK SET E X P O S U R E C O M P 5 OK MENU RESIZE RESIZE...

Страница 24: ...or during pause press m MOVIE PLAY Playing back movies 2 OK 12 30 12 30 06 11 26 06 11 26 100 0004 100 0004 4 IN IN MOVIE PLAY 12 30 12 30 06 10 07 06 10 07 100 0004 100 0004 00 00 00 36 00 00 00 36...

Страница 25: ...can protect several frames in succession Protected pictures cannot be erased Cancel protection before erasing protected pictures Once erased pictures cannot be restored Check each picture before erasi...

Страница 26: ...ting the single frame ALL ERASE Erasing all the pictures in the internal memory or the card PRINT ORDER Making print reservations DPOF SETUP menus OK MENU GO BACK IN SEL IMAGE 7 OK MENU RESET PANORAMA...

Страница 27: ...rovided OLYMPUS Master software The pixel mapping feature allows the camera to check and adjust the CCD and image processing functions It is not necessary to operate this function frequently Approxima...

Страница 28: ...rned on The time is displayed in the 24 hour format To set the time precisely with the cursor at either minutes or Y M D press Q as the time signal strikes 00 seconds 8 Adjusting the volume of camera...

Страница 29: ...na Playing back pictures on a TV Turn off the camera and the TV before connecting VIDEO OUT Playing back pictures on a TV NTSC PAL Settings on the TV Turn the TV on and set it to video input mode For...

Страница 30: ...printed using the standard settings of your printer The date and file name are not printed STANDARD All printers that support PictBridge have standard print settings If STANDARD is selected on the se...

Страница 31: ...he position of the USB port refer to the printer s instruction manual 3 Press O Printing starts When printing is finished the picture selection screen is displayed To print another picture press XY to...

Страница 32: ...n guide You can use EASY PRINT even when the camera is turned off or in shooting mode With the camera turned off or in shooting mode connect the USB cable The selection screen for the USB connection i...

Страница 33: ...on data on the card If no print reservations have been made this option is not available g Print settings DPOF P 35 OK MENU IN P R I N T PA P E R S I Z E S I Z E BORDERLESS BORDERLESS S I Z E BORDERLE...

Страница 34: ...ber of prints and data to be printed OK MENU P R I N T I N F O 1 WITHOUT WITHOUT FILE NAME SET BACK DATE Sets the number of prints You can select up to 10 prints DATE If you select WITH pictures are p...

Страница 35: ...For more details refer to the printer s instruction manual A PC card adapter may also be necessary Note DPOF reservations set by another device cannot be changed by this camera Make changes using the...

Страница 36: ...print reservations for other pictures 4 When you finish making print reservations press Q 5 Select the date and time setting and press Q NO The pictures are printed without the date and time DATE The...

Страница 37: ...press Q To reset the print reservation data for all the pictures 2 Select or U and press Q 3 Select RESET and press Q To reset the print reservation data for a selected picture 2 Select and press Q 3...

Страница 38: ...t the camera from the computer gP 44 Using OLYMPUS Master What is OLYMPUS Master Prepare the following items before starting Computer equipped with a USB port OLYMPUS Master CD ROM USB cable Download...

Страница 39: ...installed on your computer Windows XP corresponds to Windows XP Professional Home Edition Windows 2000 corresponds to Windows 2000 Professional If you are using Windows 98SE the USB driver is installe...

Страница 40: ...to proceed with the installation The OLYMPUS Master installation screen is displayed 4 Follow the on screen instructions When the OLYMPUS Master licensing agreement is displayed read the agreement an...

Страница 41: ...D ROM window is displayed If the CD ROM window is not displayed double click the CD ROM icon on the desktop 2 Double click on the desired language folder 3 Double click the Installer icon The OLYMPUS...

Страница 42: ...st time the computer attempts to recognize the camera Click OK to exit the message that is displayed The camera is recognized as a Removable Disk Macintosh The iPhoto program is the default applicatio...

Страница 43: ...the serial number After the User Information dialog box the Registration dialog box is displayed Follow the prompts and fill in the registration form Start up the OLYMPUS Master software 1 9 2 3 6 8...

Страница 44: ...d All the images in the camera are displayed 3 Select the image files and click Transfer Images A window indicating that the download is complete is displayed 4 Click Browse images now The downloaded...

Страница 45: ...When a message is displayed saying that the hardware can be ejected safely click OK Macintosh 1 The trash icon changes to the eject icon when the Untitled or NO_NAME icon on the desktop is dragged Dra...

Страница 46: ...played 2 To play back the movie click the playback button at the bottom of the screen The names and functions of the controller parts are shown below Viewing still pictures and movies Item Description...

Страница 47: ...int window is displayed 3 Click Settings in the Photo Print window The printer settings screen is displayed Make the necessary printer settings 4 Select a layout and size To print the date and time wi...

Страница 48: ...USB INSTALL EXE Data transfer is not guaranteed in the following environments even if your computer is equipped with a USB port Windows 95 98 NT 4 0 Windows 98SE upgrades from Windows 95 98 Mac OS 8 6...

Страница 49: ...ew firmware versions as well as additional languages 6 Select the firmware version and or language and click the Update button Please do not remove any cable or the battery while the camera is process...

Страница 50: ...ode before taking a picture If the camera is left for 15 minutes it automatically turns off Press o to turn the camera on The mode dial is in the position of R No pictures can be taken when the shooti...

Страница 51: ...halfway and then recompose your picture and wait for the subject to enter the frame Under certain types of conditions it is difficult to focus using auto focus The green lamp on the monitor lights all...

Страница 52: ...m to take close up pictures With the digital zoom part of the image is cropped and enlarged The greater the magnification the grainier the picture appears Taking pictures with the mode dial set to M o...

Страница 53: ...in the internal memory to the card P 27 The card P 62 Number of storable still pictures and recording length of movies Still pictures Movies If you use a non Olympus card or a card used for another a...

Страница 54: ...FORMAT BACKUP Lamp indicators Lamp Status Self timer lamp The lamp lights for approximately 10 seconds blinks for approximately 2 seconds and then the picture is taken Card access lamp Lit red Shooti...

Страница 55: ...nternal memory cannot be played back Pull out the card before operating the camera Press W on the zoom button to view pictures as thumbnails index display g Zoom button Zooming while shooting Close up...

Страница 56: ...the internal memory or on the card The internal memory or the card contains no pictures Record pictures r PICTURE ERROR There is a problem with the selected picture and it cannot be played back on thi...

Страница 57: ...ve the jammed paper SETTINGS CHANGED The printer s paper tray has been removed or the printer has been operated while changing settings on the camera Do not operate the printer while changing settings...

Страница 58: ...e in shooting modes IMAGE QUALITY is fixed to 640 480 Functions available in shooting modes and scenes Shooting mode h A i l M h f Function C N V W P d R S X i 9 9 9 9 9 Y 9 9 9 9 Zoom 9 9 EXPOSURE CO...

Страница 59: ...640 480 However if the monitor setting is 1 024 768 the picture only takes up part of the screen JPEG Joint Photographic Experts Group A compression format for still images Photographs pictures taken...

Страница 60: ...ercial blower then wipe gently with a lens cleaner Battery Charger Wipe gently with a soft dry cloth Note Do not use strong solvents such as benzene or alcohol or chemically treated cloth Mold may for...

Страница 61: ...r Using an exhausted battery may cause the camera to turn off without displaying the battery level warning The rechargeable battery is not fully charged at the time of purchase Charge the battery full...

Страница 62: ...ncreased by using a card with a larger capacity 1 Index area You can use this space to write the contents of the card 2 Contact area The part where the data transferred from the camera enters the card...

Страница 63: ...it into the card slot as shown in the illustration Insert the card straight in Insert the card until it clicks into place Removing the card 4 Push the card all the way in and release slowly The card...

Страница 64: ...while the camera is reading the images Reading of images may take some time Do not open the battery card compartment cover while the card access lamp is blinking Doing so may damage the data in the i...

Страница 65: ...ear any heat source such as a radiator heat register stove or any type of equipment or appliance that generates heat including stereo amplifiers Safety Precautions General Precautions CAUTION TO REDUC...

Страница 66: ...mmediately if you notice any unusual odors noise or smoke around it Never remove the batteries with bare hands which may cause a fire or burn your hands Never hold or operate the camera with wet hands...

Страница 67: ...m leaking overheating or causing a fire or explosion use only batteries recommended for use with this product Insert the battery carefully as described in the operating instructions If rechargeable ba...

Страница 68: ...After storage test the camera by turning it on and pressing the shutter release button to make sure that it is operating normally Always observe the operating environment restrictions described in th...

Страница 69: ...presentations or warranties either expressed or implied by or concerning any content of these written materials or software and in no event shall be liable for any implied warranty of merchantability...

Страница 70: ...eiving antenna Increase the distance between the camera and receiver Connect the equipment to an outlet on a circuit different from that to which the receiver is connected Consult your dealer or an ex...

Страница 71: ...ty the customer may turn the product in at any Olympus service station Please notice that not in all countries such Olympus service station exists 2 The customer shall transport the product to the dea...

Страница 72: ...ng regulations by law remain unaffected by this Notes regarding warranty maintenance 1 This warranty will only be valid if the Warranty Certificate is duly completed by Olympus or an authorized dealer...

Страница 73: ...3 to 18 9 mm f3 1 to 5 9 equivalent to 38 to 114 mm on a 35 mm camera Photometric system Digital ESP metering Shutter speed 4 to 1 2000 sec Shooting range 0 1 m 0 3 ft to W 0 6 m 2 0 ft to T normal m...

Страница 74: ...F operation 20 C to 35 C 4 F to 95 F storage Dimensions 31 5 39 5 6 mm 1 2 1 5 0 2 in Weight Approx 15 g 0 5 oz Battery charger LI 40C Power requirements AC 100 to 240 V 50 to 60 Hz 3 2 VA 100 V to 5...

Страница 75: ...timer gP 17 Strap eyelet gP 3 Battery card compartment cover gP 63 Tripod socket Connector cover gP 29 42 Multi connector gP 29 31 42 S button Erase gP 17 Monitor gP 27 m button gP 17 o button gP 14...

Страница 76: ...mode P 17 9 Image quality SHQ HQ SQ1 SQ2 SQ P 21 10 Image size 2816 2112 2048 1536 640 480 P 21 11 AF target mark P 8 12 Number of storable still pictures Remaining recording time 4 00 36 P 8 P 16 13...

Страница 77: ...ty SHQ HQ SQ1 SQ2 SQ P 21 7 Image size 2816 2112 2048 1536 640 480 etc P 21 8 Exposure compensation 2 0 2 0 P 23 9 Date and time 06 10 07 12 30 P 28 10 File number M 100 0004 11 Number of frames Elaps...

Страница 78: ...check 76 BEEP 27 Beep sound 8 28 BEHIND GLASS P 15 C CANDLE W 15 Card 53 62 Card access lamp 44 54 64 CCD 52 59 Close up playback U 18 Compression 21 Connector cover 29 42 CUISINE V 15 CUSTOM PRINT 3...

Страница 79: ...ngs 35 Printing pictures 30 PROTECT 0 25 R Recording movies with or without sound R 28 Red eye reduction flash 17 Remaining recording time 53 RESET 22 55 RESIZE 25 ROTATE 25 S f Scene 5 15 SEL IMAGE 2...

Страница 80: ...2006 VH740501...

Отзывы: