background image

86

Expo

sur
e, imag

e and color

5

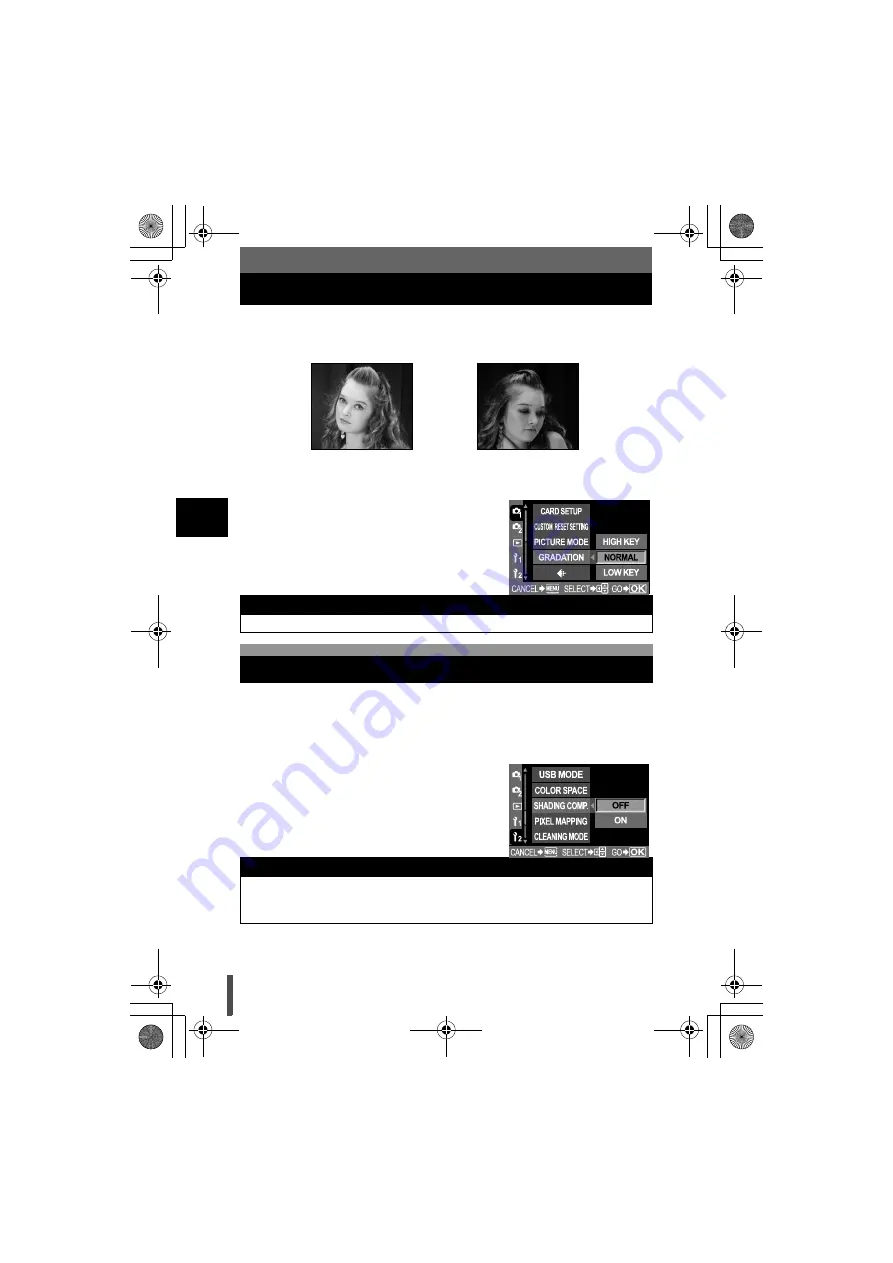
Gradation

Two types of gradation are available.

HIGH KEY (H) : Extended bright gradations.
LOW KEY (L) : Extended dark gradations.

MENU

[

W

]

[GRADATION]

[HIGH KEY]/[NORMAL]/[LOW KEY]

Use 

[NORMAL]

 mode for general uses.

In some cases, the edges of the image may be shadowed due to the 
properties of the lens. The shading compensation function compensates by 
increasing brightness at the dark edge of the image. This function is especially 
useful when a wide-angle lens is used.

MENU

[

Z

]

[SHADING COMP.]

[OFF]/[ON]

x

 Notes

Contrast adjustment does not work when set to HIGH KEY or LOW KEY.

Shading compensation

x

 Notes

This function is not available when a tele converter or inner tube extension is 
attached to the camera.

At higher ISO settings, noise in image edges may be conspicuous.

HIGH KEY

Suitable for a subject that is 

mostly highlighted.

LOW KEY

Suitable for a subject that is 

mostly shadowed.

s0003_e_advanced.book  Page 86  Wednesday, December 28, 2005  2:33 PM

Содержание EVOLT E-330

Страница 1: ...S A Tel 1 631 844 5000 Technical Support USA 24 7 online automated help http www olympusamerica com E1 Phone customer support Tel 1 800 260 1625 Toll free Our phone customer support is available from...

Страница 2: ...u want to play back the images you have just taken Go to 6 Playback and look for the page titled Single frame playback 89 W X Shooting menu 166 j button function 111 4 Center weighted averaging meteri...

Страница 3: ...alternative setting procedures AF illuminator The built in flash can function as an AF illuminator This helps with focusing in low light conditions in the AF mode To use this function raise the flash...

Страница 4: ...mode 37 Ruled lines display 37 Preview function 38 If correct focus cannot be obtained Focus lock 39 Auto bracketing 40 AE bracketing 41 WB bracketing 43 MF bracketing 44 Flash shooting 45 Flash mode...

Страница 5: ...or 70 Shutter release priority 70 Selecting the record mode 71 Types of record modes 71 RAW data 72 How to select the record mode 72 Setting the number of pixels and compression rate 72 Metering mode...

Страница 6: ...es 102 Custom reset setting 103 AEL AFL mode 106 Other function settings 108 AEL AFL memo 108 AEL metering 108 EV step 108 ISO step 108 ISO boost 108 ISO limit 109 Compensating all WB 109 Manual flash...

Страница 7: ...r color 118 AB Underwater mode 118 Firmware 118 Setting the date time 119 Print reservation DPOF 120 Flowchart for print reservation 121 Selecting the print reservation mode 122 Selecting pictures you...

Страница 8: ...ictures 144 Taking night scene pictures 146 Shooting tips and information 148 Tips before you start taking pictures 148 Shooting tips 149 Additional shooting tips and information 153 Playback tips 155...

Страница 9: ...ications 180 Glossary 183 Lens basics 187 ZUIKO DIGITAL interchangeable lens 188 ZUIKO DIGITAL 14 45 mm f3 5 5 6 188 Handling and storage precautions 190 Index 193 11 Information 163 Describes how to...

Страница 10: ...d out wheeled bin WEEE Annex IV indicates separate collection of waste electrical and electronic equipment in the EU countries Please do not throw the equipment into the domestic refuse Please use the...

Страница 11: ...acturer Power Sources Connect this product only to the power source described on the product label If you are not sure about the type of power supply in your home consult your local power company Refe...

Страница 12: ...rmally despite following operating instructions Adjust only the controls described in the operating instructions as improper adjustment of other controls could damage the product and require extensive...

Страница 13: ...ired sequentially It may be hot and cause minor burns z Do not take apart or modify the camera Never attempt to disassemble the camera The internal circuits contain high voltage points which could cau...

Страница 14: ...atch on stray objects and cause serious damage z Do not leave the camera in areas subject to extremely high temperature Doing so may cause parts to deteriorate and in some circumstances cause the came...

Страница 15: ...ht away WARNING z Keep the battery dry at all times Never allow it to come into contact with fresh or salt water z Do not touch or hold the battery with wet hands z If the rechargeable battery does no...

Страница 16: ...energy and if not installed and used in accordance with the instructions may cause harmful interference to radio communications However there is no guarantee that interference will not occur in a part...

Страница 17: ...warranty of merchantability or fitness for any particular purpose or for any consequential incidental or indirect damages including but not limited to damages for loss of business profits business in...

Страница 18: ...rtrait shooting Suitable for shooting a portrait style image of a person l Landscape shooting Suitable for shooting landscapes and other outdoor scenes Macro shooting Suitable for taking close up pict...

Страница 19: ...re and shutter speed that the camera sets g P 28 A Aperture priority shooting Allows you to set the aperture manually The camera sets the shutter speed automatically g P 30 S Shutter priority shooting...

Страница 20: ...INFO button is pressed When the mode dial is set to g the scene menu is displayed g P 27 How to make function settings There are three basic ways to make function settings with this camera Setting whi...

Страница 21: ...ting Pressing the i button while the item is being selected displays the menu for that function Turn the control dial to change the setting If you do not operate the control dial within a few seconds...

Страница 22: ...onfirm your setting on the viewfinder when setting using the direct buttons List of direct buttons The functions assigned to buttons are as shown below Direct buttons Function Ref page 1 WB White bala...

Страница 23: ...shooting functions Z Sets functions that allow you to use the camera efficiently Operation guide is displayed at the bottom of the screen CANCEL Ja Press MENU to cancel the setting SELECT J Press dac...

Страница 24: ...es to the selected function s setting screen some functions can be set on the menu Function Example of setting screen Setting Example of menu screen Menu operation procedures This manual shows the men...

Страница 25: ...oting conditions automatically i Portrait l Landscape Macro j Sport Night scene and portrait g 20 different scene modes are available g Scene mode P 27 Advanced shooting modes For more advanced shooti...

Страница 26: ...ting P 30 S Shutter priority shooting g P 32 M Manual shooting g P 34 Press the shutter button halfway down to focus and press it all the way down to shoot the picture When the shutter button is press...

Страница 27: ...e selected mode is displayed 3 Press the i button The camera enters the shooting stand by mode To change the setting press the i button again The scene menu is displayed Types of scene modes Icon Mode...

Страница 28: ...according to the subject brightness You can also perform program shift as needed to change the combination of aperture and shutter speed while keeping the correct EV exposure value Set the mode dial t...

Страница 29: ...The program shift setting will not be canceled after shooting To cancel program shift setting turn the control dial so that the viewfinder s or control panel screen s exposure mode indication changes...

Страница 30: ...perture increase the aperture value the camera will focus within a longer range Use this mode when you wish to add changes to the background representation Before shooting you can use the preview func...

Страница 31: ...en set to a lower speed set the ISO sensitivity to a higher value g ISO k Setting the desired sensitivity to light P 78 To change the EV step interval J In the menu set the EV step interval to 1 3 EV...

Страница 32: ...you to capture a fast moving subject without blur and a slower shutter speed blurs a moving subject creating a feeling of speed or motion Set the mode dial to S and turn the control dial to set the sh...

Страница 33: ...J If the aperture value indication at the minimum value is blinking set the ISO sensitivity to a higher value g ISO k Setting the desired sensitivity to light P 78 To change the EV step interval J In...

Страница 34: ...the value To set the shutter speed Turn the control dial To set the aperture value Turn the control dial while holding down the F exposure compensation button Setting DIAL allows you to change to the...

Страница 35: ...ge pickup device or image pickup device drive circuit This can also occur when shooting with a high ISO setting in an environment exposed to heat The noise reduction function helps reduce this noise g...

Страница 36: ...en press the i button Supported mode A mode B mode Shooting modes mode dial i l j 3 3 Shooting modes P A S M 3 3 Scene mode g 3 k Sequential shooting 3 3 Enlarged display k 3 3 Supported k Not support...

Страница 37: ...d lines display When the subject composition is confirmed on the LCD monitor ruled lines can be displayed Set the displays for when the live view is A mode and when it is B mode MENU Y FRAME ASSIST A...

Страница 38: ...t to the furthest point of perceived sharp focus in a picture with the selected aperture value For the preview function to work by pressing the j button it is necessary to set the function of the j bu...

Страница 39: ...nder If the AF confirmation mark blinks press the shutter button halfway again The control panel screen disappears 2 While pressing the shutter button halfway move to the desired composition and press...

Страница 40: ...at the same time as any of the other bracketing functions Auto bracketing Comparison Ref page AE bracketing Shoots multiple frames at different exposure values P 41 WB bracketing Creates frames with d...

Страница 41: ...g the menu Exposure compensation value can be adjusted within a range of 1 0 g EV step P 108 Number of frames 3 1 MENU X AE BKT 2 Use p to set OFF 3F 0 3EV 3F 0 7EV 3F 1 0EV 3 Press the i button 4 Sta...

Страница 42: ...AE bracketing to the exposure value you have compensated J Compensate the exposure value then use the AE bracketing feature AE bracketing is applied to the exposure value you have compensated x Notes...

Страница 43: ...color directions 3 Use p to set the EV steps OFF 3F 2STEP 3F 4STEP 3F 6STEP 4 Start shooting When the shutter button is pressed down all the way images adjusted in specified color directions are autom...

Страница 44: ...to adjust the focus then press the shutter button to take the picture When the shutter button is pressed all the way the camera shoots frames sequentially the frame with the manually set focal point t...

Страница 45: ...reduction flash In the red eye reduction flash mode a series of pre flashes are emitted just before the regular flash fires This helps accustom the subject s eyes to the bright light and minimizes th...

Страница 46: ...d 1st curtain Usually the flash fires right after the shutter fully opens This is called 1st curtain Unless you change it this is how the flash always fires Slow synchronization 2nd curtain SLOW2 2nd...

Страница 47: ...ful for eliminating shadows on the subject s face such as shadows from tree leaves in a backlight situation or for correcting the color shift produced by artificial lighting especially fluorescent lig...

Страница 48: ...with manual flash set the f value on the lens based on the distance to the subject Calculate the f value on the lens using the following formula ISO sensitivity Ratio of amount of light GN Guide numbe...

Страница 49: ...ons 1 30 sec 1 180 sec Auto flash red eye reduction Fill in flash Always fires 60 sec 1 180 sec Flash off k k k SLOW Slow synchronization red eye reduction 1st curtain Always fires 60 sec 1 180 sec SL...

Страница 50: ...control dial to select the setting Pressing the i button displays the direct menu from which the setting can also be made g Flash modes available in different exposure modes P 49 Menu setting procedu...

Страница 51: ...tting occurs also depends on lens type and shooting conditions such as distance to the subject 1 Press the UP button to raise the flash 2 Press the shutter button halfway The flash stand by mark light...

Страница 52: ...the contrast distinction between light and dark of images to make the images more vivid MENU X w Use p to set the compensation value x Notes This does not work when the flash control mode on the elec...

Страница 53: ...ra This enables you to take advantage of a wider variety of flash shooting techniques to suit different shooting conditions The external flashes communicate with the camera allowing you to control the...

Страница 54: ...t it back on the camera after flash shooting 2 Attach the electronic flash to the hot shoe on the camera If the lock pin is protruding turn the shoe lock ring as far as it will go in the direction opp...

Страница 55: ...e taken at a higher shutter speed than is possible with normal flashes Fill in flash shooting with the aperture open such as in outdoor portrait shooting is also possible with Super FP flash For detai...

Страница 56: ...c or slower If the shutter speed is faster than this commercially available flashes cannot be used A slower shutter speed may produce blurred images 3 Turn on the flash Be sure to turn on the flash af...

Страница 57: ...ions In such a case adjust the auto f value or ISO on the flash or calculate the distance in the manual mode 3 Use a flash with an illumination angle that matches the focal length of the lens The foca...

Страница 58: ...d keep it pressed The camera will take pictures in sequence until you release the button When settings are made with the j button the information is also displayed on the viewfinder Control panel sett...

Страница 59: ...ing Setting self timer Press the j drive button and set using the control dial Y12s 12 second self timer Y2s 2 second self timer When settings are made with the j button the information is also displa...

Страница 60: ...blinks for approximately 2 seconds then the picture is taken To cancel the activated self timer press the j button Eyepiece shutter When shooting without looking through the viewfinder turn the eyepi...

Страница 61: ...Bulb shooting is also possible when using the optional remote control Setting the remote control Press the j drive button and set using the control dial 0s Triggers the shutter right away 2s Triggers...

Страница 62: ...selected The focus and exposure are locked the remote control lamp blinks then after approximately 2 seconds the picture is taken Transmitted signal effective area Point the remote control at the remo...

Страница 63: ...shooting mode J The remote control shooting mode will not be canceled after shooting Set to one of the other drive modes To use the shutter button on the camera in the remote control shooting mode J T...

Страница 64: ...p c Joins the next image to the bottom Shoot while changing the composition such that the subject overlaps The focus exposure etc will be determined in the first image The g warning mark will be displ...

Страница 65: ...ect only one AF frame AUTO or P Auto Focuses using the 3 AF frames Q Focuses using the left AF frame R Focuses using the center AF frame S Focuses using the right AF frame Use the control panel screen...

Страница 66: ...t using the control dial S AF C AF MF S AF MF C AF MF g S AF single AF shooting P 67 Simultaneous use of S AF mode and MF mode S AF MF P 67 C AF continuous AF shooting P 68 Simultaneous use of C AF mo...

Страница 67: ...mode and MF mode S AF MF This function allows you to fine adjust focus manually by turning the focus ring after AF is performed in the S AF mode When the shutter button is not pressed MF operation is...

Страница 68: ...e picture focusing is tried continuously A beep sound is output when the subject is in focus The beep sound is not output after the third continuous AF operation even when the subject is in focus Simu...

Страница 69: ...monitor press the A B button g Live view P 36 Rotational direction of the focus ring You can select the rotational direction of the focus ring to suit your preference for how the lens adjusts to the...

Страница 70: ...is charging If you want to release the shutter without waiting until these operations have completed use the setting below You can set release priority in S AF g P 67 and C AF g P 68 respectively Whe...

Страница 71: ...d as a mosaic If an image has a high pixel count the file size amount of data will be larger and the number of storable still pictures will be lower The higher the compression the smaller the file siz...

Страница 72: ...d mode set to RAW data using this camera g Editing still images P 97 How to select the record mode MENU W D Use p to set HQ SQ RAW SHQ RAW HQ RAW SQ RAW TIFF SHQ Setting the number of pixels and compr...

Страница 73: ...the d metering button and set using the control dial e 4 n nHI nSH When settings are made with the d button the information is also displayed on the viewfinder Control panel setting procedure i p d M...

Страница 74: ...s mode when you do not want the light level of the background to affect the exposure value n Spot metering The camera meters a very small area around the center of the subject defined by the spot mete...

Страница 75: ...ure can be adjusted in range of 5 0 EV While holding down the F exposure compensation button use the control dial to set the compensation value Adjust toward up to 5 0 EV Adjust toward up to 5 0 EV Th...

Страница 76: ...ght edges of the indicator The exposure compensation indicator will not be displayed when the exposure is compensated by 0 Menu setting procedure MENU W F F Setting x Notes Exposure compensation is no...

Страница 77: ...n lock the exposure alone by pressing the AEL button The AE lock cannot be used during live view B mode Press the AEL button at the position where you wish to lock the metering values and the exposure...

Страница 78: ...ight conditions However higher values may give pictures a grainy appearance Press the ISO button and set the ISO value using the control dial Setting ISO BOOST to ON enables setting up to a higher sen...

Страница 79: ...h WB to achieve the correct white balance Preset white balance Seven different color temperatures are programmed on this camera covering a variety of indoor and outdoor lighting including fluorescent...

Страница 80: ...perature and this is called correlated color temperature The 4000K 4500K and 6600K preset settings in this camera are correlated color temperatures and should not be considered strictly as color tempe...

Страница 81: ...a sunset or the colors in a fireworks display 3 6000K For shooting outdoors on a cloudy day when using the flash 2 7500K For shooting outdoors in the shadows on a clear day 1 3000K For shooting under...

Страница 82: ...there is no near white color in the image framed in the screen the white balance will not be correctly determined In such a case try preset WB or one touch WB settings Control panel setting procedure...

Страница 83: ...t the camera at a sheet of white paper Position the paper so that it fills the viewfinder Make sure there are no shadows 2 While holding down the j button press the shutter button The one touch white...

Страница 84: ...press c Adjusting the white balance in the G M direction Depending on the original WB conditions the image will become greener each time you press a and more magenta each time you press c The white ba...

Страница 85: ...mage SATURATION Vividness of the color B W FILTER Creates a black and white image The filter color is brightened and the complementary color is darkened N NEUTRAL Creates a normal black and white imag...

Страница 86: ...tness at the dark edge of the image This function is especially useful when a wide angle lens is used MENU Z SHADING COMP OFF ON x Notes Contrast adjustment does not work when set to HIGH KEY or LOW K...

Страница 87: ...OISE REDUCTION OFF ON Select ON The noise reduction process is activated after shooting The card access lamp blinks during the noise reduction process You cannot take more pictures until the card acce...

Страница 88: ...lect sRGB or Adobe RGB This diminishes camera shake caused by vibrations when the mirror moves You can select the interval from the time the mirror is raised until the shutter is released This feature...

Страница 89: ...o operation after that Default setting is 4 hours Turn on the camera again 2 Use p to select images you want to view To exit the playback mode press the q button Pressing the shutter button halfway re...

Страница 90: ...s of 2x 14x Turning the control dial toward G restores the previous image size Single frame playback Close up playback Press p to change the close up position Close up position display Press p to move...

Страница 91: ...ft half of the screen and the next frame will be enlarged with the same magnification in the right half of the screen 3 Use p to select an image You can protect erase or copy the image Pressing the i...

Страница 92: ...per frame c Moves to the lower frame To return to single frame playback turn the control dial to U Calendar display With the calendar you can display images recorded on the card by date If more than o...

Страница 93: ...eservation protect record mode and file number Displays the frame number print reservation protect record mode number of pixels compression rate date and time and file number Distribution of the brigh...

Страница 94: ...number of frames displayed during slideshow from 1 4 9 16 or 25 1 MENU q m 2 Use p to set K 1 frame display L 4 frame display M 9 frame display N 16 frame display O 25 frame display 3 Press the i but...

Страница 95: ...ith the camera held vertically MENU q y ON OFF ON When set to ON images shot vertically will be automatically rotated and displayed during playback You can also press the F button to rotate and displa...

Страница 96: ...n and press the q playback button x Notes To connect the camera to a TV use the provided video cable Make sure that the camera s video output signal type is the same as the TV s video signal type g Se...

Страница 97: ...ata to a new file in the TIFF or JPEG format While checking recorded images you can edit them to your liking Image processing is performed based on the current camera settings If you want to use diffe...

Страница 98: ...hen editing JPEG TIFF image When editing RAW image BLACK WHITE SEPIA REDEYE FIX SATURATION Q RAW editing is based on the camera s current settings Set the camera to suit your preferences before shooti...

Страница 99: ...ton The selected images will be shown with red frames To cancel your selection press the i button again 2 Press p to display the next images you want to copy and press the i button 3 After you have se...

Страница 100: ...age you want to protect and press the AEL AFL 0 protect button 9 is displayed on the screen To cancel the protection Display the images that are protected and press the AEL AFL 0 button x Notes Format...

Страница 101: ...Use ac to select YES then press the i button TIPS To erase immediately J If you have set QUICK ERASE P 113 to ON pressing the S button will erase an image immediately All frame erase 1 MENU W CARD SE...

Страница 102: ...wn with red frames To cancel your selection press the i button again During index display press p to select the images you want to erase and press the i button 2 Press p to display the next images you...

Страница 103: ...ady been registered SET is displayed next to the RESET1 RESET2 option Registering reset settings 1 Select either RESET1 RESET2 to register and press the d button 2 Select SET and press the i button To...

Страница 104: ...ING ESP 3 3 FLASH MODE Auto flash 1 3 3 j Y o 3 3 AF S AF 3 3 P AUTO 3 3 AE BKT OFF 3 3 WB BKT OFF 3 3 FL BKT OFF 3 3 MF BKT OFF 3 3 ANTI SHOCK OFF 3 k Playback mode Single frame playback with no info...

Страница 105: ...ERASE RAW JPEG 3 k jFUNCTION j Y 3 k MY MODE SETUP k 3 k FOCUS RING b 3 k AF ILLUMINATOR ON 3 3 RESET LENS ON k k RELEASE PRIORITY S OFF 3 3 RELEASE PRIORITY C ON 3 3 FRAME ASSIST OFF 3 k X 2006 01 0...

Страница 106: ...focus on some subject and then change the composition of the photo When you want to set the exposure by metering an area different from where the camera is focused Select the function of the button t...

Страница 107: ...de Shutter button function AEL button function Half press Full press When holding down AEL Focus Exposure Focus Exposure Focus Exposure mode1 Focusing starts Locked Locked k k Locked mode2 Focusing st...

Страница 108: ...xposure MENU Y AEL METERING AUTO 4 n nHI nSH AUTO performs metering in the mode selected under METERING mode EV step This allows you to change the EV step for exposure parameter setting such as shutte...

Страница 109: ...to select the color direction R B RedkBlue G M GreenkMagenta 2 Use ac to set compensate value WB Compensation g P 84 You can check the white balance you have adjusted If you select ALL RESET 1 Use ac...

Страница 110: ...rol dial Exposure compensation setting Turning the control dial while holding down the F exposure compensation button M Manual shooting Shutter speed setting Turning the control dial Aperture value f...

Страница 111: ...g Setting the one touch white balance P 83 TEST PICTURE Pressing the shutter button while pressing the j button enables you to check the picture you have just taken on the monitor without having to re...

Страница 112: ...stered SET is displayed next to the corresponding reset option Registering Select SET and press the i button The current settings are registered in the camera To cancel the registration select RESET E...

Страница 113: ...e the picture ON Pressing the S erase button erases the picture immediately Erasing RAW and JPEG files This lets you select the method to erase images recorded in RAW JPEG It is a function effective o...

Страница 114: ...whose file number coincides with one saved on the previous card the new card s file numbers start at the number following the highest number on the previous card RESET When a new card is inserted fold...

Страница 115: ...r making a brief check of the picture you have just taken Pressing the shutter button halfway while checking the picture lets you resume shooting immediately MENU Z REC VIEW OFF The picture being reco...

Страница 116: ...ither device refer to Chapter 9 Connecting the camera to a printer g P 126 and Chapter 10 Connecting the camera to a computer g P 136 MENU Z USB MODE AUTO The selection screen for the USB connection w...

Страница 117: ...he wrong video signal type recorded pictures will not play back properly on your TV MENU Z VIDEO OUT NTSC PAL TV video signal types in major countries and regions Check the video signal type before co...

Страница 118: ...r of the monitor MENU Z CTL PANEL COLOR COLOR1 COLOR2 AB Underwater mode It is possible to switch J SPORT and U NIGHT PORTRAIT on the mode dial to A UNDER WATER MACRO and B UNDER WATER WIDE Use an opt...

Страница 119: ...To return to the previous setting press d The first two digits of the Y year are fixed 2 Repeat this procedure until the date and time are completely set The time is displayed in the 24 hour format Fo...

Страница 120: ...is called dpi dots per inch The higher the dpi value the better the printed results Keep in mind however that the dpi of the picture does not change This means that when you print an image with a hig...

Страница 121: ...e reservation U Perform the following settings in the menu MENU q Selecting the print reservation mode g P 122 Selecting pictures you want to print only when is selected g P 122 Setting printing data...

Страница 122: ...ed on the card The RESET KEEP selection screen appears giving you the choice of resetting the data or keeping it g Resetting print reservation P 123 Selecting pictures you want to print Applies print...

Страница 123: ...vation data You can reset all print reservation data or just the data for selected pictures 1 MENU q 2 Use p to select or U Select this when you want to reset the print reservation data for a selected...

Страница 124: ...vation data for a selected picture 1 Select KEEP and press the i button 2 Use bd to select the frame with print reservation data you want to reset then press c to set the number of prints to 0 To rese...

Страница 125: ...om the camera STANDARD All printers that support PictBridge have standard print settings By selecting STANDARD on the settings screens g P 129 you can print pictures according to these settings For de...

Страница 126: ...nter s manual 2 Plug the USB cable into the camera s multi connector and turn the camera on The selection screen for the USB connection is displayed 3 Use p to select EASY or CUSTOM If you select EASY...

Страница 127: ...to a printer P 126 The EASY PRINT START screen is displayed 2 Press the print button Flowchart for custom printing Selecting the print mode g P 128 Setting the print paper items g P 129 Selecting pic...

Страница 128: ...multiple copies of one image in separate frames on a single sheet ALL INDEX Prints an index of all the pictures stored in the card PRINT ORDER Prints according to the print reservation you made If the...

Страница 129: ...want to print The selected pictures can be printed later single frame reservation or the picture you are displaying can be printed right away PRINT f Prints the currently displayed picture If there is...

Страница 130: ...ing Print when you have set the pictures for printing and printing data OK Transfers images you print to the printer CANCEL Resets the settings All print reservation data will be lost If you want to k...

Страница 131: ...era with your computer using the provided USB cable g P 136 Starting OLYMPUS Master g P 137 Saving pictures to your computer g P 138 Disconnecting the camera from your computer g P 139 Using the provi...

Страница 132: ...Master on a computer running Windows 2000 Professional or Windows XP login as a user with administrator privileges QuickTime 6 or later and Internet Explorer must be installed on the computer beforeh...

Страница 133: ...is required to run OLYMPUS Master If QuickTime 6 or later is preinstalled on your computer the setup program will not run In this case go to step 4 3 Click Next then follow the on screen prompts to c...

Страница 134: ...ntinue installation A confirmation window appears asking you if you want to install Adobe Reader To view the OLYMPUS Master software user s guide Adobe Reader must be installed If Adobe Reader is alre...

Страница 135: ...your desktop 2 Double click the Installer icon Follow the on screen prompts to continue installing the program OLYMPUS Master Installer will automatically launch When the software license agreement wi...

Страница 136: ...ew device Windows When you connect the camera to the computer for the first time the computer automatically recognizes the camera Click OK when the message saying that the installation is completed ap...

Страница 137: ...hen select your region Closing OLYMPUS Master 1 Click Exit in the main menu The OLYMPUS Master program is closed 1 Transfer Images button Transfers images from the camera or removable media 2 Browse I...

Страница 138: ...es to be copied appears The thumbnails of all the images in the camera are displayed 3 Select the image file you want to save on the computer then click the Transfer Images button A confirmation messa...

Страница 139: ...s lamp has stopped blinking 2 Do the following steps depending on your computer s operating system Windows 98SE 1 Double click the My Computer icon and right click the Removable Disk to display the me...

Страница 140: ...The screen switches to the View mode enlarging the image Clicking Menu in the Browse window returns to the main menu x Notes For Windows Me 2000 XP users When you click Unplug or Eject Hardware a war...

Страница 141: ...print window The printer setting dialog box is displayed Make printer settings as required 4 Select the layout and size of the image to print To print images with the date or date and time check off P...

Страница 142: ...connecting the camera to your computer with the USB cable double click the file included in the following folder on the provided OLYMPUS Master CD ROM When you install OLYMPUS Master the USB driver w...

Страница 143: ...aperture increase the aperture value as much as possible To capture the instant where waves smash against the seashore use S Shutter priority shooting mode and select a fast shutter speed To shoot flo...

Страница 144: ...want You can select high or low setting for saturation When the setting is high a vivid color will be used However as the image will be recorded with this setting during shooting it is recommended to...

Страница 145: ...o the type of subject you wish to emphasize be it a field or a bunch of flowers To change the focus area set to A aperture priority shooting mode and select the aperture value When you open the apertu...

Страница 146: ...distance is longer such as 150 mm or 200 mm rather than 54 mm g A Aperture priority shooting P 30 Live view P 36 Preview function P 38 Exposure compensation k Varying the image brightness P 75 White...

Страница 147: ...ur easily when shooting at slow shutter speeds Set NOISE REDUCTION to ON to reduce the occurrence of noise Using manual focus For cases when the subject is dark and you cannot focus using AF auto focu...

Страница 148: ...no operation even while the camera is on monitor is lit the camera goes into sleep mode after a fixed period of time and the camera stops operating When this happens the LCD monitor s light will go o...

Страница 149: ...macro lens When using macro lens to close up on the subject it is difficult to focus with AF when the enlargement ratio of the subject is bigger Try using B mode of the live view function As AF becom...

Страница 150: ...nges automatically allowing you to take pictures in low light situations with the flash off while holding the camera The camera or your hand moves when pressing the shutter button Press the shutter bu...

Страница 151: ...nsider a composition where strong light source is not taken in the picture Flare may occur even when a light source is not present in the picture Use a lens hood to shade the lens from the light sourc...

Страница 152: ...compared to the subject the exposure will be affected at the bright parts and the subject will appear darker This is because the camera determines the exposure from the brightness of the whole screen...

Страница 153: ...Olympus card or a card used for another application such as for a computer the message CARD FULL is displayed To use this card with this camera use the FORMAT function to format the card g Formatting...

Страница 154: ...gs on the computer RAW Concern over roughness as the picture is printed in large size TIFF To print large images on full size paper To edit and process images on a computer SHQ HQ with a large pixel c...

Страница 155: ...s many peaks around here the image will appear mostly white g Information display P 93 Leaving set functions in the camera so that they can be used later Current camera settings can be stored in MY MO...

Страница 156: ...can view the entire picture on the computer screen View the picture using image browsing software Install the OLYMPUS Master software from the provided CD ROM Change the monitor setting The icons on t...

Страница 157: ...een set to read only setting with the computer Reset the card with the computer No indication CARD FULL The card is full No more pictures can be taken or no more information such as print reservation...

Страница 158: ...nnot be done the image file is damaged CARD COVER OPEN The card cover is open Close the card cover CARD ERROR The card is not formatted Format the card No indication BATTERY EMPTY The battery is drain...

Страница 159: ...d while making settings on the camera Do not manipulate the printer while making settings on the camera PRINT ERROR There is a problem with the printer and or camera Turn off camera and printer Check...

Страница 160: ...the camera s functions Cleaning and checking the image pickup device This camera incorporates a dust reduction function to keep dust from getting on the image pickup device and to remove any dust or d...

Страница 161: ...he mirror goes up and the shutter curtain opens 6 Clean the image pickup device Carefully blow off any dust on the surface of the image pickup device by using a mechanical blower commercially availabl...

Страница 162: ...tor or taking continuous shots wait for at least one minute before using the pixel mapping function to ensure that it operates correctly Before starting put on the lens cap and close the eyepiece shut...

Страница 163: ...provided with your Microdrive Be very careful when putting the camera down during recording Place it gently on a firm surface Do not use the camera in places subject to vibrations or excessive shock s...

Страница 164: ...the card is formatted When formatting a used card confirm there are no images that you still want to keep on the card 1 MENU W CARD SETUP 2 Use ac to select FORMAT Press the i button 3 Use ac to selec...

Страница 165: ...rinter z When using a drained battery the camera may turn off without the low battery warning being displayed z The battery will not be fully charged at the time of purchase Charge the battery using t...

Страница 166: ...KEY P 86 D HQ SQ RAW SHQ RAW HQ RAW SQ RAW TIFF SHQ P 72 F 5 0 0 0 5 0 P 75 NOISE REDUCTION OFF ON P 87 WB AUTO R 7 7 P 81 G 7 7 5 5300K R 7 7 G 7 7 3 6000K R 7 7 G 7 7 2 7500K R 7 7 G 7 7 1 3000K R...

Страница 167: ...TEP P 43 G M AE BKT OFF 3F 0 3EV 3F 0 7EV 3F 1 0EV P 41 FL BKT OFF 3F 0 3EV 3F 0 7EV 3F 1 0EV P 53 MF BKT OFF 5F 1STEP 5F 2STEP 7F 1STEP 7F 2STEP P 44 ANTI SHOCK OFF 1SEC 30SEC P 88 Factory default se...

Страница 168: ...110 DIAL P F P 110 M SHUTTER FNo AEL AFL S AF mode1 mode2 mode3 P 106 C AF mode1 mode2 mode3 mode4 MF mode1 mode2 mode3 AEL AFL MEMO ON OFF P 108 AEL METERING AUTO 4 n nHI nSH P 108 QUICK ERASE OFF ON...

Страница 169: ...IN P 116 4h TIMER OFF 4h P 118 BUTTON TIMER 3SEC 5SEC 8SEC HOLD P 117 SCREEN OFF ON P 118 CTL PANEL COLOR COLOR1 COLOR2 P 118 PRIORITY SET YES NO P 113 USB MODE AUTO STORAGE CONTROL EASY CUSTOM P 116...

Страница 170: ...k 3 k k SLOW 3 k 3 k SLOW 3 k 3 k H k 3 k k SLOW2 3 k 3 Cannot be selected in U mode k 3 k CUSTOM RESET SETTING 3 k k PICTURE MODE 3 k k GRADATION 3 k NOISE REDUCTION 3 k 3 k ISO 3 k WB 3 k w 3 k MET...

Страница 171: ...3 AEL AFL 3 k AEL AFL MEMO 3 k AEL METERING 3 k QUICK ERASE 3 RAW JPEG ERASE 3 jFUNCTION 3 k MY MODE SETUP 3 k FOCUS RING 3 AF ILLUMINATOR 3 k RESET LENS 3 RELEASE PRIORITY S 3 k RELEASE PRIORITY C 3...

Страница 172: ...VIEW 3 SLEEP 3 4h TIMER 3 BUTTON TIMER 3 SCREEN 3 CTL PANEL COLOR 3 PRIORITY SET 3 USB MODE 3 COLOR SPACE 3 k SHADING COMP 3 k PIXEL MAPPING 3 CLEANING MODE 3 Function P A S M i l j g 3 Available k N...

Страница 173: ...60 1 2 7 0 9 1 4 0 6 1 8 0 3 1 12 0 2 1024x768 1 2 7 0 6 1 4 0 4 1 8 0 2 1 12 0 1 640x480 1 2 7 0 2 1 4 0 2 1 8 0 1 1 12 0 1 x Notes The number of remaining pictures may change according to the subjec...

Страница 174: ...rive button g P 58 P 59 P 61 Copy Print button g P 99 P 127 d Metering button g P 73 i button g P 23 ISO button g P 78 Arrow pad g P 23 AF Focus mode button g P 66 Card cover CF card slot Eject button...

Страница 175: ...ment mark Mount Attach the lens after removing the body cap from the camera to prevent dust and dirt from entering the camera body Battery compartment lock Battery compartment cover Tripod socket F Ex...

Страница 176: ...3 Shutter speed P 28 35 4 AF confirmation mark P 39 5 Flash P 51 6 White balance U P 81 7 AE lock V P 77 8 Exposure compensation value indication appears during exposure compensation P 75 9 Metering m...

Страница 177: ...e number y 100 0030 30 P 93 8 AF frame P 65 9 Histogram P 93 10 Aperture value F2 8 P 28 35 11 Shutter speed 1 4000 P 28 35 12 Exposure mode P A S M i l j P 25 35 13 Exposure compensation 0 7 P 75 14...

Страница 178: ...posure compensation value 2 0 P 75 7 Date and time Auto bracketing Noise reduction Live view 06 06 16 21 56 0 O 5 6 P 119 P 40 P 87 P 36 8 ISO AUTO 100 200 400 P 78 9 White balance 1 5 P 81 10 Picture...

Страница 179: ...0 P 52 Metering mode e 4 n P 73 Focus mode S AF P 66 AF frame P P 65 Sequential shooting Self timer Remote control j Y2s P 58 61 Live view 5 6 P 36 Auto bracketing 0 P 40 AF illuminator T P 70 21 Col...

Страница 180: ...0 7 from the cover glass 1 m 1 Diopter adjustment range 3 0 1 0 m 1 Optical path fraction Quick return half mirror Depth of field Can be checked with the j button when PREVIEW registered Focusing Scr...

Страница 181: ...d in 1 3 1 2 or 1 EV step within a range of 5 EV White balance Product type Image pickup device Mode setting Auto Preset WB 7 settings Customized WB One touch WB Recording Memory CF card Compatible wi...

Страница 182: ...um ion battery Nominal voltage DC 7 2 V Nominal capacity 1500 mAh No of charge and discharge times Approx 500 times vary with usage conditions Ambient temperature 0 m 40 m charging 10 m 60 m operation...

Страница 183: ...of the center and periphery of the image area but is biased toward the information at the center of the image area This method is best used when the brightness of the center and periphery of the image...

Страница 184: ...printed by a printer or print lab that supports the DPOF format Eclipsing Vignetting This refers to when an object obscures part of the field of view so that the whole subject is not photographed Vig...

Страница 185: ...reate an image denotes the image size For instance an image in 640 x 480 pixel count is the same size as the computer screen if the monitor setting is also 640 x 480 If the monitor setting is 1024 x 7...

Страница 186: ...area mark in the viewfinder Spot metering is ideal for use in difficult light conditions or when the important element of the picture subject s face is small Use spot metering for backlit subjects or...

Страница 187: ...irds system interchangeable lens lineup includes a wide range of products in addition to those listed below ZUIKO DIGITAL ED 50 mm 200 mm f2 8 3 5 Super telephoto zoom lens equivalent to 100 400 mm on...

Страница 188: ...rts 1 Hood mount section 2 Filter mount thread 3 Zoom ring 4 Focus ring 5 Mount index 6 Electrical contacts 7 Front cap 8 Rear cap 9 Lens hood Attaching the hood Storing the hood Use the hood when sho...

Страница 189: ...ntrol f3 5 22 Shooting range 0 38 m 1 2ft infinity Focus adjustment AF MF switching Weight 285 g 10 1oz excluding hood and cap Dimensions l71 x 86 5 mm Lens hood mount Bayonet Filter mount thread diam...

Страница 190: ...may form inside the camera when there is a sudden extreme change in temperature such as when moving from indoors to outdoors Acclimatize the camera to the temperature e g by putting the camera into a...

Страница 191: ...t continues to flow and may lead to a decrease in battery performance When not using the battery attach the provided protection cap and store it in a cool dry place with a temperature between 15 m and...

Страница 192: ...not a malfunction It will be less noticeable in playback mode z In places subject to low temperatures the LCD monitor may take a long time to turn on or its color may change temporarily When using th...

Страница 193: ...BEACH SNOW 27 BEEP sound 8 115 BLACK WHITE 97 Bulb shooting 35 63 BUTTON TIMER 117 C C AF continuous AF shooting 68 C AF MF 68 Calendar display 92 CANDLE 27 Card formatting 164 CARD SETUP 101 164 CHI...

Страница 194: ...Program shooting P 28 Q Quick erase 113 R RAW editing 97 RAW JPEG ERASE 113 REC VIEW 115 Record mode D 71 72 REDEYE FIX 97 Red eye reduction flash 45 RELEASE PRIORITY C 70 RELEASE PRIORITY S 70 Remote...

Страница 195: ...195 Memo s0003_e_advanced book Page 195 Wednesday December 28 2005 2 33 PM...

Страница 196: ...S A Tel 1 631 844 5000 Technical Support USA 24 7 online automated help http www olympusamerica com E1 Phone customer support Tel 1 800 260 1625 Toll free Our phone customer support is available from...

Отзывы: