background image

54

Olympus

®

 DS-4000 Digital Recorder Installation and User Guide

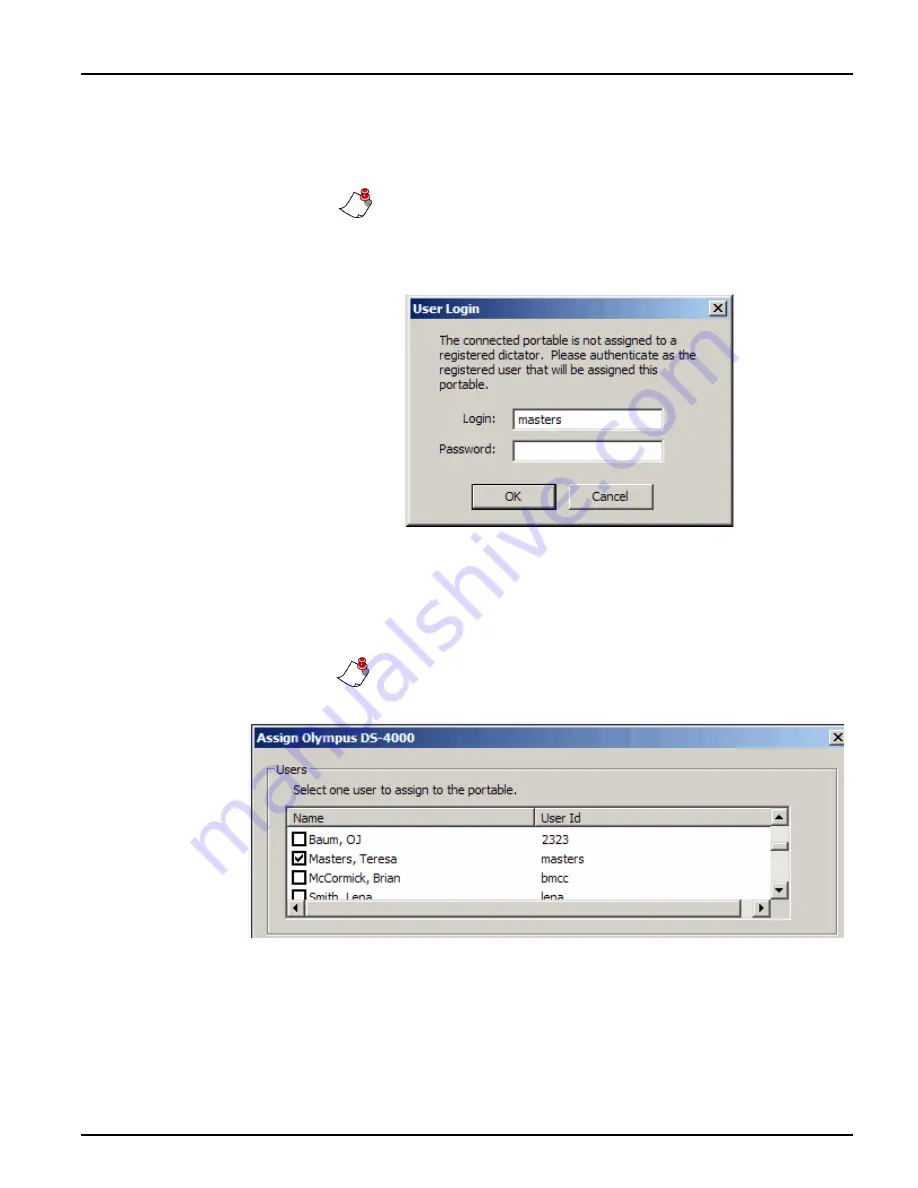
2. If the recorder has not been previously assigned to a user, the 

User 

Login

 dialog box opens. Complete the login screen by entering a valid 

client login from the 

EXVoice

 system and a password if one is used.

Note: 

You must log in as an administrator who has the 

Assign 

Users

 privilege, and then select the dictation user from a list 

when the 

Assign Olympus DS-4000

 dialog box opens.

3. Click 

OK

 to continue to the 

Assign Olympus DS-4000

 dialog box. 

4. Complete the 

Assign Olympus DS-4000

 dialog box settings:

Users

 group box – When logged in as an administrative user, find 

and check the check box beside the name of the provider to whom 
you are assigning this recorder. 

Note: 

You must be an administrator, or a user with the privilege 

to assign recorders to do this. 

Worktypes

 group box – Select up to 10 worktypes for the provider. 

Worktypes shown in the list are those that have been configured in 

ID Field Matching

 in 

EXVoice Explorer

.

Содержание DS-4000

Страница 1: ...Administrator and Provider Installation and User Guide Olympus DS 4000 Digital Voice Recorder for Enterprise Express VoiceSystem Versions 6 5 7 0 and 7 5...

Страница 2: ...he product or products referred to herein and specifically disclaims any implied warranties including without limitation any implied warranty of merchantability fitness for any particular purpose or n...

Страница 3: ...ware 22 Olympus DSS Player Pro Software 22 Directrec Configuration Tool 22 Olympus Device Detector 3 23 Chapter 3 Installing the Dictaphone EXV Olympus Uploader Application 27 Installing the Olympus U...

Страница 4: ...Chapter 5 Dictating with the Olympus DS 4000 Digital Recorder 61 Dictating with the Olympus DS 4000 Digital Recorder 62 Dictating with the DS 4000 62 Setting Priority Levels 62 Playing Back a Dictatio...

Страница 5: ...rder an illustration showing the buttons and controls on the DS 4000 recorder an illustration showing the elements of the LCD display screen on the DS 4000 recorder the specifications of the available...

Страница 6: ...s Uploader application Transfers dictation files to a single EXVoice system Multiple EXVoice systems can be listed and selected from the EXV Commander Selection dialog box as long as a default EXVoice...

Страница 7: ...rder on page 39 Record a test dictation and test the upload process Refer to Uploading a Test Dictation on page 57 Main Features of the Olympus DS 4000 Recorder The main features of the DS 4000 record...

Страница 8: ...be used if you are using or plan to use EXSpeech LP mode records 8KHz audio that is compatible with EXSpeech This mode is always used for iChart customers SP Mode Record time is approximately 5 hours...

Страница 9: ...5 Chapter 1 Olympus Digital Recorder Model DS 4000 Olympus DS 4000 Recorder Illustrations These two illustrations identify the parts of the DS 4000 recorder and the functions on the LCD display screen...

Страница 10: ...vailable recording time for one continuous file The available recording time might be shorter if many short recordings are made Documentation This user guide describes how to install the Olympus Uploa...

Страница 11: ...oader application Setting Up the DS 4000 Recorder Nuance recommends the settings shown here for the DS 4000 recorder For more detailed information on these settings refer to the Olympus Digital Voice...

Страница 12: ...ding mode a Press and hold the MENU button for about two seconds b Press FF or REW until REC MODE is highlighted Press MENU to select c Press FF or REW to select the appropriate mode LP 8kHz Long Play...

Страница 13: ...S Player Pro Software Chapter Overview This chapter covers installing the DSS Player Pro software installing the latest program patch and firmware updates disabling the Directrec Configuration Tool co...

Страница 14: ...recognize the DS 4000 recorder If the providers in your organization who dictate their reports using an Olympus DS 4000 recorder want to use their PC workstation to upload their dictations to the EXV...

Страница 15: ...S Version The InstallShield Wizard starts and the Welcome window appears 3 Click Next 4 Read the License Agreement and click Yes The Customer Information window appears 5 In the Customer Information w...

Страница 16: ...e Neither Nuance nor Olympus track software licenses shipped to customers Therefore Nuance strongly recommends you take the precautions regarding license management that are listed in Administering Ol...

Страница 17: ...apter 2 Installing the Olympus DSS Player Pro Software 8 Click Yes to confirm the creation of the new folder 9 In the Select Program Folder window click Next to accept the default Program Folders loca...

Страница 18: ...us DS 4000 Digital Recorder Installation and User Guide 10 If the Selection of recorder window appears select DS 4000 and click Next 11 In the Start Copying Files window click Next to accept the folde...

Страница 19: ...kstation and you want to install it so you can view the PDF version of the Olympus Digital Voice Recorder DS 4000 Instructions manual check the box labeled Install Adobe Acrobat Reader and click Next...

Страница 20: ...m the CD go to the Olympus Web site to check for upgrades to this software Locate download and install the latest program patch for Release 4 x from the Olympus Web site Note The Olympus DSS Player Pr...

Страница 21: ...down and locate the heading and link for DS 4000 Software Downloads and click the DS 4000 Software Downloads link d On the next page click Microsoft Windows and continue at Step 2 on page 19 OR Go dir...

Страница 22: ...18 Olympus DS 4000 Digital Recorder Installation and User Guide b Click Professional Dictation c Click DS 4000 d Click Microsoft Windows and continue at Step 2 below...

Страница 23: ...bsequent months it might indicate a higher 4 xx x update version of the software 3 In the File Download dialog box click Save to start the download 4 When the Save As dialog box opens navigate to the...

Страница 24: ...der or to the folder where you saved the downloaded file 2 In the right pane double click the downloaded file for example P4UP103EN zip WinZip or your standard zip tool opens and the executable file f...

Страница 25: ...e 5 Read the License Agreement and click Yes A progress bar is shown while the DSS Player Pro software update is installed 6 When the update is complete and the Wizard Complete window displays click F...

Страница 26: ...rec Configuration Tool The Directrec Configuration Tool is installed on your PC workstation and is placed in the Startup menu so it starts automatically each time you start your PC This tool is not ne...

Страница 27: ...nnected to the PC The Device Detector 3 must be present in the Startup menu so it starts automatically each time you start your PC The Device Detector 3 icon in the Notification Area indicates the pro...

Страница 28: ...Program Files Olympus DeviceDetector This is the location of the executable file that you can use to start Device Detector 3 In the right panel locate and double click DevDtct2 exe which is the progr...

Страница 29: ...All Users Start Menu Programs Startup 8 Verify that the Device Detector 3 shortcut is listed in the Startup folder If the Device Detector 3 shortcut is listed in the Startup folder continue with Step...

Страница 30: ...back to C Documents and Settings All Users Start Menu Programs Startup e Right click anywhere in the right panel to open the shortcut menu f Select Paste Shortcut from the shortcut menu to put the Dev...

Страница 31: ...hone EXV Olympus Uploader Application Chapter Overview This chapter covers installing the Dictaphone EXV Olympus Uploader application for use with the DS 4000 recorder testing the connection between t...

Страница 32: ...mpus Uploader application as indicated here using the exe file provided by your Nuance Service Representative A standard msi installation file is also available if you prefer to install with a push in...

Страница 33: ...aphone EXV Olympus Uploader Application 3 In the right panel double click the Enterprise Express Voice Olympus Uploader exe file to start the installation The Dictaphone EXV Olympus Uploader InstallSh...

Страница 34: ...er Installation and User Guide 5 In the Customer Information dialog box enter the Customer Name and Company Click Next 6 In the Destination Folder window click Next to accept the default location wher...

Страница 35: ...ter 3 Installing the Dictaphone EXV Olympus Uploader Application 7 Click Next to continue 8 Click Install to start the installation A progress bar is shown while the Olympus Uploader application is in...

Страница 36: ...er to Installing the Olympus Uploader with EXVoice 7 x beginning on page 28 for the installation procedures To install the Olympus Uploader application at each workstation using EXVoice 6 5 1 Contact...

Страница 37: ...right panel double click the Enterprise Express Voice Olympus Uploader exe file to start the installation The Enterprise Express Voice Olympus Uploader InstallShield Wizard starts 4 Click Next 5 In th...

Страница 38: ...DS 4000 Digital Recorder Installation and User Guide 6 In the Destination Folder window click Next to accept the default location where the software is to be installed 7 Click Install to start the in...

Страница 39: ...alling the Dictaphone EXV Olympus Uploader Application A progress bar is shown while the Olympus Uploader application is installed 8 When the InstallShield Wizard is complete click Finish to complete...

Страница 40: ...u need to configure the Commander Selection dialog box 3 Enter the Name and Address of the EXVoice server and click OK 4 If a newer version of the Olympus Uploader application is available you receive...

Страница 41: ...nfigured 9 When the Olympus Uploader starts you need to configure the provider In the Dictaphone DS 3000 DS 4000 Upload Utility dialog box select File Configure Portable Notes Before configuring a pro...

Страница 42: ...38 Olympus DS 4000 Digital Recorder Installation and User Guide...

Страница 43: ...assigning privileges to the administrators and users providers creating ID field matching for the users providers configuring the master profile configuring users providers assigning and reassigning a...

Страница 44: ...ed The Master Profile assigned to the provider must be configured for the Olympus DS 4000 The worktypes that are assigned to a provider originate in the ID Field Matching configuration in EXVoice Expl...

Страница 45: ...administrators by adding both the Olympus Uploader Execute and the Olympus Uploader Assign all users to portable privileges The instructions below are for modifying an existing group To assign the nec...

Страница 46: ...oviders using the DS 4000 recorder 5 For providers In the Available Privileges listing double click Execute to move it to the Selected Privileges list 6 For administrators In the Available Privileges...

Страница 47: ...mpus setups for version 6 5 Refer to Configuring Users for the DS 4000 beginning on page 50 for information on configuring the appropriate provider master profile for the Olympus worktypes To set up I...

Страница 48: ...a short description of the worktype up to a maximum of 16 characters for example H P for History and Physical Note Up to 10 worktypes can be assigned to the Olympus DS 4000 The maximum length of the...

Страница 49: ...t you change for the Olympus recorder This option would be useful if you want to assign different worktypes to each Olympus provider Instructions are included in this document for modifying an existin...

Страница 50: ...ate site and expand Master Profiles 2 Right click the master profile and select Modify Master Profile The Modifying master profile dialog box opens 3 Select the Portables tab 4 In the Portable type gr...

Страница 51: ...r DSS portable file conversions select the conversion method for audio files recorded on the Olympus recorder With any of the first three options in effect conversion takes place on the PC workstation...

Страница 52: ...r to Configuring the Master Profile in EXVoice 7 x beginning on page 45 for the configuration procedures To configure the master profile using EXVoice Version 6 5 1 In the EXVoice Explorer left pane o...

Страница 53: ...aware of Reference Number select None 7 From the drop down list under Before sending jobs to the server convert them to which audio format select the correct audio format based on the following Non i...

Страница 54: ...onfigure the appropriate settings If you must create new providers use these instructions to configure the required settings To configure users for the Olympus recorder 1 In the left pane of the EXVoi...

Страница 55: ...51 Chapter 4 Configuring EXVoice for Using the DS 4000 Recorder 6 Click OK when finished Uncheck Account Disabled Enter the Login and password Select the correct Admin group...

Страница 56: ...ctaphone DS 3000 DS 4000 Upload Utility has been installed and configured At the workstation place the DS 4000 in the USB cradle and select the provider who uses this Olympus recorder Information abou...

Страница 57: ...rder in the cradle The Dictaphone Dictaphone DS 3000 DS 4000 Upload Utility opens automatically 2 Press F4 or click File Configure Portable to open the Assign DS 4000 to author dialog box Note If the...

Страница 58: ...when the Assign Olympus DS 4000 dialog box opens 3 Click OK to continue to the Assign Olympus DS 4000 dialog box 4 Complete the Assign Olympus DS 4000 dialog box settings Users group box When logged...

Страница 59: ...The drive letter assigned varies from computer to computer The Olympus Uploader utility searches all five folders A through E on the device 8 Refer to Uploading a Test Dictation beginning on page 57...

Страница 60: ...o Job Lister Reports In Job Lister you can add the Input Type column to your reports so these reports identify the Olympus recorder as the type of device used for recording reports Adding this column...

Страница 61: ...ck of the recorder 2 Record a test dictation 3 Place the recorder in the cradle that is attached to your PC The Olympus Uploader should start and the file upload begins automatically 4 If the Olympus...

Страница 62: ...when you place the recorder in the docking station the application might have been closed To launch the application again click Start All Programs Dictaphone Dictaphone EXV Olympus Uploader Olympus U...

Страница 63: ...Date Time entry in the log reflects the date and time that files are uploaded The date and time stamp in Job Lister comes from the date and time set on the Olympus recorder You can also use Job Liste...

Страница 64: ...60 Olympus DS 4000 Digital Recorder Installation and User Guide...

Страница 65: ...s of your Olympus DS 4000 recorder Dictating a new report see page 62 Setting the priority level for a new dictation see page 62 Setting the priority level for an existing dictation see page 63 Playin...

Страница 66: ...d the recorder 6 10 inches from your mouth with the microphone angled slightly toward your face 6 To pause the recording move the slide switch to STOP To begin recording again move the slide switch to...

Страница 67: ...of the recorder s display If you pause while scrolling through the files the current dictation is selected and rewinds to the beginning of the report 3 Move the slide switch to PLAY to begin playback...

Страница 68: ...ted 2 With the recorder turned on and the slide switch in the STOP position place the recorder in the cradle The Olympus Uploader starts automatically and the LCD screen on the recorder displays BUSY...

Страница 69: ...corder A red icon indicates the transfer failed 7 You can sort the list of entries by clicking any column heading For example click the Date Time column heading to sort files in descending order by da...

Страница 70: ...66 Olympus DS 4000 Digital Recorder Installation and User Guide...

Страница 71: ...67 Chapter 6 Licensing Administration for the Olympus DS 4000 Recorder Chapter Overview This chapter covers administering the Olympus license IDs...

Страница 72: ...on a computer and another computer attempts to start the Olympus programs using the same license ID the programs can fail to start presenting a message about licenses being exceeded or unavailable Met...

Страница 73: ...7 Troubleshooting the DS 4000 Recorder Chapter Overview This chapter covers preliminary troubleshooting steps to take to resolve problems with the Olympus Uploader application and the Olympus DS 4000...

Страница 74: ...ot appear in the Notification Area click Start All Programs Dictaphone EXV Clients Dictaphone DS 4000 Uploader Files fail to upload If you get a failed icon red icon and error messages in the Olympus...

Страница 75: ...tration group that has been assigned the Olympus Uploader Execute privilege Failed to get files Olympus DS 4000 communication error Call Nuance Support personnel Failed to get files File conversion fa...

Страница 76: ...n t select a folder or record The recorder could be on Hold Slide the Hold button on the left side of the recorder toward the top to release Unable to record If you ve inserted a new storage card the...

Страница 77: ...he Olympus Device Detector does Symptoms include the intermittent disappearance of the Device Detector from the Notification Area Uninstall any software programs designed to look for DSS files Remove...

Страница 78: ...74 Olympus DS 4000 Digital Recorder Installation and User Guide...

Страница 79: ...de 4 M mic sense setting the 8 O Olympus DSS Player Pro installing upgrade 20 software upgrade 16 R recording mode setting the 8 S SP Mode 4 V validation of input data ID field matching for 43 variabl...

Страница 80: ...76 Olympus DS 4000 Digital Recorder Installation and User Guide...

Отзывы: