Страница 1: ...w the instructions contained in this and other manuals which pertain to any equipment and accessories used in conjunction with this equipment Possible injuries related to endoscopic procedures may inc...
Страница 2: ......
Страница 3: ...bes the recommended procedures for preparing and inspecting the equipment prior to use It does not describe how an actual procedure is to be performed in detail Nor does it attempt to acquaint a begin...
Страница 4: ...nd Filter 2 following the instructions Section 9 1 Replacement of Lamps 9 2 Replacement of Filter 2l The lamp and heat sinks are extremely hot immediately after use Allow sufficient time for them to b...
Страница 5: ...tion for Cinematography CCTV and Polaroid Photography 15 6 INSPECTION OF ENDOSCOPIC SYSTEM 16 7 OPERATING THE LIGHT SOURCE 24 7 1 Use in Combination with the Videoscope 24 7 2 With Fiberscope 25 7 3 W...
Страница 6: ...elease using a foot switch frees the endoscopist from finger tip shutter operation Indicators in the camera s viewfinder predict exposure level before taking photographs and the exposure level is give...
Страница 7: ...Exposure control Auto Manual time control by light source shutter _ _ Exposure light amount Flash output approx 1 5 times visual light output Still Shutter speed 1 4 to 1 100 sec Photography Shortest...
Страница 8: ...3 OSF OGF e Compatible I Available types Olympus medical camera 5C16 series Cameras C1610 4 3R 3R2 lOR SCP 10 OM 1 N SC35 Type of protection against electric shock Class I 3 pin cord Classification De...
Страница 9: ...scopist should wear rubber gloves as an added precaution The housing of the light source must be grounded securely and effectively Do not defect the line cord ground connection The light source endosc...
Страница 10: ...Electrosurgical equipment whose safety in linked usage is not guaranteed The light source should be used in accordance with the operating conditions described in this manual otherwise improper perfor...
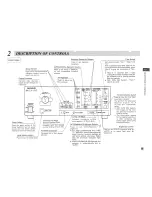
Страница 11: ..._ ILL PHOTO 11 1 IN EX ADJUS F Ll l 10 2 Lamp Life Meter Indicates cumulative working hours approx of Xenon lamp AUTO MANUAL Brightness Selector Press to set AUTO MANUAL of brightness For other combin...
Страница 12: ...I Bt A NST VISHf L c INE TV MAX o1 OUTPUT 1 2 o c 2 U 1 2 T1U U Lamp is turned on when filter 2 oB is selected 300 L 3 S RE 1 J c MP Filter selection switch MODE 0 J 00 pOwER c Cl ILLUM IE g 5 2 MIN M...
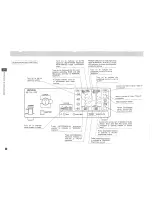
Страница 13: ...D 434 for CV 100 and CV 200 Ratings Plate Ventilation Grill Handle Lowered when lamp access cover is used Circuit Breaker o m f n IJ 1 6 z o n n o z IJ o r f Lamp access cover Opens to allow replace m...
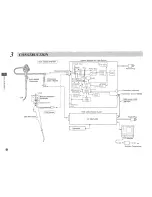
Страница 14: ...o System Center Syslem Diagram for Light Source CV 1OO CV 200 Xenon I 1 power rYnt jr l supply Motor R G B Filter Keyboard Panel displaY switch r I I I I I I I I I I I I I I I I I I Output Connector V...
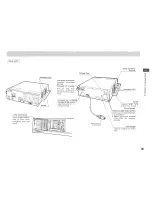
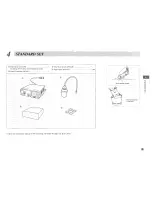
Страница 15: ...Vinyl Dust Cover MD 4481 Foot Holder MD 5121 CD CD Main Body CLV U201 including Xenon lamp and emergency lampl ClJ Water Container MD 431 I Place for easy use at any time Store the instruction manual...
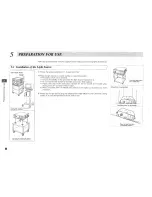
Страница 16: ...he light source is placed on it Do not use the side handle of the light source as a foot support Please refer also to the instruction manuals for TC Vl CV l00 and CV 200 when setting to TC Vl Compact...
Страница 17: ...t power cord during inspection Do not apply excess force to power cord by bending pulling twisting and pressing When combined with TC V1 compact video trolley do not connect the power cord of light so...
Страница 18: ...select I I CV 100 200connecto When using the EVIS 200 select III Light source connE c or When EVIS 100 or 200 is selected photo sensitivity will not be indicated J rnU Light source c 5 4 Preparati Qn...
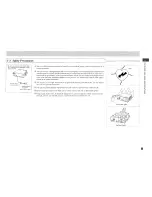
Страница 19: ...he cable and the scope together until a click is felt Be sure that the power switch of the EVIS Video System Center remains OFF when attaching or removing the videoscope cable The CCO may be destroyed...
Страница 20: ...rigid scope s camera connector of light source 2 Foot release is plugged into the connector for foot release when necessary This application is only possible for the combination of OES fiberscope SC16...
Страница 21: ...ghtly Lighting of lamp z f m 1 6 z o m Z o o f o n f f 4 m 5 i Xenon lamp is defective Caution when spare lamp is on Xenon lamp indicator CD Make sure the pointer in the lamp life meter is positioned...
Страница 22: ...until MAX MIN is reached Once MAX MIN has been reached pressing the switch dose not cause any further change If the endoscope is disconnected the LED indicator light will still change as described ab...
Страница 23: ...the Transilliumination Switch and confirm that the light becomes brighter and then returns to the original leve approximately nine seconds later With EVIS 200 system monitor images will become over e...
Страница 24: ...6 lOR intensity becomes increased When set to indices the intensity becomes A decreased U SC16 4 T 0 SCP l0 0 Repeat pressing exposure sensitivity selector OM 1N SC35 INDEX LEDs turn on sequentially S...
Страница 25: ...he shutter release is pressed disconnect all the connections and re connect them securely CD Verify that the length of the intensification of the illumination when the camera shutter release is presse...
Страница 26: ...C 16 10R SC16 3 3R2 OESscop I lt y P_ _s A D J_O U_ S T _C _IN_ _E_X_ _IND3_EX_ _ _IN_ _EX 2 UJ f u 0 o u o o z UJ LL o Z o E UJ CL Z I The OM 1N SC35 settings refer to use with the A10 M2 IOES scope...
Страница 27: ...m 5 o Overexposure Slightly over Correct o FAR NEAR With dark objects or small calibre low flash level fiberscope A indicator may sometimes not turn on Conversely in a bright endoscopy room V indicat...
Страница 28: ...he object Make sure that the farther away the distal end from the object the stronger the light transmitted through the distal end becomes Next keeping the object distance constant change the exposure...
Страница 29: ...ll types 3 i I CD When using the transillumination function to verify the insertion location of the distal end of the scope the illumination becomes temporarily brighter but with EVIS 200 system the m...
Страница 30: ...sual observation j Set air flow as desired with the AIR Regulator switch Normally to HIGH The air pressure can be adjusted in three levels depending on patient condition ClJ Feed air and water by oper...
Страница 31: ...ce to AUTO using the AUTO MANUAL Exposure Selector and set the Exposure Sensitivity Selector to the INDEX as tabulated 0 Film u m Camera X FP contact Shutter speed ll 1640 0 No 1610 0 EL 135 z INDEX Q...
Страница 32: ...t the light control cable IMB 608 when using the OTV S2 When using OTV F or OTV S refer to their instruction manuals before operation For visual observation set the Mode Selector to fJ Adjuistingi Bri...
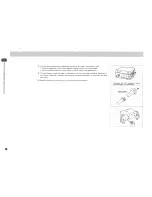
Страница 33: ...contact will result To prevent scratches do not use hard or abrasive wiping material If a glutaraldehyde solution is used wipe again with disinfectant ethanol to remove all residue Surfaces must be t...
Страница 34: ...k as far as it will go Wipe off heat compound stuck and apply a new heat compound Be careful to the lamp handling in order to avoid the danger of lamp explosion Apply heat compound to the right hand e...
Страница 35: ...and get very hot Handle the lamp after allowing sufficient time for it to be cooled down Turn OFF the power switch Be sure to unplug the power cord from the socket Open the lamp access cover After all...
Страница 36: ...r replacement the filter disk may rotate when touched by fingers which does not cause any malfunction Close the lamp access cover tightly The light source does not function unless the lamp access cove...
Страница 37: ...Periodic Inspection Periodically inspect the light source following the procedure in Section 6 INSPECTION If any irregularity or abnormality IS suspected contact your Olympus representative Repair mus...
Страница 38: ...ncorrectly Adjust as required too bright Sensitivity control is not set to AUTO Set to AUTO Mode selector is not set correclty Select required mode Lamp is installed incorrectly Reinstall lamp Lamp is...
Страница 39: ...d f Light source cable is not connected Check connection c Rigid scope camera cord connected Remove rigid scope camera cord Absent or insufficient air or Air purnp is turned OFF i Press air switch wat...
Страница 40: ...berscope SC16 Adapter IOES A10 Sl S2 S3 OM Adapter IOES Al0 Ml M2 M3 M4 b 6_ a rIO __ ES_ c q LP Q o SCP l0 OES Instant Camera SC16 10 OESCamera SC16 4 camera jJ fJ OTV F2 F OES TV System Jf J 35 mm S...
Страница 41: ...JTI r t OM AE Adapter r E aOR I I SM ER2 ER3 q h t light source I I r _ J _ I I utput socket I Camera Olot __ I t I SC16 3R2 I L SC16 3R Light Guide I f1 I _ J L____ I Adapter I n Camera I Camera Cor...
Страница 42: ...it A Electrosurgical Unit PSD lO j SOp Cord MB575 Magntic card Lower part TC V1 I Compact Video Trolley OIJ r C Patient plate J 0 C I EVIS video system center U I CV 100 200 I 1 I EVIS Universal light...
Страница 43: ......
Страница 44: ...S A OLYMPUS KEYMED KeyMed House Stock Road Southend on Sea Essex SS2 SOH United Kingdom OLYMPUS SINGAPORE PTE LTD BLK 211 Henderson Road No 13 03 Henderson Industrial Park Singapore 0315 The design of...