background image

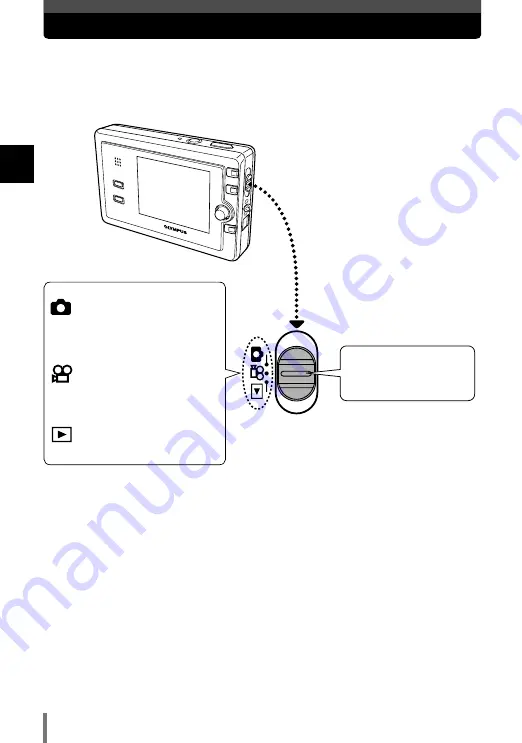
How to use the mode switch

10

1

Basic operations

This camera is equipped with the following three modes. Use the mode switch to
select the desired mode.


Still picture shooting 
mode

Select this for still picture 
shooting.


Movie record mode

Select this for movie 
shooting.


Playback mode

Select this for playback.

Slide the mode switch 
to the mode position 
you want to use.

Содержание CAMEDIA AZ-2 ZOOM

Страница 1: ...ransferring images to a computer This manual explains advanced techniques such as shooting and playback functions customizing functions or settings and transferring recorded images to a computer etc We recommend that you take test shots to get accustomed to your camera before taking important photographs The screen and camera illustrations shown in this manual were produced during the development ...

Страница 2: ...t the term INFO Go to the index at the end of this manual and look under I for INFO 105 For example C Camera movement warning 53 CAPTURE 72 Card 158 Card access mark 143 CCD 160 CHECKERBOARD 104 Close up playback 61 Compression 31 CUISINE 37 D Date time setting 97 Daylight 57 DC IN jack 170 DCF 160 Digital ESP light metering 55 160 DIGITAL ZOOM 40 DPOF 108 160 Flash stand by 53 Fluorescent light 5...

Страница 3: ...s the buttons corresponding to the function 67 5 Playback Editing still images Play back the image you want to resize Single frame playback P 60 In the top menu select MODE MENU T EDIT T How to use the menus P 17 Select the file size 640 x 480 CANCEL 320 x 240 SELECT GO EXIT OK A bar is displayed when editing is in progress When the bar disappears the normal display is restored Trimming Play back ...

Страница 4: ...s on a difficult subject 26 Subjects that are difficult to focus on 28 Selecting the record mode 29 3 Advanced shooting 33 Using the situation related shooting modes 34 NIGHT SCENE 34 NIGHT PORTRAIT 35 LANDSCAPE 35 LANDSCAPE PORTRAIT 35 INDOOR 36 FIREWORKS 36 PORTRAIT 36 SELF PORTRAIT Shooting yourself while holding the camera 37 CUISINE 37 SPORT Capturing a fast moving subject 37 BEACH SNOW Shoot...

Страница 5: ...area ESP 55 Varying the image brightness Exposure Compensation 56 WB Adjusting the color tone 57 Image stabilizer 58 5 Playback 59 Viewing still images 60 Single frame playback 60 Close up playback 61 Index display 62 Calendar display 63 Slideshow sequential auto playback 64 Rotating images 65 Editing still images 66 BLACK WHITE and SEPIA 66 Resizing 67 Trimming 67 Adding sound to recorded images ...

Страница 6: ...the warning tone 91 BEEP Setting the button operation sound 92 SHUTTER SOUND Setting the shutter sound 93 FILE NAME Assigning a file name 94 PIXEL MAPPING Checking the image processing functions 95 Adjusting the monitor brightness 96 Setting the date and time 97 VIDEO OUT Selecting the video signal type 99 Selecting the number of images 100 SETUP Changing the slideshow pattern 101 INFO Displaying ...

Страница 7: ...uter 139 Starting OLYMPUS Master 141 Displaying the camera s images on your computer 142 Downloading images to save on your computer 142 Disconnecting the camera from your computer 143 Viewing still images and movies 145 Printing images 146 Transferring images to your computer without using OLYMPUS Master 147 9 Appendix 149 If you encounter problems 150 Error codes 150 Troubleshooting 152 Camera m...

Страница 8: ...8 MEMO ...

Страница 9: ...functions listed in the camera s menus that make it easy to change the focusing area adjust the white balance etc The menus can be navigated simply by pressing buttons while viewing the monitor But before you can use these functions you first need to learn how to operate the buttons and menus 1 Basic operations PROGRAM AUTO P P For normal shooting For normal shooting SELECT GO OK OFF C A M ER A CA...

Страница 10: ... following three modes Use the mode switch to select the desired mode Still picture shooting mode Select this for still picture shooting Movie record mode Select this for movie shooting Playback mode Select this for playback Slide the mode switch to the mode position you want to use ...

Страница 11: ... viewing the monitor Button operation Some buttons have different functions in the shooting mode and the playback mode Plays back images while in the shooting mode Pressing the shutter button halfway down after checking the recorded images resumes the shooting mode Functions available in normal playback mode are also available during Quick View HQ HQ 2288 1712 P 100 100 0010 0010 HQ HQ 04 11 27 21...

Страница 12: ...21 56 04 11 27 21 56 10 10 YES NO ERASE Press SELECT GO OK 2 Erase button P 79 Shooting T Enlarges a distant subject zoom in telephoto shooting HQ HQ 2288 1712 P HQ HQ 2288 1712 P T W Press 3 Zoom button T P 39 61 Playback Close up 100 100 0020 0020 HQ HQ 04 12 10 10 00 04 12 10 10 00 20 20 2 0 2 0 Press ...

Страница 13: ...by shooting date and displays a calendar showing you corresponding thumbnails on the respective shooting dates calendar display 100 100 0016 0016 HQ HQ 04 12 16 09 56 04 12 16 09 56 16 16 13 13 16 16 11 11 14 14 17 17 12 12 15 15 18 18 10 10 2004 12 SunMon Tue Wed Thu Fri Sat 29 30 1 2 3 4 5 6 7 8 9 10 10 11 11 12 12 13 13 14 14 15 15 16 16 17 17 18 18 19 19 20 20 21 21 22 22 23 23 24 24 25 25 26 ...

Страница 14: ...14 How to use the buttons 1 Basic operations HQ HQ 2288 1712 P Press P SCENESELECT FLASHMODE MODEMENU Displays or exits menu 5 Menu button P 17 Press the menu button again to exit the menu ...

Страница 15: ... playback Push the upper edge lower edge left edge or right edge of the Joystick in the direction of illustrated arrows Press the center down on the Joystick You can confirm settings on the menus or you can move within the menus P 17 WB AUTO PICTURE CAM CARD SET You can select frames you want to play back P 60 100 100 0011 0011 HQ HQ 04 11 27 22 00 04 11 27 22 00 11 11 100 100 0010 0010 HQ HQ 04 1...

Страница 16: ...16 How to use the buttons 1 Basic operations The following illustrations show how to operate the Joystick When pushing up When pushing right When pushing down When pushing left When pressing the center ...

Страница 17: ...n Goes to MODE MENU Various functions can be set P 19 The camera s functions can be set Display the menus on the monitor and select or set them Operation Select the mode and turn on the camera Display the top menu This section explains how the menu works using the mode Press Press The Joystick operation guide is displayed Mode switch POWER switch MENU button Top menu Joystick ...

Страница 18: ...ting screen directly and setting the function Currently selected item Operation guide is displayed at the bottom of the screen Push the Joystick up or down to select the item Press the Joystick to confirm your selection Push the Joystick up down or to the right to select the item Push the Joystick left to cancel the setting ñ Indicates that there are more menu items and displays them FLASH MODE P ...

Страница 19: ...ect a tab The functions are categorized under tabs The current setting is displayed CAMERA tab PICTURE tab Setting functions in MODE MENU Push up or down to select a tab The following example shows the setting SCENESELECT FLASHMODE MODEMENU OFF OFF 0 0 ESP ESP DRIVE CAMERA CARD SET PIC å Tab P 23 CAMERA PICTURE CARD SETUP ...

Страница 20: ...hen a tab is selected the respective functions are displayed CAMERA CARD SET PIC OFF OFF 0 0 ESP ESP DRIVE Move to the functions of the tab you are selecting Select the item Push right OFF CAMERA CARD SET PIC ESP DRIVE Currently selected item Indicates that there are more menu items following DRIVE The options for the selected item are displayed Select the setting ...

Страница 21: ...rresponding to the setting is displayed The super macro icon is displayed here Press Returning to the previous item on the menus Explanations for menu operation This manual uses the following explanations for menu operations Setting functions in MODE MENU Example In the top menu select MODE MENU T SETUP T REC VIEW T OFF or ON Going to the setting screen directly and setting the function Example In...

Страница 22: ...c operations Types of the menus mode SCENESELECT FLASHMODE MODEMENU P 52 P 29 P 34 mode DIGITALZOOM MODEMENU P 58 P 29 P 40 Top menu mode still image MODEMENU INFO P 64 P 105 P 78 mode movie MODEMENU MOVIE PLAY INFO P 70 P 105 P 78 ...

Страница 23: ...TUP Sets basic functions that allow you to use the camera more efficiently such as date time language selection etc PLAY Sets playback functions CAMERA tab CAMERA CARD SET PIC OFF OFF 0 0 ESP ESP DRIVE P 42 P 55 P 43 PICTURE tab WB AUTO PICTURE CARD SET CAM P 57 CARD tab FORMAT CARD SET CAM PIC P 106 SETUP tab mode ALL RESET PW ON SETUP PW OFF SETUP REC VIEW ON ON ENGLISH SETUP CAM PIC CARD P 41 P...

Страница 24: ...RD SET P 65 P 69 EDIT tab BLACK WHITE SEPIA EDIT PLAY CARD SET P 66 CARD tab FORMAT CARD SET PLAY EDIT ALL ERASE P 80 SETUP tab ALL RESET PW ON SETUP PW OFF SETUP SCREEN SETUP ON ON ENGLISH SETUP PLAY EDIT CARD P 108 P 82 P 85 P 87 P 84 P 85 P 67 P 67 P 66 P 106 mode ...

Страница 25: ...priate record mode before you start shooting Remember that depending on what you are going to do with your shots later you may find that the image looks grainy in large prints the file size is too big for e mail etc To avoid this kind of problem always check the record mode before shooting 2 Things to know before shooting SQ1 NORMAL 1600x1200 2048x1536 1280x960 HIGH SELECT GO CANCEL OK HQ 2288x171...

Страница 26: ...on Press Mode switch Shutter button POWER switch Monitor HQ HQ 2288 1712 P How to focus on a difficult subject AF target mark The camera selects the subject to focus on automatically by detecting the contrast If the subject s contrast is relatively weak the camera may focus on something else within the chosen image composition To avoid this you can use Focus Lock ...

Страница 27: ...era at an object about the same distance away as the subject Half press If the green lamp blinks when the shutter button is pressed The subject is out of focus Recompose your shot and try focusing again Keep the shutter button pressed halfway until the green lamp lights Keeping the shutter button pressed halfway recompose your shot HQ HQ 2288 1712 P Full press Fully press the shutter button to cap...

Страница 28: ...e frame Subjects with no vertical lines The green lamp lights but the subject cannot be brought into focus Subjects with different distances Fast moving subjects The subject you are focusing on is not in the center of the frame If this happens focus on a high contrast object the same distance away as the intended subject recompose your shot and then take the picture If the subject has no vertical ...

Страница 29: ...ct the picture size SHQ HQ setting Refer to the table on page 31 for selecting the record mode SHQ 2288x1712 SQ 1 1280x960 SQ 2 640x480 HQ 2288x1712 SELECT GO OK HQ 2288x1712 2288x1520 3 2 SELECT GO CANCEL OK Mode switch You can select the best record mode for your purpose printing editing on a PC attaching to e mail etc Joystick Confirm the setting When you select the picture size ...

Страница 30: ...48x1536 1280x960 HIGH SELECT GO CANCEL OK Select the picture size 30 Selecting the record mode 2 Things to know before shooting SQ1 NORMAL 1600x1200 2048x1536 1280x960 HIGH SELECT GO OK Select the compression SQ1 SQ2 setting ...

Страница 31: ...ing in larger size or image retouching on a computer For printing in postcard size For uploading to Web Site or attaching to e mail Picture size Record mode 1 Low compression 2 High compression 3 2 P HQ HQ 2288 1520 Image data are compressed with this camera The higher the compression the less clear the image will be Compression The number of remaining pictures may change according to the subject ...

Страница 32: ...ns larger numbers are recommended so that the image will be clearer However higher resolutions make the file size amount of data larger so fewer pictures can be saved Resolution When a picture is transferred to a computer the size of the picture on the computer screen varies depending on the computer s monitor setting For instance a picture taken in 1024 x 768 resolution is the same size as the sc...

Страница 33: ...of capturing all those special moments and effects in an instant All you have to do is to select the appropriate mode and concentrate on your composition no complicated settings as with other cameras Also many more features are available including panorama shooting for assembling several images to form a single panoramic image and 2 in 1 shooting to store two successive images as a single picture ...

Страница 34: ... the settings for the shooting conditions and provides the effects you want Currently selected mode INDOOR P SELECT GO OK A sample image of the selected shooting mode is displayed POWER switch Mode switch Joystick NIGHT SCENE Suitable for shooting images of outdoor scenes in the evening or at night Usually a street at night makes a dark image with only the sparkle of lights such as street lamps du...

Страница 35: ...ght Since the shutter speed is slow be sure to stabilize the camera The flash fires in the red eye reduction mode Flash P 52 LANDSCAPE Suitable for shooting landscapes and other outdoor scenes Vivid reproduction of blues and greens LANDSCAPE PORTRAIT Suitable for shooting both main subject and background The camera brings both of them into focus ...

Страница 36: ... subject and background indoors Clear reproduction of background as well FIREWORKS Suitable for shooting fireworks Since the shutter speed is slow be sure to stabilize the camera PORTRAIT Suitable for shooting a portrait style image of a person Only the subject is brought into focus with a blurred background ...

Страница 37: ...you to take a picture of yourself while holding the camera The focus is locked on you shooter Zoom position is fixed at W CUISINE Suitable for still life photography Vividly reproduces colors of fruit vegetables flowers etc SPORT Suitable for capturing fast moving action without blurring ...

Страница 38: ...eascapes etc AVAILABLE LIGHT PORTRAIT Suitable for shooting sensitive subjects in lowlight conditions without a flash Since the shutter speed is slow be sure to stabilize the camera SUNSET Suitable for taking sunset pictures Vivid red and yellow color reproduction The flash cannot be used Since the shutter speed is slow be sure to stabilize the camera ...

Страница 39: ...is camera offers 2 8x optical zoom magnification equivalent to 40 mm to 112 mm on a 35 mm film camera By combining the optical zoom and digital zoom you can increase magnification up to approximately 30x record mode SQ2 The maximum zoom magnification is 15x when shooting still pictures in the SHQ HQ or SQ1 modes The maximum zoom magnification is 11x when shooting movies Press the zoom button in th...

Страница 40: ...m indicator When you reach the limit of the optical zoom the digital zoom is activated Zoom button T Joystick Pictures taken using digital zoom may appear grainy Camera movement is likely to occur at higher magnification during telephoto shooting Stabilize the camera to avoid camera movement When you are shooting in the SQ2 record mode the images you are viewing on the monitor will appear grainier...

Страница 41: ...17 Take the picture Shutter button OFF CAMERA CARD SET PIC EPS DRIVE macro For shooting from as close as 30 cm 50 cm 1ft 1 6ft to a subject super macro For shooting from as close as 3 cm 1 2 in to a subject Macro Super macro Joystick If you use the flash in the macro mode shadows may be noticeable and the correct exposure may not be achieved In the super macro mode flash or zoom cannot be used Not...

Страница 42: ...e self timer lamp lights up for approximately 10 seconds then blinks for approximately 2 seconds before the picture is taken HQ HQ 2288 1712 P The mark is displayed To stop the self timer press MENU so that the self timer lamp goes off MENU button The self timer is canceled automatically when shooting is finished However in 2 IN 1 P 46 or PANORAMA P 44 shooting the self timer is not canceled after...

Страница 43: ...ERA T DRIVE T How to use the menus P 17 Take pictures The camera takes pictures in sequence while the shutter button is being pressed down Releasing the shutter button stops sequential shooting Focus exposure and white balance are locked at the first shot Shutter button Joystick Sequential shooting is not available in some situation related shooting modes Available functions by shooting mode P 168...

Страница 44: ...ected to form a single panoramic image with OLYMPUS Master software included on the provided CD ROM In the mode select MODE MENU in the top menu T CAMERA T PANORAMA How to use the menus P 17 Use the Joystick to select the direction you want the images connected Shutter button MENU button Right to Left Bottom to Top Top to Bottom Left to Right Confirm Joystick ...

Страница 45: ...a appears in the frame for the next image Zooming is not possible after the first shot Example When connecting images from left to right Make sure that the edges of images overlap then take your pictures Panorama shooting is possible for up to 10 pictures Panorama shooting is possible only when using the Olympus brand card The following functions are not available during panorama shooting flash sh...

Страница 46: ...ws you to combine two pictures taken in succession and store them as a single picture The subject will be on the left in the combined image To cancel the first shot press MENU The pictures are combined and stored as a single picture The subject will be on the right in the combined image The 2 IN 1 shooting mode is canceled automatically after the second shot First shot Second shot Shutter button M...

Страница 47: ... subject can be magnified using the zoom button Zoom P 39 The remaining recording time depends on the selected record mode free space available on the card etc Selecting the record mode P 29 HQ HQ Focus and optical zoom are locked while recording movies with sound You can record movies without sound by setting to OFF Recording sound P 49 AF target mark P 26 Remaining movie recording time hour min ...

Страница 48: ...ooting Movie recording Stop recording Press the shutter button fully again HQ HQ blinks while the movie is being stored on the card When the remaining recording time has been used up recording stops automatically Note ...

Страница 49: ...bar is displayed during recording Sound can be added later to still images Recorded sound can also be changed Adding sound to recorded images P 69 The mark is displayed Microphone Shutter button Joystick Sound may not be recorded clearly in the following situations When the microphone is covered with your fingers When the camera is more than 1 m 3 3 ft away from the source of the sound It is not p...

Страница 50: ...50 MEMO ...

Страница 51: ...ithout the flash would typically result in a blurred or dark picture To overcome this problem try adjusting the ISO setting use a lower ISO value with normal light and a higher ISO value with dark subjects With exposure compensation you can adjust the image brightness and make a significant difference to how the picture turns out Try adjusting toward when shooting a sunset The setting sun will glo...

Страница 52: ...before firing the regular flash This helps accustom the subject s eyes to the bright light and minimizes the red eye phenomenon Fill in flash The flash fires regardless of available light This mode is useful for eliminating shadows on the subject s face such as shadows from tree leaves or for correcting the color shift produced by artificial lighting especially fluorescent light Flash off The flas...

Страница 53: ...ng P 43 super macro shooting P 41 or movie recording P 47 When there is a likelihood that camera movement will occur in the flash off mode the camera movement warning mark blinks Use the flash Red eye reduction flash After the pre flash it takes approximately 1 second before the shutter is released Hold the camera firmly after the pre flash to prevent camera movement Effectiveness may be limited i...

Страница 54: ...es the speed of photographic negative with film cameras and the given values with a digital camera are ISO equivalent When ISO is set to AUTO and you are shooting in dark conditions without a flash the sensitivity automatically increases otherwise the shutter speed will be reduced possibly resulting in camera movement and blurred images If the subject is too far away from the flash the sensitivity...

Страница 55: ...e or mode select MODE MENU in the top menu T CAMERA T ESP T select ESP or How to use the menus P 17 Take the picture ESP Meters the center of the monitor and the surrounding area separately The area in the center of the monitor may appear dark when there is strong backlight Meters only the center of the monitor to determine exposure A subject can be shot with optimal exposure regardless of the bac...

Страница 56: ...correct the image if the surroundings of the subject are extremely bright or dark Note Adjusts towards to make the image brighter or to make the image darker In some situations you may get better results when the exposure that the camera sets is compensated adjusted manually Often bright subjects such as snow will turn out darker than their natural colors Adjusting toward makes these subjects clos...

Страница 57: ...ve under certain light sources After setting a white balance other than AUTO play back the image and check the colors on the monitor Playback P 59 When the flash is fired with a white balance setting other than AUTO colors may appear different in the resulting image from the colors you see on the monitor White balance is determined automatically by the camera if a situation related shooting mode P...

Страница 58: ... Images will be slightly enlarged if this function is used In the mode select in the top menu then select ON How to use the menus P 17 Start movie recording OFF ON SELECT GO OK HQ HQ is displayed Image stabilizer may not be effective depending on the camera or subject movement Be sure to turn off this function when you stabilize the camera before shooting The resulting images may shake according t...

Страница 59: ...th the picture until you get the film developed Because a digital camera lets you erase those unwanted images you can keep more memory free to store images and take more shots You can also protect images that you do not want to erase Another benefit is that you can edit recorded images change colors to black and white or sepia trim images change the resolution etc So take advantage of your digital...

Страница 60: ...ormation displayed on the screen disappears after 3 seconds Push the Joystick up to jump to the image 10 frames back Push the Joystick down to jump to the image 10 frames ahead Push the Joystick left to display the previous image Push the Joystick right to display the next image Joystick If the camera is not operated for more than 3 minutes the monitor turns off then the camera turns off When the ...

Страница 61: ...e arrow 100 100 0010 0010 HQ HQ 04 01 13 21 56 04 01 13 21 56 10 10 Each time you press the zoom button the image is enlarged Images with the mark cannot be enlarged Each time you press the zoom button the image is enlarged in steps of 1 time The image returns to the original size 1x Press 2 0 2 0 Close up playback Lets you enlarge and display images at up to 5 times normal size Joystick Zoom butt...

Страница 62: ... index screen from 4 16 or 25 Selecting the number of images P 100 Press the zoom button 100 100 0010 0010 HQ HQ 04 01 13 21 56 04 01 13 21 56 10 10 Use the Joystick to select the desired image 13 13 16 16 11 11 14 14 17 17 12 12 15 15 18 18 10 10 Press the zoom button The screen returns to single frame playback 100 100 0012 0012 HQ HQ 04 01 13 21 56 04 01 13 21 56 12 12 Press Moves to the frame l...

Страница 63: ...e than one image was taken on a single date the image shot first on that date is displayed In index display mode press the zoom button once 2004 12 SunMon Tue Wed Thu Fri Sat 29 30 1 2 3 5 6 7 8 9 10 11 12 13 14 15 16 17 18 19 20 21 22 23 24 25 26 27 28 29 30 31 1 2 3 4 5 6 7 8 The first frame of the selected date enters single frame playback mode Moves only to dates with images 4 28 Moves back to...

Страница 64: ...Viewing still images In the top menu select How to use the menus P 17 End slideshow Slideshow repeats until the Joystick is pressed Slidshow starts SETUP Changing the slideshow pattern P 101 Joystick When running a slideshow for a long time we recommend that you use the AC adapter If you use the battery the camera will enter the sleep mode after about 30 minutes and stop the slideshow automaticall...

Страница 65: ...mple Images shot with the camera held vertically 100 100 0010 0010 HQ HQ 04 11 27 21 56 04 11 27 21 56 10 10 Image turned 90 degrees clockwise Image turned 90 degrees counterclockwise HQ HQ 04 11 27 21 56 04 11 27 21 56 10 10 100 100 0010 0010 HQ HQ 04 11 27 21 56 04 11 27 21 56 10 10 100 100 0010 0010 90 90 0 100 100 0010 0010 HQ HQ 04 11 27 21 56 04 11 27 21 56 10 10 Original image before rotati...

Страница 66: ...ET BLACK WHITE BLACK WHITE CANCEL SELECT GO EXIT OK SEPIA SEPIA CANCEL SELECT GO EXIT OK The black and white image or sepia toned image is displayed A bar is displayed when editing is in progress When the bar disappears the normal display is restored BLACK WHITE and SEPIA Lets you edit recorded still images The following editing functions are available Edited images will be saved as new images BLA...

Страница 67: ...lect the file size 640 x 480 CANCEL 320 x 240 SELECT GO EXIT OK A bar is displayed when editing is in progress When the bar disappears the normal display is restored Trimming Play back the image you want to trim Single frame playback P 60 In the top menu select MODE MENU T EDIT T How to use the menus P 17 Select CANCEL SELECT GO EXIT OK Joystick Zoom button W T Resizing ...

Страница 68: ... OK To change the trimming setting select RESET Do the procedure from step To quit trimming setting select CANCEL A bar is displayed when editing is in progress When the bar disappears the normal display is restored OK OK OK W T GO GO Set the trimming size GO OK OK GO OK W T Press T W In the following cases EDIT is not available Movie Images processed on a personal computer When the card does not ...

Страница 69: ...T EDIT PLAY CARD SET Point the camera microphone at the target and start recording Microphone Joystick To obtain the optimum sound the microphone should be placed no farther than 1 m 3 3 ft away from the subject If you re record the sound the original sound is erased Sound may not be recorded if there is insufficient card memory available the CARD FULL message is displayed Sound recording may pick...

Страница 70: ... 09 30 00 01 09 30 00 01 09 30 Movie play starts Elapsed playback time Overall recording time When movie play finishes the menu is displayed MOVIE PLAYBACK RESTART EXIT SELECT GO OK Movie play starts again at the first frame The camera resumes normal playback MENU button Joystick During movie play you can play the movie at double the normal speed or adjust the sound volume The operation guide is d...

Страница 71: ...ollowing sequence x2 T x20 T x1 Increases the sound volume Movie pauses Decreases the sound volume Frame by frame playback Holding the Joystick down T Reverse playback Frame by frame playback Holding the Joystick down T Playback Jumps to the last frame of the movie Jumps to the first frame of the movie The step screen is displayed Available operations during movie play During movie play During pau...

Страница 72: ...ilable only for images recorded in the SHQ or HQ record mode The captured movie frame is saved as a new still image The camera resumes normal playback CAPTURE OK CANCEL SELECT GO OK Images created from movies are saved in 640 x 480 resolution Images may appear grainier than still images of the same size You cannot create an index if there is insufficient memory space on the card When the card acce...

Страница 73: ...wn in step OK OK OK GO GO INDEX Making movie index Movies can be displayed as indexes of 9 still frames and stored as still images on the card Jumps to the first frame of the movie Jumps to the last frame of the movie Displays the next frame Holding the Joystick down plays back the movie Displays the previous frame Holding the Joystick down plays the movie back in reverse OK OK OK GO GO Setting is...

Страница 74: ...extracted automatically from the movie appear as an index display The index is stored as a still image in a different record mode from the original movie The interval between automatically extracted frames varies depending on the length of the movie INDEX is not available if there is not enough memory on the card Note Record mode when Record mode when the movie is shot stored as an index SHQ SQ1 H...

Страница 75: ...e first frame of the part you want to keep Select the last frame of the part you want to keep as shown in step OK OK OK GO GO OK OK OK GO GO Jumps to the first frame of the movie Jumps to the last frame of the movie Displays the next frame Holding the Joystick down plays back the movie Displays the previous frame Holding the Joystick down plays the movie back in reverse Setting is confirmed Joysti...

Страница 76: ... step A bar is displayed when editing is in progress After the edited movie is saved as a new file or after it is overwritten normal display is resumed To quit movie editing select CANCEL Stores the edited movie as a new movie Stores the edited movie under the same name as the original The original movie will be replaced by the new one NEW FILE is not available if there is not enough memory on the...

Страница 77: ... to the video input mode refer to the TV s instruction manual To the multi connector AV cable provided To the video input yellow and audio input white terminals on the TV Set the mode switch to and turn on the camera Press To connect the camera to a TV use the provided AV cable Make sure that the camera s video output signal type is the same as the TV s video signal type VIDEO OUT Selecting the vi...

Страница 78: ...se function Play back the image you want to protect Single frame playback P 60 In the top menu select How to use the menus P 17 04 04 12 23 21 56 12 23 21 56 100 100 0030 0030 HQ HQ 30 30 The mark is displayed When protect is canceled this mark disappears Even if you protect images they will be erased if you format the card FORMAT Formatting the card P 106 Note Joystick ...

Страница 79: ...ES NO ERASE SELECT GO OK Play back the image you want to erase Single frame playback P 60 Select YES Single frame erase The erase confirmation screen is displayed NO Cancels erasing The image is erased and the menu disappears Press button Protected images cannot be erased Cancel protected images then erase them Once erased images cannot be restored Protecting images preventing accidental erasure P...

Страница 80: ... GO OK BUSY In the top menu select MODE MENU T CARD T ALL ERASE How to use the menus P 17 Select YES All frame erase The erase confirmation screen is displayed NO Cancels erasing Displayed when erasing is in progress When erasing is finished this screen disappears Joystick ...

Страница 81: ...hose functions that accommodate your preferences Try these functions to find ways to use your camera even more effectively 6 Customizing the settings functions of your camera VOLUME BEEP SETUP PLAY EDIT CARD OFF ON ALL RESET PW ON SETUP PW OFF SETUP REC VIEW SETUP CAM PIC CARD BEEP SHUTTER SOUND FILE NAME PIXEL MAPPING OFF LOW HIGH SETUP CAM PIC CARD RESET AUTO BEEP SHUTTER SOUND FILE NAME PIXEL M...

Страница 82: ... to all the other modes both shooting and playback In the top menu select MODE MENU T SETUP T ALL RESET How to use the menus P 17 Select ON or OFF Available modes The settings made before the power is turned off are saved All settings are returned to the factory default settings after the power is turned off Ex When ALL RESET is set to ON even if you change the record mode setting to SQ1 it will r...

Страница 83: ...s when set to ON Functions Factory default settings Ref page FLASH MODE AUTO P 52 SCENE SELECT P P 34 OFF P 41 ESP ESP P 55 0 0 P 56 DRIVE P 23 ISO AUTO P 54 DIGITAL ZOOM OFF P 40 still pictures OFF P 49 WB AUTO P 57 HQ P 29 SHQ 2288x1712 P 29 HQ 2288x1712 P 29 SQ 1 1280x960 NORMAL P 29 SQ 2 640x480 NORMAL P 29 OFF P 58 movies OFF P 49 INFO OFF P 105 ...

Страница 84: ...select MODE MENU T SETUP T How to use the menus P 17 Select a language Available modes You can change the language used for the on screen display and error messages from ENGLISH to another language You can add more languages to your camera by downloading language firmware from our Web Site at http www olympus com Joystick French display English display SCENE SELECT MODE MENU FLASH MODE ...

Страница 85: ... startup screen PW OFF SETUP To select the display sound for shutdown screen In the top menu select MODE MENU T SETUP T PW ON SETUP PW OFF SETUP How to use the menus P 17 Select SCREEN or SOUND Set for SCREEN PW ON SETUP SCREEN OFF 1 2 SOUND OK GO SELECT Available modes Example PW ON SETUP is selected The selected startup screen will be played back OFF No image is displayed 1 The pre installed ima...

Страница 86: ...play sound setting 6 Customizing the settings functions of your camera Set for SOUND Confirm your setting OFF PW ON SETUP SCREEN SOUND OK GO SELECT 1 2 The sound volume is determined by the VOLUME setting VOLUME Selecting the playback volume P 90 ...

Страница 87: ... OFF SETUP Power on off display sound setting P 85 PW ON To set up an image for startup screen PW OFF To set up an image for shutdown screen In the top menu select MODE MENU T SETUP T SCREEN SETUP How to use the menus P 17 Select PW ON or PW OFF SCREEN SETUP PW ON PW OFF SELECT GO EXIT OK Available modes SCREEN SETUP RESET IMAGE EXISTING KEEP SELECT GO EXIT OK This screen appears if an image has a...

Страница 88: ...n Select OK It is not possible to set images or movies which cannot be properly played back on this camera Note SCREEN SETUP OK SET AS PW ON SCREEN CANCEL SELECT GO EXIT OK The image is set and the step menu screen reappears You can set up an image for the other screen as needed 04 04 12 24 00 00 15 12 24 00 00 15 HQ HQ OK OK YES YES SELECT SELECT OK Single frame playback P 60 Example PW ON is sel...

Страница 89: ... for making a brief check of the picture you have just taken You can release the shutter while the picture is being displayed The picture being recorded to the card is not displayed This is useful when you want to compose your next shot using the monitor while the previous picture is being recorded OFF ON ALL RESET PW ON SETUP PW OFF SETUP REC VIEW SETUP CAM PIC CARD Available modes You can select...

Страница 90: ...elect MODE MENU T SETUP T VOLUME How to use the menus P 17 Select the volume Available modes You can set the sound volume by 5 levels when playing back a movie or a still image or when turning the camera on off VOLUME BEEP SETUP PLAY EDIT CARD Set here to mute the playback sound completely Joystick Mode switch ...

Страница 91: ...ODE MENU T SETUP T How to use the menus P 17 Select the volume Available modes The volume of the selected option is played back You can change the volume of the beep sound used for warnings or turn the sound off completely BEEP SHUTTER SOUND FILE NAME PIXEL MAPPING OFF LOW HIGH SETUP CAM PIC CARD Joystick ...

Страница 92: ...Select the operation sound Select the sound volume Confirm your setting BEEP OFF 2 LOW HIGH 1 SELECT GO CANCEL OK Available modes You can select the sound emitted when a button is pressed or mute the sound completely You can also set the button sound volume to either LOW or HIGH The sound of the selected option is played back Joystick BEEP OFF 2 LOW HIGH 1 OK GO SELECT ...

Страница 93: ...7 Select the shutter sound Select the sound volume Confirm your setting Available modes The sound of the selected option is played back You can select the shutter sound or mute the sound completely You can also set the shutter sound volume to either LOW or HIGH SHUTTER SOUND OFF 2 LOW HIGH 1 SELECT GO CANCEL OK Joystick Mode switch SHUTTER SOUND OFF 2 LOW HIGH 1 OK GO SELECT ...

Страница 94: ...wing the highest number on the previous card RESET When a new card is inserted folder numbers start at 100 and file numbers start at 0001 If a card containing images is inserted the file numbers start at the number following the highest file number on the card When a picture is stored on the card the camera assigns it a unique file name and saves it in a folder The folder and file name can later b...

Страница 95: ...r at least one minute before using the pixel mapping function to ensure that it operates correctly PIXEL MAPPING Checking the image processing functions In the top menu select MODE MENU T SETUP T PIXEL MAPPING How to use the menus P 17 If you accidentally turn the camera off during pixel mapping be sure to operate pixel mapping again Note BUSY This bar is displayed to show the progress of pixel ma...

Страница 96: ...ctions of your camera 96 Adjusting the monitor brightness Lets you adjust the brightness of the monitor In the top menu select MODE MENU T SETUP T How to use the menus P 17 Adjust the brightness SELECT GO OK Available modes Joystick ...

Страница 97: ...ormat Y M D Year Month Day M D Y Month Day Year D M Y Day Month Year SET GO OK SELECT Y M D 01 01 00 00 00 00 01 01 2004 2004 The following instructions show the procedure used when the date and time settings are set to Y M D Available modes Joystick The date time is saved with recorded images and file names are assigned based on the date time settings 100 0015 HQ HQ 04 12 24 00 00 15 ...

Страница 98: ... off The date time settings will be canceled and the factory default settings will be restored if the camera is left with no battery for approximately 3 days The settings will be canceled more quickly if the battery was only loaded in the camera for a short time before being removed After loading the battery check that the date time settings are correct If the date time settings have been canceled...

Страница 99: ... Check the video signal type before connecting the camera to your TV NTSC North America Japan Taiwan Korea PAL European countries China Available modes You can select NTSC or PAL according to your TV s video signal type Select the video signal type before connecting the AV cable If you use the wrong video signal type you will not be able to play back the recorded pictures properly on your TV VIDEO...

Страница 100: ...P 62 In the top menu select MODE MENU T SETUP T How to use the menus P 17 Select the number of images VIDEO OUT SLIDESHOW 4 9 16 25 SETUP PLAY EDIT CARD 45 45 46 46 48 48 47 47 33 33 34 34 35 35 36 36 37 37 38 38 39 39 40 40 41 41 42 42 43 43 44 44 45 45 46 46 47 47 48 48 4 frame index display Available modes 16 frame index display Joystick Mode switch ...

Страница 101: ... slideshow P 64 from 9 different patterns In the top menu select MODE MENU T SETUP T SETUP How to use the menus P 17 Available modes Select the type NORMAL SCROLL FADER ZOOM DOWN SELECT GO OK SETUP The types of slideshow are displayed ZOOM UP SWIVEL CHECKERBOARD BLINDS SELECT GO OK SETUP RANDOM SELECT GO OK SETUP Joystick Mode switch ...

Страница 102: ...ngs functions of your camera 102 SETUP Changing the slideshow pattern NORMAL The images appear sequentially one after another SCROLL The next image scrolls in from the right to the left FADE The next scene gradually fades in ...

Страница 103: ...of the screen and is replaced by the next image which enlarges from the center toward the corners ZOOM UP The current image expands from the center of the screen and disappears then the next image appears and shrinks down to regular size SWIVEL The next image squeezes in from the right of the screen pushing the current image off screen to the left ...

Страница 104: ...HECKERBOARD The current image disappears and the next image appears as a mosaic gradually filling up the screen BLINDS The next image appears in stripes like a blind over the current image filling it up gradually RANDOM The camera picks a different type of slideshow at random per each transition ...

Страница 105: ... monitor In the top menu select INFO T ON or OFF How to use the menus P 17 04 04 12 23 21 56 12 23 21 56 100 100 0030 0030 HQ HQ 10 30 30 2 0 2 0 ISO100 ISO100 2048 2048 1536 1536 SIZE SIZE 100 100 0030 0030 HQ HQ 10 04 04 12 23 21 56 12 23 21 56 30 30 Available modes When set to ON When set to OFF If an image was shot with a different camera only the date time file number and battery check inform...

Страница 106: ...MODE MENU T CARD T FORMAT How to use the menus P 17 Select YES FORMAT Formatting the card FORMAT YES CAUTION ERASING ALL NO SELECT GO OK Displayed when formatting is in progress Lets you format a card Formatting prepares cards to receive data Non Olympus cards or cards formatted on a computer must be formatted with the camera before they can be used All data stored on the card including protected ...

Страница 107: ...rint at photo labs you ll find the print reservation function helpful Print reservation allows you to save the number of prints and the date and time information on the card If you print on a printer there are a number of different ways to do it One method is to connect your digital camera to an exclusive printer and print out recorded pictures directly from the camera The other is to transfer ima...

Страница 108: ...rom digital cameras You can print out pictures automatically at home or in a photo lab by storing such data as which pictures you wish to print and the number of prints on a card Pictures set with print reservation can be printed using the following procedures Printing using a DPOF compatible photo lab You can print the pictures using the print reservation data Printing using a DPOF compatible pri...

Страница 109: ... printers or at all photo labs Print reservation may take considerable time when saving printing data to a card Note The resolution of a computer printer is generally based on the number of dots pixels per square inch This is called dpi dots per inch The higher the dpi value the better the printed results Keep in mind however that the dpi of the picture does not change This means that when you pri...

Страница 110: ...on cannot be applied to pictures with movie mark Selecting the print reservation mode Two print reservation modes are available single frame reservation and all frame reservation Applies print reservation to selected pictures P 111 Applies print reservation to all the pictures stored in the card or album P 117 PRINT ORDER SETTING RESET PRINT ORDERED KEEP SELECT GO CANCEL OK RESET Resets the print ...

Страница 111: ... that has been applied print reservation You can select the picture using index display Index display P 62 4 2 5 3 6 1 OK OK GO GO GO SELECT SELECT SELECT OK Press Single frame reservation Lets you apply print reservation to selected pictures You can change print reservation data you ve already made such as the number of prints or date and time setting Display the picture to be printed and select ...

Страница 112: ...nd trimming CANCEL Cancels the print reservation of the currently displayed image END Completes the print reservation CANCEL MORE END SINGLEPRINT Select another picture to which you want to apply print reservation Step P 111 Step P 113 04 04 12 18 13 00 8 12 18 13 00 8 HQ HQ OK OK GO GO SELECT SELECT OK PRINT ORDER SELECT GO CANCEL OK NO DATE 0 SET GO OK SELECT x Resetting the print reservation da...

Страница 113: ...ing NO DATE 0 SET GO OK SELECT x When you have selected P 115 OK 5 GO SELECT x NO DATE TIME OK GO SELECT x When you have selected NO The pictures are printed without the date and time DATE All the selected pictures are printed with the shooting date TIME All the selected pictures are printed with the shooting time Displayed when x is selected ...

Страница 114: ...e with print reservation This is not displayed if the number of the prints is set to 1 Press the Joystick repeatedly to exit the menu The screen returns to the step picture selection screen To apply print reservation to other pictures repeat steps through To end MORE and exit the print reservation mode select END in step When you have selected END Exit the print reservation mode ...

Страница 115: ... is displayed Select RESET Set trimming Set the trimming position OK RESET CANCEL SELECT GO OK OK Keeps the current setting RESET Makes a new setting CANCEL Cancels the current setting No trimming setting is made OK OK OK W T GO GO The trimming frame changes from horizontal to vertical and vice versa when the maximum or minimum size is reached Set the trimming size GO OK OK GO OK W T Joystick Zoom...

Страница 116: ...7 Printing 116 Print reservation DPOF Confirm the setting Select OK YES DATE 5 x SET GO OK SELECT OK RESET CANCEL SELECT GO OK The step screen is restored P 114 ...

Страница 117: ...ing date or time for each picture One print is made for each frame DATE 0 x SET GO OK SELECT OK 5 GO SELECT x NO DATE TIME OK GO SELECT x Displayed when x is selected When you have selected NO The pictures are printed without the date and time DATE All the selected pictures are printed with the shooting date TIME All the selected pictures are printed with the shooting time Joystick Print reservati...

Страница 118: ...7 Printing 118 Print reservation DPOF Print reservation Picture with print reservation Confirm each setting Confirm the setting Exit the menu MODE MENU is restored TIME 5 x SET GO OK SELECT ...

Страница 119: ...yed Resetting the print reservation data for a selected picture Select KEEP Select Play back a still picture Single frame playback P 60 In the top menu select MODE MENU T PLAY T How to use the menus P 17 Resetting the print reservation data for all pictures Select RESET Resetting print reservation Lets you reset print reservation data You can reset all print reservation data or just the data for s...

Страница 120: ... select END on the step screen Exit the print reservation mode 04 04 12 18 13 00 8 12 18 13 00 8 HQ HQ OK OK GO GO SELECT SELECT OK CANCEL MORE END SINGLEPRINT The screen returns to step To reset print reservation for other images repeat steps and Press the Joystick repeatedly to exit the menu PRINT ORDER SELECT GO CANCEL OK Push twice MODE MENU is restored ...

Страница 121: ...at it is fully charged If the camera stops operating while communicating with the printer the printer may malfunction or image data may be lost Movies cannot be printed Note It is the standard that enables digital cameras and printers made by different manufacturers to be connected and also allows pictures to be printed directly from the camera PictBridge All printers that support PictBridge have ...

Страница 122: ...rinter on Look for this mark Insert the USB cable into the camera s multi connector For details on how to turn the printer on and the position of the USB port refer to the printer s instruction manual Connecting the camera to a printer The selection screen for the USB connection is displayed POWER switch Joystick ...

Страница 123: ...splayed Remove the USB cable and repeat the procedure from step again If END is selected the camera is not recognized by the printer In the or mode the camera turns off and in the mode the camera resumes normal playback If the selection screen disappears press the POWER switch to turn the camera on again Alternatively you can remove the USB cable from the camera then repeat the procedure from step...

Страница 124: ...Push the Joystick in the directions of ÑñÉí to select the item you want PRINT MODE SELECT PRINT ALL PRINT MULTI PRINT ALL INDEX SELECT GO EXIT OK PRINTPAPER STANDARD STANDARD SIZE BORDERLESS SELECT GO CANCEL OK You can print selected pictures one by one or you can print multiple pictures on a single sheet of paper P 126 Follow the operation guide displayed here You can select the print paper setti...

Страница 125: ...tly displayed picture at once or you can just apply print reservation to it Set the number of prints and select whether to print the date and time information or file name on the pictures You can also trim the picture and save it for printing Select frames you want to print Set the printing data 100 100 0010 0010 SELECT SELECT SELECT PRINT PRINT PRINT MORE MORE MORE SINGLE PRINT SINGLE PRINT SINGL...

Страница 126: ...he card and makes one print for each picture Prints selected pictures Prints an index of all the pictures stored in the card Makes split print with a picture inset in each split plane Prints according to the print reservation you made If there is no picture with print reservation this is not available P 108 Example of ALL INDEX Example of MULTI PRINT PRINT MODE SELECT screen The available print mo...

Страница 127: ...E MORE MORE SINGLE PRINT SINGLE PRINT SINGLE PRINT OK OK OK 100 100 0010 0010 PRINT Prints the currently displayed picture If there is a picture that SINGLE PRINT reservation has been already applied to only the picture with SINGLE PRINT reservation will be printed SINGLE PRINT Applies print reservation to the currently displayed picture If this is done push the Joystick in the directions of Éí to...

Страница 128: ...ing data OK Transfers images you print to the printer CANCEL Resets the settings All print reservation data will be lost If you want to keep the print reservation data and make other settings push the Joystick left This returns you to the previous setting PRINT CONTINUE CANCEL SELECT GO OK To stop and cancel printing press the Joystick CONTINUE Continues printing CANCEL Cancels printing All print ...

Страница 129: ...paper in the printer Replace the ink cartridge in the printer Remove the jammed paper Do not manipulate the printer while making settings on the camera Turn off camera and printer Check the printer and remedy any problems before turning the power on again Use a personal computer to print Possible cause The camera is not connected to the printer correctly There is no paper in the printer The printe...

Страница 130: ...130 MEMO ...

Страница 131: ...er criteria Trim crop colorize or add special effects And much more Once you ve transferred images to your computer you can email them to friends post them on your website create slideshows or HTML albums you can even use them as wallpaper for your desktop 8 Transferring images to a computer Transferring images to your computer Online album Editing processing images Printing images Share the fun w...

Страница 132: ...If the camera is connected to the computer via a USB hub operation may not be stable if there are any compatibility problems between the computer and the hub In such cases do not use the hub and connect the camera directly to the computer instead Just connect the camera to a computer with the USB cable and you can easily transfer images stored on the card to the computer with the provided OLYMPUS ...

Страница 133: ... if the images are processed rotated etc while they are on the card Viewing or processing images downloaded to the computer Transferring images to the computer is possible with the use of the optional PC card adapter or other media adapters for the xD Picture Card For details see the Olympus web site xD Picture Card PC card adapter When your computer cannot read the camera s image data with the US...

Страница 134: ...ble media to your computer Grouping and organizing images You can organize images by displaying them in a calendar format Using shooting date or key words you can quickly find the particular images you want Correcting images using filter and correction functions A variety of printing formats You can print in a variety of formats including index prints calendars postcards and more Creating panorama...

Страница 135: ...ows 98SE Me 2000 Professional XP CPU Pentium III 500 MHz or higher RAM 128 MB or more 256 MB or more recommended HD space 300 MB or more Interface USB port Monitor 1024 x 768 pixel or more minimum 65 536 colors Macintosh OS Mac OS X 10 2 or later CPU Power PC G3 500 MHz or higher RAM 128 MB or more 256 MB or more recommended HD space 300 MB or more Interface USB port Monitor 1024 x 768 pixel or mo...

Страница 136: ...n this case go to step Click the Next button then follow the on screen prompts to continue installing the program When the software license agreement window appears read the license agreement text then click Agree The OLYMPUS Master installation window appears Follow the on screen prompts to continue installing the program When the software license agreement window appears read the license agreeme...

Страница 137: ...to install the program click Cancel Go to step The Adobe Reader installation window appears Follow the on screen prompts to continue installing the program A window appears to inform you when installation is complete Click Finish The screen returns to the Olympus Software Setup Menu When a window appears asking you to restart your computer click the check box for I want to restart the computer now...

Страница 138: ...click the CD ROM icon on your desktop Double click the Installer icon Follow the on screen prompts to continue installing the program OLYMPUS Master Installer will automatically launch When the software license agreement window appears read the license agreement text then click Continue and Agree A window appears to inform you when installation is complete Click the Quit button Remove the CD then ...

Страница 139: ...POWER switch to turn the camera on again Alternatively you can unplug the USB cable from the camera then repeat the procedure from step Connect the camera to your computer with the provided USB cable USB cable Look for this mark USB port Terminal Multi connector Smaller terminal The location of the USB port varies depending on the computer For details refer to your computer s manual The selection ...

Страница 140: ... installation is completed appears The computer recognizes the camera as a Removable Disk Windows XP You can download image files from the camera easily To transfer images with OLYMPUS Master click Cancel Mac OS X iPhoto is the default image management application for Mac OS When you connect your Olympus digital camera for the first time iPhoto will start up automatically Close iPhoto and start OL...

Страница 141: ...at is printed on the affixed label then select your country Macintosh 1 Transfer Images button Transfers images from the camera or removable media 2 Upgrade button Displays the dialog box that allows upgrade to OLYMPUS Master PLUS 3 Browse Images button Displays the Browse window 4 Backup Images button Backs up images onto removable media 5 Create and Share button Displays menus to enjoy images 6 ...

Страница 142: ...window containing the files to be copied appears The thumbnails of all the images in the camera appear Select the image file you want to save on the computer then click the Transfer Images button A confirmation message appears Click the Browse images now button The images downloaded to the Browse window appear Clicking Menu in the Browse window returns to the main menu Never open the camera s batt...

Страница 143: ...er icon and right click the Removable Disk to display the menu 2 Click Eject on the menu Windows Me 2000 XP 1 In the System Tray click the Remove Hardware icon 2 Click on the pop up message 3 Click OK on the Safe to Remove Hardware window Card access mark Disconnecting the camera from your computer After downloading images from the camera to your computer you can disconnect the camera from your co...

Страница 144: ...ble from the camera å Windows Me 2000 XP When you click Unplug or Eject Hardware the window may return the following message In such case make sure that no image data is being downloaded from the camera and that there are no applications open that were accessing the camera image files Close any such applications and click Unplug or Eject Hardware again and then remove the cable Note ...

Страница 145: ...k button å in the lower part of the screen the movie is played back The name and function s of each controller are shown below 8 7 6 5 4 3 2 1 Items Details 1 Playback slider Moves the slider to specify the frame you want to view 2 Time display Displays the elapsed time during playback 3 Playback pause Plays back a movie During movie playback the button button functions as the Pause button 4 Previ...

Страница 146: ...e of the image to print To print images with the date or date and time check off Print Date then select Date or Date Time Select the thumbnail of the image you want to print then click the Add button The selected image is previewed on the layout Set the number of images to print Click the Print button Clicking Menu in the photo print window returns to the main menu The print menus include menus su...

Страница 147: ...our computer with the USB cable double click the file included in the following folder on the provided OLYMPUS Master CD ROM When you install OLYMPUS Master on a computer running Windows 98SE the USB driver will be installed at the same time Your computer s drive name USB INSTALL EXE Even if your computer has a USB connector data transfer may not function correctly if you are using one of the oper...

Страница 148: ...148 MEMO ...

Страница 149: ...y encounter Solutions to error messages operational problems blurry pictures camera storage basic terminology and more can easily be found in this section 9 Appendix If you encounter problems Error codes Troubleshooting Camera maintenance Safety precautions ...

Страница 150: ... cannot be played back on this camera Corrective action Set the date and time Insert a card or insert a different card If the problem persists format the card If the card cannot be formatted it cannot be used Use a different card Insert a new card The recorded image has been protected read only on a PC Download the image to a PC and cancel the read only setting Replace the card or erase unwanted p...

Страница 151: ...151 If you encounter problems 9 Appendix CARD COVER OPEN Possible cause The battery card compartment cover is open Corrective action Close the battery card compartment cover Monitor indication ...

Страница 152: ...oes not turn on or function buttons do not respond The camera automatically turns off if it is not operated for a certain period of time Press the POWER switch to turn the camera on Charge the battery Warm the battery by putting it in your pocket for a while The camera does not operate while it is connected to a PC Disconnect the camera from the PC Charge the battery Set the mode switch to any pos...

Страница 153: ... at a bright subject in sunlight may cause vertical lines to appear on the monitor This is not a malfunction Adjust the brightness in the SETUP menu s Block the sunlight with your hand Set the date time in the SETUP menu s The clock is not preset at the factory Set the date time again Set ALL RESET to OFF in the MODE MENU Use focus lock to focus on the subject and then shoot If the subject is clos...

Страница 154: ... the flash Shoot within the flash working range Select a different flash mode not flash off Set the flash to fill in mode or set ESP to Select BEACH SNOW in the SCENE SELECT menu or adjust the exposure compensation toward plus If the center of the subject is too bright the image as a whole emerges darker Adjust the exposure compensation toward plus The power is off The camera is in the shooting mo...

Страница 155: ... During night shooting or shooting with the flash set to flash off mode in low light condition stabilize the camera or hold it steady If the subject is closer than 30 cm 11 8 use the super macro mode Clean the lens Use a commercially available blower brush and then wipe with the provided camera cleaner to remove dust Mold may form on the lens surface if the lens is left dirty Install the OLYMPUS M...

Страница 156: ...t before removing the plug from the AC outlet Exterior TWipe gently with the provided camera cleaner If the camera is very dirty soak a soft cloth in mild soapy water and wring well Wipe the camera with the damp cloth and then dry it with a dry cloth If you have used the camera at the beach use a cloth soaked in clean water and well wrung Monitor TWipe gently with the provided camera cleaner Lens ...

Страница 157: ... has not been used for a long time mold may form or the camera may malfunction Before using the camera check that the camera works properly Battery handling precautions This camera uses an lithium ion battery specified by Olympus Do not use any other type of battery For safe and proper use read the battery s instruction manual carefully before using it If the battery s terminals get wet or greasy ...

Страница 158: ...eep the card away from infants or toddlers as it could be accidentally swallowed Improper use of the card could result in damage and loss of data on the card Once lost data cannot be restored Be careful of the following when using the card Do not bend the card or subject it to physical shock or vibrations Do not store the card in areas of high temperature high humidity or high dust content Do not ...

Страница 159: ...gged on the monitor This is not a malfunction It will be less noticeable in playback mode In places subject to low temperatures the LCD monitor may take a long time to turn on or its color may change temporarily When using the camera in extremely cold places it is a good idea to occasionally place it in a warm place A LCD monitor exhibiting poor performance due to low temperatures will recover in ...

Страница 160: ... or print lab that supports the DPOF format EV Exposure Value A system for measuring exposure EV0 is when the aperture is at F1 and the shutter speed is 1 second The EV then increases by 1 each time the aperture increases by one F stop or the shutter speed increases by one increment EV can also be used to indicate brightness and ISO settings Exposure The amount of light used to capture an image Th...

Страница 161: ...urers to be connected and also allows pictures to be printed directly from the camera Pixels A pixel is the smallest unit dot used to make up an image Clear large sized printed images require millions of pixels TFT Thin Film Transistor Color Monitor A transistor color monitor constructed using thin film technology ...

Страница 162: ...162 MEMO ...

Страница 163: ... meanings of the icons displayed on the monitor and the top menu and mode menu lists as necessary Use the index when you want to find the pages describing the functions and items if these are not included in the table of contents You can also use the Names of parts and Menu directory to search for the relevant pages 10 Information SCENESELECT FLASH MODE MODEMENU ...

Страница 164: ...RE WB AUTO P 57 CARD FORMAT YES NO P 106 SETUP ALL RESET OFF ON P 82 ENGLISH FRANCAIS DEUTSCH P 84 ESPAÑOL PORTUGUES PW ON SETUP SCREEN OFF 1 2 P 85 SOUND OFF 1 2 PW OFF SETUP SCREEN OFF 1 2 P 85 SOUND OFF 1 2 REC VIEW OFF ON P 89 OFF LOW HIGH P 91 BEEP OFF 1 2 LOW HIGH P 92 SHUTTER SOUND OFF 1 2 LOW HIGH P 93 FILE NAME RESET AUTO P 94 PIXEL MAPPING P 95 P 96 P 97 VIDEO OUT NTSC PAL P 99 FLASH MOD...

Страница 165: ...p menu Tab Function Setting Ref page SCENE SELECT PROGRAM AUTO P 34 SHQ 2288 x 1712 P 29 3 2 2288 x 1520 HQ 2288 x 1712 P 29 3 2 2288 x 1520 SQ1 2048 x 1536 P 29 1600 x 1200 HIGH 1280 x 960 NORMAL SQ2 1024 x 768 HIGH P 29 640 x 480 NORMAL ...

Страница 166: ... 2 0 P 56 OFF ON P 49 PICTURE WB AUTO P 57 CARD FORMAT YES NO P 106 SETUP ALL RESET OFF ON P 82 ENGLISH FRANCAIS DEUTSCH P 84 ESPAÑOL PORTUGUES PW ON SETUP SCREEN OFF 1 2 P 85 SOUND OFF 1 2 PW OFF SETUP SCREEN OFF 1 2 P 85 SOUND OFF 1 2 OFF LOW HIGH P 91 BEEP OFF 1 2 LOW HIGH P 92 FILE NAME RESET AUTO P 94 PIXEL MAPPING P 95 P 96 P 97 VIDEO OUT NTSC PAL P 99 OFF ON P 58 SHQ HQ SQ1 SQ2 P 29 DIGITAL...

Страница 167: ...NDEX 2 P 73 EDIT 2 P 75 CAPTURE 2 P 72 CARD ALL ERASE YES NO P 80 FORMAT YES NO P 106 SETUP ALL RESET OFF ON P 82 ENGLISH FRANCAIS DEUTSCH P 84 ESPAÑOL PORTUGUES 3 PW ON SETUP SCREEN OFF 1 2 P 85 SOUND OFF 1 2 PW OFF SETUP SCREEN OFF 1 2 P 85 SOUND OFF 1 2 SCREEN SETUP PW ON PW OFF P 87 VOLUME OFF 1 2 3 4 5 P 90 OFF LOW HIGH P 91 BEEP OFF 1 2 LOW HIGH P 92 P 96 P 97 VIDEO OUT NTSC PAL 3 P 99 4 9 1...

Страница 168: ...cted in mode Cannot be selected in mode SCENE SELECT DIGITAL ZOOM Cannot be selected in mode Cannot be selected in mode Cannot be selected in mode ISO still picture PANORAMA Cannot be selected in mode 2 IN 1 movie WB Only available for mode ALL RESET PW ON SETUP PW OFF SETUP REC VIEW BEEP SHUTTER SOUND Flash Available Not available ...

Страница 169: ...169 Available functions by shooting mode 10 Information Mode Function FILE NAME PIXEL MAPPING VIDEO OUT Available Not available ...

Страница 170: ...K VIEW button Erase button P 79 Shutter button P 26 Power lamp POWER switch Microphone P 49 69 Flash P 52 Lens Lens cap string eyelet Mode switch P 10 Strap eyelet Multi connector P 77 139 Battery Card compartment cover DC IN jack Self timer lamp P 42 Monitor P 96 171 Connecter cover Camera Names of parts ...

Страница 171: ...r macro mode 6 Flash mode P 52 7 Self timer P 42 8 Drive mode P 43 Image stabilizer P 58 movie 9 Sound record P 69 10 Record mode SHQ HQ SQ1 SQ2 P 29 11 Resolution 2288x1712 3 2 2288x1520 P 31 2048x1536 1600x1200 1280x960 1024x768 640x480 12 Exposure compensation 2 0 2 0 P 56 HQ HQ 2288 1712 2 0 P ISO100 1 2 12 13 14 15 16 17 18 3 4 5 6 7 8 10 11 9 04 12 23 21 56 100 0030 HQ 10 30 2 0 ISO100 ISO10...

Страница 172: ...e number 100 0030 20 Date time 04 12 23 21 56 P 97 21 Print reservation X10 P 108 Number of prints Movie P 70 22 Sound record P 69 23 Protect P 78 24 Frame number still image 30 Elapsed playback time 00 00 56 34 P 47 Overall recording time movie FILE FILE Shooting mode Playback mode HQ HQ 2288 1712 2 0 P ISO100 1 2 12 13 14 15 16 17 18 3 4 5 6 7 8 10 11 9 04 12 23 21 56 100 0030 HQ 10 30 2 0 ISO10...

Страница 173: ...he next shot Lights green Remaining power level High Lights red Remaining power level Low Charge the battery Your digital camera s power consumption varies greatly depending on usage and operating conditions Under some operating conditions the camera may turn off without warning that battery power is low If this occurs re charge the battery Shooting Shooting Shooting BATTERY EMPTY is displayed Rem...

Страница 174: ...playback 61 Compression 31 CUISINE 37 D Date time setting 97 Daylight 57 DC IN jack 170 DCF 160 Digital ESP light metering 55 160 DIGITAL ZOOM 40 DPOF 108 160 DRIVE 43 E EDIT 75 ERASE 79 Error codes 129 150 ESP 55 EV 160 Exposure 27 56 160 Exposure compensation 56 F FADE 102 FILE NAME 94 File number 172 Fill in flash 52 FIREWORKS 36 Flash charging 53 FLASH MODE 52 53 Flash off 52 Flash stand by 53...

Страница 175: ...tBridge 121 161 Picture rotation 65 PIXEL MAPPING 95 Pixels 161 Playback on TV 77 Playback mode 10 60 PORTRAIT 36 Print reservation 108 PROGRAM AUTO 34 Protecting images 78 PW OFF SETUP 85 PW ON SETUP 85 R RANDOM 104 REC VIEW 89 Record mode 29 Recording sound 49 Recording sound with still pictures 69 Red eye reduction flash 52 Remaining movie recording time 47 172 Resizing 67 Resolution 32 S SCENE...

Страница 176: ...ARD 121 SUNSET 38 Super macro 41 SWIVEL 103 T TFT 161 Top menu 17 22 Trimming 67 115 Tungsten light 57 U USB driver 135 147 V VIDEO OUT 99 VOLUME 71 90 W Warning tone 91 White balance WB 57 X xD Picture Card 133 Z ZOOM DOWN 103 ZOOM UP 103 Index ...

Страница 177: ... 23 07 61 Goods delivery Bredowstrasse 20 22113 Hamburg Germany Letters Postfach 10 49 08 20034 Hamburg Germany European Technical Customer Support Please visit our homepage http www olympus europa com or call our TOLL FREE NUMBER 00800 67 10 83 00 for Austria Belgium Denmark Finland France Germany Italy Luxemburg Netherlands Norway Portugal Spain Sweden Switzerland United Kingdom Please note some...

Отзывы: