background image

B - 5

B

Display Devices & Options

Besides the built-in LCD, you can also use an 

external VGA monitor

 (CRT) or

external Flat Panel Display

 as your display device. A VGA monitor/Flat Panel

Display connects to the external monitor port.


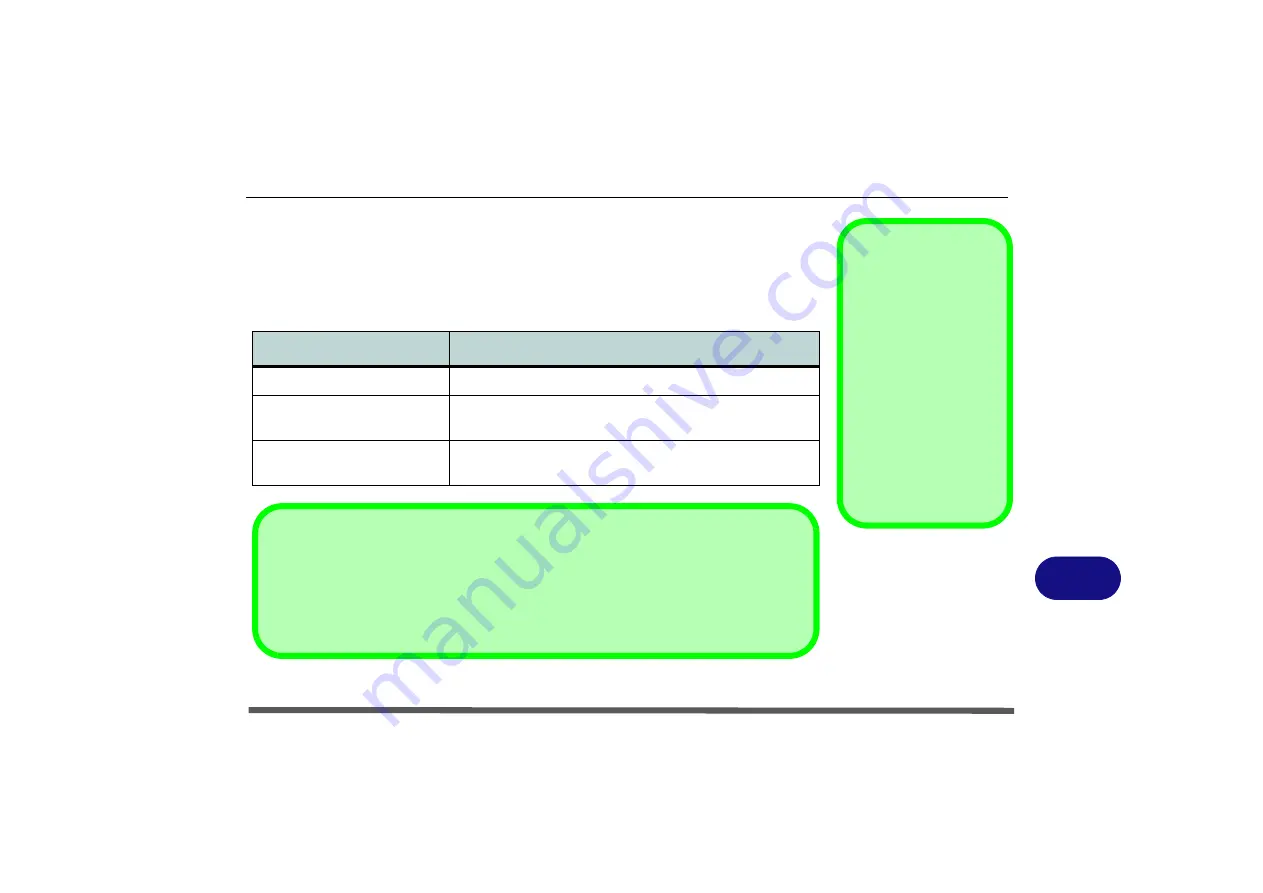
The following display modes are

available.

Intel Display Mode

Description

Single Display

One of the connected displays is used as the display device

Multiple Display - Intel(R) Dual 
Display Clone

Both connected displays output the same view and may be 
configured independently

Multiple Display - Extended


Desktop

Both connected displays are treated as separate devices, and 
act as a virtual desktop

Function Key 

Combination

You can use the 

Fn + F7

key combination to tog-
gle through the display
options:

• Notebook Only
• External Display Only
• No External 

Display

Make sure you give the
displays enough time to
refresh.

Table B - 1

Display Modes

Attaching Displays

When you first attach an external display you may find that the desktop does not occupy the
full screen area. Use either the display’s auto adjust/configure controls, or the 

Intel(R) GMA

Driver for Mobile

 control panel to configure the full screen display.

Содержание OLIBOOKM1020

Страница 1: ...Code 383311Z USER GUIDE ...

Страница 2: ...rately The dumping of these devices at unequipped and unauthorized places may have hazardous effects on health and the environment Offenders will be subjected to the penalties and measures laid down by the law The crossed dustbin symbol on the device means that When it to be disposed of the device is to be taken to the equipped waste collection centres and is to be handled separately from urban wa...

Страница 3: ...accompanying software may not in whole or in part be reproduced translated transmitted or reduced to any machine readable form without prior consent from the vendor manufac turer or creators of this publication except for copies kept by the user for backup purposes Brand and product names mentioned in this publication may or may not be copyrights and or registered trademarks of their respective co...

Страница 4: ...oid using this equipment with a telephone line other than a cordless type during an electrical storm There may be a remote risk of electrical shock from lightning 3 Use only the power cord and batteries indicated in this manual Do not dispose of batteries in a fire They may explode Check with local codes for possible special disposal instructions 4 This product is intended to be supplied by a List...

Страница 5: ...into it the computer could be badly damaged 3 Avoid interference Keep the computer away from high capacity transformers electric motors and other strong magnetic fields These can hinder proper performance and damage your data Do not expose the computer to any shock or vibration Do not place it on an unstable surface Do not place anything heavy on the computer Do not expose it to excessive heat or ...

Страница 6: ...ost if the battery is depleted 5 Take care when using peripheral devices Do not turn off the power until you properly shut down all pro grams Do not turn off any peripheral devices when the computer is on Do not disassemble the com puter by yourself Perform routine maintenance on your computer Use only approved brands of peripherals Unplug the power cord before attaching peripheral devices ...

Страница 7: ...trician install one When you want to unplug the power cord be sure to disconnect it by the plug head not by its wire Make sure the socket and any extension cord s you use can support the total cur rent load of all the connected devices Before cleaning the computer make sure it is disconnected from any external power supplies i e AC DC adapter or car adapter Do not plug in the power cord if you are...

Страница 8: ...from and promptly dispose of a damaged battery Always dispose of batteries carefully Batteries may explode or leak if exposed to fire or improperly handled or discarded Keep the battery away from metal appliances Affix tape to the battery contacts before disposing of the battery Do not touch the battery contacts with your hands or metal objects Battery Disposal Caution The product that you have pu...

Страница 9: ...hen refer servicing to qualified service personnel under any of the following con ditions When the power cord or AC DC adapter is damaged or frayed If the computer has been exposed to rain or other liquids If the computer does not work normally when you follow the operating instructions If the computer has been dropped or damaged do not touch the poisonous liquid if the LCD panel breaks If there i...

Страница 10: ...t the notebook in its carrying bag and secure it with the bag s straps 7 If you re taking any peripherals e g a printer mouse or digital camera pack them and those devices adapters and or cables 8 Anticipate customs Some jurisdictions may have import restrictions or require proof of ownership for both hard ware and software Make sure your documents are prepared Power Off Before Traveling Make sure...

Страница 11: ...ata Pass your computer and disks around the devices Ask security officials to hand inspect them you may be asked to turn it on Note Some airports also scan luggage with these devices Fly safely Most airlines have regulations about the use of computers and other electronic devices in flight These restrictions are for your safety follow them If you stow the notebook in an overhead com partment make ...

Страница 12: ... height of the chair and or desk so that the keyboard is at or slightly below the level of your elbow Keep your forearms wrists and hands in a relaxed position Your knees should be slightly higher than your hips Place your feet flat on the floor or on a footrest if necessary Use a chair with a back and adjust it to support your lower back comfortably Sit straight so that your knees hips and elbows...

Страница 13: ...river Installation 1 7 Features Components Overview 2 1 Hard Disk Drive 2 2 7 in 1 Card Reader 2 3 TouchPad and Buttons Mouse 2 4 Audio Features 2 5 Power Management Overview 3 1 Advanced Configuration and Power Interface 3 1 The Power Sources 3 2 AC DC Adapter 3 2 Battery 3 2 Turning on the Computer 3 3 Power Schemes 3 4 System Power Options 3 6 Hibernate Mode vs Shutdown 3 6 Stand by Mode vs Hib...

Страница 14: ...the Battery 6 3 Upgrading the HDD 6 4 Upgrading the System Memory RAM 6 7 Upgrading the Processor 6 10 Additional Modules Overview 7 1 PC Camera Module 7 2 Wireless LAN Module 7 4 Troubleshooting Overview 8 1 Basic Hints and Tips 8 2 Backup and General Maintenance 8 3 Viruses 8 4 Upgrading and Adding New Hardware Software 8 5 Problems and Possible Solutions 8 6 Interface Ports Jacks Notebook Ports...

Страница 15: ...ecifications Processor C 2 Core Logic C 2 Display C 2 Memory C 2 Video Adapter C 2 BIOS C 2 Storage C 2 Security C 2 Audio C 2 Pointing Device C 2 Keyboard C 2 Operating System C 3 Card Reader C 3 Slot C 3 Dimensions Weight C 3 ...

Страница 16: ...XIV Table of Contents ...

Страница 17: ...he safety information contained in the present User s Manual August 2009 Trademarks Intel and Atom are trademarks registered trademarks of Intel Corporation Olivetti and Alice are trademarks registered trademarks of Telecom Italia S p A System Startup 1 Remove all packing materials 2 Place the computer on a stable surface 3 Securely attach any peripherals you want to use with the notebook e g keyb...

Страница 18: ...d 6 Built In Microphone 7 TouchPad Buttons 8 LED Indicators 9 7 in 1 Card Reader 10 Microphone In Jack 11 Headphone Out Jack 12 Battery Front Open 7 8 Front Rear 1 2 5 4 6 3 12 Shutdown Note that you should always shut your computer down by choosing the Turn Off Com puter command from the Start menu in Windows This will help prevent hard disk or system problems 9 10 11 ...

Страница 19: ...e Setup Utility and use the arrow keys to navigate to the Advanced menu 2 Use the arrow keys to select Enhance USB ODD detection and set the item to Enabled using the spacebar 3 Press F10 to save and exit if you want to start from the external ODD you will need to set it as first priority in the Boot menu after it has been detected Figure 1 3 Side Bottom Views 1 Security Lock Slot 2 DC In Jack 3 R...

Страница 20: ...ter Table 1 1 LED Indicators Icon Color Description Orange DC Power is Plugged In Green The Computer is On Blinking Green The Computer is in Sleep Mode Orange The Battery is Charging Green The Battery is Fully Charged Blinking Orange The Battery Has Reached Critically Low Power Status Green Hard Disk Activity Green The Wireless LAN Module is Powe red On ...

Страница 21: ... are available when the hot key driver is installed Keys Function Visual Indicators Keys Function Visual Indicators Fn Play Pause in Audio Video Programs Fn F7 Display Toggle Fn F1 TouchPad Toggle Fn F8 F9 Brightness Decrease Increase Fn F10 PC Camera Power Toggle Fn F2 Turn LCD Backlight Off Press a key to or use TouchPad to turn on Fn F11 WLAN Module Power Tog gle Fn F3 Mute Toggle Fn NumLk Numb...

Страница 22: ...allation procedure click Cancel to close the window and follow the installation procedure as directed Figure 1 5 Driver Installation Driver Windows XP with Service Pack 3 Chipset Video Audio LAN TouchPad Card Reader Hot Key PC Camera Module Wireless LAN Module Driver Installation General Guidelines As a general guide follow the de fault on screen instructions for each driver e g Next Next Finish u...

Страница 23: ...rview 2 1 2 Chapter 2 Features Components Overview Read this chapter to learn more about the following main features and compo nents of the computer Hard Disk Drive 7 in 1 Card Reader TouchPad and Buttons Mouse Audio Features ...

Страница 24: ... page 6 4 Power Safety Before attempting to ac cess any of the internal components of your computer please ensure that the machine is not connected to the AC power and that the ma chine is turned off Also ensure that all peripheral cables including phone lines are disconnected from the computer Figure 2 1 HDD Bay HDD Bay Note that the HDD bay can be accessed by elevating the key board see Upgradin...

Страница 25: ...re you install the Card Reader driver Note The PC adapters are usually supplied with these cards Card Reader Cover Make sure you keep the rubber cover provided in the card reader when not in use This will help pre vent foreign objects and or dust getting in to the card reader Figure 2 2 Right View 1 Card Reader MMC MultiMedia Card SD Secure Digital MS Memory Stick MS Pro Memory Stick Pro MS Duo re...

Страница 26: ...ou can configure the mouse functions from the Mouse Properties control panel Click Start point to Settings and click Control Panel or just click Con trol Panel and then double click Mouse Click Hardware tab and double click Properties to access Advanced Set tings Mouse Driver If you are using an exter nal mouse your operat ing system may be able to auto configure your mouse during its installa tio...

Страница 27: ... taskbar control panel this will bring up the Realtek Au dio Configuration menus The volume may also be adjusted by means of the Fn F5 F6 key combination Sound Volume Adjustment How high the sound volume can be set de pends on the setting of the volume control within Windows and the volume control function keys on the computer Click the Volume icon on the taskbar to check the setting Figure 2 4 Re...

Страница 28: ...or an external micro phone then configure the audio options as follows 1 Double click the Realtek HD Audio Manager icon in the taskbar control panel 2 Click Mixer tab 3 Click the button under Mic Volume to select it you can boost the volume level as high as required 4 Click OK to close the control panel Figure 2 5 Mixer Mic Volume ...

Страница 29: ...figuration and Power Interface The ACPI interface provides the computer with enhanced power saving tech niques and gives the operating system OS direct control over the power and thermal states of devices and processors For example it enables the OS to set devices into low power states based on user settings and information from ap plications ACPI is fully supported in Windows XP OS Note Power man...

Страница 30: ...ct the AC power cord to the AC DC adapter 3 Raise the lid LCD to a comfortable viewing angle 4 Press the power button to turn On Battery The battery allows you to use your computer while you are on the road or when an electrical outlet is unavailable Battery life varies depending on the applica tions and the configuration you re using To increase battery life let the battery discharge completely b...

Страница 31: ...s feature Shutdown Note that you should al ways shut your computer down by choosing the Turn Off Computer command from the Start menu in Windows This will help prevent hard disk or system problems Forced Off If the system hangs and the Ctrl Alt Del key combination doesn t work press the pow er button for 4 seconds or longer to force the system to turn itself off Power Button as Stand by or Hiberna...

Страница 32: ... s hard disk motor to turn off if the hard disk drive has not been accessed for a specified period of time if the system reads or writes data the hard disk motor will be turned back on The schemes may also be set to set a specified time for the system to enter Stand by or Hibernate modes see System Power Options on page 3 6 Resuming Operation Press a key on the key board or move the mouse TouchPad...

Страница 33: ...ormance especially under DC battery power Choose the Home Office Desk scheme for maximum performance when the computer is powered from an AC power source Choose the Max Battery scheme bear in mind that this scheme may slow down the overall performance of the computer in order to save power for maximum power saving when the computer is battery DC power powered Windows will use Portable Laptop as th...

Страница 34: ...you last left off what was on your desktop without reopening the application s and file s you last used You can use either method depending on your needs Stand by Mode vs Hibernate Mode If you want to stay away from your work for just a while you can put the system on Stand by instead of in hibernation It takes a longer time to wake up the sys tem from Hibernate mode than from Stand by mode Stand ...

Страница 35: ...of your information on a part of the HDD before it turns the system off Although it saves the most power it takes the longest time to return to full operation You can set your computer to automatically enter Hibernate mode when the battery power is almost depleted You will need to en able Hibernate mode from the Hibernate tab in the Power Options control panel The system will resume from Hibernate...

Страница 36: ...ode the LED will be off battery or orange AC DC adapter If you are in a power saving mode set to save power through individual components e g hard disk monitor the LED will remain green Sleep Button You may also configure the Sleep Resume key combination Fn F4 from the menu illustrat ed In Windows this is referred to as the Sleep button Figure 3 3 Power Options Advanced Power Buttons Sleep Button ...

Страница 37: ...upon many factors including the programs you are running and peripheral devices attached Power Options you may set low battery Alarms and actions and check the Power Meter from the Power Options control panel and settings in the OS will help pro long the battery life if configured appropriately Low Battery Warning When the battery is criti cally low immediately connect the AC DC adapter to the com...

Страница 38: ... is powered on and in use it will take several hours to fully recharge the battery When the computer is turned off but plugged into an electrical outlet battery charge time is less Re fer to Battery Information on page 3 9 for more information on how to maintain and properly recharge the battery pack Conserving Battery Power To conserve battery power Lower the brightness level of the LCD display T...

Страница 39: ... notice any physical defects e g the battery is bent out of shape after being dropped or any unusual smells emanating from the notebook battery shut your computer down immediately and contact your service center If the battery has been dropped we do not recommend using it any further as even if the computer continues to work with a damaged battery in place it may cause circuit damage which may pos...

Страница 40: ...lick the tickboxes see page 3 9 and Schemes change all the settings to Never see page 3 4 As the battery nears the end of its life save and close any critical files How do I fully charge the battery When charging the battery don t stop until the LED charging indicator light changes from orange to green How do I maintain the battery Completely discharge and charge the battery at least once every 30...

Страница 41: ...or utility during operating system installation Instead you need to manually install some system required drivers What to Install The Device Drivers User s Manual disc contains the drivers necessary for the proper operation of the computer Table 4 1 on page 4 2 lists what you need to in stall and it is very important that the drivers are installed in the order indicated Module Driver Installation ...

Страница 42: ...RightClick and select Browse Open the Drivers folder and and browse to the exe cutable file Setup exe in the appropriate driver folder If you are installing more than a single driver make sure to install them in the order indicated in the Table 4 1 Driver Windows XP with Service Pack 3 Chipset Video Audio LAN TouchPad Card Reader Hot Key PC Camera Module Wireless LAN Module ...

Страница 43: ...ide follow the default on screen instruc tions for each driver e g Next Next Finish unless you are an advanced user In many cases a restart is re quired to install the driver Windows XP Service Pack 3 Make sure you install Windows XP Service Pack 3 or a Windows XP version which includes Service Pack 3 be fore installing any drivers External Optical CD DVD Device Drives To install applications and ...

Страница 44: ...ict message please click Yes to choose to keep the existing newer version Updating Reinstalling Individual Drivers If you wish to update reinstall individual drivers it may be necessary to uninstall the original driver To do this go to the Control Panel in the Windows OS and double click the Add Remove Programs item If you see the individual driver listed if not see be low uninstall it following t...

Страница 45: ...inal settings found in Setup Even if you are a beginner keep a record of the settings you find and any changes you make This information could be useful if your system ever needs servicing There is one general rule Don t make any changes unless you are sure of what you are doing Many of the settings are required by the system and changing them could cause it to become unstable or worse If you have...

Страница 46: ...display a sys tem summary and prompt you to run Setup If there are no problems the Setup prompt will disappear and the system will load the operating system Once that starts you can t get into Setup without rebooting POST Screen 1 BIOS information 2 CPU type 3 Memory status 4 Enter Setup prompt appears only during POST Note The POST screen as pictured right is for guideline purposes only The POST ...

Страница 47: ...r system Take the computer to your service representative or au thorized service center as soon as possible Phoenix TrustedCore tm NB Copyright 1985 2006 Phoenix Technologies Ltd All Rights Reserved Bios Revision KBC EC Firmware Revision CPU 1 Processors Detected Intel R Atom TM CPU N270 1 60GHz 1015M System RAM Passed 512 KB L2 Cache System BIOS shadowed Video BIOS shadowed Fixed Disk 0 FUJITSU M...

Страница 48: ...he setting or if the cure seems even worse call for help The Setup Utility The Phoenix TrustedCore Setup Utility tells the system how to configure itself and manage basic features and subsystems e g port configuration Entering Setup To enter Setup turn on the computer and press F2 during the POST The prompt Press F2 to Enter Setup seen on page 5 2 is usually present for a few seconds after you tur...

Страница 49: ... the bottom of the screen If these tools are confusing press F1 to call up a General Help screen and then use the arrow keys to scroll up or down the page The Item Specific Help on the right side of each screen explains the highlight ed item and has useful messages about its options If you see an arrow next to an item press Enter to go to a sub menu on that subject The sub menu screen that appears...

Страница 50: ... alter data files to reflect these changes Figure 5 2 Main Menu Main Advanced Security Boot Exit F1 Help Select Item Change Values F9 Setup Defaults Esc Exit Select Menu Enter Select Sub Menu F10 Save and Exit Item Specific Help Tab Shift Tab or Enter selects field Main System Time 22 12 05 System Date 02 18 2009 SATA Port 1 FUJITSU MHV2120BH S System Memory 640 KB Extended Memory 1014 MB BIOS Rev...

Страница 51: ...iguration of a HDD on the computer s Serial ATA Port 1 Use the Auto Type setting to have the items configured automatically for you System Extended Memory Main Menu This item contains information on the system memory and is not user config urable The system will auto detect the amount of memory installed ...

Страница 52: ...Power On Self Test POST on page 5 2 Figure 5 3 Advanced Menu Main A Advanced Security Boot Exit F1 Help Select Item Change Values F9 Setup Defaults Esc Exit Select Menu Enter Select Sub Menu F10 Save and Exit Item Specific Help Advanced Enable support for Legacy Universal Serial Bus Phoenix TrustedCore tm Setup Utility Legacy USB Support Enabled Boot time Diagnostic Screen Disabled Reset Configura...

Страница 53: ...tarts up Battery Low Alarm Beep Advanced Menu Use this menu item to enable disable the audible warning when the battery has reached low power status Detect External CRT Advanced Menu This menu allows you to Enable Disable detection for External CRT s external displays You can disable detection to save system power Enhance USB ODD detection Advanced Menu This menu allows you to Enable Disable enhan...

Страница 54: ...ter you turn it on These settings do not affect your machine or network passwords which will be set in your software OS Figure 5 4 Security Menu Main Advanced S Se ec cu ur ri it ty y Boot Exit F1 Help Select Item Change Values F9 Setup Defaults Esc Exit Select Menu Enter Select Sub Menu F10 Save and Exit Item Specific Help Supervisor Password controls access to the setup utility Security Supervis...

Страница 55: ...is selected only users who enter a correct password can boot the system see the warning in the sidebar The default setting is Dis abled Fixed disk boot sector Security Menu If you choose Write Protect this will protect against viruses being written to the hard disk boot sector this is not a substitute for installing an anti virus pro gram see Viruses on page 8 4 Note To clear existing passwords pr...

Страница 56: ...vices up and down the order Figure 5 5 Boot Menu Phoenix TrustedCore tm Setup Utility F1 Help Select Item Change Values F9 Setup Defaults Esc Exit Select Menu Enter Select Sub Menu F10 Save and Exit Item Specific Help Keys used to view or configure devices Up and Down arrows select a device and moves the device up or down x exclude or include the device to boot Shift 1 enables or disables a device...

Страница 57: ...original state and erase any previous changes you have made in a previous session Figure 5 6 Exit Menu F1 Help Select Item Change Values F9 Setup Defaults Esc Exit Select Menu Enter Select Sub Menu F10 Save and Exit Item Specific Help Exit System Setup and save your changes to CMOS Exit Saving Changes Exit Discarding Changes Load Setup Defaults Discard Changes Save Changes Main Advanced Security B...

Страница 58: ...BIOS Utilities 5 14 5 ...

Страница 59: ... or Phillips screwdriver A small regular slotted flathead screwdriver An antistatic wrist strap Before working with the internal components you will need to wear an antistat ic wrist strap to ground yourself because static electricity may damage the com ponents The chapter includes Removing the Battery Upgrading the HDD Please make sure that you review each procedure before you perform it Warranty...

Страница 60: ...ies Under any of these conditions contact your service representative to purchase or replace the component s Power Safety Warning Before you undertake any upgrade procedures make sure that you have turned off the power and disconnected all pe ripherals and cables in cluding telephone lines It is advisable to also re move your battery in or der to prevent accidentally turning the machine on Removal...

Страница 61: ...move the battery 1 Turn the computer off and turn it over 2 Slide the latches in the direction of the arrows to unlock the battery 3 Slide the battery out in the direction of the arrow Warranty Warning Please check with your service representative be fore undertaking any up grade procedures to find out if this will VOID your warranty Figure 6 1 Battery Removal 1 2 2 1 1 ...

Страница 62: ...sk Hard Disk Removals 1 Turn off the computer and remove the battery 2 Locate the hard disk bay cover and remove screw 3 Slide the hard disk assembly in the direction of the arrow HDD System Warning New HDDs are blank Be fore you begin make sure You have backed up any data you want to keep from your old drive You have all the CDs DVDs required to install your op erating system and pro grams If you...

Страница 63: ...e hard disk from the case 7 Insert the new hard disk into the case and pay careful attention to the disk s orientation in the case 5 3 Hard Disk Drive Speeds If you are going to up grade replace the hard disk drive note that It is recommended that HDDs of a maximum speed of 5400 RPM are used DO NOT use 7200rpm or higher HDDs 3 2 1 5 4 5 7 Figure 6 4 HDD Removal ...

Страница 64: ...ding The Computer 6 6 6 8 Secure the disk with the four screws and then reinsert the hard disk assembly into the computer s hard disk bay 9 Replace the hard disk bay screw see Figure 6 3 on page 6 5 6 5 4 7 ...

Страница 65: ...module types The total memory size is automatically detected by the POST routine once you turn on your computer 1 Turn off the computer and remove the battery 2 Carefully press in the three keyboard latches at the top of the keyboard to elevate the keyboard from its normal position you will need to use a small screwdriver to do this 3 Carefully lift the keyboard up do not bend the keyboard ribbon ...

Страница 66: ...ndicated by the arrows in Figure 6 6 5 The RAM module will pop up and you can remove it 6 7 Figure 6 6 RAM Module Release Latches Contact Warning Be careful not to touch the metal pins on the module s connecting edge Even the cleanest hands have oils which can attract particles and degrade the module s performance Figure 6 7 RAM Module Removal 7 6 8 8 ...

Страница 67: ... it should fit without much pressure 8 Press the module in and down towards the mainboard until the slot levers click into place to secure the module 9 Secure the keyboard replace the battery and restart the computer to allow the system to detect the hard disk drive 10 Restart the computer to allow the BIOS to register the new memory configuration as it starts up Re Inserting the Keyboard When re ...

Страница 68: ...r new one you will need to contact your customer service representative We recommend that you do not do this yourself since if it is done incorrectly you may damage the processor or mainboard A Warranty The CPU is not a user ser viceable part Accessing the CPU in any way may violate your warranty Unauthorized tampering with the HDD may also violate your warranty ...

Страница 69: ...ra Module Wireless LAN Module A Wireless Device Operation Aboard Aircraft The use of any portable electronic transmission devices aboard aircraft is usually prohibited Make sure the module s are OFF if you are using the computer aboard air craft Driver Installation Module Power Make sure any modules e g PC Camera or WLAN are ON before installing the appropriate driver ...

Страница 70: ...llation 1 Make sure the module is powered on and then insert the Device Drivers User s Manual disc into the CD DVD drive 2 Browse the CD and go to the Drivers Camera folder 3 Start the executable file Setup exe 4 Choose the language you prefer and click Next 5 Click Next Finish to restart the computer 6 Run the BisonCap application program from the BisonCam shortcut on the desktop or from the Biso...

Страница 71: ...m the Mixer device menu 5 Make sure the Mic Volume check box is checked then click OK 6 Boost the volume in the Recording section in the Recording Control menu as high as it will go and make sure the Select check box is checked 7 Close the Recording Control window and then click OK 8 Double click the Realtek HD Audio Manager icon in the taskbar control panel 9 Click Mixer tab 10 Click the button u...

Страница 72: ...s LAN module Make sure you install the drivers in the order indicated in Table 4 1 on page 4 2 A Wireless Device Operation Aboard Aircraft The use of any portable electronic transmission devices aboard aircraft is usually prohibited Make sure the module s are OFF if you are using the computer aboard air craft Use the Fn F11 key combination to toggle power to the WLAN module and check the indicator...

Страница 73: ...AN folder 3 Start the executable file Setup exe 4 Choose the language you prefer and click Next 5 Click Next Install 6 Click Finish 7 The operating system is the default setting for Wireless LAN control in Windows XP Network Connection Use the Windows Net work Connections con trol panel to access available wireless net works Start Settings Network Connections or Start Connect To Show all Connectio...

Страница 74: ...Modules 7 6 Wireless LAN Module 7 8 Access any available wireless networks from Network Connections Wireless Network Connection menu in Windows or click the icon in the taskbar and click View Wireless Connections ...

Страница 75: ...ges make sure you have followed the instructions carefully and observed the safety precautions in the preface If all else fails talk to your service representative You should also make a record of what happened and what remedies you tried Of course if something goes wrong it will happen at the most inconvenient time possible so you should preview this section just in case If after you ve tried eve...

Страница 76: ...s Make sure that the system is not in Hibernate or Sleep mode by pressing the keys configured in your Power Management Power Options see Configuring the Power Button on page 3 8 the Fn F4 key combination or power button to wake up the system Brightness Check the brightness of the screen by pressing the Fn F8 and F9 keys to adjust the brightness Display Choice Press Fn F7 to make sure the system is...

Страница 77: ...run at times when you are not using your computer You can use those that are provided free with your OS or buy the more powerful dedicated programs to do so Write down your passwords and keep them safe away from your computer This is especially impor tant if you choose to use a Supervisor password for the BIOS see The Power On Self Test POST on page 5 2 Keep copies of vital settings files such as ...

Страница 78: ...now Viruses are often triggered from within e mail attachments so take care when opening any attached file You can configure most Anti Virus programs to check all e mail attachments Note You should also beware of files from people you know as the virus may have infected an address book and been automatically forwarded without the person s knowledge Keep a Bootable CD ROM DVD ROM USB storage device...

Страница 79: ...ed on and in many cases you will need to restart the computer Always check that all the cables are correctly connected Make sure you have installed the drivers for any new hardware you have installed latest driver files are usually available to download from vendor s websites Thoroughly check any recent changes you made to your system as these changes may affect one or more system components or so...

Страница 80: ...start up immediately turn it off then on again You are losing battery power too quickly The system is using too much power If your OS has a Power Options Scheme see Power Schemes on page 3 4 check its settings You may also be using a USB device external device that is drawing a lot of power Actual battery operating time is shorter than expected The battery has not been fully discharged before bein...

Страница 81: ... travel bag may cause the Vent Fan intakes to be blocked Nothing appears on screen The system is in a power saving mode Toggle the sleep resume key combination Fn F4 see Hibernate on page 3 7 Configuring the Power Button on page 3 8 The screen controls need to be adjusted Toggle the screen control key combinations Fn F8 F9 If you re connected to an external monitor make sure it s plugged in and tu...

Страница 82: ...ow Check the volume control in the Volume Control Panel in the Windows taskbar or use the key combination Fn F5 and F6 see Function Hot Key Indicators on Chapter 1 to adjust Audio cannot be recorded from the built in or external microphone The audio recording options need to be configured from the Realtek HD Audio Manager See Audio Recording from Microphone on page 2 6 for configuration informatio...

Страница 83: ... The module is off Check the LED indicator and or function key indicator to see if the WLAN module is on or off see Function Hot Key Indicators on Chapter 1 If the LED indicator is off then press the Fn F11 WLAN key combination in order to enable the modules see Function Hot Key Indicators on Chapter 1 The PC Camera module cannot be detected The module is off Press the Fn F10 key combination in or...

Страница 84: ...itional modules on page 7 1 The Card Reader Network LAN Device does not appear in the Device Manager in Windows This is a power saving feature When not in use the Card Reader Network LAN Device will not appear in the Windows Device Manager as they are not consuming any power However as soon as the Card Reader is reading from writing to an inserted card or the LAN card is experiencing network activ...

Страница 85: ... Ports Jacks A 1 A Appendix A Interface Ports Jacks Overview The following chapter will give a quick description of the interface ports jacks which allow your com puter to communicate with external devices connect to the internet etc ...

Страница 86: ...o or simultaneous display on the LCD and external monitor FPD Headphone Out Jack Headphones or speakers may be connected through this jack Note Set your system s volume to a reduced level before connecting to this jack Microphone In Jack Plug an external microphone in to this jack to record on your computer see Audio Recording from Microphone on page 2 6 for configuration information RJ 45 LAN Jac...

Страница 87: ...yboards mice or scanners and for high speed peripherals such as external HDDs digital video cameras or high speed scanners etc Devices can be plugged into the computer and unplugged from the computer without the need to turn the system off if the power rating of your USB device is 500mA or above make sure you use the power supply which comes with the device Item Description ...

Страница 88: ...Interface Ports Jacks A 4 Interface Ports Jacks A ...

Страница 89: ...se the CD and go to the Drivers Video folder 3 Start the executable file Setup exe 4 Follow the installation procedure 5 Click Finish to restart the computer Dynamic Video Memory Technology Intel DVMT automatically and dynamically allocates as much up to 128MB system memory RAM as needed to the video system the video driver must be installed DVMT returns whatever memory is no longer needed to the ...

Страница 90: ... You can also access Graphics Properties from the Windows Intel R GMA Driver for Mobile control panel or from the taskbar icon Taskbar Icon You can also access the controller properties from the taskbar Click on the icon to bring up the menu and scroll to Graphics Properties If you cannot see the tray icon go to the Intel R Graphics Media Accel erator Driver tab in the Display Properties Advanced ...

Страница 91: ...n Help Menus Right click on many of the items in the tabs to bring up the What s This button Click the What s This button to bring up the help menu Multiple Display At least one other display must be attached in or der to view Multiple Display selection op tions Figure B 2 Intel Graphics Media Accelerator Driver for mobile Control Panel Tabs ...

Страница 92: ... 6 Browse to the executable file for the application you want to set the scheme for see sidebar and click Open to select it 7 Click Save to save the settings you can click in the Restore the display settings after exiting this application box to return to your original settings when you exit the program 8 Click OK to exit the program 9 You can run the scheme by clicking the taskbar icon and select...

Страница 93: ... may be configured independently Multiple Display Extended Desktop Both connected displays are treated as separate devices and act as a virtual desktop Function Key Combination You can use the Fn F7 key combination to tog gle through the display options Notebook Only External Display Only Notebook External Display Make sure you give the displays enough time to refresh Table B 1 Display Modes Attac...

Страница 94: ...iple Display 4 Click Apply and OK to confirm the settings change 5 Click Display Settings to adjust the settings for the attached devices Multiple Display At least one other display must be attached in or der to view Multiple Display selection op tions BIOS Setting Make sure that you have not disabled external dis play detection in the BIOS if attempting to connect external displays see Detect Ext...

Страница 95: ... mode from the Display Properties control panel see page B 8 Display Settings Extended Desktop You can have different Colors Screen Area and Monitor Refresh Rates for each display device provided your monitor can support them You can drag the moni tor icons to match the physical layout of your displays Icons and pro grams may also be dragged between the displays Figure B 5 Extended Desktop Mode Cl...

Страница 96: ... checked Extend my Windows desktop onto this monitor and click Apply Display Settings Extended Desktop Use the control panel to drag the monitors to match the physical ar rangement you wish to use You can drag any icons or windows across to ei ther display desktop which makes it possible to have one program vis ible in one of the dis plays and a different program visible in the other display Figur...

Страница 97: ...fication Information The specifications listed in this Appendix are correct at the time of going to press Certain items particularly processor types speeds may be changed delayed or updated due to the manufacturer s release schedule Check with your service center for details ...

Страница 98: ...here needed BIOS One 8Mb SPI Flash ROM Phoenix BIOS Storage One Changeable 2 5 9 5 mm h SATA Serial Hard Disk Drive Note It is recommended that HDDs of a speed of 5400 RPM are used DO NOT use 7200rpm HDDs Security Kensington Lock Audio High Definition Audio Compliant Interface Compliant with Microsoft UAA Universal Audio Architecture Direct Sound 3D Compatible 2 Built In Speakers Built In Micropho...

Страница 99: ...te MS Duo Mini SD RS MMC Cards require a PC adapter Slot Two Mini Card Slots USB PCIE Slot 1 for Wireless LAN Module Half Mini Card Power Management Wake On LAN Wake On USB Power Full Range AC DC Adapter AC Input 100 240V 50 60Hz DC Output 19V 1 57A 1 58A 30 Watts Battery Polymer Battery Pack 3550mAh Environmental Spec Temperature Operating 5 C 35 C Non Operating 20 C 60 C Relative Humidity Operat...

Страница 100: ...Specifications C 4 C ...

Страница 101: ...arately The dumping of these devices at unequipped and unauthorized places may have hazardous effects on health and the environment Offenders will be subjected to the penalties and measures laid down by the law The crossed dustbin symbol on the device means that When it to be disposed of the device is to be taken to the equipped waste collection centres and is to be handled separately from urban w...

Страница 102: ...Code 383311Z USER GUIDE ...

Отзывы: