background image

INDEX

CONTENTS

21

3

Button Manager is a utility software to link scanning functions to the SCAN key on the unit. This software enables you to 
set scanning functions to six different scan menus, which will be linked to the SCAN key on the unit.

Reference:

To begin scanning using the unit's operation panel, settings must be established in the Control Panel after the Button Manager 
is installed. For information on installing the Button Manager, establishing the Control Panel settings, and scanning using the 
unit's operation panel, see "USING THE SCANNER MODE" in the Operation Manual.

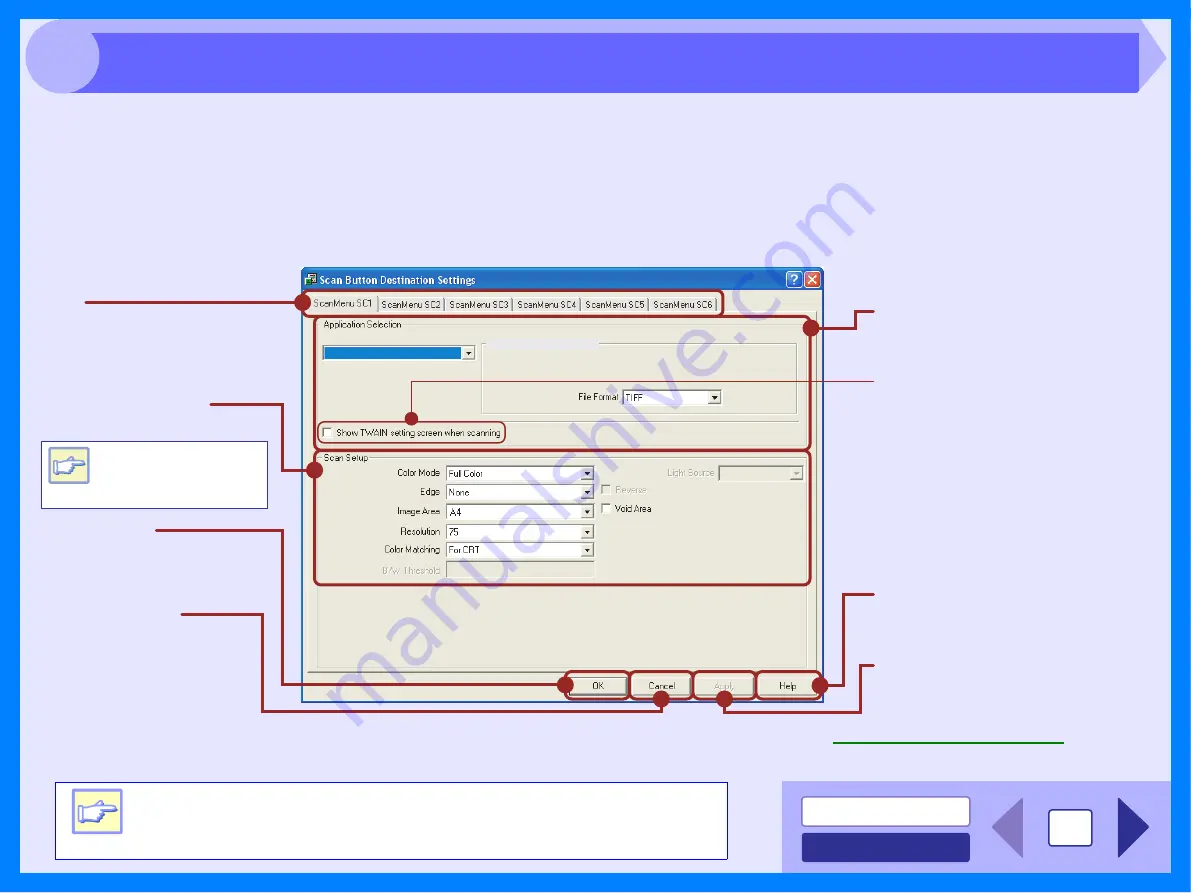
The functions of Button Manager are shown below.

You can specify and change your six scan menu options from five functions. Refer to 

Button Manager Settings

 to 

specify and change the scan menu options.

Tab

Click to set scan menu 
options.

Show TWAIN setting screen 
when scanning

You can select whether or not the 
TWAIN screen is shown. When 
the checkbox is selected, the 
TWAIN screen appears when 
scanning is executed to let you 
adjust the scanning conditions.

"Application Selection" area

Select the start-up application 
here.

"Help" button

Click this button to display the 
help file for Button Manager. 

"Apply" button

Click to save your settings without 
closing the dialog box.

"Cancel" button

Click this button to exit the 
dialog box without making 
any changes to the 
settings.

"OK" button

Click to save your settings, 
and exit the dialog box.

Note

Some applications 
may limit your choice 
of settings. 

"Scan Setup" area

Set the scan conditions.

Desktop Document Manager

Desktop Document Manager

Note

Close the source application before using the SCAN key on the 

unit.

Outline of Button Manager

Содержание d-Copia 201D

Страница 1: ...Start Online Manual d Copia 200D d Copia 201D d Copia 200D d Copia 201D...

Страница 2: ...8 Outline of Button Manager 21 Button Manager Settings 22 Identifying Unit Problems 23 Check the Connection between the Unit and Computer 24 Check Your Computer 25 Plug and Play Screen does not Appear...

Страница 3: ...es of each section You can move to the desired pages by simply clicking its bookmark How to Print Out the Online Manual In order to print out a hard copy of the Online Manual for your reference go to...

Страница 4: ...or multi bypass tray verify that the paper has been loaded before starting printing zEnsure printing has been completed before turning the power off Do not remove the power cord before turning the un...

Страница 5: ...8 Me click the Properties button Reference Printer Driver Settings Printing a Watermark Fitting the Printed Image to the Paper Printing Multiple Pages on One Page Two sided Printing 4 Click the Print...

Страница 6: ...ttings 2 Click Printers and Other Hardware and then click Printers and Faxes On Windows Vista click Printer On Windows XP click Printers 3 Click the Olivetti d Copia 200D 201D printer driver icon and...

Страница 7: ...wn in this image The tray selected in Paper Selection in the Paper tab appears in blue You can also click on a tray to select it Cancel button Click this button to exit the dialog box without making a...

Страница 8: ...b Reference See Basic Printing for details on how to open the printer driver How to Print a Watermark From the Watermark drop down list select the watermark for example CONFIDENTIAL you wish to print...

Страница 9: ...en 2 Select the paper size for the print data from Paper Size 3 Check the Fit To Page box 4 Select the paper size for Fit To Paper Size which corresponds to the size of paper in the unit Now the print...

Страница 10: ...r setup screen select 2 Up or 4 Up for N Up Printing on the Main tab If you select the Border checkbox border lines will be printed on each page Note The N Up Printing setting is not available when Fi...

Страница 11: ...tyle in the Main tab The following example shows the result when portrait data is printed on both sides of the paper Note The multi bypass tray can not be used for two sided printing Printing result P...

Страница 12: ...the print job Document Name Displays the name of the active print job Help button Click this button to display help file for the Print Status Window Status icon This icon informs you of the print stat...

Страница 13: ...computers that are connected to the machine by a USB cable If you are connected to the machine by a LAN connection only the printer function can be used Place the original in the scanning position Re...

Страница 14: ...menu and select Select Scanner 3 Select Olivetti MFP TWAIN P and click the Select button Desktop Document Manager Note zIf you are using Windows XP Vista you can also select WIA Olivetti d Copia 200D...

Страница 15: ...ress the Esc key on your keyboard When you close the scanner driver after scanning the image data will appear as a new file in Desktop Document Manager Note zIf the rotation or angle of the image is d...

Страница 16: ...ton Previews the document Scan button Click to scan an original or image according to your preferences Before clicking the Scan button check if your preferences are set correctly Select SPF when you p...

Страница 17: ...ew screen Rotate button Each time this button is clicked the preview image rotates 90 degrees This lets you change the orientation of the image without picking up and placing the original again The im...

Страница 18: ...on on setting an original for scanning refer to ORIGINAL PLACEMENT in the Operation Manual 2 After starting Paint click the File menu and select From Scanner or Camera The scan screen of the WIA drive...

Страница 19: ...scanned image and save the image To cancel your scanning job after clicking the Scan button click the Cancel button Note zIf you select Document Feeder for the Paper source and click the Preview butt...

Страница 20: ...information on setting an original for scanning refer to ORIGINAL PLACEMENT in the Operation Manual 2 Click the Start button click Control Panel click Printers and Other Hardware and then click Scann...

Страница 21: ...mat and folder for saving the image and then click the Next button JPG BMP TIF or PNG can be selected for the format To begin scanning click the Next button Note zIf you select Document Feeder for the...

Страница 22: ...orm and then click the Next button If you are ready to end the session click Nothing I m finished working with these pictures 8 Click the Finish button The Scanner and Camera Wizard closes and the sca...

Страница 23: ...Settings to specify and change the scan menu options Tab Click to set scan menu options Show TWAIN setting screen when scanning You can select whether or not the TWAIN screen is shown When the checkbo...

Страница 24: ...Mode Edge and other scan settings in the Scan Setup area Reference Outline of Button Manager 6 Click the OK button You have completed the settings Note If the Button Manager icon does not appear on th...

Страница 25: ...ed if the unit is connected to your computer with a USB cable Check Your Computer Plug and Play Screen does not Appear when the USB is connected Failed to Install the Driver Windows 2000 XP Check the...

Страница 26: ...ed through the same hub disconnect them to see if the problem still exists If the USB cable becomes disconnected If the USB cable becomes disconnected even only once during the unit s operation then p...

Страница 27: ...sk If there is insufficient memory close unnecessary applications to increase memory available for printing or scanning If you are still unable to print or scan install more memory into your computer...

Страница 28: ...rial Bus controllers Two items will display your Controller chipset type and Root Hub If these items appear you can use the USB port If the Universal Serial Bus controllers shows a yellow exclamation...

Страница 29: ...hen click System On Windows 2000 double click the System icon 3 Click the Hardware tab and then click the Driver Signing button The following dialog box will open 4 Check the What action do you want W...

Страница 30: ...an be used in the multi bypass tray CHECK 4 Is it near time to replace the toner developer cartridge or drum cartridge When it is near time to replace the toner developer cartridge or drum cartridge t...

Страница 31: ...age Orientation option is set to your requirements CHECK 3 Is the paper loaded correctly If a document is physically damaged when it is output or the image is skewed on the paper discard the damaged s...

Страница 32: ...or printing CHECK 3 Is your unit selected correctly in the current application for the print job When choosing Print from the File menu located in applications be sure you have selected Olivetti d Co...

Страница 33: ...N compliant application and are using Mono 2 gradation no Green Mono 2 gradation no Red or Mono 2 gradation no Blue mode make sure that a suitable value is specified for the B W Threshold setting A la...

Страница 34: ...or the detail on how to set the original CHECK 2 Have you set the original correctly on the document glass Place the original on the document glass in the direction as shown in the illustration below...

Страница 35: ...ld the document you want to scan Lower the scan resolution CHECK 5 Has the specified period of program timeout already elapsed Neither printing nor scanning jobs can be sent to the unit from your comp...

Страница 36: ...ck Add or Remove Programs On Windows 98 Me 2000 double click the Add Remove Programs icon The following dialog box will open Delete the Olivetti d Copia 200D 201D Series MFP driver and the Olivetti Bu...

Страница 37: ...le 1 Sided 2 Sided Book 2 Sided Tablet 1 Sided User Settings Factory Defaults User Settings Setting Name Up to seven names 20 characters each Paper Paper Size A3 Fit To Page 1 A4 A5 A6 B4 Fit To Page...

Страница 38: ...to Normal 2 Gradation Print On Off Off Image Adjustment Brightness 0 to 100 50 Contrast 0 to 100 50 Watermarks Watermark None TOP SECRET CONFIDENTIAL DRAFT ORIGINAL COPY None Text Size 6 to 300 200 An...

Страница 39: ...RL Enter the IP address previously configured in the machine Example If the IP address is 192 168 1 43 When the connection is completed the Web page will appear in your Web browser Note zTo access the...

Страница 40: ...settings If you wish to cancel the new settings click the Reset button d Copia 200D 201D NIC Setup Note If a message appears prompting you to enter your user name and password enter admin for the user...

Страница 41: ...TWAIN driver 14 WIA driver 17 Preview Screen 15 Print 2 Print Status Window 10 Printer Driver Features 35 Printer Driver Settings 5 Printing a Watermark 6 Printing Overview 2 S Scan 11 Scan button TW...

Страница 42: ...d Copia 200D_d Copia 201D_v1...

Отзывы:

Похожие инструкции для d-Copia 201D