background image

d-Color MF 651/551/451 (Version 2)

3-7

3.2

Configuring the basic settings

3

3.2.2

Paper

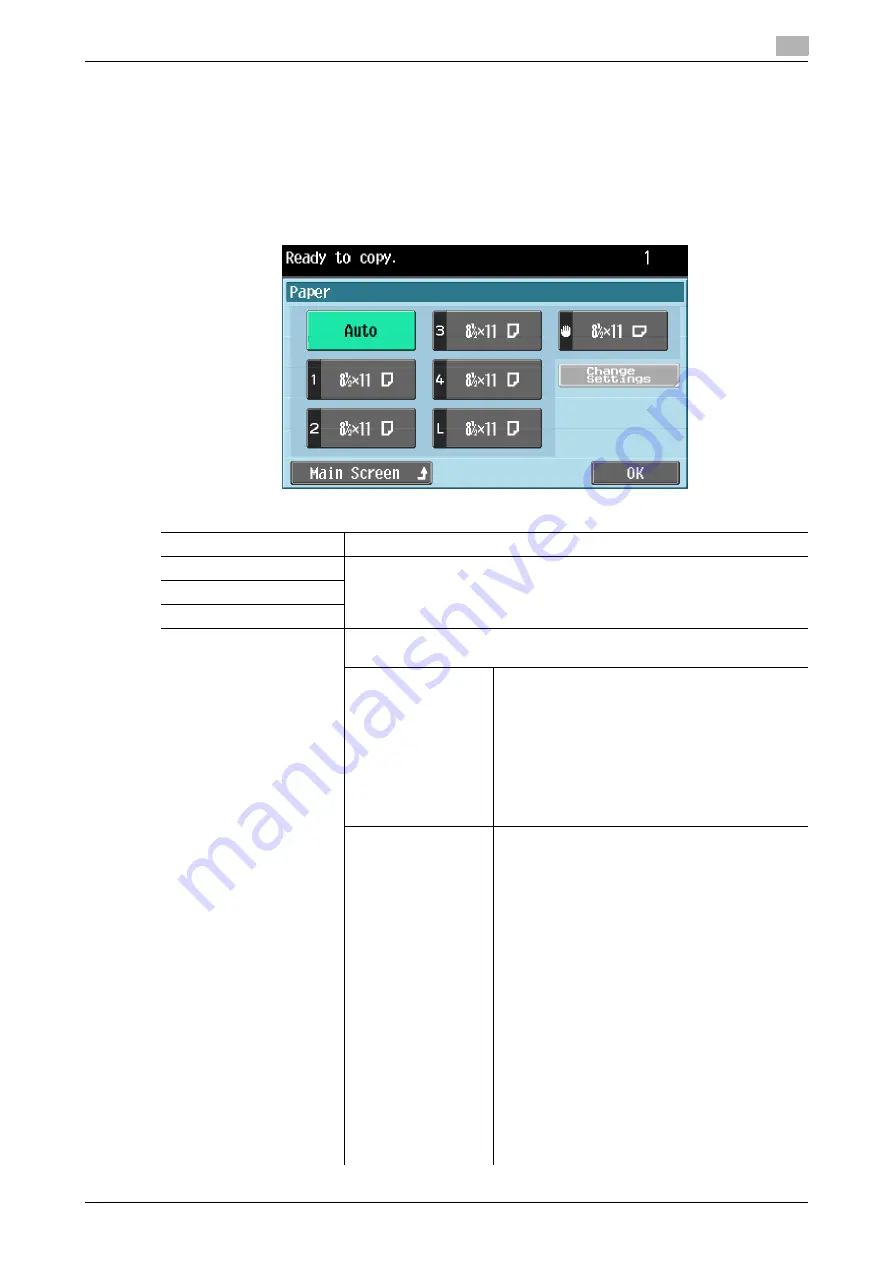
Select the paper type and size to be printed or change the paper size and paper type settings configured for 
each paper tray.

0

When you select [Transparency], specify [Black] for [Color] in advance.

0

The auto zoom setting and the auto paper setting cannot both be selected at the same time.

0

Be sure to specify the paper type when special paper is loaded into a paper tray.

%

Press [Basic] 

ö

 [Paper].

Settings

Auto

The paper size is automatically selected according to the original size.

Trays 1 - 4

Select the corresponding try button to manually select the desired paper.

L (Optional LCT)

#

 (Bypass tray)

Change Settings

Press this button to specify the paper type and size for the selected paper 
tray.

Paper Type

Press this button to specify the paper type for the 
selected paper tray. There are limits on the types 
of paper that can be loaded in a paper tray.

A paper tray with the "Single Side Only" set-
ting selected is given priority when the single-
side printing is specified.

[Duplex 2nd Side] (only for Bypass Tray): Se-
lect this setting in combination with the paper 
type to print on paper with data printed on one 
side.

Paper Size

When you have selected Tray 1/2 or Bypass Tray, 
press this button to specify the paper size.

[Auto Detect]: The paper size is automatically 
detected.

[12-1/4 

e

 18

 w

] (Tray 1/2 only): Select 12-1/4 

e

 18 

w

 for Paper Size.

[Inch Sizes] (only for Bypass Tray): Select the 
loaded paper size from the standard inch siz-
es.

[Metric Sizes] (only for Bypass Tray): Select 
the loaded paper size from the standard met-
ric sizes.

[Other] (only for Bypass Tray): Select the load-
ed paper size from the standard sizes other 
than the standard metric and inch sizes.

[Custom Size] (only for Bypass Tray): Select 
the loaded paper size from the registered cus-
tom sizes.
The Custom Size settings cannot be config-
ured when no custom size is registered.

[Wide Paper] : The paper size larger than the 
original size can be selected.

Содержание d-color MF451

Страница 1: ...ENLARGE DISPLAY OPERATIONS d Color MF651 558901en GB d Color MF451 d Color MF551...

Страница 2: ...uld compromise the conformity attested to above as well as the characteristics of the product incorrect electrical power supply incorrect installation incorrect or improper use or use not in complianc...

Страница 3: ...py and Fax Scan 2 6 Copy 2 6 Fax Scan 2 6 2 1 3 Utility Counter 2 7 Default Enlarge Display Settings 2 7 2 1 4 Mode Memory 2 8 2 1 5 Accessibility 2 9 2 1 6 Enlarge Display 2 11 Icon 2 11 2 1 7 Access...

Страница 4: ...g the destinations 4 6 4 2 1 Address Book 4 7 4 2 2 Job History 4 7 4 2 3 Address Search 4 9 4 2 4 Fax Number 4 10 4 3 Scan Settings 4 11 4 3 1 Simplex Duplex 4 11 4 3 2 Original Type 4 12 4 3 3 Resol...

Страница 5: ...1 Introduction...

Страница 6: ......

Страница 7: ...s and the settings of this machine Specifications of originals and copy paper Copy function Maintaining this machine Troubleshooting Enlarge Display Operations This manual describes details on operati...

Страница 8: ...s to perform maintenance work or troubleshooting operations Limit your maintenance and troubleshooting operations to the areas explained in this manual Should you experience any problems please contac...

Страница 9: ...may lead to mishandling that may cause injury or property damage NOTICE This symbol indicates a risk that may result in damage to this machine or documents Follow the instructions to avoid property da...

Страница 10: ...or power switch etc 1 2 2 Original and paper indications Original and paper sizes The following explains the indication for originals and paper described in this manual When indicating the original o...

Страница 11: ...2 Before use...

Страница 12: ......

Страница 13: ...use Copy mode and 4 How to use Fax Scan mode d Reference For details on the name and function of each component in the control panel refer to the User s Guide Copy Operations and the User s Guide Net...

Страница 14: ...data or unprinted fax data 13 C clear Press this key to clear a value such as the number of copies and a zoom ratio entered using the keypad p 2 12 14 Keypad Use the keypad to enter the number of cop...

Страница 15: ...angle NOTICE Do not adjust the control panel in the horizontal direction while directly holding the touch panel Pull the control panel release lever toward you and then slowly move the control panel...

Страница 16: ...screen for any warnings or other messages Stop To temporarily stop the copy scan or print operation press the Stop key The operation temporarily stops To resume a temporarily stopped job press the St...

Страница 17: ...n configure the default enlarge display settings in User Settings Default Enlarge Display Settings The default settings for Copy mode or Fax Scan mode can be configured 0 Display the enlarged display...

Страница 18: ...g the standard screen in advance 0 For details on registering programs refer to User s Guide Network Scan Fax Network Fax Operations Display the Fax Scan screen and then press the Mode Memory key Sett...

Страница 19: ...ligned with the actual position of the touch sensor Adjust the display position of the touch panel The touch sensors are not aligned in the touch panel if pressing Touch Panel Adjustment does not acti...

Страница 20: ...is invoked in the enlarge display mode to reset the setting to the default Press the corresponding button in the touch panel or press the 4 key on the keypad To display a selection screen select the l...

Страница 21: ...om the machine by pressing the Access key For the necessary settings to log in to the machine contact your administrator of this machine How to log in when the authentication settings are configured 0...

Страница 22: ...uthentication is performed when a user logs in to this machine allowing this machine to be used only by a specific registered user User Name Enter the user name User Name List Press this button to dis...

Страница 23: ...original is scanned and a single proof copy is printed If the original is placed on the original glass pressing Finish the Start key outputs one copy 3 Check the proof copy To change the copy settings...

Страница 24: ...e original is toward the back side of the machine Do not stack originals exceeding the mark If the document is loaded in any orientation other than with the top of the document toward the back of the...

Страница 25: ...3 How to use Copy mode...

Страница 26: ......

Страница 27: ...ion for making copies 1 Press the Copy key and then the Enlarge Display key on the control panel The enlarged display screen for Copy mode appears 2 Load the original For details refer to page 2 14 3...

Страница 28: ...ow The setting configured last is given priority The setting configured first is canceled The setting configured first is given priority A warning message appears In User Settings you can select to di...

Страница 29: ...9 Duplex Combine Press this button to configure the double sided copy and combined copy settings p 3 10 Finishing Press this button to select the settings for sorting and the finishing state of copie...

Страница 30: ...and print all areas determined to be black in black The colors used for the areas printed in color are red yellow blue green cyan and magenta Black Select this setting to print the copy in black and...

Страница 31: ...aper that can be loaded in a paper tray A paper tray with the Single Side Only set ting selected is given priority when the single side printing is specified Duplex 2nd Side only for Bypass Tray Se le...

Страница 32: ...o the basic settings screen with the changed settings applied Indicates that very little paper remains in the paper tray Indicates that there is no paper in the paper tray Single Side Only Special Pap...

Страница 33: ...d paper size Full Size A copy that is the same size as the original 100 is produced Enlarge Select the desired zoom ratio from the preset enlargement ratios to pro duce an enlarged copy Reduce Select...

Страница 34: ...be specified Also multiple pages of original images can be combined and printed on a single page Using these functions helps to reduce the number of sheets of paper Press Basic Duplex Combine Setting...

Страница 35: ...inishing When the finisher punch kit or saddle stitcher is installed Reference The displayed window varies depending on the installed options Original Direction When scanning double sided originals or...

Страница 36: ...her each set of copies in the output tray is separated from another set If no finisher or separator JS 504 is installed If the following conditions are met printed copies are fed out and sort ed in an...

Страница 37: ...position along the long side of the paper is selected if the original length is 11 11 16 in 297 mm or less A staple or punch position along the short side of the paper is selected if the original len...

Страница 38: ...Rotate OFF You can copy the original according to the paper orientation without rotating the image Press Basic Auto Rotate OFF To cancel the setting press Auto Rotate OFF again to deselect it Z Fold S...

Страница 39: ...pe Select the setting for the image type of the original to better adjust the copy quality p 3 16 Original Direction When copying double sided originals or making double sid ed or combined copies pres...

Страница 40: ...the page margin at the left Top Select this setting if the original is loaded with the page margin at the top Right Bind Select this setting if the original is loaded with the page margin at the right...

Страница 41: ...copying originals containing only photos half tones Photo Paper This setting is suitable when the photos on the originals are printed on photographic papers Select this setting to produce better repro...

Страница 42: ...side of this machine Select this setting for an original placed on the original glass with the top of the original toward the left side of this machine Main Screen Press this button to return to the b...

Страница 43: ...ch time this button is pressed the background density is lightened by one level Standard Press this button to select the third level from the right default Dark Each time this button is pressed the ba...

Страница 44: ...he scanning order 3 Press Original Density Mixed Original To cancel the setting press Mixed Original again to deselect it d Reference For details on combinations of standard paper available for mixed...

Страница 45: ...4 How to use Fax Scan mode...

Страница 46: ......

Страница 47: ...menu and configure the fax and network settings and register addresses in Administrator Settings in advance For details refer to the User s Guide Network Administrator and the User s Guide Network Sca...

Страница 48: ...are combined improperly the settings will be given priorities in either of the two ways described below The setting configured last is given priority The setting configured first is canceled The sett...

Страница 49: ...receiv ing the data in advance WebDAV In a network environment that contains a Web DAV server send scanned data to the specified folder in the WebDAV server WebDAV which is an extension to the HTTP s...

Страница 50: ...de Network Scan Fax Network Fax Operations Off Hook is not used for Internet fax or IP fax If Confirm Address TX is specified in the Administrator Settings Off Hook cannot be used If the optional secu...

Страница 51: ...on by specifying the transmission method or destination name as search criteria Address Type Search for the desired destination based on the trans mission method You can select group destinations Inde...

Страница 52: ...Version 2 4 2 Scan Settings Configure various settings for scan operations For details refer to page 4 11 Dest Settings The selected destinations appear allowing you to check the destinations before...

Страница 53: ...Search Search Press Address Search Advanced Search Reference If multiple LDAP servers are registered select the server to be searched Authentication may be necessary depending on the LDAP server setti...

Страница 54: ...se telephone line press this button for gen erating push button tones Use this function when using fax informa tion services When you press this button T appears on the screen From the dialing pulse t...

Страница 55: ...the con tent of the original to be scanned p 4 12 Resolution Select the scan resolution of the original p 4 13 Density Adjust the scan density of the original p 4 14 File Type Select the file type use...

Страница 56: ...inals containing text only Dot Matrix Original Appropriate for scanning originals with text that appears faint such as that written with a pencil Copied Paper Appropriate for scanning originals with a...

Страница 57: ...ven when you have selected 600 e 600 dpi Ultra Fine or 400 e 400 dpi Super Fine when sending a fax if the recipient machine is not capable of receiving data with the specified resolution the resolutio...

Страница 58: ...fax or Internet fax transmissions Press Scan Settings File Type Settings Light Each time this button is pressed the density is lightened by one level Std Press this button to reset the density to the...

Страница 59: ...of the scanned original You cannot select this setting and the JPEG file type at the same time Page Separation Select this setting to send multiple files each containing the specified pag es of the s...

Страница 60: ...though the paper width specified in the recipient s fax machine is smaller than the original size Press Scan Settings Scan Size Settings Auto Select this setting to detect the size of the first page...

Страница 61: ...ed Removal Paper Discoloration Adj Select this setting to adjust the background density such as when the orig inal to be scanned has a colored background Background Removal Lev el Light Each time this...

Страница 62: ...elect this setting for an original loaded with the top toward the back of this machine Select this setting for an original loaded with the top toward the front of this machine Select this setting for...

Страница 63: ...or left of the original A page margin position along the long side of the original is selected if the original length is 11 11 16 in 297 mm or less A page margin position along the short side of the...

Страница 64: ...ion Settings The configured destinations and their registration types are displayed in a list format Details Select a destination and then press Details to display the details of the se lected destina...

Страница 65: ...5 Index...

Страница 66: ......

Страница 67: ...larging display 2 11 Entering fax numbers 4 10 F Fax scan 2 6 Fax scan operation 4 3 File type 4 14 Finishing 3 11 G Group 3 11 I Icon 2 11 J Job history 4 7 L LDAP address search 4 9 Loading original...

Страница 68: ...2 10 Density 3 18 4 14 Destination Settings 4 20 Details 4 20 Dot Matrix Original 3 16 4 12 Duplex 2nd Side 3 7 Duplex Combine 3 10 E Enlarge 3 9 Enlarge Display 2 11 Enlarge Display Mode Confirmation...

Страница 69: ...Size 4 16 Search 4 9 Server Name 2 12 Set Zoom Ratio 3 9 Simplex Duplex 4 11 Staple Punch 3 13 Start 2 6 Stop 2 6 System Auto Reset Confirmation 2 10 T Text 3 16 4 12 Text Photo 3 17 4 12 TIFF 4 14 T...

Страница 70: ...Index by button 5 5 6 d Color MF 651 551 451 Version 2 5 2...

Страница 71: ...you need and the instructions for handling the waste correctly for example location and times of the waste collection centres etc b When you purchase a new device of ours give a used device similar t...

Отзывы: