


13
Web Connection
13-10
d-Color MF350/250/201Plus
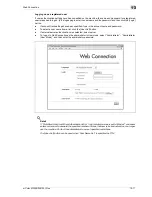
13.2.3
Login
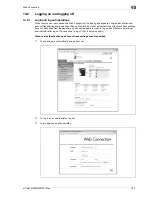
Depending on the logon method used, Web Connection will be in User mode or Administrator mode.
Depending on user authentication or user box administrator setting, it is possible to log on to Web
Connection as a an administrator or user box administrator in User mode.
!
Detail
If control panel settings have been specified to allow user box administrators, it is possible to log on to
Web Connection as a user box administrator. For details on the user box administrator settings,
permissions and password settings, refer to the User manual – Box Operations.
If you log in to Web Connection as an administrator in the User mode, it is possible to delete jobs that
cannot be done so in the Administrator mode.
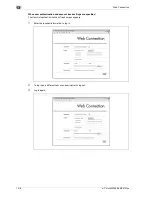
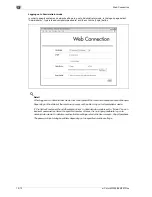
Options that can be selected when logged on to Web Connection
If necessary, select the display language and format.
If "When in warning, the dialog is displayed." check box is selected, warning messages appear during
operation after logon.
If "Flash" is selected as the display format, the following items are displayed using Flash.
-
Status icons and messages
-
Status of "Paper Tray" in the page displayed when "Device Information" is selected on the Information
tab
-
Page display of the Job List tab
Flash Player is required in order to use the "Flash" features.
If screen reader software is used, we recommend selecting "HTML" as the display format. In an IPv6
environment, select "HTML".
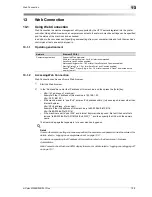
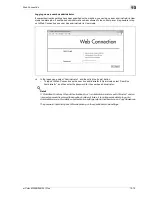
Logging on as a public user
If user authentication settings have not been specified on the machine, logon will be as a public user. In the
logon page, select "Public user", and then click the [Login] button.
Содержание D-color MF 250 Plus
Страница 8: ...Content 8 d Color MF350 250 201Plus...
Страница 9: ...1 Introduction...
Страница 10: ......
Страница 15: ...2 Overview of printer functions...
Страница 16: ......
Страница 24: ...2 Overview of printer functions 2 10 d Color MF350 250 201Plus...
Страница 25: ...3 Precautions for installation...
Страница 26: ......
Страница 31: ...4 Installation using the Add Printer wizard...
Страница 32: ......
Страница 58: ...4 Installation using the Add Printer wizard 4 28 d Color MF350 250 201Plus...
Страница 59: ...5 Installation on Macintosh computers...
Страница 60: ......
Страница 72: ...5 Installation on Macintosh computers 5 14 d Color MF350 250 201Plus...
Страница 73: ...6 Installation to use NetWare...
Страница 74: ......
Страница 76: ...6 Installation to use NetWare 6 4 d Color MF350 250 201Plus...
Страница 77: ...7 Uninstalling the printer driver...
Страница 78: ......
Страница 81: ...8 Print functions of the PCL PS drivers for Windows...
Страница 82: ......
Страница 104: ...8 Print functions of the PCL PS drivers for Windows 8 24 d Color MF350 250 201Plus...
Страница 105: ...9 Print function of Mac OS X...
Страница 106: ......
Страница 128: ...9 Print function of Mac OS X 9 24 d Color MF350 250 201Plus...
Страница 129: ...10 Print function of Mac OS 9 2...
Страница 130: ......
Страница 139: ...11 Function detail description...
Страница 140: ......
Страница 180: ...11 Function detail description 11 42 d Color MF350 250 201Plus...
Страница 181: ...12 Settings on the control panel...
Страница 182: ......
Страница 224: ...12 Settings on the control panel 12 44 d Color MF350 250 201Plus...
Страница 225: ...13 Web Connection...
Страница 226: ......
Страница 249: ...d Color MF350 250 201Plus 13 25 Web Connection 13 13 4 6 Network...
Страница 251: ...14 Troubleshooting...
Страница 252: ......
Страница 257: ...15 Appendix...
Страница 258: ......
Страница 261: ...d Color MF350 250 201Plus 15 5 Appendix 15 15 2 Configuration page GENERIC 35C 4...
Страница 262: ...15 Appendix 15 6 d Color MF350 250 201Plus 15 3 Font list 15 3 1 PCL Font List GENERIC 35C 4...
Страница 263: ...d Color MF350 250 201Plus 15 7 Appendix 15 15 3 2 PS Font List GENERIC 35C 4...
Страница 264: ...15 Appendix 15 8 d Color MF350 250 201Plus 15 3 3 Demo page...
Страница 271: ...16 Index...
Страница 272: ......
Страница 276: ...16 6 d Color MF350 250 201Plus 16 Index...