- 72 -
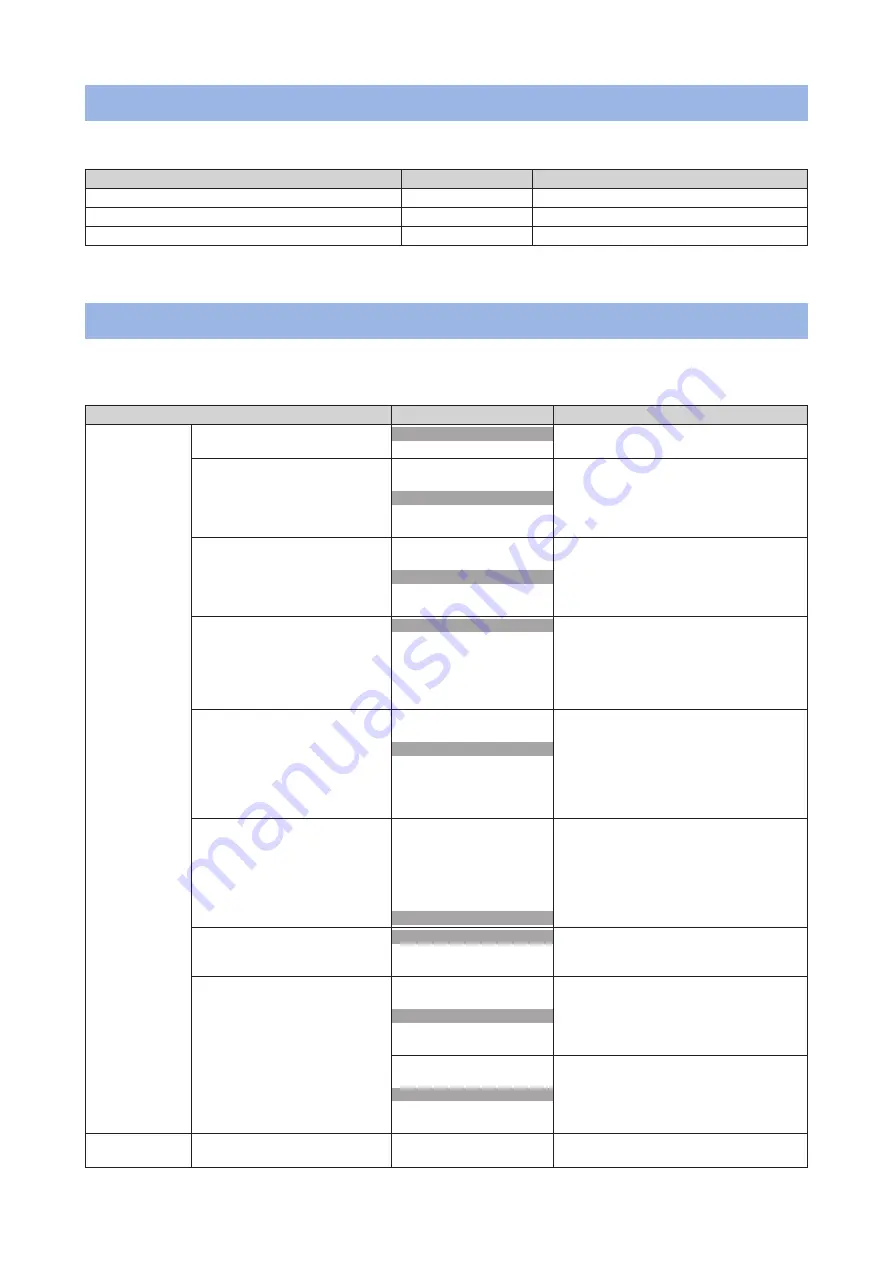
PRINT INFO
You can print information about this machine.
Item
Setting value
Description
CONFIGURATION
EXECUTE
Prints the configurations of the printer.
PRINT FILE LIST
EXECUTE
Prints the file list.
PRINT ERROR LOG
EXECUTE
Prints the error log.
MENUS
These are settings related to printing and machine operation.
The shaded settings are the factory default settings.
Item
Setting value
Description
FEEDER CONFIG
PAPER FORM
CONTINUOUS PAPER
CUT PAPER
Sets the paper form.
X DIMENSION
25.0 MM
-
74.0 MM
-
86.0 MM
Sets the paper width.
Y DIMENSION
53.0 MM
-
210.0 MM
-
551.0 MM
Sets the paper length.
MEDIATYPE
PLAIN
USERTYPE1
USERTYPE2
USERTYPE3
USERTYPE4
USERTYPE5
Sets the paper type.
*
USERTYPE 1-5 will be displayed when
registered.
MEDIAWEIGHT
LIGHT
MEDIUM LIGHT
MEDIUM
MEDIUM HEAVY
HEAVY
ULTRA HEAVY1
ULTRA HEAVY2
Sets the paper weight.
CUT TYPE
B/M (FRONT)
B/M (BACK)
SIDE HOLE
CENTER HOLE
NOTCH
GAP
LENGTH
Set the type of mark to be used as a
reference when cutting paper.
GAP LENGTH
3.0 MM
-
13.0 MM
No change is needed if you print on Plain
paper.
CUT POSITION SET
-6.5 MM
-
0.0 MM
-
+551.0 MM
Sets the cut position for paper with a
black mark.
-6.5 MM
-
0.0 mm
-
+6.5 MM
Sets the cut position for paper with a
hole and gap.
SENSOR
CONFIG
SENSOR CALIBRATION
EXECUTE CALIBRATION
Executes the paper sensor adjustment.
Содержание PRO330S
Страница 1: ...User s Manual...
Страница 14: ...Unpacking 2 Unpacking 15 Checking the accessories 16 Installing consumables 18...
Страница 102: ...102 8 Close the feeder cover...
Страница 151: ...151 8 Remove the toner cover 9 Close the top cover 10 Open the toner cartridge cover...
Страница 153: ...153 15 Turn on power of the machine For details on how to turn on the power refer to Turning the power on Page 34...
Страница 162: ...162 8 Close the top cover...
Страница 172: ...172 15 Close the top cover...
Страница 178: ...178 7 Install the image drum back to the machine 8 Close the top cover...
Страница 182: ...182 11 Close the top cover...
Страница 254: ...254 5 Click Backup settings 6 Input the folder name select the folder to save the le and click Save...
Страница 263: ...263 10 Input the admin password and click OK 11 Con rm the setting result and click Back...
Страница 266: ...266 11 Con rm the setting result and click Back...
Страница 280: ...EE8001 2750Z002 Rev1...


