


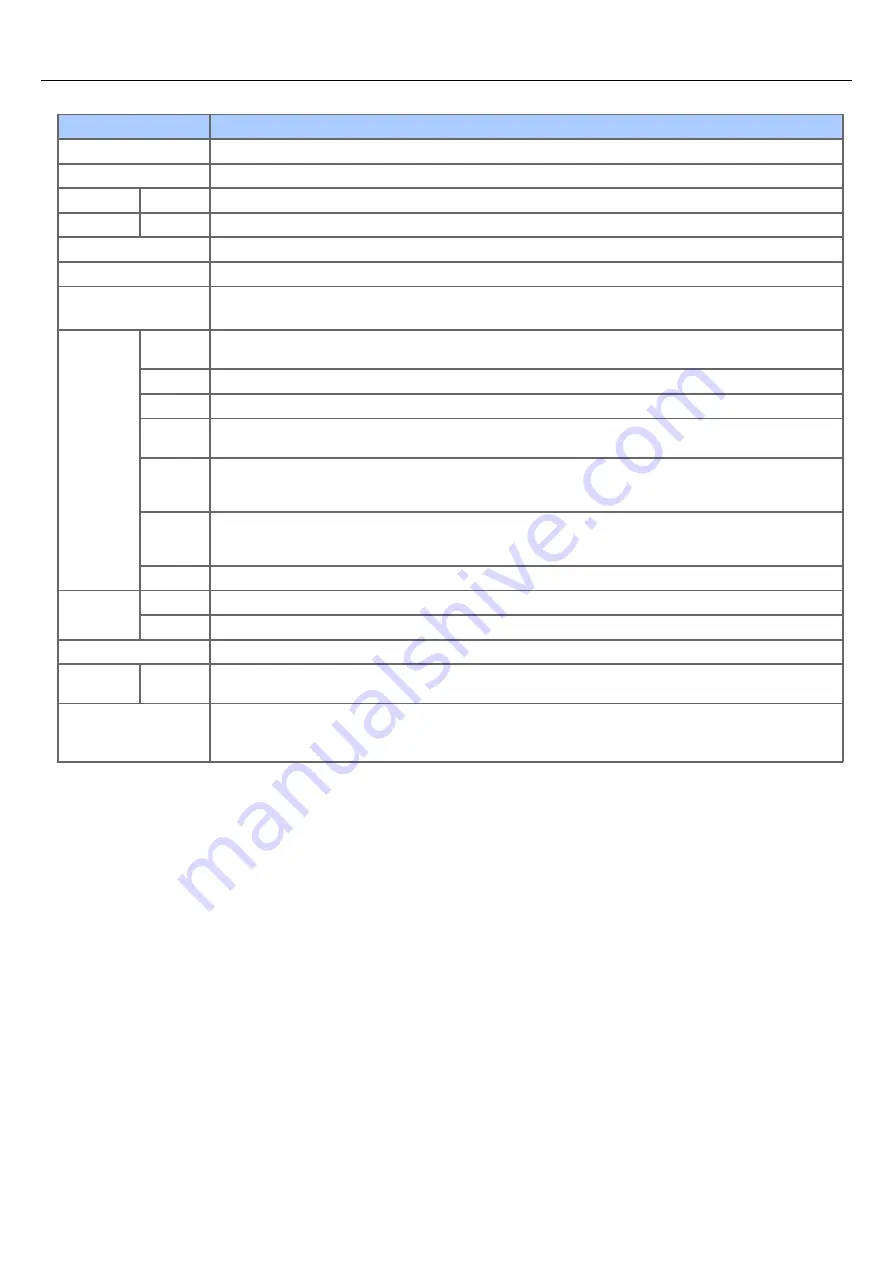
General Specifications
Item
MB472
MB472dn/MB472dnw
N22502A, N22502B
CPU
MF2 667MHz
Memory
Resident
512 MB
ROM
Controller 3.0 GB
Weight
20 kg (including consumables)
Dimensions
427 (W) x 425 (D) x 455 (H) mm
Power supply
N22502A: 120V AC ± 10%, 50/60Hz ± 2%
N22502B: 220V AC ± 10%, 50/60Hz ± 2%
Power
consumption
Typical
operation
600 W
Idle
95 W
Peak
950 W
Sleep
mode
Less than 10 W (Wireless LAN enable)
Deep
Sleep
mode
Less than 1.9 W (Wireless LAN disable)
Power
save
mode
Less than 10 W
Off mode
Less than 0.5 W
Operating
condition
Operating
Temperature: 10 - 32℃, humidity: 20 - 80% RH
Idle
Temperature: 0 - 43℃, humidity: 10 - 90% RH
Interface
USB 2.0 (Hi-Speed), Ethernet 10BASE-T/100BASE-TX/1000BASE-T
Display
Graphics
panel
84.1 (W) x 33.6 (H) mm, 320 x 128 dots
Supported OS
Windows 8.1/Windows Server 2012 R2/Windows 8/Windows Server
2012/Windows 7/Windows Vista/Windows Server 2008 R2/Windows Server 2008/Windows Server 2003
Mac OS X 10.6.8 to 10.9.0
1118
Содержание MB472dn
Страница 1: ...User s Manual MB472dn MB472dnw 2015 03 45822152EE02 ...
Страница 25: ...Horizontal 24 ...
Страница 29: ...28 ...
Страница 42: ...41 ...
Страница 68: ...Scanning Data to a Computer Scan to PC Registering a Computer That is Connected 67 ...
Страница 103: ...5 Start a scan program on the computer 6 Click a scan button in the scan program Scanning starts 102 ...
Страница 150: ...6 Click Scan 7 Exit Windows FAX and Scan 149 ...
Страница 170: ...169 ...
Страница 181: ...180 ...
Страница 190: ...189 ...
Страница 198: ...197 ...
Страница 209: ...5 Click Cancel Topics Printing with Registered Settings 208 ...
Страница 213: ...4 Change other settings if necessary and then click Print Printing starts 212 ...
Страница 215: ...Specifying the Font to Use Print Using the Printer Fonts Print Using the Fonts of Computer 214 ...
Страница 221: ...Printing starts To cancel the print job select Delete All the encrypted jobs with the same password are deleted 220 ...
Страница 225: ...6 Follow the on screen instructions to set detailed settings 7 Click Submit 224 ...
Страница 233: ...232 ...
Страница 248: ...Printing with Google Cloud Print 247 ...
Страница 265: ...3 Select OKI MB472 from Printer 4 Set options 5 Click Print 264 ...
Страница 273: ...Receiving a Fax This section describes how to check the received fax About Reception Modes Printing a Received Fax 272 ...
Страница 283: ...Selecting from the Transmission History and Reception History 282 ...
Страница 290: ...289 ...
Страница 303: ...302 ...
Страница 308: ...2 Enter a fax number Using Direct Entry 3 Select Enter and then press OK 307 ...
Страница 328: ...12 To continue deleting another number repeat the procedure from step 9 327 ...
Страница 342: ...9 Press START Transmission starts 341 ...
Страница 364: ...Sending an Internet Fax 363 ...
Страница 377: ...10 Click Print 11 Specify a destination Using Direct Entry Selecting from the Phone Book 12 Click OK 376 ...
Страница 401: ...No Name 14 Facedown stacker 400 ...
Страница 404: ...Basic Operations on the Operator Panel Names and Functions Entering Characters 403 ...
Страница 409: ...408 ...
Страница 412: ...Checking the Device Information and Status Checking the Device Information and Status Reports 411 ...
Страница 438: ...437 ...
Страница 495: ...15 Close the scanner unit 494 ...
Страница 501: ...9 Close the top cover 10 Close the scanner unit 500 ...
Страница 505: ...9 Close the top cover 10 Close the scanner unit 504 ...
Страница 507: ...4 Open the scanner unit 5 Press the top cover open button 6 Open the top cover 506 ...
Страница 508: ...7 Close the top cover 8 Close the scanner unit 507 ...
Страница 534: ...533 ...
Страница 548: ...The Entire Page is Printed Black Cause Solution Reference The machine may be malfunctioning Contact your dealer 547 ...
Страница 563: ...562 ...
Страница 570: ...569 ...
Страница 576: ...575 ...
Страница 609: ...Search Memo indicates the factory default setting 608 ...
Страница 614: ...AirPrint AirPrint Enable Memo indicates the factory default setting 613 ...
Страница 643: ...642 ...
Страница 652: ...CSV files exported from Outlook Express Windows Mail and Windows Live Mail can also be restored 651 ...
Страница 654: ...Memo CSV files exported from Outlook Express Windows Mail and Windows Live Mail can also be restored 653 ...
Страница 669: ...9 Click OK 668 ...
Страница 704: ...Quitting Network Card Setup 1 Select Quit from the File menu of Network Card Setup 703 ...
Страница 709: ...13 Restart the machine 708 ...
Страница 712: ...711 ...
Страница 734: ...733 ...
Страница 738: ...737 ...
Страница 752: ...751 ...
Страница 755: ...5 Push the tray back into the machine 6 Close the tray 754 ...
Страница 759: ...5 Wipe the lens of the LED head with a soft tissue paper lightly 6 Close the top cover 7 Close the scanner unit 758 ...
Страница 780: ...Side view Side view if the second tray unit is installed 779 ...
Страница 786: ...19 Close the scanner unit 785 ...
Страница 809: ...Topics Checking That Connection is Established Correctly 808 ...
Страница 815: ...5 Insert the other end of the LAN cable into the hub 6 Turn the machine on 814 ...
Страница 819: ...818 ...
Страница 823: ...The IP address is set to this machine and this machine automatically restarts 822 ...
Страница 826: ...The IP address is set to this machine and this machine automatically restarts 825 ...
Страница 847: ...846 ...
Страница 849: ...848 ...
Страница 874: ...6 Click New E mail Address 7 Enter an e mail address and then click OK 8 Click Save to device 873 ...
Страница 876: ...6 Click New Group 7 Register a group and then click OK 8 Click Save to device 875 ...
Страница 888: ...13 Click Setup 14 Enter the administrator password of this machine and then click OK 887 ...
Страница 891: ...13 Click Setup 14 Enter the administrator password of this machine and then click OK 890 ...
Страница 912: ...Setting Scan to E mail Without Using the Software DVD ROM Using the Software DVD ROM For Windows 911 ...
Страница 920: ...Topics Registering a Destination Profile Using Scan to Shared Folder 919 ...
Страница 943: ...12 Enter the password for this machine and then click OK 13 When a completion message is displayed click OK 942 ...
Страница 946: ...12 Enter the password for this machine and then click OK 13 When a completion message is displayed click OK 945 ...
Страница 954: ...Memo In the case of direct interconnection separate construction work is required Contact your telephone company 953 ...
Страница 961: ...12 Press until the top screen is displayed 960 ...
Страница 963: ...14 Press until the top screen is displayed 962 ...
Страница 974: ...973 ...
Страница 982: ...The fax information is set to this machine 981 ...
Страница 985: ...The fax information is set to this machine 984 ...
Страница 991: ...990 ...
Страница 994: ...993 ...
Страница 1048: ...1047 ...
Страница 1090: ...The IP address is set to this machine and this machine initializes the network settings 1089 ...
Страница 1096: ...Starting OKI LPR Utility 1 Click Start and then select All Programs Okidata OKI LPR Utility OKI LPR Utility 1095 ...
Страница 1116: ...1115 ...
Страница 1123: ...Internet Fax Specifications Item MB472 Communication protocol SMTP POP3 MIME File format TIFF TIFF 1122 ...
Страница 1134: ...1133 ...
Страница 1137: ......


