Oki MB280 MFP Скачать руководство пользователя страница 62

MB280

- 62 -

PC Features

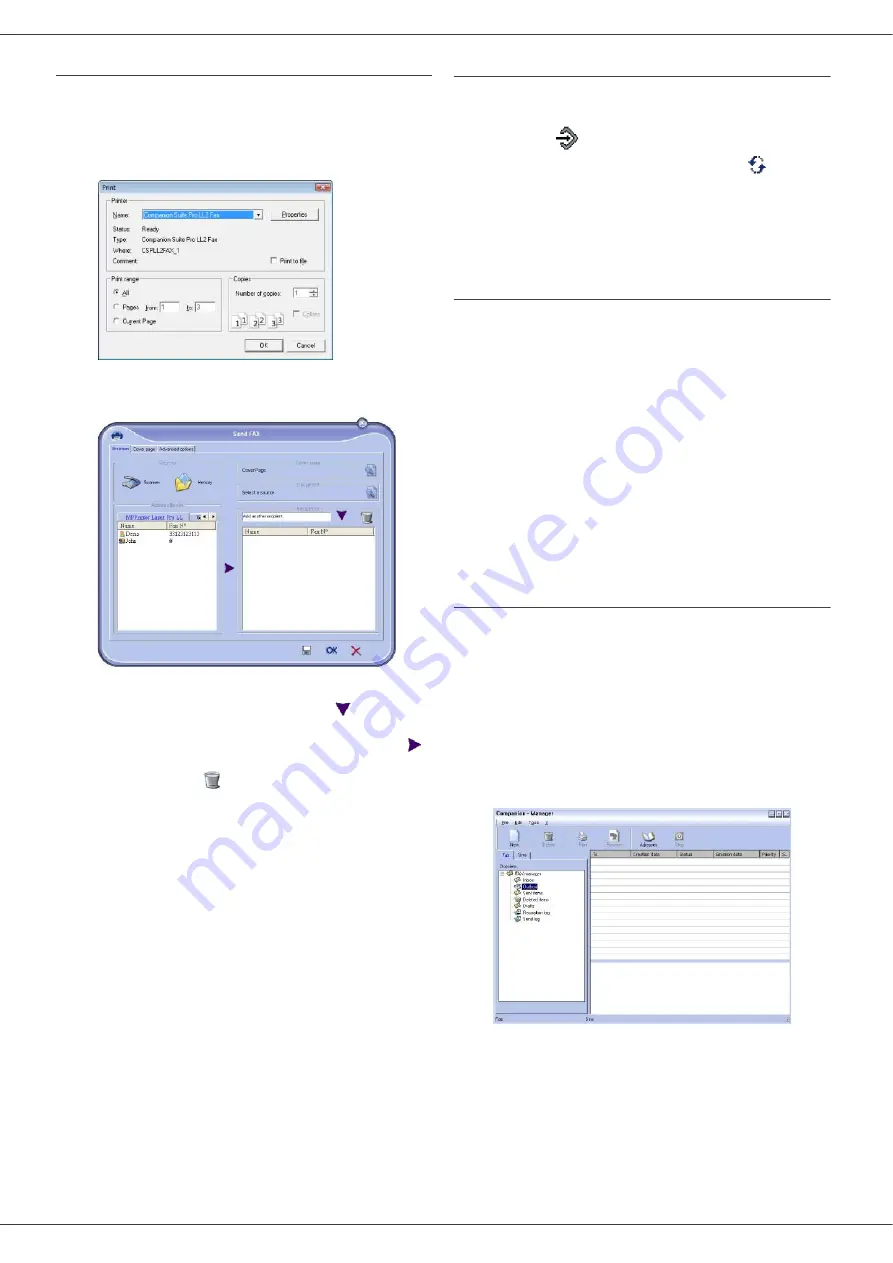
Send a fax from an application

This method is used to directly send a document you have 
created using a desktop software without printing it 
beforehand.

1

From your desktop software, select 

F

ILE

 > P

RINT

.

2

Select the printer 

OKI MB280 (FAX)

 and click 

OK

.


The fax window is displayed.

3

To send your fax to a contact, enter his/her number 
in the field 

R

ECIPIENTS

 and click on 

 or select a 

contact (or a group) from one of the address books 
in the field 

A

DDRESS


BOOK

 and click the button 


Repeat this operation as many times as necessary 
(use the button 

 to delete a contact from the list 

of contacts).

4

If necessary, adjust the advanced options (send 
later and resolution) in the tab 

A

DVANCED


OPTIONS

.

5

To add a cover page, select the tab 

C

OVER


PAGE


then click the box 

W

ITH


THE

 C

OVER


PAGE

. Select 

the cover page you want to add from the drop-down 
menu, or create a new one. For more information, 
refer to paragraph 

Cover page

, page 64

6

Click 

OK

 to send your fax to all contacts in your list 

of contacts.

Your send request can then be checked, if necessary, in 
the outbox.

Receive a fax

The window 

Companion Manager

 and 

Companion 

Director 

show, using different messages, the reception of 

a fax. The icon 

 is displayed at the bottom of the 

window 

Companion Manager

 and the icon 

 appears 

in the task bar.

You can automatically print faxes on reception. To do this, 
you have to define this parameter, refer to paragraph 

Fax 

parameters

, page 63.

Follow-up of fax communications

Follow-up of fax communications is by means of:

an outbox,

an  inbox,

a sent item memory,

an outbox log,

an inbox log.

These services enable you to always know exactly what 
communications are taking place on the terminal, whether 
sending or receiving.

The outbox and inbox logs are automatically printed when 
their contents fill a page. After automatic printout, the 
terminal creates a new log.

The outbox

In the fax outbox, there are the following:

the requests being sent,

the send later requests,

the requests for which one or more send attempts 
have already been made, and which will soon be 
redialed,

the rejected requests (calls not put through).

The requests are classed in the order in which they are 
executed.

The rejected requests are filed at the end of the list so that 
they are more accessible if you want to work with them 
(request a new send) or delete them.

Содержание MB280 MFP

Страница 1: ...User s Guide 59313701 my okidata com RT322 MB280 MFP...

Страница 2: ...ve documents through your PC If you have a WLAN adaptor optional you can communicate with a personal computer wirelessly WLAN is an optional working only with a specific adaptor that you can obtain fr...

Страница 3: ...d analysis margins setup 23 Flat bed analysis margins setup 23 Left and right printing margins setup 23 Top and bottom printing margins setup 23 Format paper setup 23 Fax 24 Fax transmission 24 Print...

Страница 4: ...rint the files located in the key 48 Delete your files located in the key 49 Analyse the USB memory key content 49 Save a document on a USB memory key 49 PC Features 51 Introduction 51 Configuration r...

Страница 5: ...Uninstall the drivers from your PC 69 Uninstall the drivers using the Companion Suite Pro software 70 Uninstall the drivers manually 70 Maintenance 71 Service 71 General information 71 Toner cartridge...

Страница 6: ...s as a Class 1 Laser Product It does not emit hazardous light as the beam is totally enclosed during all phases of customer operation and maintenance For Europe Asia This machine complies with IEC 608...

Страница 7: ...itions shown below For your safety you must never touch these surfaces when you remove a paper jam or when you replace the Toner cartridge Symbols for the main power switch In accordance with IEC 6041...

Страница 8: ...ther brands or products referred to as examples or in order to give additional information are registered trademarks of their respective owners The informations contents of this user manual are subjec...

Страница 9: ...below describes the precautions to be taken when using the machine Never turn the machine off and never open the lids while printing Never use gas or flammable liquids or objects generating magnetic...

Страница 10: ...ng into the product You suspect that your product needs service or repair Your product s cover has been damaged Do not incinerate spilled toner or used toner Toner dust might ignite when exposed to an...

Страница 11: ...aper format to avoid feed failure skewing and paper jams Amount of loaded paper must not exceed the loading mark If the loading mark is exceeded this may cause feed failure skewing and paper jams Addi...

Страница 12: ...these notes could result in moderate or minor injury or damage to the machine or to property Be sure to read these notes Refer to the security notices presented in the Safety booklet Important Indicat...

Страница 13: ...NE socket telephone cable connection 7 EXT socket connection for external telephone devices 8 Slave USB connection for PC 9 Master USB connection USB key 10 Master USB connection USB key 11 Manual pap...

Страница 14: ...e left of the cursor 5 Key input or line feed 6 Key access to special characters 7 Key Shift 8 Key document analysis to the PC or a media USB key 9 Key local copy 10 Key stops the current PC print job...

Страница 15: ...at the beginning of this booklet 3 Remove all stickers from the machine 4 Remove the plastic protection film from the screen Installing the document feeder 1 Secure the document feeder by fitting the...

Страница 16: ...ck in the feed cassette 200 sheets of 80 g m paper for instance 6 Put the feed cassette back in its location Cartridge installation 1 Stand in front of the machine 2 Push the left and right sides of t...

Страница 17: ...tall function will help you configure your machine by guiding you through the basic settings If you wish to modify the setting displayed press the OK button If you do not want to modify the displayed...

Страница 18: ...ephone numbers For example if you are installing the machine in France behind your company s PABX enter 10 10 digits being the standard telephone number length for France Use C to correct an entry Pre...

Страница 19: ...ear edge A few lines may be given in solid print at the part of being overlapped Envelopes which are not recommended may lead to improper printing refer to the paragraph Specifications page 77 Curled...

Страница 20: ...specting the indications around the glass 2 Press the button 3 Press the button Advanced copying The sophisticated copy allows to do custom setups for the current copy 1 Place the document to be copie...

Страница 21: ...rm with the OK button For optimal results with ID documents select the PHOTO resolution 7 Adjust the contrast level with the buttons or then confirm with the OK button 8 Adjust the desired brightness...

Страница 22: ...he OK button 5 Quit this menu by pressing the button Contrast setup The CONTRAST parameter allows to choose the photocopy contrast 845 ADVANCED FCT COPY CONTRAST 1 Press enter 845 using the keypad 2 S...

Страница 23: ...ring printing 855 ADVANCED FCT SCAN PRINT PRINTER MARG 1 Press enter 855 using the keypad 2 Setup the left right margins offsets by 0 5 mm steps with the buttons and 3 Confirm by pressing the OK butto...

Страница 24: ...ws you to transmit a document at a later time To program a postponed transmission you need to identify the subscriber number transmission time feeder type and number of pages To delay the transmission...

Страница 25: ...s Default tray set to Manual Default tray set to Automatic Relay broadcast Your fax machine initiator can relay a document in other words transmit a document to your subscribers via a remote fax and w...

Страница 26: ...deactivating the fax answering machine Saving an access code 383 FAX FAX ANSW ANSWER CODE 1 Press enter 383 using the keypad 2 Enter the code 4 digits and confirm with OK 3 Quit this menu by pressing...

Страница 27: ...and select the option ON to print all rerouted documents automatically 3 Confirm your choice with OK 4 Quit this menu by pressing the button Transmission waiting queue This function lets you obtain a...

Страница 28: ...X code to all subscribers equipped with a fax compatible to yours MBX 00 is public It is handled directly by the terminal to record the messages of the fax TAD as soon as this is put into service MBX...

Страница 29: ...MBX out of the 31 MBX s or enter the number of the MBX directly and press OK The document is placed in the feeder and saved in the selected MBX MBX deposit in a remote fax 1 Insert the document in th...

Страница 30: ...t in deposit 1 Insert the document to deposit in the feeder 2 Select 34 FAX POLLING TX 3 Choose the deposit type according to the table below 4 Confirm deposit by pressing OK Polling a deposited docum...

Страница 31: ...se the key to move inside the data entry field use and to move in the text from one word to another press CTRL and one of the navigator keys or to go to the next line use to delete a character by movi...

Страница 32: ...e new time you will need to use the 211 MODIFY menu If you select ON and confirm with OK you will not have to care about any change at the end of March 1h and October 1h You will just be informed of t...

Страница 33: ...ired option and press the OK key to confirm 3 To exit this menu press Language This setting enables you to choose the menu language of your choice By default the multifunction machine is set to Englis...

Страница 34: ...of the sheet feed scanner transmission will occur after dialling and paper scanning It allows transmission of larger documents To select the way you want to feed your documents 232 SETUP SEND MEMORY...

Страница 35: ...ITHOUT PAPER your fax saves the incoming messages in the memory reception mode WITH PAPER your fax refuses all incoming subscribers To select the reception mode 242 SETUP RECEPTION REC PAPER 1 Press e...

Страница 36: ...ALS 1 Press enter 29 using the keypad 2 Select the desired parameter and confirm with OK 3 With the keys or modify the parameter settings by following the table below and press OK Parameter Significat...

Страница 37: ...parameter only defines the printing of received faxes The number of lines of a document can be too high for the printing paper format This parameter defines the threshold beyond which the extra lines...

Страница 38: ...Quit this menu by pressing the button Lock the SMS service This function prevents access to the SMS service To access the SMS service locking menu 815 ADVANCED FCT LOCK LOCK SMS 1 Press enter 815 usin...

Страница 39: ...4 ADVANCED FCT COUNTERS PRINTED PG 1 Press enter 824 using the keypad 2 The number of printed pages appears on the screen 3 Quit this menu by pressing the button Display the consumables status You can...

Страница 40: ...ter 12 using the keypad 2 Enter the LIST NAME with the alphanumerical keypad 20 characters maximum confirm with OK 3 CALLED NUMBER use or to select from existing records the contacts of your list and...

Страница 41: ...OAD SAVE 1 Press enter 16 using the keypad 2 Select SAVE to save directory entries on the Smart card and confirm with OK 3 Insert your Smart card To restore the contents of your directory from your Sm...

Страница 42: ...3 Confirm with OK 4 Choose the year you want to print as calendar by entering the number on the numeric keypad for example 2009 5 Confirm with OK The calendar of the year requested is printed Importa...

Страница 43: ...into a radio network WLAN 1 Configure the network to your PC 2 Set up the parameters for your machine so that it can function in a network 3 Having set up the parameters for your device install the C...

Страница 44: ...ppears enter a figure between 1 and 13 1 to 11 for the US and confirm with OK 7 Select your encryption method OFF WEP or WPA and confirm with OK If you choose WEP enter the WEP key that you are using...

Страница 45: ...ng the keys or and confirm with OK 2 Select WLAN using the keys or and confirm with OK 3 Select PARAMETERS using the keys or and confirm with OK 4 Select GATEWAY using the keys or and confirm with OK...

Страница 46: ...r to the paragraph Software installation page 51 An example of how an AD HOC network may be set up An example of how to configure an Ad hoc network without security protection using the following para...

Страница 47: ...ork house once this has been detected 5 Now set up the WLAN network connection of your PC To do this you must configure the element Protocol Internet TCP IP for the WLAN connection that has been creat...

Страница 48: ...h the or buttons and confirm with OK 4 You have three possibilities to print your files ALL to print all the files located in the USB memory key Select ALL with the or buttons and confirm with OK The...

Страница 49: ...n You come back to the previous menu 5 Quit this menu by pressing the button Analyse the USB memory key content After a period of inactivity your machine will return to the main menu To view the USB m...

Страница 50: ...e picture will be saved in TIFF format COLOUR the picture will be saved in JPEG format You can choose the image resolution that will be digitized to the USB memory key the default resolution is AUTO P...

Страница 51: ...ollowing installation procedures full installation of the Companion Suite Pro software installation of the drivers only Installing the full software package Turn your PC on Open an account session wit...

Страница 52: ...software manual installation of drivers Installing the drivers using the Companion Suite Pro software Turn your PC on Open an account session with the administration rights 1 Open the CD ROM drive in...

Страница 53: ...installation The Companion Suite Pro software is now installed on your PC You can now connect your multifunction machine refer to paragraph Connections page 54 Installing the drivers manually You can...

Страница 54: ...your multifunction machine The PC detects the device and the drivers are automatically installed 3 Once the installation is finished a message indicates that the drivers are installed correctly You c...

Страница 55: ...resentation Run the application by clicking on the COMPANION DIRECTOR icon located on your desktop or from the menu START ALLPROGRAMS OKIDATA COMPANION SUITE PRO LL2 COMPANION DIRECTOR Utilities and a...

Страница 56: ...ect the desired scan RESOLUTION in the drop down menu 4 Click OK to confirm the new parameters Removing a device 1 Select the device from the list and click the minus sign or REMOVE button 2 To confir...

Страница 57: ...2 Select the desired scanner document feeder or flatbed 3 Customise the advanced properties of the digitisation by clicking on the ADJUST THE QUALITY OF THE SCANNED PICTURE link 4 Adjust the desired p...

Страница 58: ...LCD screen displays the message PUT THE PRINTED SHEETS IN THE PAPER TRAY WITH THE PRINTED SIDE VISIBLE 7 Place the sheets in the paper tray as indicated on the explanation page and below The followin...

Страница 59: ...l contacts from for example a given company or the same service etc to which you frequently send common documents Add a contact to the terminal address book 1 Click on the link ADDRESS BOOK of the win...

Страница 60: ...ERTIES 3 Make the necessary changes in the window ADDRESS BOOK 4 Click on OK Modify a group 1 Select the group in the address book list 2 Click on PROPERTIES 3 Make the necessary changes 4 Click on OK...

Страница 61: ...ield RECIPIENTS and click on or select a contact or group from one of the address books in the field ADDRESS BOOK and click on the button Repeat this operation as many times as necessary use the butto...

Страница 62: ...the outbox Receive a fax The window Companion Manager and Companion Director show using different messages the reception of a fax The icon is displayed at the bottom of the window Companion Manager a...

Страница 63: ...and reception of the fax the status Fax parameters Access to fax parameters 1 Click on the icon of the window COMPANION DIRECTOR 2 Select TOOLS OPTION FAX 3 Make the adjustments required referring to...

Страница 64: ...ver page template there are two major steps First step Create a background image with the logos and the layout that you wish Second step Add the field that you want to be displayed in the cover page f...

Страница 65: ...es Companion Suite Pro LL 2 Documents FAX Temporary and has the file extension fax Option B Launch MFMANAGER select NEW FAX select the scanner source as shown below Add any recipient to the recipient...

Страница 66: ...this window f The window New Fax is displayed you can now choose the Cover Page template that you want to use When you double click the preview image in the lower right corner another window pops up...

Страница 67: ...he recipient is listed in the address book favourites a group or a distribution list Comments This is an editing window with all the basic functions of a text editor so that you can enter a text which...

Страница 68: ...r send request can then be checked if necessary in the outbox Follow up of SMS SMS communications are monitored by means of an outbox a sent item memory an outbox log These services make it possible t...

Страница 69: ...L PROGRAMS OKIDATA COMPANION SUITE PRO LL2 UNINSTALL 1 A confirmation screen appears Click on the YES button to continue the Companion Suite Pro program removal 2 The uninstall program is launched You...

Страница 70: ...ERS tab 5 Select the OKI MB280 driver and click on the REMOVE button 6 Select the option REMOVE DRIVER AND DRIVER PACKAGE and click on the OK button 7 A confirmation screen appears Click on the YES bu...

Страница 71: ...toner cartridge at any time before it reaches its end of cycle To replace the toner cartridge proceed as shown below 1 Insert the smart card provided with the new toner cartridge as shown on the pict...

Страница 72: ...when one or more vertical lines appear on the copies of documents placed on the document feeder presence of debris ink glue etc in the paper transport mechanism the message YOU SHOULD CLEAN THE ROLLER...

Страница 73: ...age displayed when starting the machine CLOSE COVER PRINTER The printer front cover is open close it TONER EMPTY REPLACE OK Replace the toner cartridge PAPER JAM REMOVE TONER A sheet of paper is jamme...

Страница 74: ...m the feeder You have the choice between waiting until the transmission takes place at the given time restarting the transmission immediately by pressing abandoning transmission by pressing To eject t...

Страница 75: ...x The mailbox number does not exist Code 18 Relay Bcst impossible You requested a document relay from a remote fax which does not have the relay broadcast function Code 19 Subscriber has stopped The c...

Страница 76: ...jam Paper format problem Toner empty The printing of the active document is cancelled Documents waiting to be printed however will be printed or Printing resumes from the first non printed page Pause...

Страница 77: ...ications connection modes USB or WLAN paper formats as well as file types and sizes Preheating time 21 sec First page out time 13 sec Type Autonomous Black and White Copy speed 20 ppm maximum Resoluti...

Страница 78: ...MB280 78 Maintenance Consumable specifications Reference paper Specifications are subject to changes for improvement without notice Scanner Inapa tecno SPEED A4 Printer Ricoh T6200 A4...

Отзывы: