background image

1.LOADING PAPER

Loading Paper on the MPT    33

LO
AD
ING PA

PER

Non-standard paper on the MPT

You can also copy or print non-standard size paper. For paper size which can be set, refer to the 

Specifications Guide

To learn how to set the paper size, refer to the 

Copying Guide

 or 

Printing Guide

.

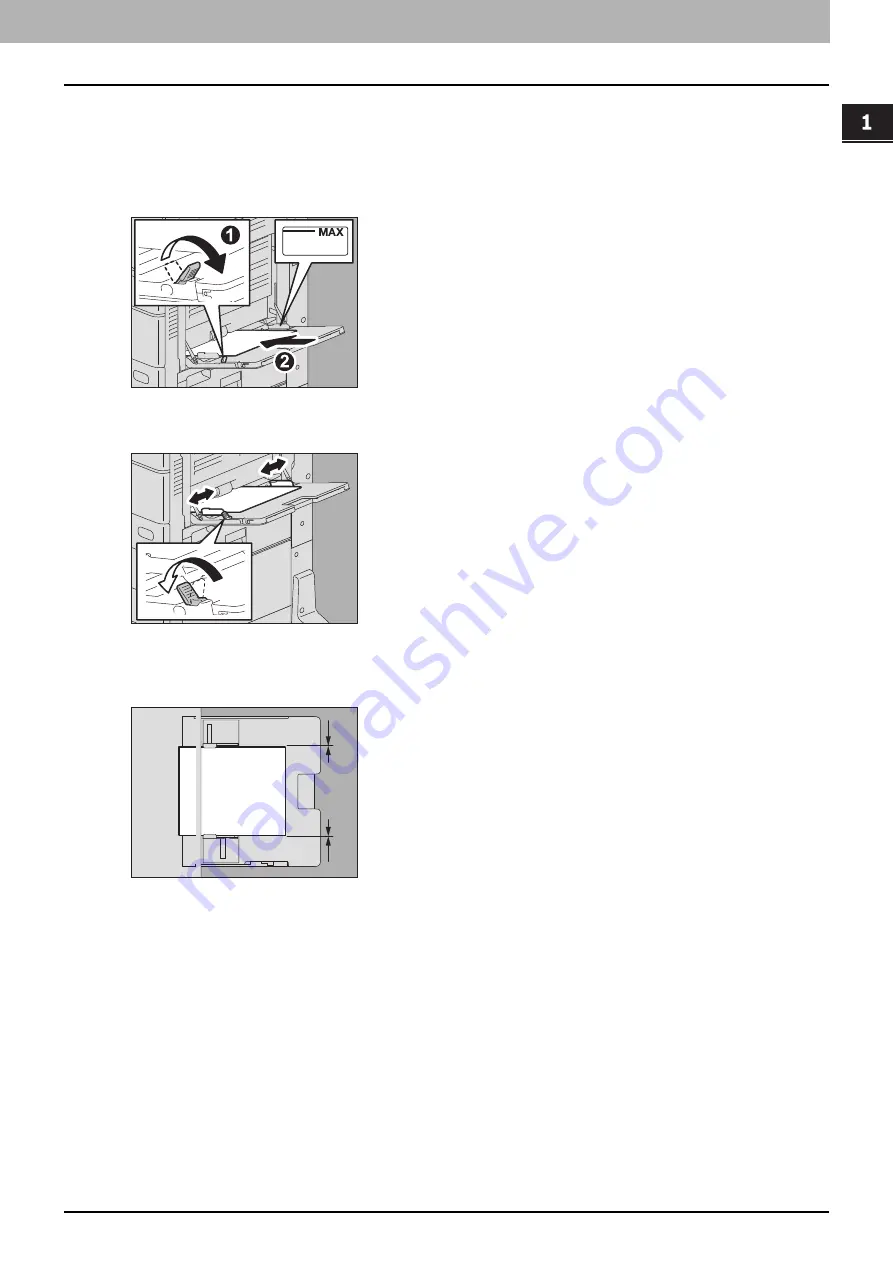
1

Move the paper holding lever toward the outside. Place paper with its print side down on the 
MPT.

2

Align the side guides to the paper length. Move the paper holding lever toward the equipment.

3

Check that there is no gap between the paper and the side guides.

If the gap is too wide, it could cause paper jamming, or the paper size could not be correctly detected.

Between the paper and side guides (“A” in the figure):

Make sure there is no gap. (0.5 mm (0.02") or less on one side, 1.0 mm (0.04") or less in total) However, if paper 
jamming occurs, make a gap.

4

Select the MPT during the operation for copying or printing and specify the paper size and 
thickness.

For details for the operation for copying or printing, refer to the 

Copying Guide

 or 

Printing Guide

.

A

A

Содержание ES9466

Страница 1: ...MULTIFUNCTIONAL DIGITAL COLOR SYSTEMS Paper Preparation Guide ES9466 MFP ES9476 MFP...

Страница 2: ...2016 Oki Data Corporation All rights reserved Under the copyright laws this manual cannot be reproduced in any form without prior written permission of Oki Data...

Страница 3: ...lable options refer to the Quick Start Guide Screens in this manual The details on the screens may differ depending on your model and how the equipment is used such as the status of the installed opti...

Страница 4: ...SDF and Reversing Automatic Document Feeder RADF are collectively referred to as Automatic Document Feeder ADF In this manual Dual Scan Document Feeder is referred to as DSDF and Reversing Automatic D...

Страница 5: ...r size 21 Setting paper type 23 Clearing the set paper type 26 Loading Paper on the MPT 27 Standard size paper on the MPT 29 Envelopes on the MPT 30 Tab paper on the MPT 32 Non standard paper on the M...

Страница 6: ...6 CONTENTS...

Страница 7: ...ding Paper in Trays 11 Paper Feed Unit for this equipment 11 Envelope Drawer 15 Large Capacity Feeder 19 Doing Paper Settings 21 Setting paper size 21 Setting paper type 23 Clearing the set paper type...

Страница 8: ...ee ply structures may occur faint printing dirt with streaks or wavy curl even if you print the envelopes in the printable recommended area Do not print the back side of the addressing face When you c...

Страница 9: ...pes sealed with adhesive paste or tape 9 Partly opened or perforated envelopes 10 Envelopes with special coating on the surface 11 Envelopes with double sided adhesive tape and its protector paper 12...

Страница 10: ...ns for storing copy paper Make sure of the following when storing copy paper Wrap the paper in its wrapping to keep it free from dust Avoid direct sunlight Store in a damp free space To prevent paper...

Страница 11: ...njure you Fan and jog the stack of paper well before you place it in a tray or the sheets may not be separated before being fed Place paper with its copy side up The copy side may be noted on its wrap...

Страница 12: ...ber of sheets that can be loaded refer to the Specifications Guide If paper cannot be fed printing takes a long time after feeding or the quality is poor turn over the paper and place it again When pl...

Страница 13: ...se paper jamming or the paper size could not be correctly detected Between the paper and side guides A in the figure Make sure there is no gap 0 5 mm 0 02 or less on one side 1 0 mm 0 04 or less in to...

Страница 14: ...ation area on the menu screen If you want to change the setting for displaying this menu ask your administrator During printing from the Paper Feed Pedestal if you place paper in another tray there ma...

Страница 15: ...s Guide For how to handle envelopes to load see the following page P 9 Notes for using envelopes Every 10 copies take the envelopes out from the stacker 1 Place the envelope on a flat clean surface an...

Страница 16: ...guides For maximum number of sheets to be loaded refer to the Specifications Guide Printing may be uneven depending on the envelope types If printing is uneven or if paper jamming occurs try the foll...

Страница 17: ...m 0 02 or less on one side 1 0 mm 0 04 or less in total However if paper jamming occurs make a gap Between the paper and end guide B in the figure Make sure there is no gap 0 5 mm 0 02 or less 7 Chang...

Страница 18: ...8 x 7 1 2 CHO 3 120 mm x 235 mm and YOU 4 105 mm x 235 mm You can also set envelope sizes which are not registered as the standard sizes Press Custom Envelope and enter the size To learn more about a...

Страница 19: ...lternately Paper in the right hand tray is used first When it runs out paper in the left hand tray will be moved automatically to the right hand tray and fed Be careful that the stack height of the pa...

Страница 20: ...e Capacity Feeder carefully until it comes to a stop Only the left tray will come out Do not touch the slide rail A in the figure on the right This could injure you 2 Place paper on the left tray Plac...

Страница 21: ...and end guide in the correct positions again P 11 Loading Paper in Trays Make sure that Auto inch is not selected when A B format paper is loaded Make sure that Auto mm is not selected when LT format...

Страница 22: ...Settings Setting paper with non standard sizes 1 Press Setting User on the Home screen 2 Press the User tab Tray 3 Select the desired tray and press Custom 4 Enter the size and press OK Press Length...

Страница 23: ...e equipment status indication area as shown below Thickness Paper Feed Unit Paper Feed Pedestal Large Capacity Feeder Envelope Drawer 1 These types of paper cannot be accepted for the Large Capacity F...

Страница 24: ...tic paper selection mode When an attribute other than None is set for a tray the Automatic Change of Paper Source function Feeding the same size of paper from a different tray even if the specified tr...

Страница 25: ...1 LOADING PAPER Doing Paper Settings 25 LOADING PAPER 1 Press Setting User on the Home screen 2 Press the User tab Tray 3 Press Paper Type 4 Select the desired tray and paper type and press OK...

Страница 26: ...depending on the paper type Clearing the set paper type Press the tray button on the menu in step 4 of Setting paper type and then press the paper type whose setting you want to clear If both Insert...

Страница 27: ...refer to the Specifications Guide When you use more than one sheet of paper fan the sheets well before placing them on the MPT Otherwise the sheets may not be separated before being fed Do not push pa...

Страница 28: ...ing even if the paper of the same size is in any of the trays Printing restarts when paper is supplied to the MPT When you perform copying from MPT the RESET button on the control panel blinks to indi...

Страница 29: ...holding lever toward the outside Place paper with its print side down on the MPT 2 Align the side guides to the paper length Move the paper holding lever toward the equipment When paper is placed the...

Страница 30: ...velopes to load see the following page P 9 Notes for using envelopes Every 10 copies take the envelopes out from the stacker 1 Place the envelope on a flat clean surface and press it with your hands i...

Страница 31: ...ld cause paper jamming or the paper size could not be correctly detected Between the paper and side guides A in the figure Make sure there is no gap 0 5 mm 0 02 or less on one side 1 0 mm 0 04 or less...

Страница 32: ...menu for MPT settings appears There is no affect on the printing quality though noise may occur during paper feeding depending on the paper type 3 Check that there is no gap between the paper and the...

Страница 33: ...per length Move the paper holding lever toward the equipment 3 Check that there is no gap between the paper and the side guides If the gap is too wide it could cause paper jamming or the paper size co...

Страница 34: ...the side guides to the paper length Move the paper holding lever toward the equipment 3 Check that there is no gap between the paper and the side guides If the gap is too wide it could cause paper ja...

Страница 35: ...quipment Make sure that the trailing edge of the paper will not be fed into the equipment while you are holding it Printing is done at 300 dpi if the custom paper size is longer than the maximum stand...

Страница 36: ...1 LOADING PAPER 36 Loading Paper on the MPT...

Страница 37: ...explains how to place originals on this equipment Precautions for Originals 38 Acceptable originals 38 Unacceptable originals 39 Placing Originals 40 Placing originals on the original glass 40 Book ty...

Страница 38: ...heavy objects 4 kg 9 lb or over on the original glass and do not press on it with force Be sure to place ST size or A5 size originals in a landscape direction when using the ADF A maximum of 1000 shee...

Страница 39: ...ed or stapled originals 6 Originals with holes or tears 7 Damp originals 8 Originals whose correction fluid or ink has not been dried completely 9 OHP films or tracing paper 10 Coated paper with wax e...

Страница 40: ...the ADF Raise it 60 degrees or more so that the size of the original can be detected correctly 2 Place the original with its face down on the original glass and align it with the left rear corner of t...

Страница 41: ...type original to 2 sided copying or dual page copying align the center of the original on the orange colored indicator line of the original glass For the instructions for the above functions refer to...

Страница 42: ...eaning of these areas is recommended For cleaning refer to the Quick Start Guide For placing laterally long originals at the RADF or using the DSDF The original stopper prevents the scanned originals...

Страница 43: ...sizes When using the DSDF passages of a large number of originals with curled wavily may cause paper jamming In that case reduce the number of the originals For mixed size originals see the following...

Страница 44: ...ed page by page continuously It is useful when you want to scan more than one original at one time For how to set the feeding mode refer to the Copying Guide The way of placing originals is the same a...

Страница 45: ...on The original sizes that can be mixed are as follows North America LD LG LT LT R COMP Other than North America A3 A4 A4 R B4 B5 FOLIO 1 Adjust the side guides to the widest original and then align t...

Страница 46: ...2 PLACING ORIGINALS 46 Placing Originals...

Страница 47: ...3 OPERATING STAPLING MANUALLY This chapter explains how to operate manual stapling using the Finisher or the Saddle Stitch Finisher Stapling Using the Finisher 48...

Страница 48: ...paper well Place it with its face down When you staple them at their corner on the front side place the sheets of paper aligned to the front side When you staple them on the rear side place the sheets...

Страница 49: ...29 Original glass 40 Original stopper 42 Originals acceptable originals 38 book type originals 41 mixed size originals 45 placing 40 using the ADF 42 P Paper paper size setting 21 paper type setting 2...

Страница 50: ...50 INDEX...

Страница 51: ...ES9466 MFP ES9476 MFP...

Страница 52: ...www oki com printing Oki Data Corporation 4 11 22 Shibaura Minato ku Tokyo 108 8551 Japan 46568606EE Ver00 F Issued in Nov 2016...

Отзывы: