


ES 1220n Postscript Emulation Driver • 27
N-Up Printing (Printing Multiple Pages on One Sheet)
Me and 98
You can print either 2 or 4 pages on one sheet of paper.
1.
Open the file in your application and select
File
→
.
2.
In the Print dialog box, click the Postscript emulation printer, then
click
Properties
.
3.
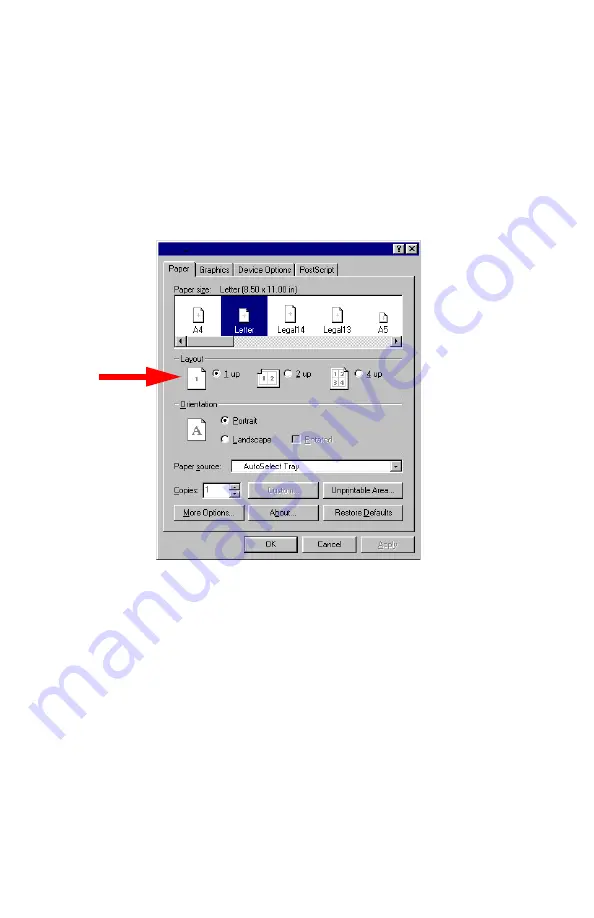
On the
Paper
tab, under
Layout
, select
2 up
or
4 up
printing.
4.
Click
OK
to return to the
dialog box.
5.
Click
OK
to print the document.
Содержание ES1220n
Страница 1: ...59356001 User s Guide Windows...
Страница 23: ...ES 1220n Loading Paper 23 1 Open the MP Tray...
Страница 135: ...ES 1220n PCL Emulation Driver 135 3 On the Setup tab under 2 Sided Printing select Long Edge or Short Edge 4 Click Print...
Страница 225: ...ES 1220n Replacing Consumables 225 9 Close and latch the top cover...
Страница 232: ...ES 1220n Replacing Consumables 232 11 Remove the silica gel pack 12 Place the image drum in the printer...
Страница 233: ...ES 1220n Replacing Consumables 233 13 Remove the orange drum seal 14 Install the toner cartridge in the image drum...
Страница 234: ...ES 1220n Replacing Consumables 234 15 Push back the toner cartridge lock lever 16 Close and latch the top cover...
Страница 244: ...ES 1220n Replacing Consumables 244 8 Close and latch the top cover...
Страница 252: ...ES 1220n Clearing Paper Jams 252 5 Close the rear exit 6 Close the top cover...
Страница 260: ...ES 1220n Clearing Paper Jams 260 3 Close the front cover...
Страница 262: ...ES 1220n Clearing Paper Jams 262 2 Remove any jammed sheets...
Страница 264: ...ES 1220n Clearing Paper Jams 264 3 Pull the duplexer lid to unlock it 4 Open the lid and remove the jammed sheet...
Страница 267: ...ES 1220n Clearing Paper Jams 267 2 Open the front cover 3 Remove any jammed sheets 4 Close the front cover...
Страница 269: ...ES 1220n Clearing Paper Jams 269 2 Remove any jammed sheets 3 Close the front cover...


