Oki C911dn Скачать руководство пользователя страница 18

18

 -

Paper jams

Troubleshooting

1

2

Index

Maintenance

13 

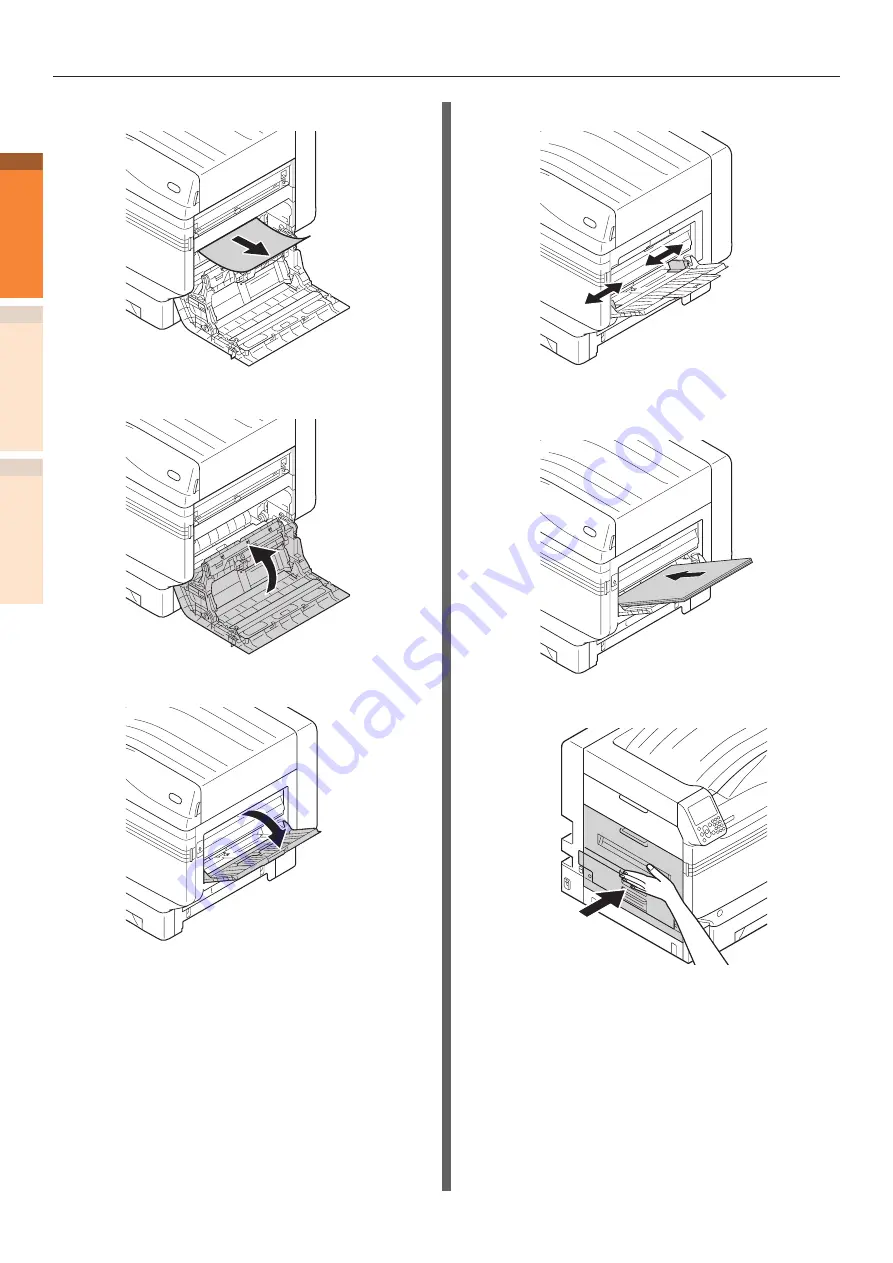
Slowly remove the remaining paper.

14 

Close the right side cover.

15 

Open the MP tray.

16 

Match the paper guide with the paper.

17 

Set the print side for the removed 

paper to face up.

18 

Put the output unit back into the printer.

Содержание C911dn

Страница 1: ...stood or for maintenance 1 Troubleshooting 2 Maintenance Index User s Manual Troubleshooting Daily MaintenanceManual C911dn C931dn C941dn ES9411dn ES9431dn ES9541dn Store this manual carefully close t...

Страница 2: ...Guide Set up Guide Opening the box and installing the printer 1 Step This guide uses illustrations to explain the methods from opening the box to installation For the advanced setup guide see the Bas...

Страница 3: ...g this display may cause death or serious injury CAUTION z z Mishandling due to ignoring this display may cause personal injury Keys Buttons and Symbols This chapter described the following keys butto...

Страница 4: ...ons used herein show the C931 model unless otherwise specified Illustrations may differ from the actual product Screens The images of the control panel and PC used herein are examples The images may d...

Страница 5: ...s 7 64 bit Edition operating system Windows 7 64 bit Edition Microsoft Windows 7 operating system Windows 7 Mac OS X10 3 9 and above Mac OS X The manuals enclosed with the printer use as examples Wind...

Страница 6: ...er message appears 35 Printing Troubles 40 Unable to print 40 Printer driver malfunctions 44 Print quality is poor 47 Paper feed is poor 50 2 Maintenance 51 Replacing consumables and maintenance unit...

Страница 7: ...7 Transporting and moving the device 86 When moving the device 86 Transporting the device 86 Index 87...

Страница 8: ...8...

Страница 9: ...nce 1 Troubleshooting Troubleshooting solutions procedure 10 Paper jams 11 When a message related to paper appears 31 When a message related to replacement of consumables appears 33 When some other me...

Страница 10: ...replacement timing or service life of consumables and maintenance items refer to the page 52 and solve it When there is a display of other errors refer to the page 31 and solve it In the even to trou...

Страница 11: ...essage notifying paper jam will appear on the liquid crystal panel of the operation panel and the ATTENTION lamp will blink When Please see HELP for details is shown in the message pressing the HELP b...

Страница 12: ...Paper jam in the vicinity of the lower side of 2 Sided Printing unit 375 page 26 Message does not disappear When the message does not disappear even after removing the jammed paper Paper remains in t...

Страница 13: ...ink 1 Press the HELP button The error code will appear and the condition of paper jam will be displayed 2 Press the scroll button The next page will appear and solution procedure for paper jam and cor...

Страница 14: ...Removing paper jam in the vicinity of Right Side Cover Error code 380 390 637 1 If paper is set in the MP tray remove it and close the tray 2 Lift the opening and open the right side cover 3 Slowly r...

Страница 15: ...per to face up Removing paper jam in the output unit Error code 381 638 639 CAUTION There is a risk of burns Work carefully as the temperature of fuser unit is high Ensure to hold the handle when lift...

Страница 16: ...up the fuser unit s jam release lever blue 4 Ensure to slowly pull the remaining paper towards the printer body opposite to the paper feeding direction 5 Push down the fuser unit s jam release lever b...

Страница 17: ...Remove the remaining paper 9 Hold the fuser unit handle with both hands and set to the output unit 10Push down the fuser unit s lock lever blue 11 If paper is set in the MP tray remove it and close th...

Страница 18: ...dex Maintenance 13Slowly remove the remaining paper 14Close the right side cover 15Open the MP tray 16Match the paper guide with the paper 17Set the print side for the removed paper to face up 18Put t...

Страница 19: ...it cools down before starting the work 1 Lift opener of the output unit and pull out the output unit When you cannot see the jammed paper return the output unit to the printer and go to Operating the...

Страница 20: ...r unit handle with both hands and remove it onto a flat surface 7 Lift up the fuser unit s jam release lever blue and slowly pull the paper out in the opposite direction from the paper operation direc...

Страница 21: ...the 2 Sided Printing unit lift it up a little with both hands and remove it Note z z Do not pull the 2 Sided Printing unit out in one shot 2 Sided Printing unit may fall down if you pull it out in on...

Страница 22: ...e Removing paper from the vicinity of Right Side Cover Error code 391 392 393 394 395 631 632 633 634 635 Example In the case of Tray 1 1 Open the tray side cover where the error is displayed 2 Remove...

Страница 23: ...640 641 642 1 Pull out the 2 Sided Printing unit lift it up a little with both hands and remove it When you cannot see the jammed paper in the 2 Sided Printing unit inside the printer put the 2 Sided...

Страница 24: ...f the output unit and pull out the output unit 5 Check inside of the printer and slowly remove the remaining paper 6 If the paper tip is not visible pull up the fuser unit s lock lever blue 7 Hold the...

Страница 25: ...x Maintenance 8 Hold the knob pull up the transfer roller unit lift the paper guide and remove the remaining paper 9 Close the cover push down the transfer roller unit 10Hold the fuser unit handle wit...

Страница 26: ...ck lever blue 12Put the output unit back into the printer Removing paper from the vicinity of the lower side of 2 Sided Printing unit Error code 375 650 1 Pull out the 2 Sided Printing unit lift it up...

Страница 27: ...1 2 Index Maintenance 3 Put the 2 Sided Printing unit back into the printer If no paper remains in visible locations in the printer follow the procedure given below 4 Lift opener of the output unit a...

Страница 28: ...If the paper tip is not visible pull up the fuser unit s lock lever blue 6 Hold the fuser unit handle with both hands and remove it onto a flat surface 7 Hold the knob pull up the transfer roller uni...

Страница 29: ...Index Maintenance 8 Close the cover push down the transfer roller unit 9 Hold the fuser unit handle with both hands and set to the output unit 10Push down the fuser unit s lock lever blue 11 Put the...

Страница 30: ...owing when paper jam occurs very frequently z z Is the feeding paper roller dirty Cleaning feed rollers P 83 z z Is the paper guide set correctly Refer to Setting the Paper in the Basic z z Is the pap...

Страница 31: ...Ensure MEDIA_SIZE MEDIA_TYPE is installed press OK button If printing fails cancel and re adjust tray settings Pressing OK will print using current paper tray settings Please see HELP for details 461...

Страница 32: ...idance shown on the Help screen Multiple sheets of paper were fed at once Reset Paper in TRAY Please see HELP for details 401 Blinking Multiple sheets of paper have been fed To cancel printing press t...

Страница 33: ...mpty Replace Black Toner Please see HELP for details 4103 Blinking Black Toner Empty Press the HELP button and solve according to the guidance shown on the Help screen page 55 Toner Empty Install COLO...

Страница 34: ...ng so please replace it with a new waste toner box Press the HELP button and solve according to the guidance shown on the Help screen page 67 Fuser Unit Fuser Unit Life Install New Fuser Unit Please s...

Страница 35: ...printer contact your designated help desk Japanese a column COLOR Image Drum Not Installed Please see HELP for details 6940 6941 6942 6943 6944 6945 Blinking The image drum shown in the message has n...

Страница 36: ...12 313 314 315 585 588 589 Blinking The cover shown in the message is open Close the cover Incompatible COLOR Image Drum Please see HELP for details 6840 6841 6842 6843 6845 6900 6901 6902 6903 6904 6...

Страница 37: ...this printer model Use a fuser unit intended for use in this printer model Belt Unit Regional Mismatch Please see HELP for details 6881 6882 6883 6884 6885 6886 Blinking Belt unit not intended for use...

Страница 38: ...print once again Press the OK button for deleting the display of the liquid crystal panel C941 ES9541dn only Spot Color has been replaced Press OK to change the Spot Color settings in the menu to COL...

Страница 39: ...of the message Open Face Up Stacker Please see HELP for details 580 Blinking Face up stacker is closed Please open the face up stacker Belt Unit Not Installed Please see HELP for details 689 Blinking...

Страница 40: ...are correctly connected to the printer and the computer Cables are defective Replace with new cables Printer is offline Press the ON LINE button on the operation panel Error message has appeared on t...

Страница 41: ...with other device z z Check that correct address is set in IP address Subnet mask and Gateway address Advanced Duplicate IP address Check that IP address of the printer does not overlap with other IP...

Страница 42: ...ice center Printing process does not start Error is displayed Check the error code and follow the instructions displayed on the liquid crystal panel page 31 page 33 page 35 LAN Cable USB Cable is not...

Страница 43: ...progress Wait until the printing is complete Printing stops in between Temperature is adjusted because temperature of the fuser unit increased due to continuous printing Temperature is adjusted becau...

Страница 44: ...Select Custom Install select the printer drivers you want to install on the Install Software screen and then click the Install button 4 When the Installing screen appears click Install on other ports...

Страница 45: ...or utility the User Account Control dialog may appear Click Yes or go and run installer or utility as administrator Clicking No or Cancel will not start installer or utility The Program compatibility...

Страница 46: ...eptions tab and click Add program Click reference and select the following files Click Open OK OK J2EE installation folder jdk bin java exe J2EE installation folder jdk bin javaw exe J2EE installation...

Страница 47: ...rrectly Re install the toner cartridge page 55 Low toner Replace the toner cartridge page 55 Paper is moist Use paper stored at appropriate temperature and humidity Paper not supported Use recommended...

Страница 48: ...Use paper stored at appropriate temperature and humidity Basic Thick paper is used Use thinner paper Low toner Replace the toner cartridge Basic Border of characters is blurred LED head is unclean Wi...

Страница 49: ...in CMY 100 Density is set to Disable Select Admin Setup Color Setup CMY 100 in the operation panel and select Enable Advanced Black spots or white spots appear Paper not supported Use recommended pape...

Страница 50: ...ting papers as it is Remove the papers that are already there in the tray and set after aligning them in all directions with the papers to be added Papers are not set straight Align the paper guide an...

Страница 51: ...Index Troubleshooting 1 2 Maintenance 51 2 Maintenance Replacing consumables and maintenance unit 52 Maintenance of the device 77 Transporting and moving the device 86...

Страница 52: ...nit When 3 pages of A4 size documents are printed at once with long edge feed with 1 side printing it will reach its service life after printing about 150 000 copies When one page is printed at once i...

Страница 53: ...ence pages When the replacement period approaches When it is time for replacement Toner Cartridge COLOR Toner Low Toner Empty Replace COLOR Toner Please see HELP for details Yellow magenta cyan black...

Страница 54: ...gargle with a lot of water and move the person to a place with fresh air Consult a physician as necessary When there is toner on skin of hands etc wash it off with liquid soap It toner gets into eyes...

Страница 55: ...low Toner Cartridge Only Magenta Toner Cartridge Only Cyan Toner cartridge Spot Color White Only for C941dn Can not be used in C911dn C931dn Toner cartridge Spot Color Clear Replacing Toner Cartridges...

Страница 56: ...z Even after replacing the toner cartridge if the Replace Toner message does not disappear it is possible that the toner cartridge is not installed firmly Reinstall it correctly z z If Error709 appear...

Страница 57: ...ge Drum Only Cyan Image drum Spot Color White Only for C941dn Can not be used in C911dn C931dn Image drum Spot Color Clear Note z z Do not expose the image drum to direct sunlight or strong light Abou...

Страница 58: ...4 Gently lift the handle blue upwards and remove the image drum taking care that your hand does not touch the drum on the lower side green cylindrical section Note z z Ensure not to touch or damage t...

Страница 59: ...Note z z Ensure not to touch or damage the drum 8 Close the front cover Memo z z If Error709 appears after replacing the image drum refer to When a message related to replacement of consumables appea...

Страница 60: ...fer roller units Types of belt unit and transfer roller unit The following belt units and transfer roller units can be used with this printer Item Belt unit 1 New transfer roller unit is supplied with...

Страница 61: ...6 kg Note z z Removing the belt unit will expose all image drums to light For preventing the optical deterioration of image drums do not leave them as it is for more than 5 minutes after removing the...

Страница 62: ...move the new belt unit from its packaging 9 Remove stopper from the belt unit you have removed 10Align the new belt unit and arrow label red of the printer set it in the printer and firmly press it in...

Страница 63: ...the left 13Set the waste toner box on the printer 14Close the front cover Replacing the transfer roller unit 15Lift opener of the output unit and pull out the output unit 16Pull up both tips of the t...

Страница 64: ...e z z Do not touch the sponge of the transfer roller unit 20Push both sides of the lock lever blue down 21Put the output unit back into the printer 22Please support recycling of the used belt unit and...

Страница 65: ...nits can be used with this device Item Fuser unit Replacing fuser units 1 Prepare a new fuser unit 2 Lift opener of the output unit and pull out the output unit 3 Pull up the fuser unit s lock lever b...

Страница 66: ...h both hands and set it to the exit unit 7 Push down the fuser unit s lock lever blue 8 Put the output unit back into the printer 9 Please support recycling of the used fuser units Memo z z When dispo...

Страница 67: ...nance unit Replacing waste toner boxes Types of waste toner box The following waste toner box can be used with this device Item Waste Toner Box Replacing waste toner boxes 1 Prepare a new waste toner...

Страница 68: ...packaging 5 Install the new waste toner box to the printer 6 Close the front cover 7 Please support recycling of the used toner boxes Memo z z When disposing of the used waste toner box in unavoidable...

Страница 69: ...er feed roller set for Multi Purpose Tray Replacing paper feed rollers of Tray 1 to Tray 5 There are three types of paper feed rollers Center is white With gear Center is blue Items to be prepared Pap...

Страница 70: ...hile expanding the claws of feed rollers in outside direction remove them from the axial Memo z z When the feed rollers are dark and not visible open the right side cover Removing paper jam in the vic...

Страница 71: ...ntenance unit 71 Index Troubleshooting 1 2 Maintenance 7 Insert the new feed rollers in the axial and firmly insert up to inside 8 Similarly insert the remaining two paper feed rollers 9 Check that no...

Страница 72: ...and ensure to dispose according to the instructions provided by the local municipality Replacing the paper feed rollers and separator of Multi Purpose Tray There are three types of paper feed rollers...

Страница 73: ...nsumables and maintenance unit 73 Index Troubleshooting 1 2 Maintenance 4 Lift the opening and open the right side cover 5 While expanding the claws of feed rollers in outside direction remove them fr...

Страница 74: ...4 Index Troubleshooting 1 2 Maintenance 6 Lift Section A release the claws in the direction shown in figure and remove the paper feed rollers 7 Pinch the claws two places and remove the separator Open...

Страница 75: ...the separator 9 Insert the new paper feed rollers and firmly insert up to inside along the notch 10Insert the new feed rollers in the axial and firmly insert up to inside while rotating them 11 Check...

Страница 76: ...2 Maintenance 14Please support recycling of the used paper feed rollers Memo z z When disposing of the used paper feed rollers in unavoidable circumstances put them in a plastic bag and ensure to dis...

Страница 77: ...nt on one piece of cotton cloth and wipe with thoroughly squeezed cloth Furthermore wipe off with another dry cotton cloth Cleaning LED heads Clean LED head when there are stripes or white creases on...

Страница 78: ...enance 3 Open the front cover 4 Gently lift the handle blue upwards and remove the photoreceptor from the lower side taking care that your hand does not touch the drum on the lower side green cylindri...

Страница 79: ...dex Troubleshooting 1 2 Maintenance 5 Remove the waste toner box from the printer 6 Push the center lever blue to the right 7 Rotate the belt unit left right lock lever knob blue to the left and push...

Страница 80: ...the belt unit When leaving for more than 5 minutes close the front cover or remove all image drums and store them in a safe place where they are not directly exposed to sunlight or fluorescent light...

Страница 81: ...81 Index Troubleshooting 1 2 Maintenance 11 Raise the belt unit left right lock lever rotate the lock lever knob blue to the right and lock it 12Return the center lever blue to the left 13Set the wast...

Страница 82: ...he image drum and arrow label red of printer slowly insert in the slot taking care that your hand does not touch the photoreceptor green below and firmly push it inside Note z z Ensure not to touch or...

Страница 83: ...Remove wrist watch bracelet etc 2 Press and hold the power switch for approximately 1s to switch off the power supply 3 Check that the operation panel is completely turned off and then switch off the...

Страница 84: ...he paper feed rollers of Multi Purpose Tray 1 Press and hold the power switch for approximately 1s to switch off the power supply 2 Check that the operation panel is completely turned off and then swi...

Страница 85: ...he dirt on paper feed rollers with the moist soft cloth 6 Lift Section A 7 Wipe off the dirt on paper feed rollers 2 places and on separator with the moist soft cloth 8 Insert the feed rollers in the...

Страница 86: ...ple and move it to the destination Transporting the device CAUTION There is a risk of injury The printer weighs approx 97kg for C911 C931 ES9411dn ES9431dn models and approx 117 Kg for C941 ES9541dn m...

Страница 87: ...Index Troubleshooting 1 2 Maintenance 87 Index Troubleshooting 1 2 Maintenance Index Troubleshooting 1 2 Maintenance Index...

Страница 88: ...Maintenance units 52 Message 14 O Other troubles 40 Blurred print 47 Operation of the device 42 Paper feeding 50 P Paper feed roller 52 53 69 83 Paper jam 11 2 Sided Printing Unit 21 23 2 Sided Print...

Страница 89: ...89 Index Troubleshooting 1 2 Maintenance U USB connection 40 Basic cause 47 Paper feeding 44 Power outage 40 Print quality 40 Printer driver 41 Right side cover 50 W Waste toner box 52 53 67...

Страница 90: ...www okiprintingsolutions com Oki Data Corporation 4 11 22 Shibaura Minato ku Tokyo 108 8551 Japan 45582802EE 02EE Rev1...

Отзывы: