background image

- 230 -

7. Utility Software

4

Change the setting if necessary.

5

Click [OK].

Up to 100 senders can be registered as e-mail senders.

Checking Logs

Using the event log, you can check whether there are any records about the machine that is 
registered.

1

Click [Start], and then select [All Programs] > [Okidata] > [Configuration Tool] > 
[Configuration Tool].

2

Select [Alert Info] from the [Plug-ins] menu.

3

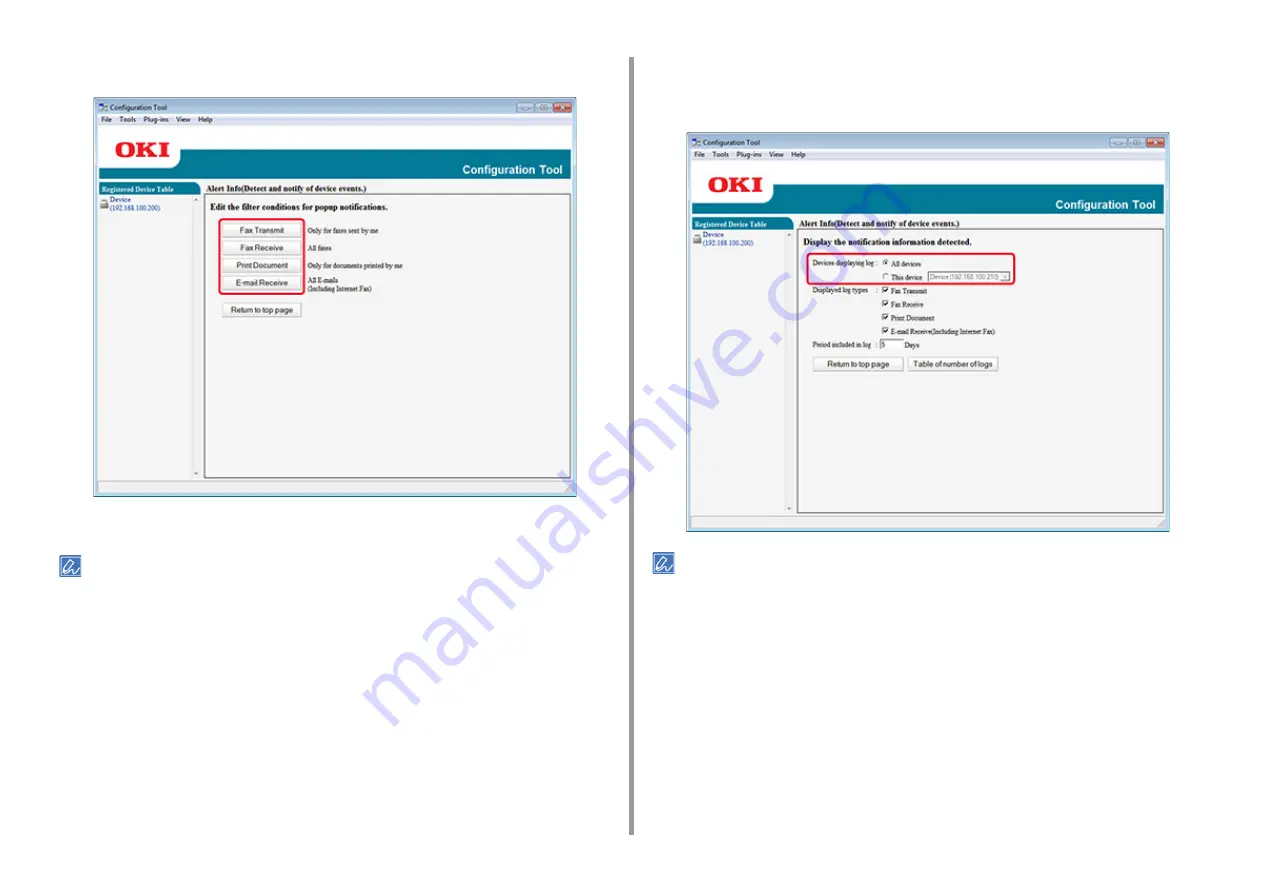
Select [Display log].

4

Select [Devices displaying log].

• You can check the total number of recorded events in [Log Number List].

• You can check details of recorded logs in [Log details].

Содержание C542

Страница 1: ...C542 ES5442 Advanced Manual...

Страница 2: ...and illustrations used in this manual About Marks This manual uses the following marks Mark Meaning Indicates cautions and restrictions for the correct operation of the device Be sure to read them to...

Страница 3: ...er Duplex Printing 44 Saving Toner 45 Combining Multiple Pages onto One Sheet of Paper 46 Adjusting Color on the Computer 48 Printing Color Data in Grayscale 48 Using Color Matching on Printer Driver...

Страница 4: ...Appear 109 The Peripheral Area of the Page is Dirty 109 Color of the printed image is not what you expect 110 Solid printing of CMY 100 is too light 110 Problems about Software 111 Problems on Configu...

Страница 5: ...owser 210 About Items That Can be Set or Checked 211 Color Correct Utility 215 Changing Palette Color 215 Changing Gamma Value or Hue 217 Printing in Adjusted Color Settings 218 Saving Color Correctio...

Страница 6: ...8 Set Options Automatically 249 Uninstall the Utility 249 Network Card Setup Mac OS X 250 Setting the IP Address 250 Configuring Web Settings 251 Quitting Network Card Setup 251 Print Job Accounting C...

Страница 7: ...l Adjusting Brightness of the Touch Panel Adjusting the Touch Position of the Touch Panel Setting Output Destination Adjusting Volume Checking the Information of the Machine Easy Setup JOB MACRO This...

Страница 8: ...administrator name and password and press OK The factory default administrator name and password are admin and 999999 respectively 4 Press Configure Home Screen 5 Press the button whose setting you w...

Страница 9: ...Print From USB Memory Google Cloud Print Job Macro Troubleshoot indicates the factory default setting 4 Move Moves the selected button to a specified location 5 Delete Deletes the function that is reg...

Страница 10: ...nd press Admin Setup 3 Enter the administrator name and password and press OK The factory default administrator name and password are admin and 999999 respectively 4 Press Manage Unit 5 Press System S...

Страница 11: ...ch panel 2 Press or several times and then press Admin Setup 3 Input the admin name and password and press OK The default admin name is admin and the default admin password is 999999 4 Press Manage Un...

Страница 12: ...ng Paper jams may result Output Tray Rear Output Tray Use this output tray when printing on plain paper Paper is output with the printed side down It is not available for envelopes labels or long pape...

Страница 13: ...he output tray Use the rear output tray when printing on envelopes labels or long paper Paper is output with the printed side up Plain paper is also available for this output tray 1 Open the rear outp...

Страница 14: ...14 1 Basic Operations 3 Draw the sub support...

Страница 15: ...pressed When a paper jam occurs AirPrint Buzzer Volume 1 Press Device Settings on the touch panel 2 Press or several times and press Admin Setup 3 Enter the administrator name and password and press O...

Страница 16: ...vice Settings on the touch panel 2 Press Reports 3 Select the category of a report to print 4 Select a report to print If the administrator login screen is displayed enter administrator name and passw...

Страница 17: ...Information Prints general information on the network Supplies Report Prints the information about consumables User Counter Report Prints the user counter report Account Counter Report Prints the acc...

Страница 18: ...or password 6 to 12 characters can be used Item Description Enabling Default Gateway If wireless LAN module fitted Sets which default gateway to be enabled between wired LAN or wireless LAN Wireless S...

Страница 19: ...ets the IP address for a Secondary DNS server You can enter up to 15 characters WINS Server Primary Sets the name or the IP address for the WINS server You can enter up to 15 characters WINS Server Se...

Страница 20: ...tion is enabled log in to the machine before creating a macro You can register up to 16 macros Registering a Frequently used Setting as a Macro Using a Registered Macro Editing a Macro Title Checking...

Страница 21: ...ations 3 Change a setting value to register 4 Press Register to Job Macro on the touch panel 5 Check the setting and then press Yes 6 Enter a new macro name Entering Characters User s Manual 7 Press O...

Страница 22: ...the functions you want to use a message is displayed to inform you that you are not permitted to use them and the screen returns to the JOB MACRO menu 3 Perform a job You can edit a macro title 1 Pres...

Страница 23: ...heck the content and then press Back If you press Apply instead of Back the macro is applied You can delete a macro 1 Press Job Macro 2 Press Edit 3 Select a macro and then press Delete A confirmation...

Страница 24: ...gs from a Computer Saving Paper Saving Toner Adjusting Color on the Computer For a Better Finish Useful Functions Printing Confidential Document WordPad for Windows and TextEdit for Mac OS X are used...

Страница 25: ...asing may occur after printing Be sure to perform a test print to check that no problems exist Load envelopes with the address side up in the direction as described below If you are using envelopes wi...

Страница 26: ...de up 2 Open the rear output tray 3 Press Device Settings on the touch panel 4 Press Paper Setup 5 Press MP Tray 6 Press Paper Size 7 Press the size of envelopes you use 8 Press Back until the home sc...

Страница 27: ...move the envelope lever For details see Removing the Envelope Lever For Mac OS X 1 Open the file to print 2 Select Print from the File menu 3 Select the envelope size from Paper Size and select the or...

Страница 28: ...played Available label type About Paper Types That Can be Loaded User s Manual For Windows PCL Printer Driver 1 Open the file to print 2 Select Print from the File menu 3 Click Preferences 4 Select A4...

Страница 29: ...es of 64 to 216 mm in width and 90 to 1321 mm in length can be registered Register the paper size so that the length is longer than the width You cannot set the length that is shorter than the width T...

Страница 30: ...ze from the drop down list and then enter values in Width and Height 5 Press OK until the print setting dialog is closed 6 Open the file to print 7 Select Print from the File menu 8 Click Advanced 9 C...

Страница 31: ...ormal 600x600dpi for Quality in the PS printer driver Printing may be improved Loading Custom Size Paper When printing on custom paper size change the paper type setting and specify a paper tray 1 Loa...

Страница 32: ...down list 13 Click OK 14 Change other settings if necessary and then click OK 15 Click Print on the Print screen For Mac OS X On Mac OS X you can set a paper size out of the available range in the pr...

Страница 33: ...et at a time by loading paper in the MP tray The Paper request on MP Tray message is displayed on the touch panel every time you print one page To continue printing select Print Resume To cancel print...

Страница 34: ...essage is displayed every time you print one page For Mac OS X 1 Open the file to print 2 Select Print from the File menu 3 Select Multi Purpose Tray for All Pages From on the Paper Feed panel 4 Selec...

Страница 35: ...he Print screen For Windows PS Printer Driver 1 Open the file to print 2 Select Print from the File menu 3 Click Preferences 4 Select the Resize document to fit printer page checkbox on the Job Option...

Страница 36: ...tray from Source and then click OK Select a paper type from Type and media weight from Weight if necessary 7 Change other settings if necessary and then click OK 8 Click Print on the Print screen For...

Страница 37: ...n To make an A5 booklet by using A4 paper select A4 from Size on the Setup tab If this function is not available with the Windows PCL printer driver select Start Devices and Printers right click the O...

Страница 38: ...en select Printer properties the Advanced tab Print processor OKX05HPP OK For Windows PCL Printer Driver For Windows PS Printer Driver This function is not available on Mac OS X Watermarks are not pri...

Страница 39: ...der of registration and printed The form that is registered last is printed on the top Before printing overlay create a form and register it in this machine Registering Forms For Windows PCL printer d...

Страница 40: ...gistered using the Storage Manager plugin of Configuration Tool select pages on which you want to apply the form from Print on Pages and then click OK 7 Click OK 8 Change other settings if necessary a...

Страница 41: ...ws PS Driver For Mac OS X Printing the Stored Document from This Machine Store a print job in the internal memory of the printer When printing select a shared job from the operator panel If you cannot...

Страница 42: ...rom Job Type Options 5 Change other settings if necessary and then click Print The print job is only sent to the printer and it is not printed yet If setting details are not displayed in the print dia...

Страница 43: ...nction you must set the e mail reception settings on a POP server or SMTP server E mail Setup Web Page For the number of copies duplex printing or other printing settings the current settings on the A...

Страница 44: ...tom size Duplex printing is available for the following media weight 64 to 176 g m2 17 to 46 8 lb Do not use media weight other than the above because paper jams may occur This function may not be ava...

Страница 45: ...dows PCL Printer Driver For Windows PS Printer Driver For Mac OS X Printing is possible with less toner The amount of toner can be saved in three levels Printer setting Conforms to the printer setting...

Страница 46: ...Printer Driver For Windows PS Printer Driver For Mac OS X You can print multiple pages of a document onto a single side of a sheet of paper This function reduces the page size of your document for pr...

Страница 47: ...8 Click OK 9 Change other settings if necessary and then click OK 10 Click Print on the Print screen For Mac OS X 1 Open the file to print 2 Select Print from the File menu 3 Select the number of page...

Страница 48: ...3 Click Preferences 4 On the Setup tab select Monochrome 5 Change other settings if necessary and then click OK 6 Click Print on the Print screen Selecting Monochrome on the printer driver enables you...

Страница 49: ...this setting when printing business document using word processing software spreadsheet software and presentation software Color matching is applied when RGB color space print data is converted to CM...

Страница 50: ...as that of an offset printing press by adjusting the CMYK color data For some applications this function is not available on Mac OS X This function can be used when the Office Color or Graphic Pro is...

Страница 51: ...imulation Target Profile 7 Change other settings if necessary and then click Print If setting details are not displayed in the print dialog click Show Details at the bottom of the dialog You can print...

Страница 52: ...machine turns on or the output trays are opened closed You can manually adjust color registration from the operation panel if necessary 1 Press Device Settings on the touch panel 2 Press or several t...

Страница 53: ...53 2 Print 5 Press Color Menu 6 Press or several times and press Adjust Registration 7 Press Yes...

Страница 54: ...ion from the operation panel if necessary 1 Press Device Settings on the touch panel 2 Press or several times and press Admin Setup 3 Enter the administrator name and password and press OK The factory...

Страница 55: ...times and press Admin Setup 3 Enter the administrator name and password and press OK The factory default administrator name and password are admin and 999999 respectively 4 Press Print Setup 5 Press C...

Страница 56: ...Print You can adjust color using utilities For details refer to the instruction manuals of the utilities Color Correct Utility Color Swatch Utility PS Gamma Adjuster Utility Adjusting Color with Soft...

Страница 57: ...g White Gap Between Text and Background Overprinting Black You can print photographs more vividly This function is not available with the Windows PS printer drivers or on Mac OS X For Windows PCL Prin...

Страница 58: ...the Job Options tab 5 Select a print quality level from Quality 6 Change other settings if necessary and then click OK 7 Click Print on the Print screen For Mac OS X 1 Open the file to print 2 Select...

Страница 59: ...click OK 7 Change other settings if necessary and then click OK 8 Click Print on the Print screen For Windows PS Printer Driver 1 Open the file to print 2 Select Print from the File menu 3 Click Pref...

Страница 60: ...rt and then select Devices and Printers 2 Right click the OKI C542 PS icon and then select Printer properties 3 Double click Font Substitution Table on the Device Settings tab 4 Click a TrueType font...

Страница 61: ...are two types of black finishes one is composed of cyan C magenta M yellow Y and black K toners and the other is composed of a black K toner only A black finish using CMYK toners is suitable for prin...

Страница 62: ...the dialog Depending on the conditions of use you can set black to overprint and reduce the white gap between black letters and colored background This function cannot be used with some applications...

Страница 63: ...7 Click Print on the Print screen For Mac OS X 1 Open the file to print 2 From the File menu select Print 3 Select the Print Options panel 4 Select the Black Overprint check box in the Quality 1 tab 5...

Страница 64: ...y For Windows PCL Printer Driver For Windows PS Printer Driver For Mac OS X You can print a multiple page document in units of copies This function may not be available for some applications For Windo...

Страница 65: ...ory For Windows PS Printer Driver For Mac OS X You can print in forward or reverse page order to suit your needs When using the output tray print in the forward page order to stack printouts in forwar...

Страница 66: ...s set with the printer driver Trays switch in accordance with the Tray Sequence setting Be sure to set the paper size and weight for paper cassettes and the MP tray on the touch panel Loading Paper Us...

Страница 67: ...S Printer Driver For Mac OS X When the specified tray runs out of paper the machine can continue to print from another tray if paper of the same paper size weight and type is loaded in the paper casse...

Страница 68: ...ick Preferences 4 Click Advanced on the Layout tab 5 Click Tray Switch and then select ON 6 Click OK 7 Change other settings if necessary and then click OK 8 Click Print on the Print screen For Mac OS...

Страница 69: ...can save up to 14 settings Registering the Windows PCL Driver Settings 1 Click Start and then select Devices and Printers 2 Right click the OKI C542 PCL6 icon and then select Printing preferences 3 Se...

Страница 70: ...nter Driver For Windows PS Printer Driver For Mac OS X You can spool print jobs to the memory that is integrated in this machine This allows you to finish your work on your computer early which makes...

Страница 71: ...S X The paper size depends on the PDF Paper Size setting from Device Settings Admin Setup Print Setup PS Setup on the touch panel For Windows install PDF Print Direct beforehand List of Utility Softwa...

Страница 72: ...baseline XPS PRN PS PCL XPS Up to 32 GB USB Memory is supported Up to 100 files in supported file formats that are saved in USB Memory are displayed in the file list If 100 or more files are saved in...

Страница 73: ...d to inform you that you can remove USB Memory from the port remove it Cancelling a Print Job To cancel a print job from USB Memory press the STOP button on the operator panel You can cancel a print j...

Страница 74: ...ou cannot store the spooled data due to insufficient free space in the internal memory of this machine a message is displayed to inform you that the file system is full and the print job is not execut...

Страница 75: ...nly sent to this machine and it is not printed yet The print job saved in the memory is automatically deleted if the printing is complete or not printed for a certain period of time If an error occurs...

Страница 76: ...Each Part of the Machine Updating Installed Drivers Removing Installed Driver Updating Firmware Initializing Memory and Settings This category describes consumable replacements and cleaning to ensure...

Страница 77: ...isplayed to prevent malfunction If you replace the belt unit use it until the end of its usable life If you remove the belt unit and install and use another one before its usable life has expired the...

Страница 78: ...removing the image drum be careful not to hit it to the LED head 4 Cover the image drums you took out with paper so that the image drums do not expose to the light 5 Turn the lock levers b on the bot...

Страница 79: ...nto the machine 8 Turn the lock levers b on the both sides of the belt unit backward 9 Return all the four image drums to the machine While setting the image drum be careful not to hit it to the LED h...

Страница 80: ...the fuser unit somewhat you should replace it soon after Change Fuser Unit is displayed to prevent malfunction If you replace the fuser unit use it until the end of its usable life If you remove the...

Страница 81: ...ad 5 Push the blue lever on the new fuser unit and remove the orange safety stopper 6 Hold the handle of a new fuser unit align the fuser unit to the grooves behind the toner cartridges place the fuse...

Страница 82: ...lock 8 Close the output tray a slowly and push the center of the tray for confirmation Do not touch the LED head when closing the output tray 9 Please recycle fuser unit If you must dispose of a fuser...

Страница 83: ...se benzine thinners or alcohol because they may damage the plastic parts of the machine Do not lubricate the machine with oil Do not apply oil 1 Turn off the machine Turning Off the Machine User s Man...

Страница 84: ...2 3 1 Pull out the paper cassette 2 Wipe the two paper feed rollers inside the machine with a wet cloth that has been wrung out well 3 Remove paper loaded in the paper cassette 4 Wipe the separation...

Страница 85: ...gers into the front recess 2 Slightly lifting the MP tray a press the right arm b inward then unlock the tab c 3 In the same manner slightly lifting the MP tray press the left arm inward then unlock t...

Страница 86: ...ay a and hook the tab c Closing the MP tray without putting the tab back in place may crack the paper set cover Be sure to put it back in place 8 In the same manner while pressing the left arm on the...

Страница 87: ...e 1 Double click the downloaded file If the User Account Control dialog is displayed click Yes 2 Select a language and then click OK 3 Read the license agreement and then click Agree 4 Install the dri...

Страница 88: ...ferences from the Apple menu 5 Click Printers Scanners 6 Click and select Add Printer or Scanner when the menu is displayed If the machine is already shown in Printers select your machine and click on...

Страница 89: ...splayed click Yes When a message is displayed to inform you of the device in use restart a computer and then repeat steps 1 to 2 4 Select an icon in Printers and Faxes and then click Print server prop...

Страница 90: ...tions enter the administrator password and then click OK until the uninstallation procedure is complete 8 Remove the Software DVD ROM from the computer For OS X 10 8 5 1 Select System Preferences from...

Страница 91: ...91 3 Maintenance Updating Firmware You can update the firmware of your machine to the latest version through the Internet For details visit the Oki Data web site...

Страница 92: ...e administrator name and password and press OK The factory default administrator name and password are admin and 999999 respectively 4 Press Manage Unit 5 Press or several times and press Storage Main...

Страница 93: ...en Manage Unit settings User Install settings 1 Press Device Settings on the touch panel 2 Press or several times and press Admin Setup 3 Enter the administrator name and password and press OK The fac...

Страница 94: ...If the STATUS Button on the Operator Panel Lights Up or Flashes Print Problems About Problems with Printing Results Problems about Software Problems on the Machine or Paper AirPrint Problems Google Cl...

Страница 95: ...on on the Operator Panel Lights Up or Flashes If any problem occurs in this machine the STATUS button lights up or flashes Press the STATUS button and check the problem status 1 Press the STATUS butto...

Страница 96: ...the hub On the touch panel press Device Settings select Admin Setup Network Menu Network Setup Network Setting HUB Link Setting and then change the setting The network connection setting is incorrect...

Страница 97: ...reless access point We suggest that the distance between the machine and the access point be 30 m or less If there is metal aluminum sash or a reinforced concrete wall between the machine and wireless...

Страница 98: ...ual Cause Solution Reference The machine is offline Right click the OKI C542 icon on the Devices and Printers folder and then select See print jobs If the icons are grouped select See print jobs OKI C...

Страница 99: ...he Entire Paper Area is Lightly Stained When Printing on Envelopes or Coated Paper Toner Comes Off When Printed Paper is Rubbed Uneven Gloss Black or White Dots Appear Dirt is Printed The Entire Page...

Страница 100: ...opes or Coated Paper Toner Comes Off When Printed Paper is Rubbed Uneven Gloss Black or White Dots Appear Dirt is Printed The Entire Page is Printed Black Nothing is Printed White Patches Appear The P...

Страница 101: ...e paper The image drum is not installed properly Install the image drum properly Replacing the Image Drum User s Manual There may be foreign objects in the image drum Replace the image drum Replacing...

Страница 102: ...s of the media weight is incorrect On the touch panel press Device Settings select Paper Setup the paper tray you are using and then select the proper values for Media Type and Media Weight Or select...

Страница 103: ...erature and humidity conditions are high Use the machine under proper temperature and humidity conditions Installation Requirements User s Manual Vertical Lines Appear Cause Solution Reference The ton...

Страница 104: ...utput tray and then print again Names of Components User s Manual The image drum has been exposed to light Place the image drum back into the machine and then do not use for a few hours If the problem...

Страница 105: ...paper is unsuitable Use recommended paper Loading Paper User s Manual The paper is damp Replace the damp paper with new paper Loading Paper User s Manual The Entire Paper Area is Lightly Stained When...

Страница 106: ...up the paper tray you are using and then select a thicker value for Media Weight Loading Paper User s Manual The envelope lever remains attached Remove the envelope lever Printing on Envelopes The saf...

Страница 107: ...94 mm 3 7 inches the green tube of the image drum is damaged or dirty Lightly wipe the image drum with a soft tissue paper Replace the image drum if it is damaged Replacing the Image Drum User s Manu...

Страница 108: ...alfunction may occur in the machine Contact your dealer Nothing is Printed Cause Solution Reference Two or more sheets of paper are fed at the same time Fan the paper well and load the paper again Loa...

Страница 109: ...per User s Manual The paper is unsuitable Use recommended paper Loading Paper User s Manual The Peripheral Area of the Page is Dirty Cause Solution Reference The document is not reduced at the rate th...

Страница 110: ...ed Do color matching from the printer driver Using Color Matching on Printer Driver The color balance is out of adjustment On the touch panel press Device Settings Admin Setup Color Setup and adjust d...

Страница 111: ...reen The model name of the copy destination device is different Cloning functions only between the devices with the same model name Check the model name of the copy destination device Cloning Settings...

Страница 112: ...printer driver is already installed another printer driver cannot be installed Perform Custom Install by following the procedure described in the reference Installing Software The Unable to install p...

Страница 113: ...ashes at approximately 0 3 second intervals Problems on the Machine Cause Solution Reference The power cord is unplugged Turn off the machine and then plug in the power cord firmly Connecting the Powe...

Страница 114: ...the Machine A communication protocol is disabled On the touch panel press Device Settings select Admin Setup Network Menu Network Setup Network Setting and then enable the communication protocol that...

Страница 115: ...inting process is also processed in the computer Use a computer with faster processing speed You have selected Fine Detail 1200x1200 on the Job Options tab of the printer driver Select Nomal 600x600 o...

Страница 116: ...e paper guide and paper stopper to the paper For the MP tray adjust the manual feeding paper guide to the paper Loading Paper User s Manual Envelopes are loaded in the wrong direction Load the envelop...

Страница 117: ...oading Paper User s Manual There are nearly solid fill on the leading edge of the paper Insert a margin into the leading edge of the paper For duplex printing insert a margin into the bottom edge of t...

Страница 118: ...the information Device Settings Admin Setup User Install Execute Erase Privacy Data on the touch panel The following information is saved in the device Before Relinquishing Your Device Admin Password...

Страница 119: ...he Machine User s Manual Is the machine connected to the same network as the iOS device Check that the machine is displayed on the print screen of the iOS device If the machine is not displayed check...

Страница 120: ...eference Did you delete the machine on the management screen of Google Cloud Print Delete the registration information from the operator panel of the machine Checking That Deletion is Complete Error c...

Страница 121: ...If the problem cannot be solved check with your network administrator xxxxxx83 Failed to connect to the XMPP server Check that the XMPP 5222 port is opened If the problem cannot be solved check with...

Страница 122: ...ment Specifications Administrator Setup Management Software User Authentication Access Control Account Management Moving Transporting This Machine This section describes how to manage the machine and...

Страница 123: ...ge the administrator settings the administrator name and password are required The factory default administrator name and password are admin and 999999 respectively Use them if any administrator names...

Страница 124: ...range 1 to 999 Duplex OFF or Long Edge Bind Turns the duplex printing function on or off OFF simplex printing Long Edge Bind duplex printing for long edge binding Short Edge Bind duplex printing for s...

Страница 125: ...ines appear decrease the value If the dark part becomes light increase the value Item Factory default setting Description SMR Setting SMR Setting Black 0 Corrects variations in print results caused by...

Страница 126: ...y Cyan Density 0 Adjust the total density of each color within a range of 3 to 3 Adjusted to be darker Adjusted to be lighter Magenta Density 0 Yellow Density 0 Black Density 0 Adjust Registration Col...

Страница 127: ...1 The effective number for paper tray starts from 1 Type 2 The effective number for paper tray starts from 0 Network PS Protocol RAW Specifies PS communication protocol mode of data from Network USB P...

Страница 128: ...pacing White Page Skip OFF Selects whether to print blank pages CR Function CR Select a carriage return from CR or CR LF Line Length 80 Column Specifies the number of characters per line Form Length 1...

Страница 129: ...is item is displayed when TCP IP protocol is enabled Proxy Disable Sets whether to use proxy Proxy Server NULL Sets the name or IP address of the proxy server You can enter up to 15 characters Proxy S...

Страница 130: ...etup SSID Device specific string Displays SSID of Wireless AP Mode Password 8 digit number Displays the password of Wireless AP Mode Item Factory default setting Description Connection Setting SSID De...

Страница 131: ...art searching the LDAP directory Authentication Method Anonymous Sets the authentication method For Digest MD5 the DNS server must be set For Secure Protocol the SNTP server DNS server and secure prot...

Страница 132: ...cts a displayed unit millimeter inch Default Paper Size A4 or Letter Sets the default paper size Date Format dd mm yyyy or mm dd yyyy Sets the date format Allow All Reports To Print Disable Sets wheth...

Страница 133: ...y available in a file system and performs administration data FAT information recovery Initial Lock Enable Sets whether to give permission to change settings associated with the memory initialization...

Страница 134: ...ows to always enable the toner save function To forcibly enter the machine in toner save mode select Mode2 High Humid Mode OFF Sets whether to enable the humidity mode Selecting Enable reduces curl ge...

Страница 135: ...135 5 Operating Management Specifications Management Software This section describes useful software for managing the machine Configuration Tool Web Page of This Machine...

Страница 136: ...control so that the access control function can be used For the preparation process to use the access control function refer to Preparation For Administrator When the access control function is enable...

Страница 137: ...assign authorized operations to each role and then register Up to 100 roles can be registered Controllable operations by roles are as follows Printing from a Computer Printing from USB Memory Two type...

Страница 138: ...een change items if required and then register Registering Users When using Local authentication for the user authentication register users on a web browser Up to 5000 users can be registered 1 Open t...

Страница 139: ...ccount Management function 8 Click Submit You can copy registered users to add Click Copy on the right of the user name to display the user information screen change items if required and then registe...

Страница 140: ...ecify the attribute key to obtain the language code of the user information Group Set when automatically assigning users to groups Card ID Set when using IC card authentication You do not need to ente...

Страница 141: ...t Regulations 9 To add a new rule for assigning a role click 10 When the role assigning screen appears enter the required information 11 Click Submit Enabling Access Control After the user information...

Страница 142: ...o monochrome before being printed If Disable is set received Email attachment is not printed Use Google Cloud Print Make the access control settings of the Google Cloud Print function Three options Co...

Страница 143: ...use IC card authentication connecting an IC card reader is required The message Authent by IC card is also available is not displayed if no IC card reader is connected When the access control functio...

Страница 144: ...l is enabled enter user information from the printer driver to print For Windows The procedure when using the memo pad and PCL printer driver is used as an example 1 Select Print from the File menu 2...

Страница 145: ...the Device Options tab 9 If Summary Account Name is displayed set a type of summary account account to be charged usage amount of printing points and name If you want to add up for each user and grou...

Страница 146: ...Edit as an example 1 Select Print from the File menu 2 Select the printer driver of this machine 3 Select User Authentication from the panel menu 4 Select the Use User Authentication check box Clear t...

Страница 147: ...s Supplies 4 Check functions you want to use in the Options tab 5 Change Default Authentication Type and then click OK To log in the machine using an IC card register the IC card information You can r...

Страница 148: ...e XX points for color printing etc Each time users print corresponding numbers of points are subtracted from their accounts Users whose remaining points reach 0 cannot print Before enabling the accoun...

Страница 149: ...ed Format Setting Set an action when your points are insufficient Display Time of The Insufficient Balance Error When you do not have enough points to perform the job the error screen appears on the o...

Страница 150: ...ue printing when the remaining points reach 0 Set a number of points to each account 1 Open the Web page of the machine Open the Web Page of This Machine 2 Log in as the administrator Log In as the Ad...

Страница 151: ...t Points are charged for each print job For the balance you cannot enter a number larger than that for the assigned amount 8 Click Submit Create a shared account which can be used by the users 1 Open...

Страница 152: ...pecifications 7 Enter Shared Account Name Assigned Amount and Balance and then set Operation When Balance is Insufficient 8 Set a role which can use the shared account For the role see Preparation For...

Страница 153: ...rinting Points are charged on a page by page basis so when you print two pages you need twice as much as the set rate In addition you can apply point reduction system for two sided printing or saving...

Страница 154: ...e paper to A4 paper 6 Enter the setting value and click Submit 7 Close the setting screen 8 Click Duplex Printing Discount Settings or Toner Saving Discount Rate Settings OnlyWhen Toner Saving Calcula...

Страница 155: ...rint or Private Print follow the procedure below 1 Log in to the machine 2 If several accounts are available select an account to use To switch accounts log out from the current account and then log i...

Страница 156: ...executed ask your administrator for checking your balance in Summary Account Settings The period of time from when the shortage of points is detected to when the machine deletes the job can be set on...

Страница 157: ...ne Transporting This Machine 1 Turn off the machine Turning On or Off the Machine User s Manual 2 Unplug all the cables Power cord LAN or USB cable 3 Remove any paper from the paper trays 4 Lift up th...

Страница 158: ...tional additional tray unit is installed remove the 2 lock pieces 5 Lift up the machine to remove the additional tray unit 6 Attach the packing material to the machine Use the packing box and packing...

Страница 159: ...6 Network AirPrint Google Cloud Print Network Related Software Network Settings Network Problems This section describes the network operation of the machine...

Страница 160: ...ting with AirPrint Print AirPrint Print is a function that enables you to easily print from a Mac You can print from an iPhone iPad and iPod touch with using AirPrint Print The mobile device or Mac au...

Страница 161: ...s LAN Infrastructure in advance Before Connecting to a Wireless LAN User s Manual If you want to connect with a wired LAN connect this machine to the access points with a LAN cable If you want to conn...

Страница 162: ...used as an example 1 Turn on the machine and computer 2 Connect this machine to the computer with a wired or wireless LAN 3 Select System Preferences from the Apple menu 4 Click Printers Scanners 5 C...

Страница 163: ...t with Mac OS X register this machine on the computer Registering the Machine in a Computer Mac OS X Printing from an iOS Device 1 Open a file 2 Tap Action 3 Tap Print The name of the printer model th...

Страница 164: ...Network 4 Tap Printer to select your machine The functions that this machine supports are displayed 5 Set options 6 Tap Print Printing from a Computer Mac OS X 1 Open a file 2 Select Print from the Fi...

Страница 165: ...165 6 Network 3 Select OKI C542 from Printer 4 Set options 5 Click Print...

Страница 166: ...ther devices via the Internet With Google Cloud Print you can send documents or images to a specified printer from anywhere For example you can print from your computer at home to a printer in your of...

Страница 167: ...s how to register the machine in Google Cloud Print using a Google account If you already have an account there is no need to create a new account Proceed to step 3 To enter the Google Cloud Print men...

Страница 168: ...efault administrator name and password are admin and 999999 respectively 8 Check the DNS Server Primary setting value Since 0 0 0 0 indicates that the value is not set correctly set the IP address tha...

Страница 169: ...press Proxy to Enable If the proxy server is not used proceed to step 22 9 Press Proxy Server 10 Enter a server name You can enter up to 64 characters 11 Press OK 12 Press Proxy Server Port No 13 Ente...

Страница 170: ...password You can enter up to 64 characters For the setting values contact your network administrator 20 Press OK 21 Press Back to return to the Google Cloud Print menu 22 Press Register to Google Clo...

Страница 171: ...for registration authentication processing approximately 10 minutes Proceed to step 30 within the time restriction to complete the registration If you cannot complete within the time restriction and a...

Страница 172: ...ayed click Finish printer registration 29 Wait until the Thanks you re ready to go message is displayed 30 When the registration content and completion message is displayed on the operator of the mach...

Страница 173: ...the displayed drop down list 4 Select the registered machine on the displayed screen 5 Set the printing settings and then print To print use the Google account that you used to register the machine in...

Страница 174: ...following three ways Checking from the Management Screen of Google Cloud Print 1 Access the Google Web site from a computer smartphone or other mobile device The Google Cloud Print administrator scree...

Страница 175: ...nistrator 3 Click View Information 4 Click Network 5 Click Google Cloud Print 6 Check Using Cloud Service The use status is displayed There are three use statuses Enable You can print automatically or...

Страница 176: ...ion about the machine that is registered in Google Cloud Print by following the procedure below 1 Check that the machine is connected to a network If you delete the information with the machine connec...

Страница 177: ...rom Google Cloud Print in one of the following three ways Checking from the Management Screen of Google Cloud Print 1 Access the Google Web site from a computer smartphone or other mobile device The G...

Страница 178: ...dprint In such a case delete the machine on the Google Cloud Print administrator screen If You Deleted the Information on the Google Cloud Print Administrator Screen If you deleted the registered mach...

Страница 179: ...The IP address of this machine Specify the certificate that is issued by the certificate authority trusted by the proxy server You can import a PEM DER and PKCS 7 files For details on your network co...

Страница 180: ...Network Related Software This section describes useful software when using the machine connected to a network Web Page of This Machine Configuration Tool OKI LPR Utility Network Extension Network Card...

Страница 181: ...available combinations are as follows Enable Unable Wireless Infrastructure and Wireless AP Mode cannot be enabled at the same time If a wired LAN and wireless LAN are connected to the same subnet th...

Страница 182: ...OK The factory default administrator name and password are admin and 999999 respectively 4 Press Network Menu 5 Press Network Setup 6 Press Factory Defaults 7 Press Yes Initializing from the Operator...

Страница 183: ...3 6 Network Network Problems This section describes how to solve problems when the machine is connected to a network Unable to print from network Unable to Print User s Manual Network Connection Probl...

Страница 184: ...of This Machine Color Correct Utility Color Swatch Utility PS Gamma Adjuster Utility Configuration Tool OKI LPR Utility Network Extension Network Card Setup Mac OS X Print Job Accounting Client This...

Страница 185: ...u can adjust the color density used for photographs when printing from a computer PS Gamma Adjuster Utility Configuration Tool You can set the access control settings of this machine register and dele...

Страница 186: ...rs by adjusting the palette color output gamma value hue or saturation of the primary colors Color Correct Utility Network Card Setup You can set a network Network Card Setup Mac OS X Profile Assistan...

Страница 187: ...I LPR Utility Color Correct Utility Color Swatch Utility PS Gamma Adjuster Utility Configuration Tool PDF Print Direct Print Job Accounting Client Connect the machine to a computer via a network or US...

Страница 188: ...ge from the drop down list 4 Read the license agreement and then click Accept 5 Read Environmental advice for Users and click Next 6 Select Network or USB corresponding to your connection environment...

Страница 189: ...k Custom Install 9 Click Separate Install 10 Click a driver or software to install Installation starts The procedure below varies depending on the selected software The installation of the Configurati...

Страница 190: ...a utility by dragging to any location You can also run a utility directly from the Software DVD ROM 1 Insert the included Software DVD ROM into a computer 2 From OKI double click the Utilities folder...

Страница 191: ...That Can be Set or Checked Check whether your browser is set as follows Set the security setting for the Web page to the middle level or enable Cookie To enter the Admin Setup menu the administrator p...

Страница 192: ...lick Administrator Login 2 Enter admin in User Name and the current password in Password and then click OK The password is the same as the administrator password on the operator panel The factory defa...

Страница 193: ...or SKIP To omit the setting click SKIP To not display from the next login select the Do not show this page again check box and then click OK or SKIP 4 The following screen is displayed The following...

Страница 194: ...to restart the machine The next time you log in as the administrator you can use the new password You can operate the following from the Web page of this machine About the Operating Environment Displa...

Страница 195: ...e following screen is displayed You can check the remaining amount of the consumables printing counter and information of network and system of this machine You can change the setting of this machine...

Страница 196: ...e existing certificate click Delete Certificate 5 Specify detailed settings by following the on screen instructions 6 Check the settings and then click OK In the case of a self signed certificate clos...

Страница 197: ...rt Certificate to export a certificate You can export a certificate in PEM format Add this machine to your computer as an IPP printer If you enable IPP print you can send print data to this machine vi...

Страница 198: ...tered tries to access the machine it is rejected When you try to access a host that is not registered the attempt is invalid Be sure to configure the machine in advance before configuring your compute...

Страница 199: ...ty Policy Wizard 6 Enter Name and Description and then click Next 7 Clear the Activate the default response rule earlier versions of Windows only check box and then click Next 8 Select the Edit Proper...

Страница 200: ...ot support IPsec screen and then click Next 8 Select Custom on the IP Traffic Security screen and then click Settings 9 Set in the Custom Security Method Settings window and then click OK Set the same...

Страница 201: ...g access to hosts that are not specified in this setting is rejected 1 Open the Web page of this machine Open the Web Page of This Machine 2 Log in as the administrator 3 Select Admin Setup 4 Select N...

Страница 202: ...Setup Web Page Setting to Send an E mail Alert if an Error Occurs 1 Open the Web page of this machine Open the Web Page of This Machine 2 Log in as the administrator 3 Select Admin Setup 4 Select Netw...

Страница 203: ...rent settings of up to two addresses in the main window Select the address you want to check from the list box 11 Click Submit The new settings take effect when the network function of this machine re...

Страница 204: ...IUS server You can import a PEM DER and PKCS 7 file 13 Click Submit The new settings take effect when the network function of this machine restarts 14 Turn off the machine after this machine becomes o...

Страница 205: ...Using EAP TLS 1 Open the Web page of this machine Open the Web Page of This Machine 2 Log in as the administrator 3 Click Admin Setup 4 Select Network IEEE802 1X 5 Select Disable for IEEE802 1X 6 Sel...

Страница 206: ...er You can import a PEM DER and PKCS 7 file 11 Click Submit 12 Go to Setting Wireless LAN WPA WPA2 EAP when the machine becomes online Setting Wireless LAN WPA WPA2 EAP 1 Open the Web page of this mac...

Страница 207: ...hod Anonymous Connects to the LDAP server by Anonymous authentication Simple Connects to the LDAP server by Simple authentication Digest MD5 Connects to the LDAP server by Digest MD5 authentication Se...

Страница 208: ...ng information sheet if necessary 6 Click Submit 7 Click E mail Receive Settings on the left side of the screen 8 Select POP3 or SMTP and then click To STEP2 9 Set the POP3 protocol if necessary 10 Cl...

Страница 209: ...Setting the Transition Time You can set Auto Power Off Setting Auto Power Off 1 Open the Web page of this machine Open the Web Page of This Machine 2 Log in as the administrator 3 Click Admin Setup 4...

Страница 210: ...he application name set here is registered as a job macro name and is displayed in the Job Macro list Application Name and URL Address used when registered are regulated by the sXP application supplie...

Страница 211: ...of consumables Usage Report This function is displayed only if you log in as the administrator of the machine Displays the print statistics results Network You can check general information the status...

Страница 212: ...mation IEEE802 1X Sets EEE802 1X EAP information Secure Protocol Server Sets secure protocol server information LDAP Sets LDAP information Proxy Sets Proxy information Security Protocol ON OFF Stops a...

Страница 213: ...t settings Print Position Adjust Adjusts front X front Y back X and back Y positions Drum Cleaning Sets cleaning of an image drum Hex Dump Displays all the received print data in hex To exit this mode...

Страница 214: ...dministrator of the machine E mail Printing Prints a PDF JPEG and TIFF file if it is attached on an e mail that the machine receives Receive Settings Sets an e mail receive settings Item Description L...

Страница 215: ...Color Settings Saving Color Correction Settings Importing Color Correction Settings Deleting Color Correction Settings Color Correct Utility allows you to specify colors on the palette selected in so...

Страница 216: ...hen click OK 12 Click Print Palette and check if the adjusted color is closer to the color you want and then click Next If you want to change the color more or change other colors repeat steps 8 to 11...

Страница 217: ...3 Select the machine and click Next 4 Select the standard mode and click Next If the settings are initialized after the printer driver is updated or reinstalled start Color Correct Utility to reset t...

Страница 218: ...file you want to print 2 Select Print from the File menu 3 Click Preferences or Properties 4 Click Detail in the Setup tab and select Office Color 5 Select the Color Correct Utility Settings and selec...

Страница 219: ...er to save to and then click Save 8 Click Cancel You can import color correct settings from files For Windows 1 Click Start and select All Programs Okidata Color Correct Utility Color Correct Utility...

Страница 220: ...4 Select the file you want to delete and click Delete 5 On the confirmation screen click Yes 6 Check that the setting is deleted properly and then click Finish For Mac OS X 1 Launch Color Correct Uti...

Страница 221: ...om the application When the printer driver is installed the color swatch utility software is installed at the same time Printing Color Swatch Customizing the Color Swatch Printing a File With the Colo...

Страница 222: ...k OK 8 Check that the color is adjusted as you want If you are not satisfied with the printing result repeat from step 1 to 8 1 Open the file you want to print 2 Select the text or graphic to adjust t...

Страница 223: ...tions provided by the application uncheck Custom Gamma Adjustment check box in the Color tab for the windows print driver or select None for Custom gamma in the Quality2 tab on the Print Options panel...

Страница 224: ...yed while the printer is being registered click Cancel and then register the printer again For Windows PS Printer Driver 1 Open the file to print 2 Select Print from the File menu 3 Click Properties 4...

Страница 225: ...erlay Checking the Free Space in Memory Hard Disk Drive Registering a User Name and Password Removing This Machine Descriptions of Screens for Configuration Tool When you install this machine for the...

Страница 226: ...and information of this machine 1 Click Start and then select All Programs Okidata Configuration Tool Configuration Tool 2 Select the machine from Registered Device Table 3 Select the Device Info tab...

Страница 227: ...dministrator password and then click OK The factory default password is 999999 6 Select a cloning destination to and cloning settings 7 Click Execute 8 Enter the password for the cloning source and ta...

Страница 228: ...g ins menu 3 Select Basic settings 4 Change the setting if necessary 5 Click Update Device Settings 1 Click Start and then select All Programs Okidata Configuration Tool Configuration Tool 2 Select Al...

Страница 229: ...o set 6 Change the settings if necessary and then click OK Filter Settings You can set display alert conditions 1 Click Start and then select All Programs Okidata Configuration Tool Configuration Tool...

Страница 230: ...ether there are any records about the machine that is registered 1 Click Start and then select All Programs Okidata Configuration Tool Configuration Tool 2 Select Alert Info from the Plug ins menu 3 S...

Страница 231: ...u 3 Select Discover Devices Search results are displayed Specifying Search Conditions 1 Click Start and then select All Programs Okidata Configuration Tool Configuration Tool 2 Select Network Setting...

Страница 232: ...t the machine from the device list 5 Click Device Settings 6 Change the setting if necessary 7 Click OK 8 Enter the administrator password and then click OK The factory default password is 999999 9 Cl...

Страница 233: ...to the machine as forms and then print overlays This section describes how to register forms Creating a Form Registering the Form to the Machine Using Configuration Tool About how to Print Overlays Ov...

Страница 234: ...river for overlay printing specify the form ID entered in ID and who use the Windows PS printer driver specify the form name entered in Component 7 Select the machine from the bottom of the Storage Ma...

Страница 235: ...nguage Code Enter the language code PIN Enter the PIN Card ID Enter the user s IC card information Role Set the role Group Set the group the user belongs to You can enter PIN optional in the user sett...

Страница 236: ...he check box of the user you want to delete 8 Click Delete 9 Click Yes on a confirmation screen 10 Click Save to device You can remove a registered machine 1 Click Start and then select All Programs O...

Страница 237: ...vice Info tab The status and information of the machine are displayed User Setting tab Set the user role and other settings Descriptions of Screens for Configuration Tool Item Description 1 Role Manag...

Страница 238: ...the basic Alert Info settings 4 Setting devices Edit the communications settings for each device 5 Filter settings Edit the filter conditions for popup notifications 6 Display log Display the notific...

Страница 239: ...239 7 Utility Software Storage Manager plug in Create or edit a file to download to a device...

Страница 240: ...cking the Status of a Registered Device Forwarding Print Jobs to a Registered Device Printing the Same Document from the Registered Multiple Devices Opening the Web Page of the Registered Device Follo...

Страница 241: ...red in OKI LPR Utility To change the port select Confirm Connections from Remote Print 1 Start OKI LPR Utility 2 Select Add Printer from the Remote Print menu If the User Account Control dialog is dis...

Страница 242: ...tatus from the Remote Print menu 3 To forward a print job select a job select Redirect from the Job menu and then select the destination device Forwarding Print Jobs Automatically If you are unable to...

Страница 243: ...or rights 1 Start OKI LPR Utility 2 Select a device to set 3 Select Confirm Connections from the Remote Print menu 4 Click Details 5 Select the Print to more than one printer at a time check box 6 Cli...

Страница 244: ...o that you can maintain the connection with the original printer even after the IP address of the device changes You must have the administrator rights The IP address may change if DHCP dynamically as...

Страница 245: ...re is a device that is connected via a network and registered in OKI LPR Utility you can download the print data 1 Start OKI LPR Utility 2 Select the device to which the data is downloaded 3 Select Do...

Страница 246: ...to delete 5 Select Delete Job from the Job menu You must have the administrator rights 1 Check that OKI LPR Utility is closed 2 Click Start and then select All Programs Okidata OKI LPR Utility Uninst...

Страница 247: ...network Network Extension works in conjunction with the printer driver Do not install only Network Extension Network Extension only functions when the printer driver is connected to OKI LPR port or th...

Страница 248: ...the Status tab 3 Click Update 4 Click OK Click Web Setting to start the webpage automatically You can change settings of this machine on this webpage screen Web Page of This Machine The Status tab ma...

Страница 249: ...Options tab 3 Click Get Printer Settings 4 Click OK You cannot configure this when using Network Extension in unsupported environments 1 Click Start and then select Control Panel Programs Uninstall a...

Страница 250: ...ard Setup 1 Start Network Card Setup Installing Software 2 Select this machine from the list 3 Select IP Address Settings from the Operations menu 4 Change other settings if necessary and then click S...

Страница 251: ...d and then click Save 5 Enter the administrator password and then click OK The factory default password is 999999 The password is case sensitive 6 Click OK in a confirmation window Opening the Web pag...

Страница 252: ...again However if you are using the function that enables you to set the same mode to all the printer drivers you do not need to set the mode again Setting the User Name and Job Account ID You can set...

Страница 253: ...Use Hide Mode for shared printers 1 Create an ID file using Notepad or spreadsheet software Describe user names and user IDs in an ID file in the following order A login user name a user name that is...

Страница 254: ...me user ID and user name separated with commas 3 Save the file in a CSV format 4 Start the Print Job Accounting client 5 Select Import from the File menu 6 Select the CSV file you created in step 3 an...

Страница 255: ...46532502EE Rev3...

Отзывы: