
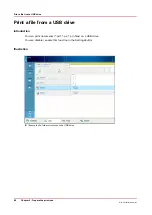


Bundle jobs in the list of [Waiting jobs]
Introduction
The bundle function allows you to combine two or more jobs into one new job. For example, this
can be convenient when the participants of a meeting need several documents in a specific order.
Often, the required documents are sent from several workplaces to the printer in advance.
Normally, this means that you must print the documents first and sort or staple them later. By
using the bundle function you can determine the order of the documents before printing and
print all documents in the correct order in only 1 print job.
Important information about the bundle function
• You can only bundle print jobs that are currently in the list of [Waiting jobs].
• You can change a number of settings for the bundled job via the [Properties] window.
• By default, the number of sets for a bundled job is 1. So before printing, you must first indicate
the required number of sets.
• When you stop a job after a set, the printing stops after 1 copy of the complete bundle.
• The jobs in a bundle are accounted separately under the account ID of the original jobs.
• All the jobs in the bundle must have the same output location. Otherwise, the control panel
displays a warning message. To change the output location, you must first split the bundled
job, then change the individual job settings and finally bundle the jobs again.
Main actions on the bundle function
The table below describes the main actions you can carry out with regard to the bundle function.
Main bundle functions
Main actions
Description
[Bundle]
When you touch [Bundle] after selecting 2 or more jobs, a new job
is created that contains the original jobs. The new job is added to
the bottom of the list of [Waiting jobs]. The original jobs are re-
moved from the list. The new job gets a new name that is based
on the name of the first job in the bundle.
[Split]
When you touch [Split] after selecting a bundled job, the job is
split into the original, separate jobs. The bundled job is removed.
The separate jobs are added to the bottom of the list of [Waiting
jobs]. You can use the [Split] function to correct mismatched set-
tings, for example.
Change job settings
The [Properties] window gives access to a pane where you can do
the following.
• Change a number of job settings.
• Change the order of the jobs in the bundle.
[Delete]
Delete the job.
[Ticket]
Print the job ticket of the job.
[Proof]
Print 1 copy of the job first to check if the result meets your ex-
pectations.
Procedure
1.
Touch [Jobs] -> [Queues] -> [Waiting jobs].
Bundle jobs in the list of [Waiting jobs]
Chapter 8 - Plan the jobs
99
Océ VarioPrint 6000 line
Содержание VarioPrint 6180
Страница 1: ...User guide Océ VarioPrint 6000 line VarioPrint 6180 6220 6270 6330 ...
Страница 8: ...Contents 8 Océ VarioPrint 6000 line ...
Страница 9: ...Chapter 1 Introduction ...
Страница 15: ...Chapter 2 Explore the print system ...
Страница 31: ...Chapter 3 Explore the ease of operation ...
Страница 43: ...Chapter 4 Start the print system ...
Страница 49: ...Chapter 5 Prepare the print system ...
Страница 80: ...Learn about user authentication 80 Chapter 5 Prepare the print system Océ VarioPrint 6000 line ...
Страница 81: ...Chapter 6 Prepare the print jobs ...
Страница 89: ...Chapter 7 Plan the workload remotely ...
Страница 93: ...Chapter 8 Plan the jobs ...
Страница 129: ...Chapter 9 Carry out print jobs ...
Страница 193: ...Chapter 10 Keep the system printing ...
Страница 202: ...The operator attention light 202 Chapter 10 Keep the system printing Océ VarioPrint 6000 line ...
Страница 203: ...Chapter 11 Media handling ...
Страница 245: ...Chapter 12 Maintain the print system ...
Страница 275: ...Chapter 13 PRISMAlytics Dashboard ...
Страница 277: ...Chapter 14 Troubleshooting ...
Страница 286: ...Store the logging in case of software errors 286 Chapter 14 Troubleshooting Océ VarioPrint 6000 line ...
Страница 287: ...Chapter 15 Specifications ...
Страница 305: ......


