


Add an automated workflow
Introduction
The Settings Editor contains 1 factory default automated workflow. However, it can be beneficial
for your productivity to add more automated workflows.
NOTE
It is not compulsory to define all the settings. When you put a check mark in front of a setting,
that setting and its values become enabled.
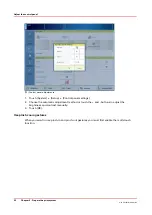
Procedure
1.
Go to [Workflow] -> [Automated workflows].
2.
Click the [Add] button.
A pop-up window displays the attributes you can specify for the new workflow.
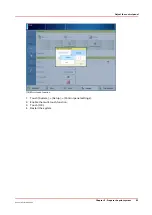
3.
Put a check mark in front of the attributes you want to define.
4.
Specify or select the values of the attributes.
5.
Click [OK].
Add an automated workflow
60
Chapter 5 - Prepare the print system
Océ VarioPrint 6000 line
Содержание VarioPrint 6180
Страница 1: ...User guide Océ VarioPrint 6000 line VarioPrint 6180 6220 6270 6330 ...
Страница 8: ...Contents 8 Océ VarioPrint 6000 line ...
Страница 9: ...Chapter 1 Introduction ...
Страница 15: ...Chapter 2 Explore the print system ...
Страница 31: ...Chapter 3 Explore the ease of operation ...
Страница 43: ...Chapter 4 Start the print system ...
Страница 49: ...Chapter 5 Prepare the print system ...
Страница 80: ...Learn about user authentication 80 Chapter 5 Prepare the print system Océ VarioPrint 6000 line ...
Страница 81: ...Chapter 6 Prepare the print jobs ...
Страница 89: ...Chapter 7 Plan the workload remotely ...
Страница 93: ...Chapter 8 Plan the jobs ...
Страница 129: ...Chapter 9 Carry out print jobs ...
Страница 193: ...Chapter 10 Keep the system printing ...
Страница 202: ...The operator attention light 202 Chapter 10 Keep the system printing Océ VarioPrint 6000 line ...
Страница 203: ...Chapter 11 Media handling ...
Страница 245: ...Chapter 12 Maintain the print system ...
Страница 275: ...Chapter 13 PRISMAlytics Dashboard ...
Страница 277: ...Chapter 14 Troubleshooting ...
Страница 286: ...Store the logging in case of software errors 286 Chapter 14 Troubleshooting Océ VarioPrint 6000 line ...
Страница 287: ...Chapter 15 Specifications ...
Страница 305: ......


