Identify the printhead transitions that need manual printhead alignment
(horizontal)
When to do
When you observe thin white or dark(er) lines along the length of the printed output, at positions
that correspond with the printhead boundaries, and the automatic printhead alignment procedure
does not completely solve the problem, you must identify the printhead transitions that need
additional manual printhead alignment. You can use this information to perform an additional,
horizontal manual printhead alignment on page 187
.
Before you begin
To identify the printhead transitions that need additional manual printhead alignment you need
the following.
• The printed output that shows the problem and that you printed
after
you performed the
automatic printhead alignment procedure.
• The
automatic printhead alignment test print
as a reference to identify the printhead
transitions.
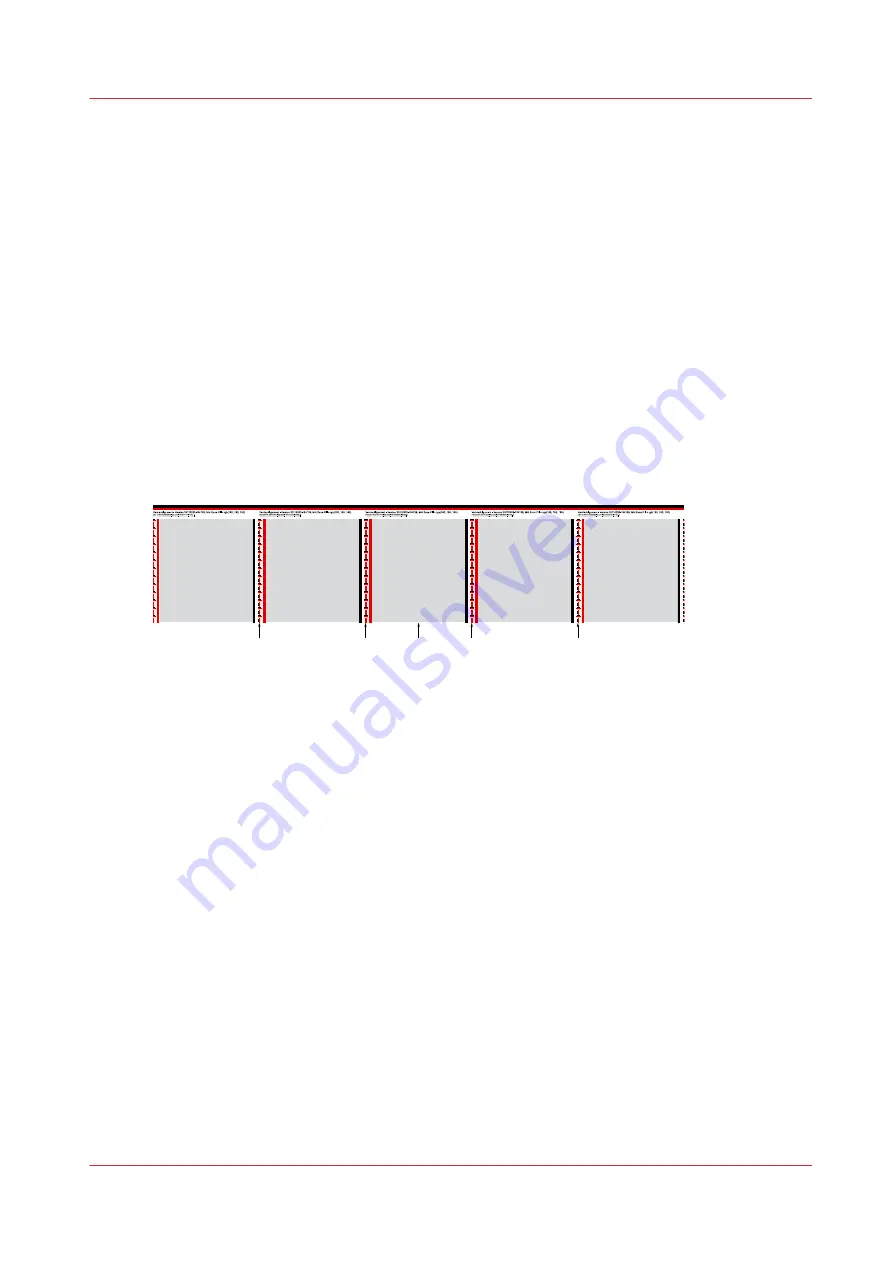
Middle
A
B
C
D
The printhead transitions B and C are closest to the middle of the printed output,
approximately 10.8 centimeters from the middle. The printhead transitions A and D are located
approximately 32.8 centimeters from the middle.
Procedure
1.
Place the automatic alignment test print on top of your printed output and mind the leading
edges and the trailing edges.
2.
Align the middle of the test print with the middle of your printed output and mark, according to
the test print, the transitions A, B, C en D on your printed output.
Identify the printhead transitions that need manual printhead alignment (horizontal)
Chapter 9 - Maintain the print system
185
Содержание ColorWave 900
Страница 1: ...Operation guide Oc ColorWave 900 User Manual...
Страница 7: ...Chapter 1 Introduction...
Страница 14: ...Available documentation 14 Chapter 1 Introduction...
Страница 15: ...Chapter 2 Explore the print system...
Страница 33: ...Ease of operation Chapter 2 Explore the print system 33...
Страница 40: ...Status of the printer 40 Chapter 2 Explore the print system...
Страница 41: ...Chapter 3 Getting started...
Страница 56: ...Move the printer 56 Chapter 3 Getting started...
Страница 57: ...Chapter 4 Media handling...
Страница 78: ...Check the media compatibility with folding devices 78 Chapter 4 Media handling...
Страница 79: ...Chapter 5 Configure the print system...
Страница 101: ...The Preferences System settings Chapter 5 Configure the print system 101...
Страница 136: ...Accounting workflow 136 Chapter 5 Configure the print system...
Страница 137: ...Chapter 6 Plan jobs...
Страница 149: ...Chapter 7 Print jobs...
Страница 163: ...Chapter 8 Adjust the print quality and print productivity...
Страница 174: ...Define the color management settings 174 Chapter 8 Adjust the print quality and print productivity...
Страница 175: ...Chapter 9 Maintain the print system...
Страница 190: ...Align printheads Manual horizontal 190 Chapter 9 Maintain the print system...
Страница 201: ...14 Take off the gloves and close the print unit Clean wiper roller compartments Chapter 9 Maintain the print system 201...
Страница 246: ...1 2 3 4 15 Take off the gloves and close the print unit Replace wiper rollers 246 Chapter 9 Maintain the print system...
Страница 258: ...Install the system security patches in Oc Express WebTools 258 Chapter 9 Maintain the print system...
Страница 259: ...Chapter 10 Troubleshooting...
Страница 284: ...4 Tap on Start 5 Wait while the system removes all job data and restarts Clear the system 284 Chapter 10 Troubleshooting...
Страница 287: ...Chapter 11 Support...
Страница 294: ...Downloads and support for your product 294 Chapter 11 Support...
Страница 295: ...Chapter 12 References...
Страница 319: ......


