background image

43

Roll Media Safety Awareness

Roll Media Safety Awareness

Introduction

This section contains two sets of principles that must be followed to assure 
maximum safety when operating the Roll Media Option for the Arizona 250 GT 
printer. The first image uses a negative example to show you a situation to avoid in 
order to prevent injury to the operator. The following images illustrate some of the 
residual risks that are inherent in the operation of the printer. These are situations or 
physical aspects of the printer that may present a potential danger to the operator, but 
would compromise the capabilities of the printer if changed. Therefore, they are 
pointed out as a precaution the operator must be aware of when using the printer with 
the Media Roll Option.

Attention: 

The photos in the following table illustrate residual risks that must 

be avoided when operating the Arizona 250 GT printer.

Situation and Action to Avoid

[14] 

[14] How NOT to use the Roll Media Option 

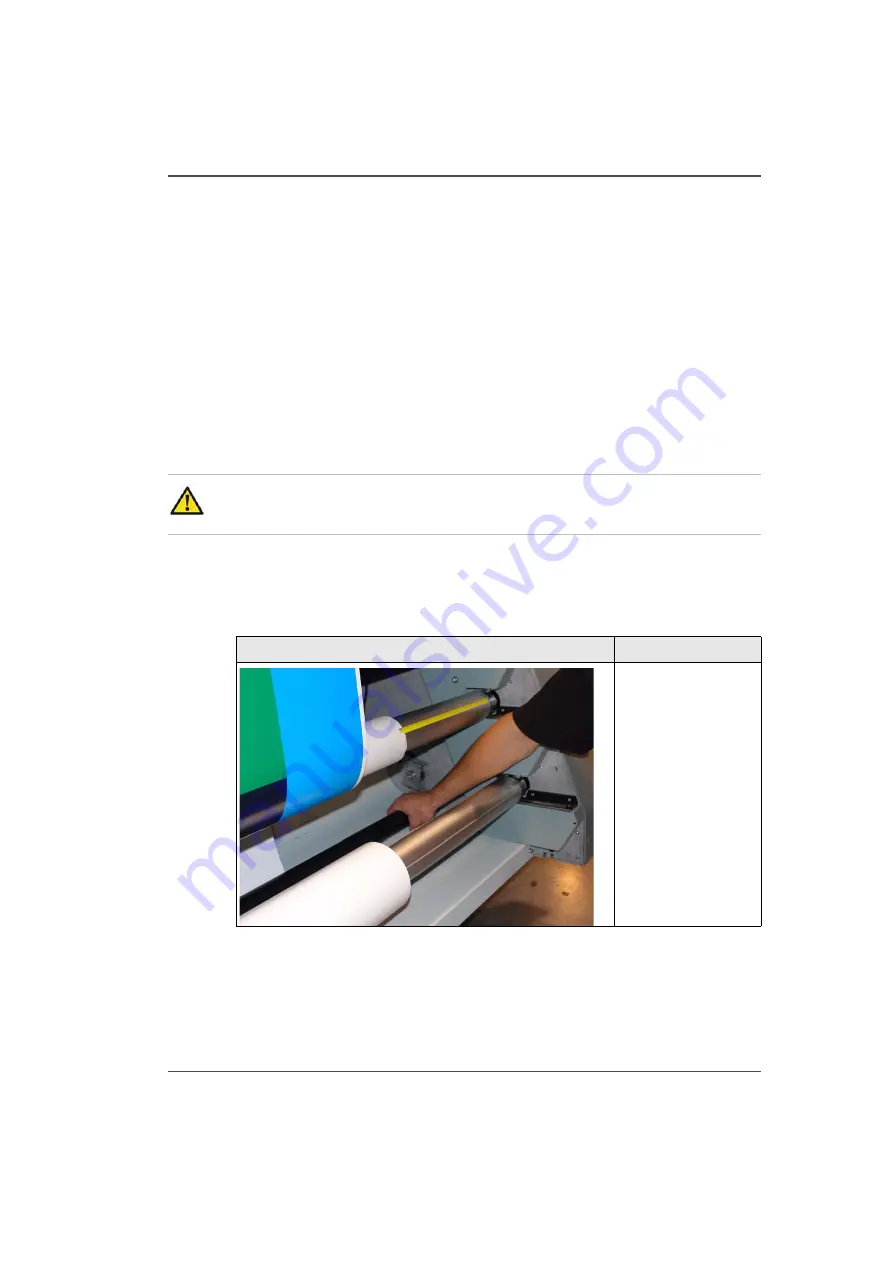
Avoid these Situations For Your Personal Safety

[29] 

Do not place you 
hands near any of the 
media shafts or the 
media tension bar 
when the printer is 
printing.

Содержание Arizona 250 GT

Страница 1: ...Arizona 250 GT Oc User manual User Manual Revision D...

Страница 2: ...ans without written permission from Oc Oc makes no representation or warranties with respect to the contents hereof and specifically disclaims any implied warranties of merchantability or fitness for...

Страница 3: ...ter 4 How to Navigate the User Interface 45 Operator Interface Hardware 46 Operator Interface Software 52 Print Job Control Module 54 Printer Metrics Module 62 Settings Module 63 Special Prints Module...

Страница 4: ...atic Suppression Upgrade Kit 123 Reduce Static with a Static Suppression Kit 124 Chapter 8 Ink System Management 127 Arizona 250 GT Ink 128 How to Change Ink Bags 132 Chapter 9 Error Handling and Trou...

Страница 5: ...5 Table of Contents Roll Media Option Maintenance 167 How to Clean the Rubber Capstan 167 Appendix A Application Information 173 Application Resources on the Web Site 174...

Страница 6: ...6 Table of Contents...

Страница 7: ...7 Chapter 1 Introduction...

Страница 8: ...ad a PDF file of the manual in the eight languages that we support from the Customer Support web page http www dgs oce com PrinterSupport Arizona250GT_Customer Supported languages US English UK Englis...

Страница 9: ...the Skin s exposure to UV emissions Avoid looking directly at UV lamps Caution Warning for Seated Individuals The UV Emissions and Blue Light Emissions profile of the Arizona 250 GT is at its worst fo...

Страница 10: ...ur site has a technician in charge of printer maintenance that person is the optimal candidate While any trained operator may perform routine maintenance the best maintenance results from familiarity...

Страница 11: ...o produce outdoor durable output It can print directly onto rigid and flexible substrates up to 2 5 m 98 4 x 1 25 49 2 and up to 48 mm 1 89 thickness The printer holds substrates stationary while the...

Страница 12: ...e following two conditions 1 This device may not cause harmful interferece and 2 This device must accept any interference received including interference that may cause undesired operation Any change...

Страница 13: ...ustrial Equipment Generic EN 61000 6 1 2001 Immunity Residential Commercial and Light Industrial Equipment Generic R TTE Directive ETSI EN 301 489 01 V1 5 1 ETSI EN 301 489 03 V1 4 1 USA and Canada 47...

Страница 14: ...E mail info oce com Oc Deutschland GmbH Solinger Stra e 5 7 45481 M lheim Ruhr Germany Telephone 49 2084 8450 Fax 49 2084 80950 E mail ves oce de Web site http www oce de Oc UK Ltd Langston Road Lough...

Страница 15: ...Product Compliance Linear Encoder Readheads X 0 0 0 0 0 Printheads X 0 0 0 0 0 Part Name Lead pb Mercury Hg Cadmiu m Cd Hexavale nt CrVI Polybro miated biphenyl s PBB Polybro minated dipenylet her PB...

Страница 16: ...16 Chapter 1 Introduction Product Compliance...

Страница 17: ...17 Chapter 2 Product Overview...

Страница 18: ...length of the table to print an image on the media In addition to the benefits of stationary positioning the use of UV ink technology on rigid material eliminates finishing processes such as mounting...

Страница 19: ...ivity Production 16 sq metres hr 170 sq ft hr Quality 12 sq metres hr 130 sq ft hr Quality Matte 8 sq metres hr 85 sq ft hr Fine Art 8 sq metres hr 85 sq ft hr Ink Colors Black Cyan Magenta Yellow Cur...

Страница 20: ...ransition or quarter tone values such as skin tones drops of medium volume can be used and when printing areas of high density such as solid colors large droplets can be used Oc VariaDot for Improved...

Страница 21: ...21 Chapter 3 Safety Information...

Страница 22: ...ndling inks Note Warning for Seated Individuals The UV Curing System on the Arizona 250 GT generates hazardous levels of thermal electrical and UV energies UV light exposure is at it s worst for indiv...

Страница 23: ...ation dizziness weakness fatigue nausea headache and possible unconsciousness Skin Contact Upon prolonged or repeated contact can cause severe irritation defatting and dermatitis May cause lingering a...

Страница 24: ...ater Remove contaminated clothing launder immediately and discard contaminated leather goods Get medical attention immediately Ingestion Severely irritating Do not induce vomiting Seek medical attenti...

Страница 25: ...fumes use only in a well ventilated area Wash thoroughly after handling Do not get in eyes on skin or clothing Remove contaminated clothing and wash before reuse Storage Conditions Store in a cool dry...

Страница 26: ...her exposed areas with mild soap and water before eating drinking and when leaving work Use of protective coveralls and long sleeves is recommended Gloves Wear impervious material 10 Disposal Consider...

Страница 27: ...to local regulations concerning Mercury disposal Bare skin contact with the UV lamps must be avoided Compounds from the skin when heated on lamps operating at 600 to 850 C will form permanent etching...

Страница 28: ...e and Dermal skin Protection Industrial Protective Eyewear with lenses that block both UVA and UVB must be used Long sleeved work clothes and gloves are essential to reduce the Skin s exposure to UV e...

Страница 29: ...tion There are three Emergency Stop buttons one is located at the Operator Control Station and one at each end of the Gantry The fourth Emergency Stop is the AC power Supply Disconnect Motion Motors t...

Страница 30: ...will be unable to initiate motion To satisfy the requirements for Machinery Directive the Carriage Interlock must be cycled to ensure the Interlock is functional and that the Carriage Safety Guard is...

Страница 31: ...s 1 2 Description Label Warning UV Light Hazard Avoid looking directly at UV lamps Located on carriage cover to remind the operator that looking at the UV light source is dangerous 2 Wear Safety Glove...

Страница 32: ...d service technician 7 Pinch Point A reminder that horizontal movement of the carriage can create a pinch hazard as it moves along the gantry Located on both ends and the rear of the carriage 8 Crush...

Страница 33: ...set of principles illustrates some of the residual risks that are inherent in the operation of the printer These are situations or physical aspects of the printer that may present a potential danger t...

Страница 34: ...ay when printer power is on Do not leave any objects on the table printing surface except for media that you will print on Also make sure the media is 48 mm 1 89 inches or less in thickness 12 12 Avoi...

Страница 35: ...and you will have to use the mouse to click Reset on the user interface LCD display 14 14 Hot UV Lamps When the Maintenance Station is open to clean heads do not touch the UV lamp assembly as it can...

Страница 36: ...mum safety in the operation of this printer Caution there may be a time lag between when a print job is issued and when the gantry movement actually begins as the UV lamps must warm up first 15 15 IGU...

Страница 37: ...high risk crushing hazard is created by the movement of the carriage and gantry supports Keep hands away from this area unless the printer power is off 17 17 Carriage and Gantry Supports A high risk...

Страница 38: ...by the table and the carriage 19 19 Table Carriage Pinch Hazard A high risk crushing pinch hazard is created by the carriage and the gantry when the Z Axis is moving carriagemoves upor down 20 20 Gant...

Страница 39: ...frame 21 21 Gantry Table Pinch harard A medium risk crushing pinch hazard is created by the gantry and the table frame stop on the underside of the table at the electronics enclosure end 22 22 Gantry...

Страница 40: ...hazard is created by the carriage and the gantry frame from the bottom 23 23 Carriage Gantry Frame Shear Hazard A high risk shearing hazard is created by the carriage and the gantry frame from the bot...

Страница 41: ...d by the carriage and the gantry frame 25 25 Hazard Entanglement hazard A medium risk of finger or material entanglement is created by the web assembly IGUS track 26 26 IGUS Impact Hazard 13 Arizona 2...

Страница 42: ...pact hazard is created by the carriage when cycling from left to right 27 27 Carriage Impact Hazard Heat hazard the UV lamp assembly and the surrounding guard can be hot 28 28 UV Lamp Heat Hazard 13 A...

Страница 43: ...ese are situations or physical aspects of the printer that may present a potential danger to the operator but would compromise the capabilities of the printer if changed Therefore they are pointed out...

Страница 44: ...ses are required The following table documents some of these residual hazards By making the operator aware of the potential risks we hope to ensure maximum safety in the operation of this printer 15 1...

Страница 45: ...45 Chapter 4 How to Navigate the User Interface...

Страница 46: ...s section identifies and explains the functions of these components 32 32 User Interface Hardware 16 1 Main Power Switch 9 Maintenance Station 2 Operator Control Station 10 Coolant Reservoir Level 3 V...

Страница 47: ...47 Operator Interface Hardware Illustration 33 33 Vacuum System Hardware 34 34 Carriage Area Hardware...

Страница 48: ...andles determine which of the three print zones on the printer table will have vacuum applied when the vacuum pump is switched on The vacuum zones are opened or closed by the handles 4 Vacuum Table Fo...

Страница 49: ...f coolant at this location See Maintenance section for instructions 11 Ink Filters and Ink Bay The ink filters ensure that ink flows easily and is free of particulate matter These filters must be chan...

Страница 50: ...ght and it also protects the lamps and the carriage by stopping all motion if it encounters an obstacle in the path of the carriage 15 Vacuum Shut off Valves On top of the carriage are vacuum shut off...

Страница 51: ...51 Operator Interface Hardware Thermal fluid heater Purge pump Purge valve Printheads jetting...

Страница 52: ...as the input device For operations that require operator input the mouse is used to select either numeric characters from a virtual keypad or alphanumeric charaters from a virtual keyboard These virtu...

Страница 53: ...special adjustment prints the Quality Control Reference print image and the Nozzle Check print Software Upgrade Upgrade tab Allows field service technicians to update the printer to the latest version...

Страница 54: ...rest of this section explains each area in more detail The Print Job Control display is divided into functional and status areas The functional areas supports all operator input necessary to operate...

Страница 55: ...view an ink status report 4 Command Toolbar left Displays icons for actions related to the print jobs and control of the printer 5 Command Toolbar right Displays icons for ink temperature lamp control...

Страница 56: ...e a print job It is active only while a job is printing Ink System Status Click the icon to open an ink system status dialog that displays ink related information This includes for each color of ink a...

Страница 57: ...finishes a currently printing copy and puts the job on hold Cancel job The command can do following actions depending on context Deactivates a selected active job by moving it to the inactive list Ca...

Страница 58: ...uate curing for a particular media Leading and Trailing Edge are relative to the direction of carriage travel They can be set independently if that function is selected in the User Interface dialog in...

Страница 59: ...ve from the active to the inactive print job list A job count summary displays the total number of active and inactive jobs and the number of active jobs on hold UV Curing Lamp Control Button This but...

Страница 60: ...isplay only the middle part of the image if it does not fit in the window They can t be repositioned by dragging in the window 8 Inactive Print Job List Inactive job list consists of a table and job c...

Страница 61: ...method to change parameter values is to click on the field and this brings up an onscreen keyboard so you can click on the numbers required Print Parameters Displays information about the print job t...

Страница 62: ...Illustration 38 38 Printer Metrics Component function table 23 23 Couters Explained Component Function Non resettabl e Counters These counters display a cumulative total of ink consumed or area printe...

Страница 63: ...rk connection settings user interface configurations printer settings and if installed the Roll Media settings Date and Time Settings 24 Date display only cannot change the date Time change the time o...

Страница 64: ...ed manually If you don t know how to do this bring in a network consultant to determine what the setting must be for the network alternately you can purchase a DHCP router for your network that will a...

Страница 65: ...ported The user interface can be set to display the following languages English US English UK German French Dutch Japanese Italian Spanish Measurement Units Allows you to specify how to display offset...

Страница 66: ...Automatic warmup day Automatic warmup time Ionizer bar static suppression On or Off Roll Module 28 Separation Between Copies Specifies the separation in the selected measurement units Media Move on U...

Страница 67: ...metric or imperial measure The Nozzle Check is used to determine if there are any clogged nozzles that can affect print quality note that it is also available on the command toolbar in the Print Job...

Страница 68: ...ontrol module to actually print the test print It will appear in the active job list and is printed like any other print job Note Refer to the sections that document the two special prints for details...

Страница 69: ...dates are available only to customers with a service contract Your local service representative will either install the upgrade or provide you with the upgrade file in some circumstances Illustration...

Страница 70: ...70 Chapter 4 How to Navigate the User Interface Installation and Upgrade Module...

Страница 71: ...71 Chapter 5 How to Operate the Arizona 250 GT...

Страница 72: ...g Maximum performance from the Arizona 250 GT printer requires a properly trained operator Oc trains the operator in the use of the printer hardware and software at installation However this is not a...

Страница 73: ...objects such as clothing tools and cleaning materials are not interfering with the printer mechanisms Position the power cord so that it does not pose a hazard when walking around or moving media or o...

Страница 74: ...is automatically started The software displays a splash screen followed by a screen that requests you to raise and then lower the carriage guard 5 Walk over to the carriage and lift the aluminum guard...

Страница 75: ...he ink from draining out and filling the waste tray 47 47 Vacuum Shutoff Valves Magenta Yellow are Off Black Cyan still ON 3 Open the vacuum shutoff valves again when the power is turned back on Note...

Страница 76: ...the printer 1 Turn the AC power switch to the Off position 2 Apply a lock and a tag out label to the Lock out area of the switch for the duration of any service or maintenance procedures 3 Close the...

Страница 77: ...connect device for the printer For maximum safety if the printer is moved the blue AC power plug must first be unplugged from the printer 1 Follow the Lock out procedure above 2 For additional safety...

Страница 78: ...and installed later However it must be available for the software to communicate with the printer Installation Procedure 1 Power on the printer 2 Select the Setup tab in the printer software to acces...

Страница 79: ...printer must have a unique network name The network name can be changed in the Settings module of the printer User Interface Check Configuration Click on Test to verify that the computer and printer a...

Страница 80: ...izona 250 GT How to Install the Onyx Printer Driver Result When a Valid IP address for the printer is verified click on OK to complete the configuration of the communication link between ProductionHou...

Страница 81: ...are and software interface if you are not familiar with the Command Toolbar and other components mentioned in this section Note Make sure the ink is up to temperature before you perform Printhead Main...

Страница 82: ...t Zones Mask Active Vacuum Zones Not Covered With Media Turn On Table Vacuum Adjust Bleed Valve If Required Clean Media If Required Check the table to make sure that there are no obstacles that can in...

Страница 83: ...left of the job to be printed will turn green When printing Flatbed mode and Flatbed icon on the command toolbar is not selected select it Similarly if printing in roll mode and the Roll icon is not...

Страница 84: ...acts caused by the suction when imaging on flexible media In most cases when printing on rigid material full vacuum suction is desired Clean Media If Required If the media is dusty or dirty clean it w...

Страница 85: ...the level of vacuum if so desired Vacuum Overlay Sheet The vacuum overlay sheet is supported on the table by 0 5mm diameter formed half shear features This produces a small gap between the sheet and t...

Страница 86: ...r to starting a print and the vacuum cannot be turned off until a print is completed Vacuum Bleed Valve Gauge The bleed valve handle is located to the left of the vacuum control handles This bleed val...

Страница 87: ...mon material sizes or a regular repeating job that is non square or unusually sized If ink build up occurs on the overlay sheet remove the ink If it is not removed the print gap could be affected and...

Страница 88: ...ddle controls the Top zone and the right controls the Right zone The vacuum zones are open when the handles are vertical To close a zone turn the control handle a quarter turn clockwise Purpose The va...

Страница 89: ...Set Up Custom Zones 1 Flip the aluminum overlay sheet over requires two people 2 Remove any foam tape that is no longer required in the new configuration 0 0 Print Origin 1 Left Vacuum Zone 2 Right Va...

Страница 90: ...active vacuum holes are a minimum of 15 mm from the outside edges of the media This will optimize the sealing effect between the media and the table 5 Flip the overlay sheet over and position it on t...

Страница 91: ...o Onyx ProductionHouse profiles please consult our web site at http www dgs oce com PrinterSupport Arizona250GT_Customer Definition The term media covers a wide range of possible materials for the Ari...

Страница 92: ...static and also removes particles that tend to attract stray ink drops that result in ink buildup Tack cloths are used by auto body shops to clean cars before painting Oc does not provide additional...

Страница 93: ...rp the media You can also try to print uni directional using only the trailing lamp to do this set the power of the leading lamp to 0 Media Registration Media can be registered on the table using the...

Страница 94: ...If this board is damaged replacements are not available from Oc Display Graphics Systems You must source the underlay locally these boards are used with routers that require vacuum tables which may he...

Страница 95: ...ed by the media to avoid vacuum loss Tips On How to Use the Underlay Board 1 Use scrap pieces of media to cover any exposed area of the underlay board that the carriage will travel over This prevents...

Страница 96: ...96 Chapter 5 How to Operate the Arizona 250 GT Underlay Board to Reduce Artifacts...

Страница 97: ...97 Chapter 6 How to Operate the Roll Media Option...

Страница 98: ...assembly Once the Roll Media Option is installed it shares the print gantry with the base configuration 55 55 Roll Media Components Component Locations 31 Hardware function table The Roll Media Optio...

Страница 99: ...th a roll of media depending on whether the shaft is used for take up or supply The media shaft consists of a ribbed aluminum extrusion with a spring loaded spike assembly inside it There is a large t...

Страница 100: ...idth Media Width 8mm Tracks media drift during printing If media drift exceeds 3mm printing is halted after the current print is completed An error message is then reported to the operator and he will...

Страница 101: ...a negative pressure inside the platen A series of fans on the bottom of the platen assembly create the negative pressure that helps to hold the media in place while the image is printed 13 Gimbal Main...

Страница 102: ...250 GT Site Preparation Guide and all safety requirements noted in this document Media Size Supported Width Max 2 2m 86 6 Width Min 0 9mm 36 Roll Diameter Max 240mm 9 45 Core Inner Diameter 76 2mm 3...

Страница 103: ...for the first print Trailer waste is the media that cannot be printed at the end of the supply media roll This will vary slightly depending on the attachment method that was used to secure the media t...

Страница 104: ...control modes Non Initialized Control mode Initialized Control mode Non Initialized Control Mode The default control mode for the Roll Media Option motion system is the non initialized control mode Th...

Страница 105: ...results it is recommended the media be aligned such that no more than a 1mm offset exists between the supply and take up media rolls The Roll Media Option design does not have a media drive pinch The...

Страница 106: ...erefore goes through the full Load media function Media Manual Feed This enables the operator to advance or rewind loaded media using the foot pedal controls in the initialized control mode This allow...

Страница 107: ...Media Rewinds media onto supply shaft Unlocks media supply shaft Advance media from supply shaft Unlocks take up shaft Initialized Rewinds media n a Advances media n a Unload before media cut Importan...

Страница 108: ...printer to prepare it to print on roll media This section introduces the icons in the Roll Media Manager that are necessary to load and initialize a roll media print job How to set the Media parameter...

Страница 109: ...ia 35 Roll Media Manager Icons Icon Function Load Allows the operator to load new media Set the foot pedal switches to the Load state Unload Prepares the RMO to allow the operator to cut the existing...

Страница 110: ...Install Shaft in the Supply position 2 Load Empty Core On Media Shaft And Install Shaft the Take Up Position 3 Thread media 4 Initialize Roll Media To Prepare For Printing 5 Select Existing Or Create...

Страница 111: ...d also make sure the correct icon is selected in the Roll Media Manager menu 4 Roughly center the roll and then insert the shaft into the Supply bottom position on the printer 5 Accurately center the...

Страница 112: ...in green on the left below For Print Side In the media comes out over the top of the supply shaft as shown in red on the right This allows you to print on the back side of the media 59 59 Media Path C...

Страница 113: ...an the media advance the media past the take up shaft to align it with the supply shaft then rewind the media onto the take up shaft 7 Check alignment of the media by feeding it down to the supply rol...

Страница 114: ...e Media to the Take up Roll Core Note Ensure that the media is flat along the core If the media is not flat it can create an uneven roll that affects the motion of the media past the printheads and th...

Страница 115: ...move Media Roll Or Empty Core From Media Shaft When to do This procedures details the actions required when there is still some media left on the supply shaft When the supply shaft is empty there is n...

Страница 116: ...m the Printer 1 If you want to change the supply shaft momentarily press the left pedal to rotate the supply shaft four complete revolutions This rewinds excess media back onto the supply roll if is n...

Страница 117: ...iven a Hold status when it was generated in Onyx ProductionHouse 64 64 Roll Icon 2 In the Print Job Control module transfer a print job from ProductionHouse 3 Click on the Roll Manager icon to enter t...

Страница 118: ...hrough the RMO unit The low tension setting is usually fine however if the media shows significant puckering across its entire width the medium or high tension setting may be required 7 Select the Med...

Страница 119: ...B Overstep can result in white gaps where the placement of a swath is displaced a significant distance away from the prior swath C Perfect Step where media advances correctly Purpose The Media Advanc...

Страница 120: ...sent on the test print The test print used for the calibration of the MACF can be found in the Special Prints module It is called the Media Advance Correction Factor print Procedure to Determine the M...

Страница 121: ...stepping is present The median value of this range is entered in the MACF field in the Roll Media Manager The given media profile media thickness tension MACF and lamp power settings can then be saved...

Страница 122: ...122 Chapter 6 How to Operate the Roll Media Option How to Determine Media Advance Correction...

Страница 123: ...123 Chapter 7 How to Use the Static Suppression Upgrade Kit...

Страница 124: ...e ions which are attracted to the unbalanced surface of the material This neutralizes the media and ink is more readily accepted It is important to note that static electricity cannot be entirely elim...

Страница 125: ...ed to turn if Off as the bar is only active when the printer is printing How to Change the Height of the Bar The Ionizer bar is mounted by default to accommodate media up 13mm 0 5 inches in height If...

Страница 126: ...the other keyed slot over the bracket screw 5 Slide the bracket mount until the screw is located in the smaller end of the keyed slot 69 69 Bracket Mounted High 6 Make sure the bracket is level an th...

Страница 127: ...127 Chapter 8 Ink System Management...

Страница 128: ...shed into their corresponding female coupling This opens up the flow path for the ink The bags contain tags that identifies them to the printer when they are loaded This allows the printer to ensure t...

Страница 129: ...aminates in the process details of this procedure are available in the Maintenance sectionPrinthead Maintenance UV Flush UV Flush is used as a cleaning agent for the printheads or to flush the ink lin...

Страница 130: ...ters can last longer and some will require more frequent replacements due to the ink color pigment and varying rates of use Note A loss of pigment when printing a nozzle check indicates that a filter...

Страница 131: ...f particles or ink Access to MSDS Ink Information MSDS Material Safety Data Sheets for each color of ink and the UV Flush are available on the customer web site at http www dgs oce com PrinterSupport...

Страница 132: ...the ink bag does not need to be changed immediately but monitor the level of ink remaining and change the bag before the ink runs out The operator sees the bag is empty An ink bag is nearly empty and...

Страница 133: ...k Station 2 Identify the the ink bag to be replaced 3 Press the quick release coupler button at the bottom corner of the ink bag 4 Unhook the bag from the top of the ink station 5 Replace with a new i...

Страница 134: ...134 Chapter 8 Ink System Management How to Change Ink Bags...

Страница 135: ...135 Chapter 9 Error Handling and Troubleshooting...

Страница 136: ...ate remedy Otherwise note the exact error message and associated error number and what the printer was doing before the error then place a service call Basic Troubleshooting Troubleshooting helps you...

Страница 137: ...ful installation Try printing a test print If the printer is not receiving print jobs check the network cable connection Note If you still have problems contact your Oc Display Graphics Systems servic...

Страница 138: ...e separate nozzles out or two or more adjacent nozzles out the following procedures for recovering clogged nozzles is recommended to improve image quality Note Keep the table surface clean and ensure...

Страница 139: ...139 Chapter 10 Printer Maintenance...

Страница 140: ...jobs environmental conditions duty cycles and volume of work While we provide guidelines for periodic maintenance the optimum maintenance schedule depends on operator observation of the printer over...

Страница 141: ...nce Daily and as needed Swab Printheads Weekly and as needed Clean Carriage Underside Daily and as needed Remove Ink from Table As needed Empty the Waste Tray When ink is visible in maintenance statio...

Страница 142: ...required Note The nozzle plate on the printhead has a non wetting coating contact with this surface may affect the performance of the printhead Do not wipe the nozzle plate with anything other than th...

Страница 143: ...rile gloves must be worn when performing maintenance Caution The underside of the UV lamps may be hot avoid touching them Also be aware that the carriage moves up and down during printhead maintenance...

Страница 144: ...to its purge height 4mm above the table surface Watch the ink as it falls from the heads After a few seconds most of the ink stops dripping and you can then raise the carriage 4 Press switch 2 to rais...

Страница 145: ...head at a speed of approximately 8mm per second 8 seconds per printhead The suction head slides on stainless steel strips on the printhead Check to see that all ink is removed repeat if necessary 74 7...

Страница 146: ...es Maintenance for Persistent Nozzle Outs 1 If some nozzles are still out after the print quality check open the maintenance station cover raise the carriage and then suction only the printheads that...

Страница 147: ...to remove debris from the bottom of the printhead Note If UV ink has fully cured on a printhead it must be replaced Contact your Oc service representative Before you begin Print a Nozzle Check to det...

Страница 148: ...er slight pressure to help clear debris from around the nozzles 1 Open the maintenance station cover 2 Close the ink purge valves of the three other colors but leave open the valve for the color you w...

Страница 149: ...ew clean side of the swab each time this means a maximum of two swipes per swab It is possible that as many as ten swipes can be required 11 Run another nozzle check if necessary When the Nozzle Check...

Страница 150: ...ave a static charge To remove particles and to reduce the static charge buildup on the media use a tack cloth and lightly rub the media surface before you print How to Handle Media for more informatio...

Страница 151: ...contact with the printhead by any object other than the suction head used for maintenance can cause damage to the nozzles and result in poor image quality or possibly require a printhead replacement 4...

Страница 152: ...m them out as required this is not likely a daily task but must be performed as needed Required tools Poly Wipe Cloth Nitrile Gloves Note When scraping ink off the table be sure to remove all of the d...

Страница 153: ...thead Maintnance it is a good practice to visually examine the sloped drain plate at the bottom of the Maintanance Station If ink starts to pool on the drain plate it is time to empty the waste tray i...

Страница 154: ...off the valve when ink no longer drains out or if the container become full Note The valve closes clean drip free but because it has long pipe use a piece of cloth or paper to wipe it clean as some in...

Страница 155: ...r dust or debris If you get a lamp overheat error and there is no dust on the filter call for service immediately Required tools Toothbrush or similar brush device Handheld Vacuum appliance Attention...

Страница 156: ...displays the level of coolant in the reservoir The operator must maintain this level Purpose If the coolant level is low the ink and printheads cannot be maintained at the proper temperature Periodic...

Страница 157: ...the hose is wet it is difficult to perform the next step 4 Insert the hose into the fill nozzle above the coolant level tube 5 Press on the syringe plunger to inject the fluid Inject the entire conte...

Страница 158: ...on the rail it should be cleaned immediately before the bearings have a chance to run over the spill After the area has been cleaned wipe the spill area again thoroughly with a water moistened lint f...

Страница 159: ...is time to change an ink filter If an ink filter becomes clogged it will trap color pigment and affect the color balance of printed images so it is important to change a filter before this occurs If t...

Страница 160: ...screws can be loosened by hand or use a Philips screwdriver if they are too tight 3 Use a lint free cloth to catch ink and place it below the bleed valve at the bottom of the filter Then turn the the...

Страница 161: ...ce the cap that came with the new filter on the old filter to prevent ink from leaking out of the old filter 7 Repeat the previous step for the bottom connection Wipe off any spilled ink 8 Insert the...

Страница 162: ...do The life expectancy of the UV lamp is 500 hours Oc recommends that both UV Lamp Cartridges be replaced simultaneously to ensure that the curing effect is balanced when printing in opposite directio...

Страница 163: ...rriage guard by lifting it straight up and then away from the carriage 3 Use a 3mm allan key to loosen the screw at the top of the cartridge with the lamp that needs to be replaced 4 Slide the cartrid...

Страница 164: ...block of data Individual Nozzles Fired Each nozzle is fired multiple times Clogged nozzles can be easily identified because the 5 mm 7 32 line associated with the clogged nozzle will be missing from t...

Страница 165: ...e active print list when you select it from the Special Prints module 3 Modify the horizontal offset only if a previous nozzle check was printed on the same piece of media 4 Confirm media thickness 5...

Страница 166: ...zle Check print of the black K section illustrated below Note There is an indication of some poor directionality in one of the nozzles illustrated in the top left section of the sample below but it wi...

Страница 167: ...Brush or equivalent dust remover Lint free absorbent clothes Rubber gloves Mild detergent Lint free cloth Isopropoyl alcohol 95 pure Note Always wear wrap around safety glasses and latex gloves when w...

Страница 168: ...Our R D Lab has tested only Ivory Detergent If you are uncertain about a detergent try it out in a 50 1 solution on a small area at the end of the capstan 3 Wet the cloth in the cleaning solution and...

Страница 169: ...the Rubber Capstan 84 84 Ink Spill on Capstan 2 Wipe up the majority of the ink by blotting with the absorbent cloth 85 85 Wipe up ink with cloth 3 Wet a new absorbent cloth with alcohol and wipe up t...

Страница 170: ...has left the surface Continue to wet and wipe the capstan surface until the cloth does not show any sign of ink color 87 87 Wipe up remainder of ink 4 Allow adequate time for capstan to dry Note If th...

Страница 171: ...n Result When the capstan is kept clean and its rubber surface free of blemishes or defects you will be ensured of accurate media transport and optimal print quality If its surface is badly damaged th...

Страница 172: ...172 Chapter 10 Printer Maintenance How to Clean the Rubber Capstan...

Страница 173: ...173 Appendix A Application Information...

Страница 174: ...Bulletin 1 New Media Profiles Available Application Bulletin 2 How to Select the Appropriate Media Model and ICC Profile Application Bulletin 3 How to Achieve Optimal UV Lamp Power Application Bulleti...

Страница 175: ...175 Application Resources on the Web Site Opal White Acrylic or Polycarbonate such as Lexan Polystyrene Pre Stretched Canvas Textiles Un Documented Materials Variable Height Materials...

Страница 176: ...176 Appendix A Application Information Application Resources on the Web Site...

Страница 177: ...User Interface 52 I ICC profile 91 Ink Bag 132 Ink Consumption 20 ink delivery 128 Ink Filters 48 130 L Lock Out 76 M Maintenance 140 Maintenance Schedule 140 Maintenance Station 48 142 Measurement Un...

Страница 178: ...ints 52 Specifications 18 suction head 144 T Thermal Expansion 93 Training 72 U Underlay Board 94 Upgrade 52 User Interface Settings 65 UV Flush 128 V Vacuum Bleed Valve 48 86 Vacuum Overlay 85 Vacuum...

Отзывы: