Oasis Osmosis Home Скачать руководство пользователя страница 1

Congratulations on your new Oasis Osmosis Home RO system purchase!

Let’s learn how to install it in just 30 minutes!

Содержание Osmosis Home

Страница 1: ...Congratulations on your new Oasis Osmosis Home RO system purchase Let s learn how to install it in just 30 minutes...

Страница 2: ...Required Tools Adjustable wrench Screw driver Utility knife Variable speed drill Drill bit Flash light Towel 2...

Страница 3: ...ter x 1 RO Membrane Composite Filter x 1 RO faucet x 1 Feed Water Adapter x 1 set Lock Clips x 6 Screws x 5 3 Power Cord x 1 White 3 8 PE tubing White 2 8 PE tubing Mount washer and nut x 2 Quick conn...

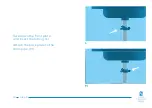
Страница 4: ...4 Install the feed water adapter Step 1...

Страница 5: ...5 Step 1 Shut off the water supply and turn on the kitchen faucet to release pressure Connect the feed water adapter to the cold water valve A Position the RO system housing under the sink B A B...

Страница 6: ...nd water intake port and feed water adapter to be sure that they can reach according to your home setup Cut the included 2 tubes in half or different length based on your measurement and setup Connect...

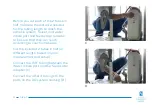
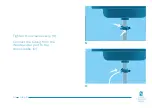
Страница 7: ...7 Install the RO Faucet Step 2...

Страница 8: ...ill bit drill a hole in the countertop large enough to fit the two small piping on the bottom of the faucet but small enough to allow support of the faucet base and ensuring it does not go through the...

Страница 9: ...F G Install the mounter washer and screw the nut on to the threaded tubing under the sink F Insert the quick connect fittings in the faucet stems G 9 Step 2...

Страница 10: ...he tubing from the Water outlet port to the bigger quick connect fitting on the faucet stem H Connect the tubing from the Pure water nozzle port to the smaller quick connect fitting on the faucet stem...

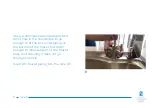
Страница 11: ...11 Install the Drain saddle Step 3 Drain saddle will be shipped separately...

Страница 12: ...Drill a quarter inch hole on the vertical drain pipe J Separate the front and back plates of the drain saddle K 12 Step 3 J K...

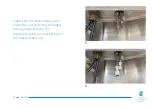
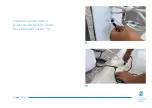
Страница 13: ...Take down the front plate and insert the tubing L Attach the back plate to the drain pipe M 13 Step 3 L M...

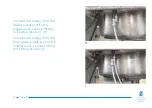
Страница 14: ...Tighten the screws evenly N Connect the tubing from the Waste water port to the drain saddle O 14 Step 3 N O...

Страница 15: ...15 Plug in RO system Step 4...

Страница 16: ...P Q Insert the power cord in power socket port P and in the wall power socket Q 16 Step 4...

Страница 17: ...17 Insert filters Step 5...

Страница 18: ...Insert the filters one at a time being sure to match the filters to their correct filter holes Push them in and then twist until you hear a clicking sound to confirm it is in place R 18 Step 5 R...

Страница 19: ...19 Turn on the RO System Step 6...

Страница 20: ...feed water adapter Turn on the tap water faucet and let it discharge for 10 minutes S Turn on the pure water faucet Press the power switch O The RO system will start to run water and after an hour you...

Страница 21: ...Pure water better life...

Отзывы: