


Scanning Inventory Only Devices
61
n
ov
do
cx (e
n)
16
Ap
ril 20
10
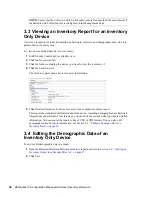
The Inventory Only scan settings are used when you create the Portable Collector. If you want
the Portable Collector to scan for software files, for example, that option must be selected on
the Inventory Only configuration page. For information on configuring an Inventory Only scan,
see
Section 3.1, “Configuring an Inventory Only Scan,” on page 51
.
2
Click
Devices
.
3
In the
Device Tasks
list, click
Create Portable Client
.
4
Save the file to disk.
5
Uncompress the file and continue with
Section 3.6.2, “Running the Portable Collector on a
Windows Device,” on page 61
.
3.6.2 Running the Portable Collector on a Windows Device
1
Create the Portable Collector as shown in
Section 3.6.1, “Creating the Portable Collector for a
Windows Device,” on page 60
.
2
Copy the Portable Collector files to a removable media, such as a CD or flash drive.
3
Take the Portable Collector to the device you want to inventory, then run
collect.bat
.
To see the available switches, type
/?
on the command line.
4
Copy the inventory data files onto a removable media, then take it to a device connected to
ZENworks Control Center.
5
Continue with
Section 3.6.4, “Importing Data Gathered with the Portable Collector,” on
page 62
.
3.6.3 Running the Portable Collector on an OSX Device
1
Navigate to https://
ZENworks_Server_ID
/zenworks-setup/ (where
ZENworks_Server_ID
is the
DNS name or IP address of a Primary Server).
2
Click
Inventory Tools
.
3
Click
osxportable.dmg
to download it to the desktop.
4
Uncompress
osxportable.dmg
.
5
Create a temporary folder to run the portable scan from.
6
Copy the contents of
osxportable
, which is found in
/Volumes/osxportable
, to the
temporary folder.
7
Close (eject) the osxportable image.
8
Open a terminal window.
You must be a user with administrative privileges.
9
Run
sudo ./zenumia-portable /full/path/to/output/directory
.
The WIF file (<
xxx
>.xml) will be written there. This file contains the device’s inventory data. It
will be convenient for the output directory to be accessible by a Windows device. Or you can
copy the file and put it on a device connected to the ZENworks Control Center.
10
When the scan finishes, remove the temporary directory you created in
Step 5
and the file
osxportable.dmg
that you downloaded in
Step 3
.
Содержание ZENworks 10 Configuration Management Asset Inventory
Страница 4: ...4 ZENworks 10 Configuration Management Asset Inventory Reference novdocx en 16 April 2010...
Страница 8: ...8 ZENworks 10 Configuration Management Asset Inventory Reference novdocx en 16 April 2010...
Страница 12: ...12 ZENworks 10 Configuration Management Asset Inventory Reference novdocx en 16 April 2010...
Страница 94: ...94 ZENworks 10 Configuration Management Asset Inventory Reference novdocx en 16 April 2010...
Страница 114: ...114 ZENworks 10 Configuration Management Asset Inventory Reference novdocx en 16 April 2010...
Страница 128: ...128 ZENworks 10 Configuration Management Asset Inventory Reference novdocx en 16 April 2010...
Страница 132: ...132 ZENworks 10 Configuration Management Asset Inventory Reference novdocx en 16 April 2010...
Страница 138: ...138 ZENworks 10 Configuration Management Asset Inventory Reference novdocx en 16 April 2010...
Страница 144: ...144 ZENworks 10 Configuration Management Asset Inventory Reference novdocx en 16 April 2010...