background image

31

Sample Flip

Although each track on Circuit Rhythm is monophonic, it is possible to assign different samples to 
individual steps on a single track. This is useful for creating interesting and intricate drum beats. The 
action of assigning different samples per-step is called Sample Flip.

Steps may be assigned a sample in two different ways:

•  The first is via live recording in 

Sample View

. To do this, first enable Record Mode by 

pressing the 

Rec

 button so that it lights bright red 

G

. Now press 

Play


 and hit some 

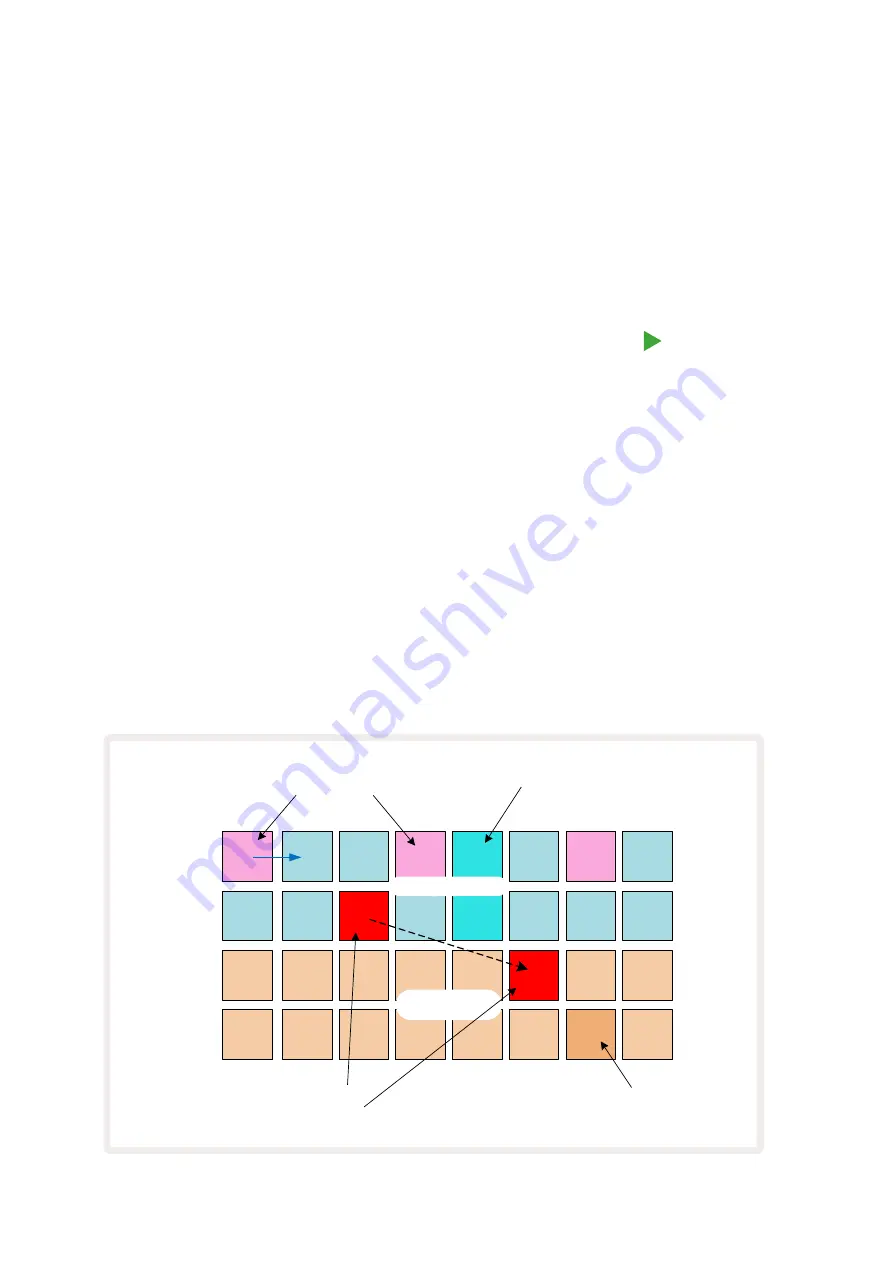
sample pads – these hits will be recorded to steps. Note that these steps will be lit lilac – 
this indicates that Sample Flip has been used to assign a different sample. These steps will 
ignore the track’s currently active sample, instead playing back their assigned sample.

•  The second is via manual assignment. Press and hold a sample pad (it will turn red after a 

moment) and then press the steps where you want to place the sample – the steps will turn 
red until you release the sample pad, at which point they will turn lilac to indicate that they 
have an assigned sample. If you press and hold the sample pad again, the steps that match 
the assigned sample will turn red to indicate the relationship. Pressing and holding a step 
with an assigned sample will also light the corresponding sample pad red – this behaviour is 
useful when you have many steps with different assigned samples in a single pattern.

Steps that are sample flipped will be lit bright lilac, while steps that will play back the active sample 
will be lit bright blue.

PLAY

Current default sample

Pattern step display

Samples (one 

page of eight) 

(HOLD)

Steps with samples other than 

the current default are lit lilac

Steps with the default 

sample are lit bright blue

Press and hold a lilac pad 

to see which sample it 

triggers

Содержание Circuit Rhythm

Страница 1: ...1...

Страница 2: ...or any equipment which may result from use of this manual or the equipment which it describes The information provided in this document may be modified at any time without prior warning Specification...

Страница 3: ...tarting from Scratch 25 Using Sample Tracks 29 Sample View 29 Sample Flip 31 Sample Modes 32 Keyboard and Slice Note Views 33 Using the Macros to sculpt samples 36 Non quantised record 37 Micro step e...

Страница 4: ...Master Compressor 70 Side Chains 71 The Filter Knob 72 Grid FX 73 Effect Latching 75 Using Grid FX with external audio 75 MIDI control of Grid FX 75 Recording Samples Sample Rec View 76 Recording 77 R...

Страница 5: ...annels 89 MIDI I O 90 Clock settings 91 Analogue clock rates 91 Sticky Shift 91 Advanced Setup View 92 Easy Start Tool Mass Storage Device 92 MIDI Thru configuration 92 Master Compressor 92 Save Lock...

Страница 6: ...ds sequencer steps and perform numerous other functions The pads internal illumination is RGB colour coded so you can see at a glance what s going on Eight rotary controls are provided to let you twea...

Страница 7: ...pattern mutate sync rates and more Sample recording via stereo input or resample internal audio Instant performance control with Grid FX Drum Pad performance mode with beat repeat functionality Rever...

Страница 8: ...used a number thus X to cross reference the top panel diagram and thus X to cross reference the rear panel diagram See pages 16 and 19 We ve used Bold text to name physical things the top panel contro...

Страница 9: ...t Journey where we ll get you set up Alternatively if you have Google Chrome open when you connect Circuit Rhythm a pop up will appear that will take you straight to the Easy Start Journey If you re o...

Страница 10: ...m with a USB C to USB C cable if required A cable of similar length to the included USB A to USB C cable will offer the same performance Using the AC adaptor The AC adaptor supplied with the unit is a...

Страница 11: ...12 pads are green the charge level is high As the charge level decreases fewer of the central pads will be lit in the battery indication view Battery at 100 Battery at 50 The battery will be charged...

Страница 12: ...e of a sample is how many steps it sounds for Gate View allows the length of a step to be edited Individual gate values can be set for each sample assigned to a single step by using live record Grid F...

Страница 13: ...Pattern at which the assigned samples will play Note View Note A View that gives you a standard chromatic keyboard for playing the selected sample Pack A complete set of Projects and Samples Up to 32...

Страница 14: ...on will be lit bright red Recording Source You can either record your samples from an external sound source or resample internally processed sounds selected in Sample Rec View Recording Threshold A us...

Страница 15: ...ter Patterns of any length my be defined in Pattern Settings View See also Micro step Step buttons Collective name for the button group comprising the Note Velocity Gate Micro Step and Probability but...

Страница 16: ...ke on an analogue synth It is always active 3 Macro controls 1 to 8 eight multi functional rotary encoders with associated RGB LED The availability and function of these controls varies with Circuit R...

Страница 17: ...rameters of each step of the pattern to be individually entered deleted or modified for the currently selected track Note that Probability is the Shift function of the Pattern Settings button and that...

Страница 18: ...steps to change the feel of a pattern using Macro 2 for adjustment In this mode Macro 5 adjusts the level of Click track 17 Clear allows deletion of individual sequence steps Patterns Projects samples...

Страница 19: ...the MIDI Thru port may be configured in Advanced Setup View to act as a clone of the MIDI Out port see page 92 for details 5 Sample In L Mono and R mono or stereo external audio inputs for recording s...

Страница 20: ...ct the main outputs to a monitoring system powered speakers or a separate amplifier and passive monitors alternatively plug in a pair of headphones if you prefer Long press the POWER button 8 and the...

Страница 21: ...21 After boot up the grid display will change to something like that shown below...

Страница 22: ...using the J and K buttons 15 you ll find that each of the first six pages represents a genre kit made up of 16 samples Each kit has twelve percussive sounds and four melodic sounds Bank 7 comprises a...

Страница 23: ...blue slot contains either a Project saved by the user or a factory demo Project Dim blue slot is empty See paragraph on Customising Session Colours on page 82 You can select a different factory demo...

Страница 24: ...n the last selected Project memory which will most likely be the one that held an earlier version the earlier version will be overwritten To save your work in a different Project memory leaving the or...

Страница 25: ...anything just yet NOTE On Circuit Rhythm Patterns are 16 steps long by default This can be changed to 32 steps for any or all of the eight tracks This topic is explained in Step Page on page 49 For s...

Страница 26: ...ressing a different pad on the lower two rows you can use any of the eight sample pages Now add a snare drum to other steps in the sequence in the same way Press 2 5 to enter Track 2 s Sample View the...

Страница 27: ...the J and K arrows 15 to scroll through higher and lower octaves Pressing J and K together will reset the pitch to the default octave The root note of the default octave is middle C on a standard pian...

Страница 28: ...this View the sequencer steps are replaced by a second chromatic keyboard which triggers samples one octave higher than the lower C D E F G A B C C D F G A Expanded Note View for Track 3 C D E F G A...

Страница 29: ...g for the sample pads and elsewhere for ease of identification see page 22 The default sample page allocation is Track 1 Page 1 slot 1 Kick 1 Track 2 Page 1 slot 3 Snare 1 Track 3 Page 1 slot 5 Closed...

Страница 30: ...ht blue steps will always trigger the track s currently active sample Pressing a sample pad as opposed to tapping will not change the active sample This behaviour is useful for Sample Flipping which y...

Страница 31: ...a manual assignment Press and hold a sample pad it will turn red after a moment and then press the steps where you want to place the sample the steps will turn red until you release the sample pad at...

Страница 32: ...d pad is released Gated the sample plays once until Note Off occurs at which point sample playback stops according to the envelope Loop the sample will continuously loop from start to end until the No...

Страница 33: ...er such that if Tune is set to its maximum positive value 1 octave notes played on the keyboard which are higher than two octaves above middle C will play at a fixed maximum pitch To reset the keyboar...

Страница 34: ...E 13 SLICE 14 SLICE 15 SLICE 16 SLICE 1 SLICE 2 SLICE 3 SLICE 4 SLICE 5 SLICE 6 SLICE 7 SLICE 8 Pads 1 16 Pattern Steps Pads 17 32 Slice keyboard Note View for Track 3 in 16 slice mode By default each...

Страница 35: ...ew The slice pads will turn gold at this point indicating Live Slice Point Recording is primed Tap a slice pad to initiate Live Slice Point Recording The selected sample will now play from the start o...

Страница 36: ...ticlockwise will add a decay phase After the sample is triggered the volume will decrease The greater the anticlockwise rotation the faster the decay will be until only a short click remains Macro 5 D...

Страница 37: ...recorded while non quantised recording will place hits directly on the intermediate micro steps To toggle between quantised and non quantised recording hold Shift and press G Record If Record Quantis...

Страница 38: ...the beat Micro step 4 is bright the sample at the selected step will be delayed by three ticks half a step interval If the first pad is illuminated as in the first example above it indicates that the...

Страница 39: ...adding micro step values to empty steps these will be populated with the current default sample for the drum track in use Note also that all micro step hits adopt the velocity value and sample assigne...

Страница 40: ...mple while the two lower rows represent a 16 segment fader spilt across two rows the number of pads illuminated sand represent the Velocity value for the selected step In the example above Steps 4 8 1...

Страница 41: ...hit is to be added and press a pad on the two lower rows the pad defines the velocity of that hit This is great for adding a series of ghost hits at low volume Probability Circuit Rhythm s Probabilit...

Страница 42: ...row will be dark The possible Probability values are Lit pads Row 3 Probability 1 8 100 1 7 87 5 1 6 75 1 5 62 5 1 4 50 1 3 37 5 1 2 25 1 only 12 5 To assign a Probability to a step while sequencer pl...

Страница 43: ...in the pattern where you initially turned the Macro otherwise Circuit Rhythm will overwrite the automation data with that corresponding to the new knob position Provided you do this you ll hear the ef...

Страница 44: ...ear and Duplicate To remove a step from a Pattern hold Clear 17 and press the step pad This will remove the sample trigger well as all automated parameters Velocity Micro Steps Probability that were a...

Страница 45: ...1 4 LATCH 1 16 1 32 1 4T 1 8T 1 16T 1 8 1 32T TRACK 1 TRACK 2 TRACK 3 TRACK 4 TRACK 5 TRACK 6 TRACK 7 TRACK 8 Hold a repeat rate pad down and press a sample trigger pad to play the track s active samp...

Страница 46: ...a sample with note repeat hold down a Repeat Rate pad and press the sample trigger pad for the required track The sample will repeat for as long as both pads are pressed You can remove the need to use...

Страница 47: ...Patterns View accessed by pressing Patterns 10 The first time you open Patterns View in a new Project it will look like this 4 4 4 4 4 4 4 4 3 3 3 3 3 3 3 3 2 2 2 2 2 2 2 2 1 1 1 1 1 1 1 1 Pattern 1 f...

Страница 48: ...hile you press it While playback is stopped if the Pattern that is cleared is not the currently active Pattern indicated by the track colour pulsing and is not part of a Pattern Chain it will light wh...

Страница 49: ...ar two repetitions of the shorter tracks for every one of the longer Pressing Step Page 1 16 17 32 while a 32 step Pattern is playing changes the display to the other page but does not interrupt the P...

Страница 50: ...to 3 together hold Pad 1 down and then press Pad 3 You ll see that all three pads now illuminate brightly in the track colour indicating that they now form a chained sequence If you want to select a...

Страница 51: ...t dim Pulsing bright dim Pulsing bright dim Pulsing bright dim Pulsing bright dim Pulsing bright dim The Patterns View example above shows a possible arrangement of Patterns for an 8 pattern sequence...

Страница 52: ...Pattern 3 Pattern 4 Pattern 1 Pattern 1 Pattern 1 Pattern 1 Track 4 Track 3 LOOPS BACK AFTER 128 BEATS LOOPS BACK AFTER 128 BEATS Track 6 Track 5 Pattern 5 Pattern 2 Pattern 3 Pattern 2 Pattern 4 Pat...

Страница 53: ...hat of the others will remain unaffected If the pattern contains notes which are already in the highest octave that Circuit Rhythm can generate they will remain unaffected by an upward Pattern Octave...

Страница 54: ...ed Pattern hold Shift and press a Pattern pad You can still change which Patterns and Pattern Chains are playing in the usual way described in Patterns View at page 47 View Lock also lets you freeze t...

Страница 55: ...ift to toggle Pattern Start point with Pattern End point 5 Sync rate display Any alterations to patterns made in Pattern Settings View can be saved to the Project in the usual way press Save 19 it fla...

Страница 56: ...rn length is now 12 steps Dim red pad indicates that note hit data still exists for this step Altering the start point is exactly the same process except that Shift needs to be held down while selecti...

Страница 57: ...y regardless of note hit assignment though still at step intervals If the play order is changed in Play Mode the Pattern always completes its current cycle before starting a cycle with the new directi...

Страница 58: ...ns on a per track basis Mutate shuffles the notes or hits in the current Pattern to different steps The number of notes hits in the Pattern and drum samples themselves are unchanged they are just reas...

Страница 59: ...he pads will trigger Pattern 1 of all eight tracks as no Pattern Chains have been defined or assigned yet The first Pad 17 will be pulsing bright green which indicates that the currently playing Patte...

Страница 60: ...are now stored as that Scene On releasing Shift the pad with the stored Scene now shows bright white 1 8 7 6 5 2 3 4 Pulsing bright dim Scene pads Mixer View when Shift is released Bright white indica...

Страница 61: ...rn to dim white If the matching Patterns are selected once again the Scene pad will once again pulse green Note that this behaviour will only occur for the most recently selected Scene if you select t...

Страница 62: ...Scene memory Then you can define a Scene Chain of those two Scenes and will get the four required Patterns in sequence Queuing Scenes Scenes may be pre selected in the same way as Patterns so if a Sce...

Страница 63: ...eck the BPM momentarily The BPM is displayed on the pad grid as two or three large digits in blue and white The hundreds digit which can only ever be a 1 2 or off occupies grid columns 1 and 2 while t...

Страница 64: ...taps for Circuit Rhythm to change its tempo setting to your manual input and it will then calculate the BPM by averaging the last five taps You can use Tap Tempo at any time but if you re in Tempo Vi...

Страница 65: ...enabled you will hear a metronome tick at every quarter note on all audio outputs whenever the sequencer is playing This is a global setting therefore Click will remain on or off regardless of Pack o...

Страница 66: ...HP Filter 7 LP Filter Setup The illuminated pads on Row 1 are Mute buttons for each track Press a pad to stop the sequencer triggering a track s samples and CC automation this will in turn mute the tr...

Страница 67: ...ompleted Pressing K will return the Macros to their level control function Performing with Muted Tracks Muting can be used for more creative purposes than simply silencing a track it lets you perform...

Страница 68: ...e reverb preset Active delay preset Delay presets Reverb presets 1 Tune 2 Start 3 Length 4 Slope 5 Distortion 6 HP Filter 7 LP Filter 8 Resonance J J 1 16 17 32 Duplicate Setup Each of the peach pads...

Страница 69: ...e different reverb presets on different tracks however Details of the eight reverb presets are given below PRESET DELAY TYPE 1 Small Chamber 2 Small Room 1 3 Small Room 2 4 Large Room 5 Hall 6 Large H...

Страница 70: ...with swing 14 4th Triplets 6 cycles per bar 15 4th dotted Ping Pong Swung 4 cycles per 3 bars with swing 16 4th Triplets Ping Pong Wide 6 cycles per bar Note that below certain BPM values the delay p...

Страница 71: ...illuminate yellow if last Side Chain preset selected was for Track 2 Pad for active trigger source will illuminate aqua if last Side Chain preset selected was for Track 4 TRACK 5 1 1 TRACK 3 TRACK 7 T...

Страница 72: ...f you mute the drum track selected as the key in Mixer View side chain triggering is disabled The Filter Knob The entire audio output of Circuit Rhythm the sum of the sounds from all eight tracks is f...

Страница 73: ...rser 1 16 rate 9 Gater 1 4 rate 10 Gater 1 8 rate 11 Gater 1 16 rate 12 Gater 1 32 rate 13 Phaser light 14 Phaser heavy 15 Vinyl light 16 Vinyl heavy Grid FX may be configured using Novation Component...

Страница 74: ...yle of choice of samples Briefly the basic effects are Beat Repeat capture a short segment of tempo synced audio from the master mix and repeat it for a stutter effect Beat Repeat playback is not sync...

Страница 75: ...is enabled multiple effects will be latched on when they are selected however only one effect of each of the seven types may be latched at any one time The Latch state for each effect type is saved w...

Страница 76: ...l through the sample pages the page you are currently viewing will be indicated by one of the 1 to 8 buttons momentarily illuminating bright white i e if you scroll to page 5 the 5 button will briefly...

Страница 77: ...pads being unlit To stop recording press Record again If the maximum sample time of 32 seconds is reached or no sample storage remains available recording will stop automatically While sample recordin...

Страница 78: ...ays 12 the recording level is reduced by 12 dB Use the attenuator if the signal level from an external sound source is too high and causing unwanted distortion on the recording Resample On Off Pad 31...

Страница 79: ...ward with the Start control and the end point moved back with the Length control both controls have the effect of shortening the overall sample length The pads go dark to illustrate the effect of trim...

Страница 80: ...enabled or disabled These modes behave identically to tracks 1 8 see Sample Modes at page 32 The default mode is One Shot which will be selected upon power on This selection is not saved with the proj...

Страница 81: ...that it is being queued The new Project will then begin playing from the Start point Step 1 by default of its Pattern or the Start Point of the first Pattern in a chain or its first Scene as the case...

Страница 82: ...ote that you can abort the Save routine after the first press of Save by pressing any other button Changing Project Colours You can also assign a different colour to any of the pads in Project View th...

Страница 83: ...s complete with personalised samples as appropriate The principle can be extended further still as you can of course use as many microSD cards as you wish Packs View is the secondary view of the Proje...

Страница 84: ...w seconds while the Pack loads and once the load is complete Packs View will be displayed again with the pad for newly loaded pack lit white You can create a new Pack with no samples or projects by lo...

Страница 85: ...s not been inserted since powering up Packs View will display a red and yellow icon that means no SD available The no SD icon is also displayed in other situations see Removing a MicroSD card below fo...

Страница 86: ...oad As such Projects View will display the No SD icon as described above and the Save button 19 will not be lit until the card is re inserted Packs View will also display the No SD icon until the card...

Страница 87: ...to communicate with your device We recommend using Google Chrome or Opera Alternatively you can download a standalone version of Components from your Novation account once you have registered your pr...

Страница 88: ...ew produces the display shown below 9 5 11 13 12 14 15 16 2 ppqn Tx On Off 3 7 10 6 4 8 Rx On Off 1 ppqn Rx On Off Tx On Off Rx On Off Tx On Off Rx On Off Tx On Off 1 2 4 ppqn 8 ppqn 24 ppqn MIDI Note...

Страница 89: ...hannels 1 15 Channel 16 is reserved for the Project To change the MIDI channel that will be used by a track press the track select button 5 or the required track The top two rows of pads in Setup View...

Страница 90: ...lity in how Circuit Rhythm integrates with the rest of your system MIDI Rx receive and Tx transmit can be enabled independently for each of the data categories Pads 25 to 32 are arranged as four pairs...

Страница 91: ...ircuit Rhythm outputs a continuous analogue clock from the rear panel Sync Out connector 2 at an amplitude of 5 V The frequency of this clock is related to the tempo clock internal or external The out...

Страница 92: ...n determine the behaviour of the MIDI Thru port on Circuit Rhythm s rear panel in Advanced Setup View The options are for the port to act as a regular MIDI Thru port this is the default or to duplicat...

Страница 93: ...t is possible that if the power was interrupted while a Project was being saved it may have become corrupted in some way This might mean that Circuit Rhythm ends up in some anomalous state at power on...

Страница 94: ...urn Circuit Rhythm off 2 Hold down the Sample Rec 9 Sample 14 and Note 6 buttons 3 Power Circuit Rhythm on again Circuit Rhythm will now be in Bootloader Mode and the grid display will display a selec...

Страница 95: ......

Отзывы:

Похожие инструкции для Circuit Rhythm