ENGLISH
GREAT BRITAIN • CUSTOMER SERVICE
tel. 020 8247 9300 e-mail: [email protected] internet: www.clasohlson.co.uk postal: 10 – 13 Market Place, Kingston Upon Thames, Surrey, KT1 1JZ
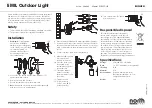
A
B
C
D
Ver
. 20170602
EMIL Outdoor Light
Art.no 36-6864 Model EL-995DNB
Please read the entire instruction manual before using the product
and then save it for future reference. We reserve the right for
any errors in text or images and any necessary changes made
to technical data. In the event of technical problems or other
queries, please contact our Customer Services.
Safety
• This product must only be installed by a qualified electrician.
• The product is intended for fixed wall installation.
Installation
6. Pass the mains flex through the wall mount’s rubber grommet.
7. Screw the wall mount to the wall. Use fasteners suitable for
the surface material and ensure that there are no electrical
wires or water pipes in the wall where you intend to drill/
screw.
8. Connect the flex’s wires to the terminal block.
Responsible disposal
1.
Warning:
Before beginning
any electrical installation
always disconnect the power
to the circuit you are working
on, either by turning off
the main circuit breaker or
by removing the fuse from
the consumer unit.
2. Loosen the two nuts (D) that hold the lamp base (C)
against the wall mount (A).
3. Remove the nuts and washers.
4. Detach the lamp base from the wall mount.
5.
Note:
Handle the electrical wires and rubber gasket (B)
with care so as not to damage them.
9. Align the rubber gasket
to match the wall
mount’s screw holes.
10. Once the screw holes
are aligned, press
the lamp base against
the wall mount.
11. Thread the rubber
washers and then
the metal washers onto
the screws.
12. Tighten the nuts.
13. Screw in a bulb.
1 × E27, max 60 W
(sold separately).
14. Turn on the mains. The light is
now ready for use.
This symbol indicates that this product
should not be disposed of with general
household waste. This applies throughout
the entire EU. In order to prevent any harm to
the environment or health hazards caused by
incorrect waste disposal, the product must
be handed in for recycling so that the material
can be disposed of in a responsible manner.
When recycling your product, take it to your
local collection facility or contact the place of
purchase. They will ensure that the product is
disposed of in an environmentally sound manner.
Specifications
Voltage
220–240 V AC, 50/60 Hz
Bulb
1 × E27, max 60 W (sold separately)
IP rating
IP44
Material
Steel
Measurement
Distance from wall 38.0 cm
Base/wall mount diam: 11.5 cm
Lampshade diam: 24 cm
Weight
1 kg

