Chapter 20 — Meridian Mail Compact Option installation and maintenance
Page 275 of 536
Option 11C Compact
Planning, Installation, Fault Clearing and CCBR Guide
8
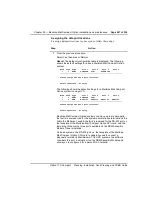
At the prompt, insert an appropriate tape into the tape drive.
for more information about how
to insert a tape.
9
Press [OK To Start Backup].
The Backup Status screen appears. From here, you can follow the
progress of the backup. You have the option of aborting the backup or
exiting to the Volume Administration screen.
The backup should take about 30 to 60 minutes, and requires only a
single tape of the appropriate size for your system.
10
When the backup is complete, remove the tape and label it clearly.
Include the date and time of the backup.
11
Press [Exit] to return to the Volume Administration screen.
12
Remove the external tape drive if required.
—————————— End of Procedure ——————————
Scheduling backups
Permanently installing an external tape drive allows regular backups to be
scheduled. In this way, should anything go wrong with the system, there will
always be a recent backup on hand.
Procedure 48
Scheduling system backups
1
Log on to the Meridian Mail Compact Option system at the system
administrator’s terminal.
2
From the Main Menu, choose “2 General Administration.”
→
“2 Volume Administration and Selective Backup.”
3
Choose the disk volume you wish to schedule for backup. (Meridian
Mail Compact Option has only one disk volume, but you still must
select it by pressing the space bar.)
4
Press [Backup To Tape].
5
The Disk to Tape Backup screen appears.
6
Complete a tape label and attach it to the tape cartridge.
7
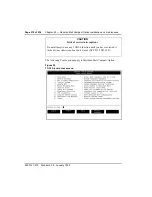
Press [Schedule Backup].
8
The Schedule Backup screen appears.
Содержание Meridian Meridian 1
Страница 3: ...553 3121 210 Standard 3 0 January 1999 ...
Страница 17: ...xiv Contents 553 3121 210 Standard 3 0 January 1999 ...
Страница 89: ...Page 70 of 536 Chapter 6 Bracing cabinets against earthquakes 553 3121 210 Standard 3 0 January 1999 ...
Страница 97: ...Page 78 of 536 Chapter 8 Installing a new system 553 3121 210 Standard 3 0 January 1999 ...
Страница 107: ...Page 88 of 536 Chapter 10 Installing the system ground 553 3121 210 Standard 3 0 January 1999 ...
Страница 113: ...Page 94 of 536 Chapter 11 Installing the power supply 553 3121 210 Standard 3 0 January 1999 ...
Страница 125: ...Page 106 of 536 Chapter 12 Adding an expansion cabinet 553 3121 210 Standard 3 0 January 1999 ...
Страница 139: ...Page 120 of 536 Chapter 13 Installing the circuit cards 553 3121 210 Standard 3 0 January 1999 ...
Страница 157: ...Page 138 of 536 Chapter 15 Installing and connecting SDI and Ethernet ports 553 3121 210 Standard 3 0 January 1999 ...
Страница 175: ...Page 156 of 536 Chapter 16 Starting up and testing the system 553 3121 210 Standard 3 0 January 1999 ...
Страница 209: ...Page 190 of 536 Chapter 18 Connecting the trunks 553 3121 210 Standard 3 0 January 1999 ...
Страница 323: ...Page 304 of 536 Chapter 21 Installing Hospitality 553 3121 210 Standard 3 0 January 1999 ...
Страница 419: ...Page 400 of 536 Chapter 23 Pre programmed data 553 3121 210 Standard 3 0 January 1999 ...
Страница 455: ...Page 436 of 536 Chapter 24 Changing pre programmed data 553 3121 210 Standard 3 0 January 1999 ...
Страница 555: ...Page 536 of 536 Chapter 25 Fault locating and clearing 553 3121 210 Standard 3 0 January 1999 ...


