background image

6

H

OW TO

A

DJUST THE

S

KI

E

XERCISER

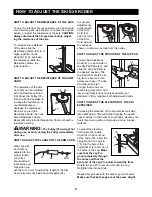
HOW TO ADJUST THE RESISTANCE OF THE SKIS 

To vary the intensity of your exercise, you can change
your exercise pace, use the arm cord (see the section
below), or adjust the resistance of the skis. CAUTION:
Always dismount the ski exerciser before adjust-
ing the resistance of the skis.

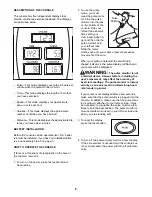
To increase the resistance
of the skis, slide the
Resistance Clamp (85) to a
higher position on the
Upright (16). To decrease
the resistance, slide the
Resistance Clamp to a
lower position. 

HOW TO ADJUST THE RESISTANCE OF THE ARM
CORD

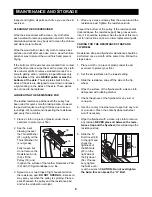
The resistance of the Arm
Cord (23) can be adjusted
with the Resistance Knob
(39) above the Pulley (35).
Turn the Knob clockwise to
increase the resistance, or
counterclockwise to
decrease the resistance.
Note: As you turn the
Resistance Knob, the num-
bered Resistance Scale
Decal (88) will protrude through the Knob to show the
resistance setting.

WARNING:

The Pulley (35) will get hot

during use. Avoid touching the Pulley immediately
after use. 

HOW TO ADJUST THE LENGTH OF THE ARM CORD

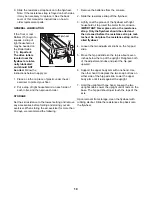
When the Arm
Cord (23) is
adjusted to the
proper length,
your arms
should extend
just behind your
hips when you
use the Arm Cord. To adjust the length of the Arm
Cord, retie the knot inside each Handgrip (24). 

For greater
adjustments
in the length
of the Arm
Cord (23),
add one loop
of the Arm
Cord around
the pulley as
shown, or remove one loop from the pulley.

HOW TO ADJUST THE POSITION OF THE HIP PAD

Loosen the Adjustment
Knob (41) on each side of
the Hip Pad Slide (42), and
slide the Hip Pad Slide to
the desired position. The
Hip Pad (53) should be at
hip level, about one inch
below your navel. The Hip
Pad should be high
enough that it does not
restrict leg movement, and
low enough that it does not press against your
abdomen. Firmly retighten both Adjustment Knobs. 

HOW TO ADJUST THE ELEVATION OF THE SKI
EXERCISER

Increasing the elevation of the ski exerciser will simu-
late uphill skiing. This will further develop the quadri-
ceps muscles on the fronts of your thighs, elevate your
heart rate more quickly, and provide a more intense
workout.   

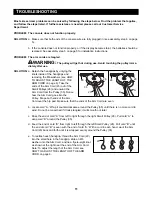
To adjust the elevation,
first loosen the Incline
Knob (93) in front of one
of the Legs (76). Insert the
straight end of a Leg Pin
(74) into the hole in the
Leg Bracket (2) and one of
the holes in the Leg. Make
sure that the Leg Pin
goes completely through
the holes and that the
bent end of the Leg Pin points toward the floor.
Rotate the Leg Pin to secure it around the Leg.
Retighten the Incline Knob. 

Repeat this process with the other Leg (not shown).
Make sure that both Legs are at the same height.

85

16

41

53

42

76

93

74

2

35

23

39

88

23

24

Knot

23

23

Содержание NTXC80182

Страница 1: ...DIRECT TO OUR TOLL FREE CUSTOMER HOT LINE The trained technicians on our cus tomer hot line will provide imme diate assistance free of charge to you CUSTOMER HOT LINE 1 888 825 2588 Mon Fri 6 a m 6 p m MST USER S MANUAL CAUTION Read all precautions and instruc tions in this manual before using this equipment Save this manual for future reference Serial Number Decal Model No NTXC80182 Serial No Wri...

Страница 2: ...y persons weighing more than 250 pounds 7 Wear appropriate clothing when exercising do not wear loose clothing that could become caught on the ski exerciser Always wear athletic shoes for foot protection 8 The pulse monitor is not a medical device Various factors including the user s move ment may affect the accuracy of heart rate readings The pulse monitor is intended only as an exercise aid in d...

Страница 3: ...manual please call our Customer Service Department toll free at 1 888 825 2588 Monday through Friday 6 a m until 6 p m Mountain Time excluding holidays To help us assist you please note the product model number and serial number before calling The model number is NTXC80182 The serial number can be found on a decal attached to the ski exerciser see the front cover of this manual Before reading furt...

Страница 4: ... Make sure that the Leg Pin goes completely through the holes and that the bent end of the Leg Pin points toward the floor Rotate the Leg Pin to secure it around the Leg Slide an Incline Clamp 92 onto the indicated stud and into the slots in the Leg Bracket 2 Tighten an Incline Knob 93 with an Incline Washer 94 onto the stud Attach the other Leg 76 in the same way 3 Lift the Upper Body Arm 27 slig...

Страница 5: ...the battery compartment with the negative ends of the batteries touching the springs Then reattach the Battery Door Attach the Console 66 to the Upper Body Arm 27 by firmly pressing it into place in the desired location 6 Plug the Console Wire 47 and the Pulse Monitor 49 into the indicated jacks on the Console 66 See the inset drawing Plug the other end of the Console Wire 47 into the jack on the ...

Страница 6: ...side each Handgrip 24 For greater adjustments in the length of the Arm Cord 23 add one loop of the Arm Cord around the pulley as shown or remove one loop from the pulley HOW TO ADJUST THE POSITION OF THE HIP PAD Loosen the Adjustment Knob 41 on each side of the Hip Pad Slide 42 and slide the Hip Pad Slide to the desired position The Hip Pad 53 should be at hip level about one inch below your navel...

Страница 7: ...the handlebar or the hip pad for balance Swing your other arm at your side When your left leg is for ward your left arm should be back Repeat this process with your other arm 2 When you are comfortable swinging each arm sep arately try swinging both arms Swing your arms naturally Practice this motion until it feels comfort able COMBINE THE ARM AND LEG MOTIONS 1 Set the arm cord resistance at a com...

Страница 8: ...ear lobe several times with your thumb and index fin ger and then clip the pulse monitor onto your left ear lobe Slide the metal clothes clip onto your collar to prevent excessive movement of the wire When your pulse is detected the small heart shaped indicator in the pulse display will flash and your pulse will be displayed WARNING The pulse monitor is not a medical device Various factors includi...

Страница 9: ...stance Pad 32 with 100 grit sandpaper or a file 3 Spread one or two drops of light household oil on the resistance pad DO NOT OVER OIL Excess oil may spray out when the pulley is spinning Place a pencil between the pulley and the resistance pad and let the oil absorb overnight 4 Wipe any excess oil away from the area around the resistance pad Tighten the resistance knob Inspect the bottom of the p...

Страница 10: ...1 Remove the batteries from the console 2 Slide the resistance strap off the flywheel 3 Lightly coat the groove of the flywheel with light household oil to protect the metal from corrosion IMPORTANT Never place oil on the resistance strap Only the flywheel should be oiled and then cleaned before the resistance strap is reat tached Do not place the resistance strap on the oiled flywheel 4 Loosen th...

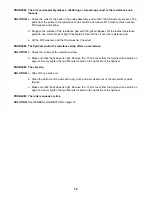
Страница 11: ... the Small Pulleys 28 and unwind the Arm Cord from the Pulley 35 Notice how the Arm Cord goes into the Pulley Drape both ends of the Arm Cord over the hip pad Make sure that the ends of the Arm Cord are even b Locate cord A Wrap it counterclockwise around the Pulley 35 until there is no more cord to wind Do not be concerned if it looks tangled it will smooth out later c Pass the end of cord A from...

Страница 12: ...thrust washer if needed PROBLEM The flywheel and or the resistance strap offers no resistance SOLUTION a Check the routing of the resistance strap b Make sure that the flywheel is tight Remove the U bolt cover from the flywheel see step 8 on page 9 Evenly tighten the two M6 nuts located on the right side of the flywheel PROBLEM The skis slip SOLUTION a Wipe off any excess oil b Clean the bottoms o...

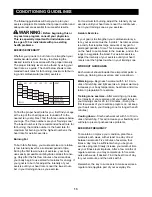
Страница 13: ...ur exercise until your heart rate is near the middle num ber in your training zone as you exercise Aerobic Exercise If your goal is to strengthen your cardiovascular sys tem your exercise must be aerobic Aerobic exercise is activity that requires large amounts of oxygen for prolonged periods of time This increases the demand on the heart to pump blood to the muscles and on the lungs to oxygenate t...

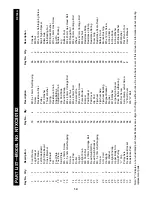
Страница 14: ...38 1 Spring 39 1 Resistance Knob 40 1 Snap Buttons 41 2 Adjustment Knob 42 1 Hip Pad Slide 43 2 Round Endcap 44 2 M8 x 40mm Carriage Bolt 45 2 M6 Jam Nut 46 2 M6 x 40mm Bolt 47 1 Console Wire 48 4 M6 x 20mm Screw 49 1 Pulse Monitor 50 2 Bumper 51 1 Pad Bracket 52 1 Pad Cover 53 1 Hip Pad 54 1 Flywheel 55 1 Flywheel Axle 56 2 Flywheel Bearing 57 1 Magnet Bracket 58 1 Magnet 59 4 M16 Washer 60 4 Lar...

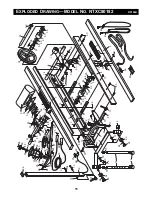
Страница 15: ... 25 26 27 28 28 29 29 29 30 30 31 31 32 33 33 34 35 36 37 38 39 41 41 40 42 43 43 44 44 45 46 46 48 48 45 50 50 51 52 53 54 55 56 57 58 59 60 61 60 59 56 59 60 61 60 59 62 63 64 65 25 67 68 68 68 68 69 70 70 69 71 71 72 73 72 73 74 74 75 75 76 77 17 79 78 79 79 80 80 80 81 81 82 83 84 85 86 87 47 49 66 87 88 89 90 90 91 92 94 93 92 94 93 95 96 15 ...

Страница 16: ... for repair USER S MANUAL It is VERY IMPORTANT THAT YOU READ THE MANUAL before operating the Product Remember to do the periodic maintenance requirements specified in the Manual to assure proper operation and your continued satisfaction HOW TO GET PARTS AND SERVICE Simply call our Customer Service Department at 1 888 825 2588 and tell them your name and address and the serial number of your Produc...

Отзывы: