background image

Model No. NTSR01309.0

Serial No.

Write the serial number in the space

above for reference.

USERʼS MANUAL

Serial

Number

Decal

CAUTION

Read all precautions and instruc-

tions in this manual before using

this equipment. Keep this manual

for future reference.

www.nordictrack.com

QUESTIONS?

If you have questions, or if parts are

damaged or missing,

DO NOT

CONTACT THE STORE; please

contact Customer Care.

IMPORTANT: Please register this

product (see the limited warranty

on the back cover of this manual)

before contacting Customer Care.

CALL TOLL-FREE:

1-888-825-2588

Mon.–Fri. 6 a.m.–6 p.m. MT

Sat. 8 a.m.–4 p.m. MT

ON THE WEB:

www.nordictrackservice.com

Содержание FREESTRIDER 35 S

Страница 1: ...p this manual for future reference www nordictrack com QUESTIONS If you have questions or if parts are damaged or missing DO NOT CONTACT THE STORE please contact Customer Care IMPORTANT Please registe...

Страница 2: ...ODED DRAWING 21 HOW TO CONTACT CUSTOMER CARE Back Cover LIMITED WARRANTY Back Cover NordicTrack is a registered trademark of ICON IP Inc WARNING DECAL PLACEMENT This drawing shows the location s of th...

Страница 3: ...3 ft 0 9 m of clearance in the front and rear of your elliptical strider and 2 ft 0 6 m on each side 5 Inspect and properly tighten all parts regu larly Replace any worn parts immediately 6 Keep child...

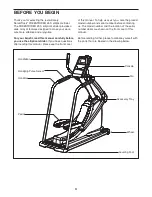
Страница 4: ...e elliptical strider If you have questions after reading this manual please see the front cover of this manual To help us assist you note the product model number and serial number before contacting u...

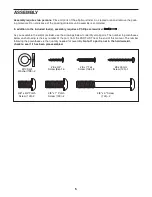
Страница 5: ...liptical strider use the drawings below to identify small parts The number in parentheses below each drawing is the key number of the part from the PART LIST near the end of this manual The number fol...

Страница 6: ...e top of the Upright 26 Next tie the lower end of the other wire tie to the end of the Power Cable 81 Pull the other end of the wire tie upward out of the top of the Upright 26 Then untie and discard...

Страница 7: ...ft Shields 6 7 Attach the Shield Cap 5 with a 8 x 35mm Screw 125 and two 8 x 3 4 Screws 86 Tip Start all the Screws before tightening any of them 3 86 86 6 125 5 7 4 Orient the Accessory Tray 18 as sh...

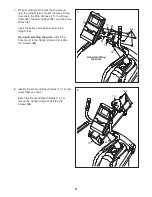
Страница 8: ...the Right Handrail 69 with a 3 8 x 3 4 Patch Screw 123 and an M10 Split Washer 128 Do not tighten the Patch Screw yet Repeat this step for the Left Handrail 70 5 69 128 123 79 26 70 78 30 6 IMPORTANT...

Страница 9: ...ires 78 Insert the excess wire downward into the Upright 26 Tip Avoid pinching the wires Attach the Console 4 to the Upright 26 with four 8 x 3 4 Screws 86 7 86 77 81 82 26 78 4 8 Identify the Front a...

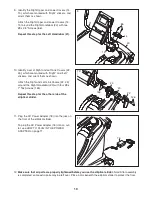
Страница 10: ...hown Attach the Right and Left Link Covers 22 23 around the Right Handlebar 20 with four 8 x 1 Tek Screws 126 Repeat this step for the other side of the elliptical strider 20 126 126 23 22 12 Make sur...

Страница 11: ...r to the desired location and then lower it to the level position CAUTION To decrease the risk of injury bend your legs and keep your back straight Make sure to use your legs rather than your back to...

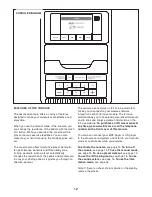
Страница 12: ...he console also features an iFit training mode that allows you to connect to your wireless network through an optional iFit Live module The iFit Live module allows you to download personalized workout...

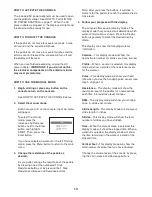
Страница 13: ...pressing the 1 Step Resistance Increase and Decrease buttons Note After you press the buttons it will take a moment for the pedals to reach the selected resis tance level 4 Follow your progress with t...

Страница 14: ...ntacts for at least 15 sec onds If the display does not show your heart rate make sure that your hands are positioned as described Be careful not to move your hands excessively or squeeze the metal co...

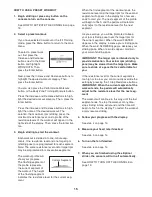
Страница 15: ...the resistance level for the current seg ment When the first segment of the workout ends the resistance level and the target rpm for the second segment will appear in the display for a few sec onds t...

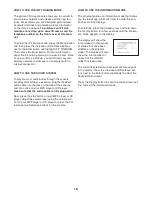
Страница 16: ...jack on the side of the console and into a jack on your MP3 player or CD player make sure that the audio cable is fully plugged in Next press the play button on your MP3 player or CD player Adjust the...

Страница 17: ...ch the track rollers ride IMPORTANT To avoid damage to the console keep liquids away from the con sole and keep the console out of direct sunlight CONSOLE TROUBLESHOOTING If the console does not turn...

Страница 18: ...your goal is to strengthen your cardiovascular system you must perform aerobic exercise which is activity that requires large amounts of oxygen for prolonged periods of time For aerobic exercise adju...

Страница 19: ...racket 47 1 Tension Spring 48 1 Tension Pulley 49 1 Tension Bushing 50 1 Resistance Bar 51 1 Magnet Ring 52 2 Hard Pulley 53 1 Drive Belt Pulley 54 2 Cable Spool 55 1 Spool Hub 56 2 Spool Bearing 57 1...

Страница 20: ...2 M10 Flat Washer 117 2 1 Snap Ring 118 1 3 4 Snap Ring 119 1 6 x 10mm Screw 120 4 3 8 x 3 4 Screw 121 4 3 4 Washer 122 4 3 8 x 1 Patch Screw 123 2 3 8 x 3 4 Patch Screw 124 2 3 8 x 3 Screw 125 1 8 x...

Страница 21: ...25 28 28 29 29 32 33 37 38 37 38 79 87 87 87 87 89 89 26 27 27 30 30 31 31 36 36 69 70 71 71 72 72 73 73 73 86 86 86 86 86 123 123 120 120 120 120 86 108 108 108 108 107 107 107 107 104 105 90 91 104...

Страница 22: ...66 66 67 74 74 74 74 75 75 76 77 81 82 78 83 83 83 83 39 41 42 43 95 44 45 50 51 56 57 58 58 68 84 84 85 110 110 95 97 97 112 97 97 97 97 112 95 106 118 95 119 95 112 103 95 98 100 100 102 95 95 95 9...

Страница 23: ...PLODED DRAWING C NTSR01309 0 R1009A 6 7 11 13 18 10 12 8 9 14 15 16 17 5 22 22 23 23 86 86 86 86 126 125 126 95 95 95 86 86 86 86 86 86 95 95 86 95 95 86 94 86 86 86 86 86 126 126 115 115 115 94 115 1...

Страница 24: ...ge This warranty does not extend to any damage to a product caused by or attributable to freight damage abuse misuse improper or abnormal usage or repairs not provided by an ICON authorized service ce...

Отзывы: