background image

USER’S MANUAL

Model No. NTEL71315.3

Serial No.                                  

Write the serial number in the space 

above for reference.

nordictrack.com

    CAUTION

Read all precautions and 

instructions in this manual before 

using this equipment. Keep this 

manual for future reference.

Serial 

Number 

Decal

To register your product and 

activate your warranty today, 

go to my.nordictrack.com.

For service at any time, go to 

nordictrackservice.com.
Or call 1-800-TO-BE-FIT

(1-800-862-3348)

Mon.–Fri. 6 a.m.–6 p.m. MT

Sat. 8 a.m.–12 p.m. MT
Please do not contact the store.

ACTIVATE YOUR 

WARRANTY

CUSTOMER CARE

Содержание FREESTRIDE

Страница 1: ...al before using this equipment Keep this manual for future reference Serial Number Decal To register your product and activate your warranty today go to my nordictrack com For service at any time go t...

Страница 2: ...E ELLIPTICAL 12 FCC INFORMATION 20 MAINTENANCE AND TROUBLESHOOTING 21 EXERCISE GUIDELINES 23 PART LIST 24 EXPLODED DRAWING 26 ORDERING REPLACEMENT PARTS Back Cover LIMITED WARRANTY Back Cover NORDICTR...

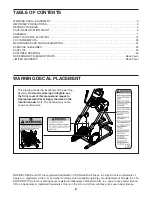
Страница 3: ...evel surface with at least 4 ft 1 2 m of clearance in the front of the elliptical 6 ft 1 8 m in the rear and 2 ft 0 6 m on each side To protect the floor or carpet from damage place a mat under the el...

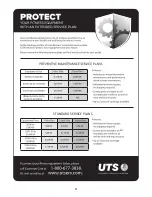
Страница 4: ...4 all STANDARD SERVICE PLANS...

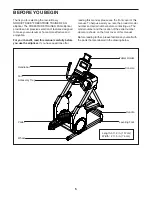
Страница 5: ...e questions after reading this manual please see the front cover of this manual To help us assist you note the product model number and serial number before contacting us The model number and the loca...

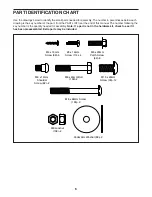
Страница 6: ...d of this manual The number following the key number is the quantity needed for assembly Note If a part is not in the hardware kit check to see if it has been preassembled Extra parts may be included...

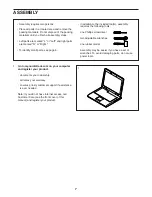
Страница 7: ...ssembly requires the following tools one Phillips screwdriver two adjustable wrenches one rubber mallet Assembly may be easier if you have a set of wrenches To avoid damaging parts do not use power to...

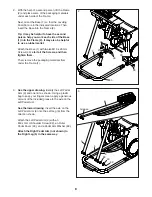
Страница 8: ...edal Arm not shown to the Right Leg 5 in the same way 3 30 1 2 30 53 30 30 2 With the help of a second person lift the Frame 2 and place some of the packaging materials under each side of the Frame Ne...

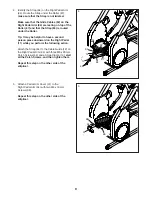
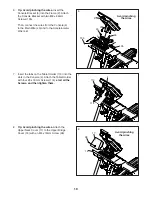
Страница 9: ...ve a second person press downward on the Right Pedal 11 while you perform the following action Attach the Strap 64 to the Cable Guide 12 on the Right Pedal Arm 94 with three M6 x 20mm Patch Screws 42...

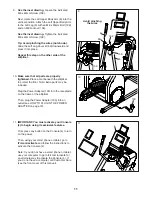
Страница 10: ...onsole 4 to the Main Wire 45 and to the Accelerometer Wire 48 4 4 105 105 3 2 Avoid pinching the wires 45 48 7 Insert the tabs on the Tablet Holder 113 into the slots in the Console 4 Attach the Table...

Страница 11: ...d an M8 Locknut 108 See the inset drawing Tighten the indicated M8 x 45mm Screw 109 Tip Avoid pinching the wires not shown Slide the Left Leg Cover B 60 downward and press it into place Repeat this st...

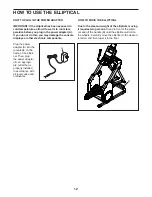
Страница 12: ...the receptacle on the frame of the ellipti cal Then plug the power adapter into an appropri ate outlet that is properly installed in accordance with all local codes and ordinances HOW TO MOVE THE ELLI...

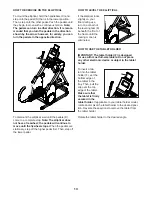
Страница 13: ...igher pedal first Then step off the lower pedal HOW TO LEVEL THE ELLIPTICAL If the elliptical rocks slightly on your floor during use turn one or both of the leveling feet E beneath the front of the f...

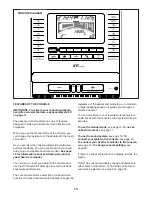
Страница 14: ...iFit Bluetooth Tablet app to record and track your workout information The console also offers a selection of onboard work outs Each onboard workout automatically changes the resistance of the pedals...

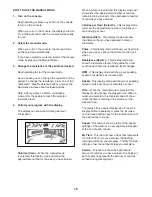
Страница 15: ...ill show the approximate number of calories you are burning per hour Distance Dist This display mode will show the distance that you have pedaled in miles or kilometers Pulse This display mode will sh...

Страница 16: ...art rate monitor to the console see HOW TO CONNECT YOUR HEART RATE MONITOR TO THE CONSOLE on page 19 When a heart rate monitor is connected to the console your heart rate will be shown in the display...

Страница 17: ...the current segment At the end of each segment of the workout a series of tones will sound and the next segment of the profile will begin to flash If a different resis tance level and or target speed...

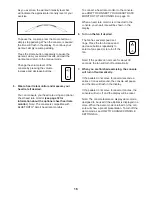
Страница 18: ...n Note To purchase an audio cable see your local electronics store Next press the play button on your per sonal audio player Adjust the volume level using the volume increase and decrease buttons on t...

Страница 19: ...ll turn solid blue 4 Record and track your workout information Follow the instructions in the iFit Bluetooth Tablet app to record and track your workout information 5 Disconnect your tablet from the c...

Страница 20: ...used if the elliptical is dis played in a store Press the Resistance increase button repeatedly to turn the demo mode on or off 4 Exit the settings mode Press the Settings button to exit the settings...

Страница 21: ...st level of the display If a replacement power adapter is needed call the telephone number on the cover of this manual IMPORTANT To avoid damaging the console use only a manufacturer supplied regulate...

Страница 22: ...Bracket Then reattach the outer disc to the right outer shield and plug in the power adapter HOW TO ADJUST THE GLIDE CABLES If the underside of a pedal arm touches the glide cables when a person is s...

Страница 23: ...m aerobic exercise which is activity that requires large amounts of oxygen for prolonged periods of time For aerobic exercise adjust the intensity of your exercise until your heart rate is near the hi...

Страница 24: ...rew 47 1 Accelerometer 48 1 Accelerometer Wire 49 1 Eddy Mechanism 50 1 Eddy Mechanism Bracket 51 2 Wheel 52 2 Foot 53 2 Leveling Foot 54 1 Reed Switch Bracket 55 1 Clamp 56 1 Reed Switch Wire 57 1 Re...

Страница 25: ...t Crank Clamp 111 1 Left Weld Spacer 112 1 M4 Star Washer 113 1 Tablet Holder 114 4 8 x 16mm Screw 115 6 M6 x 20mm Flange Screw 116 2 Roller Spacer User s Manual Assembly Tool Grease Packet Key No Qty...

Страница 26: ...17 38 37 98 98 98 98 98 98 98 98 98 98 98 97 97 97 97 97 97 97 48 20 23 21 25 44 24 98 98 98 98 98 98 98 98 98 97 57 103 1 3 2 4 18 19 50 52 49 51 54 56 58 53 55 85 85 98 104 98 98 98 99 99 30 30 98 8...

Страница 27: ...60 61 92 92 68 116 67 69 70 72 71 74 73 86 97 88 87 90 98 98 82 76 47 46 80 81 81 65 65 77 77 79 80 79 111 110 64 12 98 98 12 5 7 34 36 33 35 88 89 93 43 98 98 82 109 109 108 83 83 32 32 31 39 39 40 4...

Страница 28: ...product is used as a store display model 2 if the product is purchased or transported outside the USA 3 if all instructions and warnings in this manual are not followed 4 if the product is abused or i...

Отзывы: