NordicTrack Cx985 Elliptical Скачать руководство пользователя страница 24

24

1

1

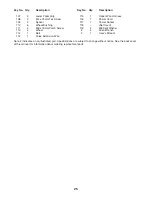
Frame

2

1

Upright

3

1

Ramp

4

1

Left Pedal Leg

5

1

Right Pedal Leg

6

1

Rear Stabilizer

7

1

Rear Stabilizer Cover

8

1

Front Stabilizer

9

1

Front Stabilizer Cover

10 1 Left 

Pedal

11 1 Right 

Pedal

12 1 Incline 

Motor

13 1 Incline 

Axle

14 1 Pivot 

Axle

15 

1

Left Side Shield

16 

Right Side Shield

17

1 Console

18 

Right Flywheel Cover

19 

Left Flywheel Cover

20 

Pulse Sensor w/Wire

21 

Right Incline Cover

22 

Left Incline Cover

23 1 Right 

Handlebar

24 1 Left 

Handlebar

25 

Upper Handlebar Cover

26 2 Handlebar 

Cover

27 1 Frame 

Cover

28 4 Pedal 

Wheel

29 8 Wheel 

Bearing

30 2 Wheel 

Frame

31 2 Wheel 

Spacer

32 

1

“C” Magnet

33 

1

Magnet Bracket

34 1 Left 

Crank 

Arm

35 

2

28.7mm Pulley Spacer

36 1 Flywheel

37 1 Magnet

38 

1

Pulley

39 

Control Box Cover

40 1 Control 

Board

41 

1

Control Box

42 

Lower Wire Harness

43 1 Crank

44 

2

Crank Bearing

45 1 Idler

46 4 Foot

47 

4

Ramp Bushing

48 2 Ramp 

Cover

49 1 Incline 

Sensor

50 

1

Sensor Cover

51

4

Pedal Leg Bushing

52 1 Resistance 

Motor

53 

1

Reed Switch Bracket

54 1 Clamp

55 1 Reed 

Switch/Wire

56 1 Return 

Spring

57 1 Guide 

Rod

58 1 Resistance 

Cable

59 1 Flywheel 

Axle

60 2 Flywheel 

Bearing

61 2 Eye 

Bolt

62 2 Adjustment 

Bracket

63 

M8 x 47mm Button Bolt

64 2 M6 

Washer

65 

M10 x 78mm Bolt Set

66 2 M8 

Washer

67 

M10 x 50mm Bolt Set

68 2 Handlebar 

Bushing

69

10

M4 x 16mm Tek Screw

70

2

M10 x 110mm Button Screw

71

1

M8 Tek Washer

72

1

M11 x 40mm Bolt Set

73

2

M10 Split Washer

74

1

M8 x 25mm Button Bolt

75

1

M10 x 19mm Button Bolt

76

8

M6 x 16mm Patch Screw

77

4

M5 Nut

78

4

M5 x 16mm Bolt

79

4

M5 Washer

80

2

M6 x 18mm Bolt

81

1

M6 x 25mm Bolt

82

2

5/16” x 25mm Flange Screw

83

4

M8 x 58mm Button Screw

84

8

M8 x 44mm Button Screw

85

4

M8 x 41mm Button Bolt

86

6

M8 Jam Nut

87

8

M4 x 38mm Screw

88

3

M8 Nylon Locknut

89

1

M10 Nylon Locknut

90

3

M6 Nut

91

2

M6 Nylon Locknut

92

2

Snap Ring

93

2

M8 x 56mm Button Screw

94

3

M4 x 10mm Screw

95

6

M4 x 19mm Screw

96

1

M4 x 12mm Screw

97

2

M4 x 25mm Screw

98

15

M4 x 16mm Screw

99

2

Ramp Spacer

100

4

M5 Nylon Locknut

101

2

31.5mm Pulley Spacer

102

1

Right Crank Arm

103

1

Flywheel Spacer

104

2

Support Plate

105

2

M8 x 38mm Button Bolt

106

2

Upper Foam Grip

Key No. Qty.

Description

Key No. Qty.

Description

PART LIST—Model No. NTE1192.1

R0405A

Содержание Cx985 Elliptical

Страница 1: ...As a manufacturer we are com mitted to providing complete customer satisfaction If you have questions or if parts are damaged or missing PLEASE CONTACT OUR CUSTOMER SERVICE DEPARTMENT DIRECTLY CALL T...

Страница 2: ...MBLY 5 HOW TO USE THE ELLIPTICAL EXERCISER 10 MAINTENANCE AND TROUBLESHOOTING 22 CONDITIONING GUIDELINES 23 PART LIST 24 EXPLODED DRAWING 26 HOW TO ORDER REPLACEMENT PARTS Back Cover LIMITED WARRANTY...

Страница 3: ...c shoes for foot protection 9 Always hold the handlebars when mounting dismounting or using the elliptical exerciser 10 Keep your back straight when using the ellip tical exerciser do not arch your ba...

Страница 4: ...manual carefully before you use the elliptical exerciser If you have ques tions after reading this manual see the front cover of this manual To help us assist you please note the product model number...

Страница 5: ...ly requires a phillips screwdriver two adjustable wrenches a rubber mallet and pliers As you assemble the elliptical exerciser use the drawings below to identify the small parts used in assembly The n...

Страница 6: ...x 16mm Patch Screw 76 as shown Tighten the Patch Screw into the open end of the Pivot Axle 14 4 4 Slide an M6 Washer 64 onto an M6 x 16mm Patch Screw 76 Tighten the Patch Screw into one end of the Inc...

Страница 7: ...of the Left Handlebar with two M8 x 41mm Button Bolts 85 and two M8 Jam Nuts 86 be careful not to damage the Pulse Sensor Wire 20 or the Pulse Extension Wire 114 as you insert the Button Bolts Make su...

Страница 8: ...he Console Carefully insert all excess wiring up into the Console 17 and down into the Upright 2 Attach the Console to the Upright with four M4 x 16mm Screws 98 Note The Screws may be shipped in the c...

Страница 9: ...ceiver in the position shown with the small cylinder at the top Using the two screws included with the chest pulse sensor attach the receiver to the two plastic posts not shown inside the access openi...

Страница 10: ...an adapter Note When the power cord is plugged in the ellip tical exerciser s incline system may automatically calibrate itself During the calibration process two dashes will appear in the left displ...

Страница 11: ...rt rate near a target level as you exer cise The console also features iFIT com interactive technol ogy Having iFIT com technology is like having a per sonal trainer in your home Using the included au...

Страница 12: ...lays The matrix When the manual mode or the iFIT com mode is selected the matrix will show a track representing 1 4 mile As you exercise the indicators around the track will light one at a time until...

Страница 13: ...lower contacts Avoid moving your hands When your pulse is detected the Heart Rate indicator above the right dis play will begin to flash one or two dashes will appear in the right display and then yo...

Страница 14: ...ace If an indicator to the left of any lit indicator is flashing see drawing b decrease your pace When no indicator is flashing your pace matches the pace setting for the current segment Important The...

Страница 15: ...xercise heart rate pro gram 2 is designed to keep your heart rate between 50 and 85 of your maximum heart rate Follow the steps below to use a heart rate program Press any button on the console or beg...

Страница 16: ...r will help you to keep your heart rate near the heart rate setting for the current segment The lit indicators in the bar will show your actual pace When you hold the handgrip pulse sensor or wear the...

Страница 17: ...to a 1 8 Y adapter available at electronics stores Plug the Y adapter into the PHONES jack on your CD player Plug your headphones into the other side of the Y adapter HOW TO CONNECT YOUR PORTABLE STER...

Страница 18: ...adapter Plug the Y adapter into the LINE OUT jack on your stereo HOW TO CONNECT YOUR COMPUTER Note If your computer has a 1 8 LINE OUT jack see instruction A If your computer has only a PHONES jack se...

Страница 19: ...he adapter into the AUDIO OUT jack on your VCR B Plug one end of the audio cable into the jack beneath the console Plug the other end of the cable into the adapter Plug the adapter into an RCA Y adapt...

Страница 20: ...nt after the play button is pressed your personal trainer will begin guiding you through your workout Simply follow your personal trainer s instructions The program will function in almost the same wa...

Страница 21: ...iFIT com Follow the desired links on our Web site to select a program Read and follow the on line instructions for using a program Follow the on line instructions to start the program When you start t...

Страница 22: ...n of letters and numbers may appear in the displays 3 Press the 30 Ramp button The ramp will move all of the way up and then all of the way down 4 Press the Program Select button three times The conso...

Страница 23: ...is to strengthen your cardiovascular sys tem your exercise must be aerobic Aerobic exer cise is activity that requires large amounts of oxygen for prolonged periods of time This increases the demand o...

Страница 24: ...55 1 Reed Switch Wire 56 1 Return Spring 57 1 Guide Rod 58 1 Resistance Cable 59 1 Flywheel Axle 60 2 Flywheel Bearing 61 2 Eye Bolt 62 2 Adjustment Bracket 63 2 M8 x 47mm Button Bolt 64 2 M6 Washer 6...

Страница 25: ...ing replacement parts 107 2 Lower Foam Grip 108 3 M4 x 25mm Tek Screw 109 2 Spacer 110 6 Wheel Bushing 111 2 M8 x 19mm Patch Screw 112 2 Wheel 113 1 Belt 114 1 Pulse Extension Wire 115 1 Upper Wire Ha...

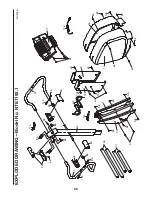
Страница 26: ...17 20 97 98 98 98 98 98 98 69 69 98 2 26 86 105 68 26 86 23 85 85 96 25 86 24 105 26 68 86 26 22 21 19 18 15 69 69 69 69 108 69 69 16 114 116 115 106 107 98 69 108 EXPLODED DRAWING Model No NTE1192 1...

Страница 27: ...1 51 66 111 83 5 29 65 28 31 30 29 28 29 65 11 27 95 95 95 70 73 73 76 64 13 3 12 49 50 64 76 76 48 14 47 47 99 99 47 47 48 76 65 28 29 29 65 30 31 29 28 29 10 83 4 88 71 60 90 61 62 37 36 60 59 103 8...

Страница 28: ...TANT THAT YOU READ THE MANUAL before operating the Product Remember to do the periodic maintenance requirements specified in the Manual to assure proper operation and your continued satisfaction HOW T...

Отзывы: