NordicTrack Cx985 Elliptical Скачать руководство пользователя страница 23

23

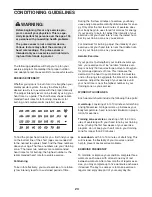
CONDITIONING GUIDELINES

The following guidelines will help you to plan your

exercise program. Remember that proper nutrition

and adequate rest are essential for successful results. 

EXERCISE INTENSITY

Whether your goal is to burn fat or to strengthen your

cardiovascular system, the key to achieving the

desired results is to exercise with the proper intensity.

The proper intensity level can be found by using your

heart rate as a guide. The chart below shows recom-

mended heart rates for fat burning, maximum fat

burning, and cardiovascular (aerobic) exercise.

To find the proper heart rate for you, first find your age

on the bottom line of the chart (ages are rounded off

to the nearest ten years). Next, find the three numbers

above your age. The three numbers are your “training

zone.” The lower two numbers are recommended

heart rates for fat burning; the highest number is the

recommended heart rate for aerobic exercise.

Fat Burning

To burn fat effectively, you must exercise at a relative-

ly low intensity level for a sustained period of time.

During the first few minutes of exercise, your body

uses easily accessible 

carbohydrate calories for ener-

gy. Only after the first few minutes of exercise does

your body begin to use stored 

fat calories for energy.

If your goal is to burn fat, adjust the intensity of your

exercise until your heart rate is near the lowest num-

ber in your training zone as you exercise. 

For maximum fat burning, adjust the intensity of your

exercise until your heart rate is near the middle num-

ber in your training zone as you exercise.  

Aerobic Exercise

If your goal is to strengthen your cardiovascular sys-

tem, your exercise must be “aerobic.” Aerobic exer-

cise is activity that requires large amounts of oxygen

for prolonged periods of time. This increases the

demand on the heart to pump blood to the muscles,

and on the lungs to oxygenate the blood. For aerobic

exercise, adjust the intensity of your exercise until

your heart rate is near the highest number in your

training zone as you exercise. 

WORKOUT GUIDELINES

Each workout should include the following three parts:

A warm-up, consisting of 5 to 10 minutes of stretching

and light exercise. A proper warm-up increases your

body temperature, heart rate, and circulation in prepa-

ration for exercise. 

Training zone exercise, consisting of 20 to 30 min-

utes of exercising with your heart rate in your training

zone. (During the first few weeks of your exercise 

program, do not keep your heart rate in your training

zone for longer than 20 minutes.)  

A cool-down, with 5 to 10 minutes of stretching. This

will increase the flexibility of your muscles and will

help to prevent post-exercise problems.

EXERCISE FREQUENCY

To maintain or improve your condition, complete three

workouts each week, with at least one day of rest

between workouts. After a few months of regular exer-

cise, you may complete up to five workouts each week

if desired. The key to success is to make exercise a

regular and enjoyable part of your everyday life.

WARNING:

Before beginning this or any exercise pro-

gram, consult your physician. This is espe-

cially important for persons over the age of 35

or persons with pre-existing health problems.
The pulse sensor is not a medical device.

Various factors may affect the accuracy of

heart rate readings. The pulse sensor is

intended only as an exercise aid in determin-

ing heart rate trends in general.

Содержание Cx985 Elliptical

Страница 1: ...As a manufacturer we are com mitted to providing complete customer satisfaction If you have questions or if parts are damaged or missing PLEASE CONTACT OUR CUSTOMER SERVICE DEPARTMENT DIRECTLY CALL T...

Страница 2: ...MBLY 5 HOW TO USE THE ELLIPTICAL EXERCISER 10 MAINTENANCE AND TROUBLESHOOTING 22 CONDITIONING GUIDELINES 23 PART LIST 24 EXPLODED DRAWING 26 HOW TO ORDER REPLACEMENT PARTS Back Cover LIMITED WARRANTY...

Страница 3: ...c shoes for foot protection 9 Always hold the handlebars when mounting dismounting or using the elliptical exerciser 10 Keep your back straight when using the ellip tical exerciser do not arch your ba...

Страница 4: ...manual carefully before you use the elliptical exerciser If you have ques tions after reading this manual see the front cover of this manual To help us assist you please note the product model number...

Страница 5: ...ly requires a phillips screwdriver two adjustable wrenches a rubber mallet and pliers As you assemble the elliptical exerciser use the drawings below to identify the small parts used in assembly The n...

Страница 6: ...x 16mm Patch Screw 76 as shown Tighten the Patch Screw into the open end of the Pivot Axle 14 4 4 Slide an M6 Washer 64 onto an M6 x 16mm Patch Screw 76 Tighten the Patch Screw into one end of the Inc...

Страница 7: ...of the Left Handlebar with two M8 x 41mm Button Bolts 85 and two M8 Jam Nuts 86 be careful not to damage the Pulse Sensor Wire 20 or the Pulse Extension Wire 114 as you insert the Button Bolts Make su...

Страница 8: ...he Console Carefully insert all excess wiring up into the Console 17 and down into the Upright 2 Attach the Console to the Upright with four M4 x 16mm Screws 98 Note The Screws may be shipped in the c...

Страница 9: ...ceiver in the position shown with the small cylinder at the top Using the two screws included with the chest pulse sensor attach the receiver to the two plastic posts not shown inside the access openi...

Страница 10: ...an adapter Note When the power cord is plugged in the ellip tical exerciser s incline system may automatically calibrate itself During the calibration process two dashes will appear in the left displ...

Страница 11: ...rt rate near a target level as you exer cise The console also features iFIT com interactive technol ogy Having iFIT com technology is like having a per sonal trainer in your home Using the included au...

Страница 12: ...lays The matrix When the manual mode or the iFIT com mode is selected the matrix will show a track representing 1 4 mile As you exercise the indicators around the track will light one at a time until...

Страница 13: ...lower contacts Avoid moving your hands When your pulse is detected the Heart Rate indicator above the right dis play will begin to flash one or two dashes will appear in the right display and then yo...

Страница 14: ...ace If an indicator to the left of any lit indicator is flashing see drawing b decrease your pace When no indicator is flashing your pace matches the pace setting for the current segment Important The...

Страница 15: ...xercise heart rate pro gram 2 is designed to keep your heart rate between 50 and 85 of your maximum heart rate Follow the steps below to use a heart rate program Press any button on the console or beg...

Страница 16: ...r will help you to keep your heart rate near the heart rate setting for the current segment The lit indicators in the bar will show your actual pace When you hold the handgrip pulse sensor or wear the...

Страница 17: ...to a 1 8 Y adapter available at electronics stores Plug the Y adapter into the PHONES jack on your CD player Plug your headphones into the other side of the Y adapter HOW TO CONNECT YOUR PORTABLE STER...

Страница 18: ...adapter Plug the Y adapter into the LINE OUT jack on your stereo HOW TO CONNECT YOUR COMPUTER Note If your computer has a 1 8 LINE OUT jack see instruction A If your computer has only a PHONES jack se...

Страница 19: ...he adapter into the AUDIO OUT jack on your VCR B Plug one end of the audio cable into the jack beneath the console Plug the other end of the cable into the adapter Plug the adapter into an RCA Y adapt...

Страница 20: ...nt after the play button is pressed your personal trainer will begin guiding you through your workout Simply follow your personal trainer s instructions The program will function in almost the same wa...

Страница 21: ...iFIT com Follow the desired links on our Web site to select a program Read and follow the on line instructions for using a program Follow the on line instructions to start the program When you start t...

Страница 22: ...n of letters and numbers may appear in the displays 3 Press the 30 Ramp button The ramp will move all of the way up and then all of the way down 4 Press the Program Select button three times The conso...

Страница 23: ...is to strengthen your cardiovascular sys tem your exercise must be aerobic Aerobic exer cise is activity that requires large amounts of oxygen for prolonged periods of time This increases the demand o...

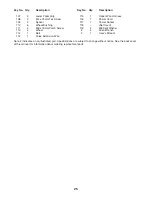
Страница 24: ...55 1 Reed Switch Wire 56 1 Return Spring 57 1 Guide Rod 58 1 Resistance Cable 59 1 Flywheel Axle 60 2 Flywheel Bearing 61 2 Eye Bolt 62 2 Adjustment Bracket 63 2 M8 x 47mm Button Bolt 64 2 M6 Washer 6...

Страница 25: ...ing replacement parts 107 2 Lower Foam Grip 108 3 M4 x 25mm Tek Screw 109 2 Spacer 110 6 Wheel Bushing 111 2 M8 x 19mm Patch Screw 112 2 Wheel 113 1 Belt 114 1 Pulse Extension Wire 115 1 Upper Wire Ha...

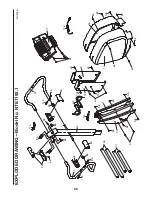
Страница 26: ...17 20 97 98 98 98 98 98 98 69 69 98 2 26 86 105 68 26 86 23 85 85 96 25 86 24 105 26 68 86 26 22 21 19 18 15 69 69 69 69 108 69 69 16 114 116 115 106 107 98 69 108 EXPLODED DRAWING Model No NTE1192 1...

Страница 27: ...1 51 66 111 83 5 29 65 28 31 30 29 28 29 65 11 27 95 95 95 70 73 73 76 64 13 3 12 49 50 64 76 76 48 14 47 47 99 99 47 47 48 76 65 28 29 29 65 30 31 29 28 29 10 83 4 88 71 60 90 61 62 37 36 60 59 103 8...

Страница 28: ...TANT THAT YOU READ THE MANUAL before operating the Product Remember to do the periodic maintenance requirements specified in the Manual to assure proper operation and your continued satisfaction HOW T...

Отзывы: