NordicTrack CLUB XI NTEL81507.0 Скачать руководство пользователя страница 10

10

HOW TO USE THE ELLIPTICAL EXERCISER

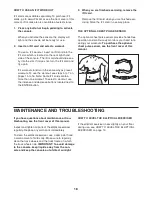
HOW TO MOVE THE ELLIPTICAL EXERCISER

Due to the size and weight of the elliptical exer-

ciser, moving it requires two persons.

Have two

persons lift the indicated end of the elliptical exerciser

until the elliptical exerciser will roll on the front wheels.

Carefully move the elliptical exerciser to the desired

location and then lower it to the level position.

CAU-

TION: To decrease the risk of injury, bend your

legs and keep your back straight. Make sure to

use your legs rather than your back to lift the ellip-

tical exerciser. Do not attempt to move the ellipti-

cal exerciser over an uneven surface.

HOW TO LEVEL THE ELLIPTICAL EXERCISER

If the elliptical exerciser rocks slightly on your floor

during use, turn one or both of the leveling feet

beneath the front stabilizer until the rocking motion is

eliminated. Then, turn the leveling foot beneath the

center of the frame to prevent the frame from flexing.

HOW TO EXERCISE ON THE ELLIPTICAL

EXERCISER

To mount the elliptical exerciser, hold the handlebars

and step onto the pedal that is in the lowest position.

Then, step onto the other pedal. Push the pedals until

they begin to move with a continuous motion.

Note:

The pedal discs can turn in either direction. It is

recommended that you turn the pedal discs in the

direction shown by the arrow; however, for variety,

you can turn the pedal discs in the opposite direc-

tion.

To dismount the elliptical exerciser, wait until the ped-

als come to a complete stop.

Note: The elliptical

exerciser does not have a freewheel; the pedals

will continue to move until the flywheel stops.

When the pedals are stationary, step off the higher

pedal first. Then, step off the lower pedal.

Pedals

Pedal

Disc

Handlebars

Wheel

Leveling

Feet

Lift here

Содержание CLUB XI NTEL81507.0

Страница 1: ...nce QUESTIONS As a manufacturer we are commit ted to providing complete customer satisfaction If you have questions or if parts are damaged or missing DO NOT CONTACT THE STORE please contact Customer...

Страница 2: ...BLESHOOTING 18 EXERCISE GUIDELINES 19 PART LIST 20 EXPLODED DRAWING 21 ORDERING REPLACEMENT PARTS Back Cover LIMITED WARRANTY Back Cover WARNING DECAL PLACEMENT This drawing shows the location s of th...

Страница 3: ...0 lbs 159 kg 8 Wear appropriate exercise clothes when exercising do not wear loose clothes that could become caught on your elliptical exer ciser Always wear athletic shoes for foot protection 9 Hold...

Страница 4: ...exerciser If you have ques tions after reading this manual please see the front cover of this manual To help us assist you note the product model number and serial number before con tacting us The mo...

Страница 5: ...ser use the drawings below to identify small parts The number in parenthe ses below each drawing is the key number of the part from the PART LIST near the end of this manual The number following the p...

Страница 6: ...s 60 Tip Start all the Screws before tightening any of them Then slide the Shield Cover 39 downward to the bottom of the Upright 2 Attach the Cup Holder 19 to the Upright 2 with two M4 x 15mm Screws 5...

Страница 7: ...with four M8 x 20mm Screws 60 Tip Avoid pinching the wires 3 Identify the Right Frame Cover 8 which is marked with the word Right and orient it as shown Attach the Right Frame Cover 8 to the Frame 1 w...

Страница 8: ...M4 x 15mm Screws 52 5 Identify the Right Handlebar 35 which is marked with an R sticker Apply a generous amount of the included fastener adhesive to two M8 x 25mm Bolts 65 Then attach the Right Handl...

Страница 9: ...Rear Stabilizer Overlay onto the Track Frame 3 and the Rear Stabilizer Cover 7 10 3 5 8 Make sure that all parts of the elliptical exerciser are properly tightened Note Some hardware may be left over...

Страница 10: ...et beneath the front stabilizer until the rocking motion is eliminated Then turn the leveling foot beneath the center of the frame to prevent the frame from flexing HOW TO EXERCISE ON THE ELLIPTICAL E...

Страница 11: ...s and prompts you to maintain a target pace as it guides you through an effective workout The console also offers three manual programs that allow you to set your own time distance or calorie goal for...

Страница 12: ...utton it will take a moment for the pedals to reach the selected resistance level 4 Follow your progress with the displays The display will show the elapsed time and the distance you have pedaled Note...

Страница 13: ...n Then press the ENTER button 4 Enter your weight Next the words ENTER WEIGHT and a weight setting of 185 pounds US will appear in the main display To enter your weight 1 kilogram 2 2 pounds press the...

Страница 14: ...time press the CLEAR button 7 Follow your progress with the displays During a MANUAL program the display will show the time the distance you have pedaled the approximate number of calories you have bu...

Страница 15: ...your weight 1 kilogram 2 2 pounds press the increase and decrease buttons beside the ENTER button Then press the ENTER button 5 Press the START button or begin pedaling to start the program Each pres...

Страница 16: ...eart rate when you use the optional chest pulse sensor see page 18 To view the time your exercise intensity in mets and your power output in watts press the DIS PLAY button To view the time the approx...

Страница 17: ...he words MAINTENANCE MODE SCREEN 2 appear the display will allow you to set a maximum program time for the programs and a default time for the pause timeout The maximum program time for the programs c...

Страница 18: ...you are finished exercising remove the iFit card Remove the iFit card when you are finished exer cising Store the iFit card in a secure place THE OPTIONAL CHEST PULSE SENSOR The optional chest pulse s...

Страница 19: ...ur goal is to strengthen your cardiovascular system you must perform aerobic exercise which is activity that requires large amounts of oxygen for prolonged periods of time For aerobic exercise adjust...

Страница 20: ...x 15mm Screw 53 1 Console Back Cover 54 10 M8 Locknut 55 2 Track Cap 56 8 5mm Bushing 57 1 M4 Washer 58 10 M4 x 50mm Screw 59 2 M12 x 60mm Bolt 60 8 M8 x 20mm Screw 61 2 M6 Large Washer 62 6 M8 x 42mm...

Страница 21: ...2 25 25 40 10 41 41 42 42 42 42 43 43 50 50 46 44 45 73 73 58 58 58 59 59 60 60 60 78 68 68 81 52 24 81 82 72 54 9 44 45 82 72 54 67 86 53 89 68 40 84 68 81 13 15 16 54 62 62 76 54 52 41 90 89 75 6 74...

Страница 22: ...32 33 34 35 47 43 44 44 44 44 43 50 47 44 50 47 44 50 47 42 50 48 48 48 48 50 42 42 50 47 55 55 49 49 54 54 56 56 56 56 56 47 56 56 63 64 65 64 63 65 65 66 64 66 33 64 68 64 68 64 50 61 61 43 43 43 5...

Страница 23: ...23 EXPLODED DRAWING C Model No NTEL81507 0 R0109A 36 37 38 38 39 69 79 70 68 71 68 68 68 68 68 7 8 68 68 68 70 71 68 68 84 84 79...

Страница 24: ...will be responsible for a minimal handling charge For in home service the customer will be responsible for a minimal trip charge This warranty does not extend to any damage to a product caused by or...

Отзывы: