NordicTrack 831.23665.0 Скачать руководство пользователя страница 7

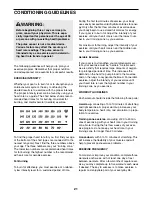
5. Orient the Left and Right Upright Covers (19, 20)

as shown. Then, attach the Upright Covers
around the Upright (10) with five M4 x 16mm
Round Head Screws (80).

7

5

19

20

10

80

80

80

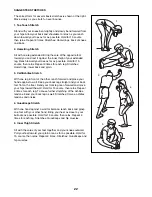
4. While another person holds the Upright (10)

near the Frame (1), connect the Upper Wire
Harness (65) to the Lower Wire Harness (64).

Then, insert the Upright (10) into the Frame (1).
Attach the Upright with four M8 x 19mm Button
Screws (85) and four M8 Split Washers (97). 

Do

not tighten the Button Screws yet.

Avoid pinching the Wire Harnesses (64, 65)
during this step.

10

1

97

97

97

97

85

85

65

64

4

Avoid pinching the

Wire Harnesses (64, 65)

during this step

Содержание 831.23665.0

Страница 1: ...facturer we are com mitted to providing complete customer satisfaction If you have questions or if parts are damaged or missing PLEASE CONTACT OUR CUSTOMER SERVICE DEPARTMENT DIRECTLY CALL TOLL FREE 1...

Страница 2: ...SEMBLY 5 HOW TO USE THE ELLIPTICAL EXERCISER 12 MAINTENANCE AND TROUBLESHOOTING 20 CONDITIONING GUIDELINES 21 PART LIST 24 EXPLODED DRAWING 26 ORDERING REPLACEMENT PARTS Back Cover LIMITED WARRANTY Ba...

Страница 3: ...275 lbs 124 kg 8 Wear appropriate exercise clothes while using the elliptical exerciser Always wear athletic shoes for foot protection while exer cising 9 Hold the handgrip pulse sensor or the upper...

Страница 4: ...xerciser If you have ques tions after reading this manual please see the front cover of this manual To help us assist you note the product model number and serial number before con tacting us The mode...

Страница 5: ...small parts may have been preassem bled If a part is not in the parts bag check to see if it has been preassembled M8 x 23mm x 2mm Washer 96 8 M8 Split Washer 97 16 M4 x 16mm Round Head Screw 80 21 M8...

Страница 6: ...nto its side Attach the Center Foot 40 to the Frame 1 with two M4 x 16mm Screws 78 Then return the ellipti cal exerciser to the upright position Orient the Rear Stabilizer 3 as shown While another per...

Страница 7: ...he Upright 10 near the Frame 1 connect the Upper Wire Harness 65 to the Lower Wire Harness 64 Then insert the Upright 10 into the Frame 1 Attach the Upright with four M8 x 19mm Button Screws 85 and fo...

Страница 8: ...into the Upright 10 Be careful not to damage the Upper Wire Harness 65 Apply a small amount of grease to a Wave Washer 101 Slide the Wave Washer onto the left end of the Upper Body Axle 71 Identify t...

Страница 9: ...emperature before inserting batteries into the Console If you do not do this the console displays or other electronic components may become damaged Remove the battery cover and insert four batteries i...

Страница 10: ...Screw 80 Repeat this step for the Right Pedal not shown and the other Link Arm not shown 11 34 96 96 97 97 90 30 80 39 10 While another person holds the Console 11 near the Upright 10 connect the cons...

Страница 11: ...r Body Leg Spacer is facing out ward Then slide the other Large Wave Washer onto the left Crank Arm 55 Slide the left Pedal Arm 32 onto the Left Upper Body Leg 24 while sliding the left Link Arm 30 on...

Страница 12: ...rciser first hold the handle press the latch button and then lower the frame to the floor HOW TO MOVE THE ELLIPTICAL EXERCISER To move the elliptical exerciser first fold it as described at the left N...

Страница 13: ...ction It is recommended that you turn the crank arms in the direction shown by the arrow at the right how ever for variety you can turn the crank arms in the opposite direction To dismount the ellipti...

Страница 14: ...teractive Workout System The iFIT Interactive Workout System is compatible with iFIT Cards containing workout pro grams designed to help you achieve specific fitness goals For example lose unwanted po...

Страница 15: ...r of grams of carbs you have burned The display will change modes every few seconds The lower right sec tion of the display can show your pedaling pace in revolutions per minute and the resistance lev...

Страница 16: ...the metal contacts using a soft cloth never use alcohol abrasives or chemicals to clean the contacts Turn on the fan if desired To turn on the fan at high speed press the Fan button To turn on the fan...

Страница 17: ...different resistance level is pro grammed for the next segment the resistance level will appear in the display for a few seconds to alert you The resistance of the pedals will then change During the...

Страница 18: ...uld hold the handgrip pulse sen sor frequently for the programs to operate proper ly Each time you hold the handgrip pulse sen sor keep your hands on the metal contacts for at least 30 seconds Begin p...

Страница 19: ...any button on the console or begin pedaling to turn on the console See step 1 on page 14 Insert an iFIT Card and select a program To use an iFIT program insert an iFIT Card into the iFIT slot make su...

Страница 20: ...tion of the Side Shields 14 15 until the Discs 12 no longer rub against them and then tighten the Bolt Sets 88 and the M4 x 16mm Screws 78 HOW TO ADJUST THE BELT If the pedals slip while you are pedal...

Страница 21: ...strengthen your cardiovascular sys tem your exercise must be aerobic Aerobic exer cise is activity that requires large amounts of oxygen for prolonged periods of time This increases the demand on the...

Страница 22: ...lles Stretch With one leg in front of the other reach forward and place your hands against a wall Keep your back leg straight and your back foot flat on the floor Bend your front leg lean forward and...

Страница 23: ...23 NOTES...

Страница 24: ...witch Wire 51 1 Clamp 52 2 Large Axle Cover 53 4 Pivot Arm Bushing 54 4 Link Snap Ring 55 2 Crank Arm 56 1 Crank Arm Spacer 57 1 Large Pulley 58 2 Crank Flange 59 2 Crank Bearing Assembly 60 1 Crank S...

Страница 25: ...ubject to change without notice See the back cover of this manual for information about ordering replacement parts 101 2 Wave Washer 102 4 Large Wave Washer 103 8 M8 Nylon Locknut 1 User s Manual 2 He...

Страница 26: ...37 39 39 65 66 66 67 67 67 67 68 68 69 71 7 7 7 7 8 8 9 9 70 25 21 21 38 40 41 16 16 92 91 82 80 85 96 101 80 78 80 84 97 97 80 83 83 83 80 80 86 95 102 73 73 77 77 80 80 80 85 96 101 80 84 97 84 97 9...

Страница 27: ...3 53 53 53 55 55 56 57 58 58 59 59 60 61 64 18 18 42 42 42 42 43 43 54 54 54 54 62 62 63 63 74 89 89 103 103 94 94 33 33 87 87 81 81 79 102 95 86 88 88 88 88 103 103 87 87 87 87 81 102 95 86 79 78 78...

Страница 28: ...epair USER S MANUAL It is VERY IMPORTANT THAT YOU READ THE MANUAL before operating the Product Remember to do the periodic maintenance requirements specified in the Manual to assure proper operation a...

Отзывы: