background image

ASSEMBLY, USE  

AND INSTRUCTION MANUAL

Meteor

EN


READ THE OPERATING INSTRUCTIONS 

BEFORE USING THE APPLIANCE.

FOR OUTDOOR USE ONLY.

!

GG501700


EDITION

Black

3B

Содержание 3B Black Series

Страница 1: ...ASSEMBLY USE AND INSTRUCTION MANUAL Meteor EN READ THE OPERATING INSTRUCTIONS BEFORE USING THE APPLIANCE FOR OUTDOOR USE ONLY GG501700 EDITION Black 3B ...

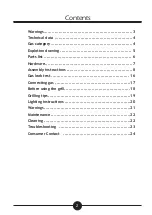
Страница 2: ...on drawing 5 Parts list 6 Hardware 7 Assembly instructions 8 Gas leak test 16 Connecting gas 17 Before using the grill 18 Grilling tips 19 Lighting instructions 20 Warnings 21 Maintenance 22 Cleaning 22 Troubleshooting 23 Consumer Contact 24 Contents 2 ...

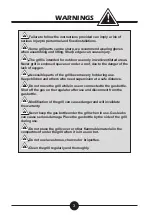
Страница 3: ...ing use Keep children and others who need supervision at a safe distance Do not move the grill while in use or connected to the gas bottle Shut off the gas on the regulator after use and disconnect from the gas bottle Modification of the grill can cause danger and will invalidate the warranty Never keep the gas bottle under the grill when in use Gas leaks can cause serious damage Place the gas bot...

Страница 4: ...NB Gas hoses used for this product must not exceed 150 cm in length Gas information 0359 16 This product is produced according to EUROPEAN GAS APPLIANCE STANDARD EN498 AND EN484 and is CE certified H 124 cm L 140 cm D 58 cm USE IN COUNTRIES VALVE SIZE GAS TYPE GAS CATEGORY BE CH CY CZ ES FR GB GR IE IT LT LU LV PT SK SI 0 84 mm Butan 28 30 mbar Propan 37 mbar I3 28 30 37 BE CY CZ DK EE FI FR HU IT...

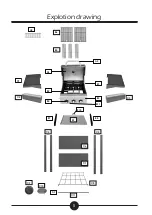
Страница 5: ...Explotion drawing A3 B1 B7 B8 B11 B9 C8 C11 C3 C2 C9 C6 C7 C5 C4 B3 A2 A1 C1 D9 B6 B5 C10 B4 B2 B10 5 ...

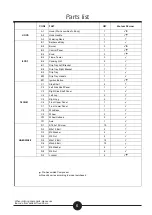
Страница 6: ...B8 Drip Tray Right Bracket 1 B9 Drip Tray 1 B10 Drip Tray Handle 1 B11 Ignition Button 1 TROLLEY C1 Side Shelf 2 C2 Left Side Shelf Panel 1 C3 Right Side Shelf Panel 1 C4 Left Leg 2 C5 Right Leg 2 C6 Front Upper Panel 1 C7 Front Lower Panel 1 C8 Wire Base 1 C9 Wheel 2 C10 Wheel Hubcap 2 C11 Axle 1 HARDWARE D1 ST4 0x10 Screw 10 D2 M5x15 Bolt 4 D3 Ø5 Washer 4 D4 M5 Nut 4 D5 M6x15 Bolt 12 D6 M6x65 Bo...

Страница 7: ...Hardware D6 D7 D8 D5 D1 D5 D6 D8 D3 D4 D2 The following screws and nuts are supplied with the grill and must be fitted 7 ...

Страница 8: ...1 2 3 4 5 6 Medium size flat blade or Philips cross point screwdriver Adjustable spanner or metric spanner set Ruler 01 02 03 04 05 06 07 08 09 0 100 110 120 130 140 150 01 23 45 6 NB Exercise caution when using electric tools their strength can damage the screws Please follow these instructions step by step We recommend two people to assemble the grill to avoid heavy lifting 8 ...

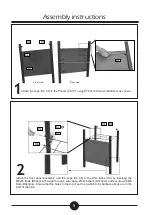
Страница 9: ...tach the front panel assembly and the Legs C4 C5 to the Wire Base C8 by inserting the M6x65 Bolts D6x4pcs through the legs wire base Ø6 Washers D7x4pcs and secure with M6 Nuts D8x4pcs Ensure that the holes in the top of each leg which to fix barbecue body are in the front of the side C8 D8 D7 D6 C4 C5 Assembly instructions 9 ...

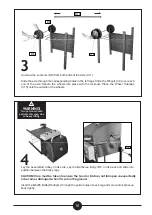
Страница 10: ...he ground Insert the M6x65 Bolts D6x8pcs through the guide holes of each leg and screw into barbecue body tightly D6 4 WARNING Two persons should perform this step due to heavy lifting 3 Unscrew the Locknuts D9 from both ends of the Axle C11 Slide the axle through the corresponding holes in the left legs Slide the Wheels C9 over each end of t he axle S ecure the wheels i nto place with the locknut...

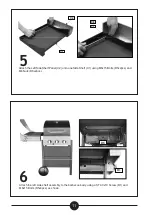
Страница 11: ...the left side shelf assembly to the barbecue body using a ST4 0x10 Screw D1 and M6x15 Bolts D5x4pcs as shown 6 Attach the Left Side Shelf Panel C2 onto one Side Shelf C1 using M6x15 Bolts D5x2pcs and M6 Nuts D8x2pcs C1 5 11 ...

Страница 12: ...f Panel C3 onto the other Side Shelf C1 using M6x15 Bolts D5x2pcs and M6 Nuts D8x2pcs C3 C1 D5 D8 D5 D1 Attach the right side shelf assembly to the barbecue body using a ST4 0x10 Screw D1 and M6x15 Bolts D5x4pcs as shown 7 8 12 ...

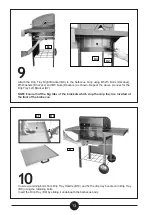
Страница 13: ...or the Drip Tray Left Bracket B7 NOTE Ensure that the big tabs of the brackets which stop the drip tray are located at the front of the barbecue B8 D3 D2 Unscrew retaining bolts from Drip Tray Handle B10 and fix the drip tray handle onto Drip Tray B9 using the retaining bolts Insert the Drip Tray B9 by sliding it underneath the barbecue body 9 10 B9 B10 B9 13 ...

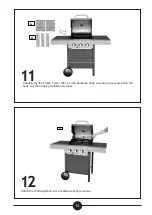
Страница 14: ...Carefully lay the Flame Tamer B5 into the barbecue body ensuring it lies level within the body Lay the Cooking Grill B6 into place B6 B5 Attach the Warming Rack A3 to barbecue body as shown A3 11 12 14 ...

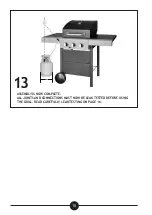
Страница 15: ...13 ASSEMBLY IS NOW COMPLETE ALL JOINTS AND CONNECTIONS MUST NOW BE LEAK TESTED BEFORE USING THE GRILL READ CAREFULLY LEAK TESTING ON PAGE 16 15 ...

Страница 16: ...e no naked flames heat sources and cigarettes in the vicinity when performing a leak test 3Check that all controls on the grill are in the OFF position 4Set the regulator to the OFF position and connect it to the gas bottle 5Apply the liquid to all joints and connections on the gas bottle regulator the entire hose and all valves on the grill ALL JOINTS AND CONNECTIONS MUST NOW BE LEAK TESTED BEFOR...

Страница 17: ...bly instructions supplied with the regulator set Check the gas hose regularly for cracks damage and decay Never use a damaged gas hose Check that the movable plastic collar on the regulator is intact and that it has not been damaged by hot grill parts Check that the gas bottle stands on a firm flat surface and is lower than the connector Use an approved gas bottle that fits the regulator supplied ...

Страница 18: ... grill is placed where there is plenty of ventilation Do not grill below normal ground level Always lock the wheels whenever using the grill LOCATION FINAL CHECK Check that all controls knobs work normally Check that the gas hose is free of cracks and damage this should be done everytime the grill is used Check that the gas bottle and hose do not come into contact with hot objects Before using the...

Страница 19: ...ing time and give apoorer result DIVIDE THE GRILL INTO HOT AND COLD ZONES When the food is half ready move it to the coldzone to finish grilling This gives a better result and cooks the food through without itbeing burnt ASSESS COOKING TIME FOR EACH PRODUCT to be grilled and put them on the grill in the orderwhich will mean they are ready at the same time BRUSH THE FOOD REGULARLY WHILE GRILLING wi...

Страница 20: ...MAL OR MANUAL LIGHTING REFER TO THE TIPS SECTION IN THE TROUBLESHOOTING MANUAL OR CONTACT YOUR DEALER Flames should be blue and stable If the flames are large and yellow flaring or broken check the troubleshooting manual 1Always open the barbecue hood before lighting 2Open the gas supply valve on the gas bottle or regulator 3From the OFF position push in the control knob of the burner you wish to ...

Страница 21: ...ever be sealed or blocked Check that the venturi ventilation on burners and side burners are not sealed orblocked before use Wear gloves when assembling or lifting Sharp edges can cause injury Do not place the grill cover or other flammable material in the compartment under thegrill when it is in use or hot Clean the grill regularly and thoroughly PREVENT FAT FIRE Keep the grill clean to prevent f...

Страница 22: ...ur on cast iron and steel parts and will not affect the grill in the shortterm Superficial rust can be washed polished off Keep the grill free of fat and grease to maintain performance The fat cup should be emptied regularly to avoid it running over When using a grill cover the grill must be clean and dry and sufficient ventilation must beensured If not moisture will accumulate under the cover cau...

Страница 23: ...rectly Burners will not light when lighting manually Empty gas bottle Replace gas bottle Irregular gas supply Check replace the regulator The burner is blocked Clean the burner Gas supply or hose is blocked Clean gas ventury or hose Low flame or backfire Gas bottle is too small 10 11 kg or larger bottle is recommended Burner is blocked Clean the burner Gas supply or hose is blocked Clean gas ventu...

Страница 24: ...ty controls and testing at the factory If there are any parts missing or the product has been damaged please contact your dealer or the consumer contact below for help Faults due to misuse lack of maintenance or modification of the product will invalidate the warranty Damaged parts not due to a fault with the product will be invoiced according to our price list carriage and administration fee If n...

Отзывы: