Use and maintenance manual model “UNICA 10 V/C” - WOOD
ENGLISH
14
6
PRODUCT SETUP
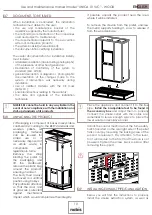
Once all the installation, covering assembly
(where present as a kit) and electrical connection
are in place, with utmost attention, access the
rear part of the product to power it.
A
PANNELLO DI EMERGENZA
B
The “I/O” switch (
A
in the figure above) must be
positioned on “I”. In the event of a power failure,
check the condition of the fuse placed under
the switch
B
(4A fuse EU configuration). During
periods of non-use, you are advised to disconnect
the cable powering the appliance, and also the
batteries from the handheld device..
6.1 REMOTE CONTROL
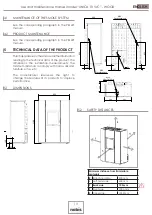
Remove the protective cover of the batteries on
the rear of the remote control, as in the figure
C
,
and insert 3 batteries (type AAA Alkaline 1.5V)
in the handheld device compartment, paying
attention to polarity. Close the protective cover
of the batteries as in the figure
D
.
C
D
CAUTION
Risk of explosion
if the battery is
replaced with the
wrong type.
LThe batteries, once exhausted, must be disposed
of in the dedicated collection centers. To protect
the battery from adverse conditions or misuse,
remember to:
- keep the command away from heat sources, risk
of explosion;
- remove the batteries in case of prolonged not use
of command, risk of oxidation and liquid leakage;
Nobis srl declares that the type of “Handheld”
radio device complies with Directive 2014/53 / EU.
The full text of the EU declaration of conformity is
available at the following Internet address:
https://www.nobisfire.it/wp-content/uploads/2019/04/DoC-
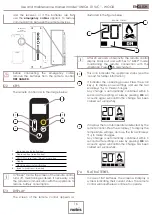
The handheld device, after a first short screen with
the manufacturer’s logo, lists a series of languages
available on the menu: press
↑ ↓ to
select your
language and then press
OK
to confirm.
To work correctly, the handheld device requires
interfacing with the electronic board inside the
product. For this reason, the display shows a first
installation message.
If this is the first time you are using the remote
control, choose YES with the selection keys
↑
↓
and press
OK
to confirm and display the next
screen.
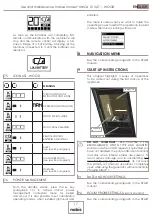
Follow the instructions to link via remote the
appliance to the display, as outlined in the figure
below.
AUTO
To start the connection procedure, long press the
radio-connection button (the one in the center
among the three available) on the electronic
board (located on the right side of the product)
for a few seconds, until the orange LED begins to
flash, as shown in the image below
.
Press OK to pair the remote to the device (it might
be necessary to press it twice).
A tick sign on the display, accompanied by an
acoustic signal, indicates the remote connection
has been successfull.
Содержание UNICA 10 V/C
Страница 1: ...EN Installation use and maintenance manual WOOD UNICA 10 V C...
Страница 25: ...Use and maintenance manual model UNICA 10 V C WOOD ENGLISH 25 MAINTENANCE DATE MAINTENANCE TASK PERFORMED...
Страница 26: ...Use and maintenance manual model UNICA 10 V C WOOD ENGLISH 26 MAINTENANCE DATE MAINTENANCE TASK PERFORMED...
Страница 27: ...Use and maintenance manual model UNICA 10 V C WOOD ENGLISH 27 MAINTENANCE DATE MAINTENANCE TASK PERFORMED...

