background image

Hub’O: Getting started 


All Rights Reserved – nke Watteco®  


Hub’O: Description of the exchanges with the Server


Page 

11

 of 

14


3.2.3


U

PLOAD ON 

H

UB

’O 

To upload the new configuration on the gateway, copy the configuration file “c_010_0000.json” and 
its signature “c_010.manifest” on the root of a USB stick. 

Then plug the USB stick on one of the Hub’O USB slots. Wait approximately 15 seconds and then take 
back the USB stick, Hub’O is now configured as you wanted. 


3.2.4


O

THER FILES 

USB

 UPLOAD


From  the  firmware  version  02.00,  it  is  possible to  upload  through  USB  two  other  kind  of  files:  the 
ModBus  configuration  file  and  the  allowed  end-devices  list.  In  order  to  have  an  exhaustive 
description  of  these  files  and  how  to  complete  it,  please  see  the  document  named 

“Hub'O_Server_Exchanges_Description_X_X.pdf”. 


3.2.4.1


M

OD

B

US CONFIGURATION FILE


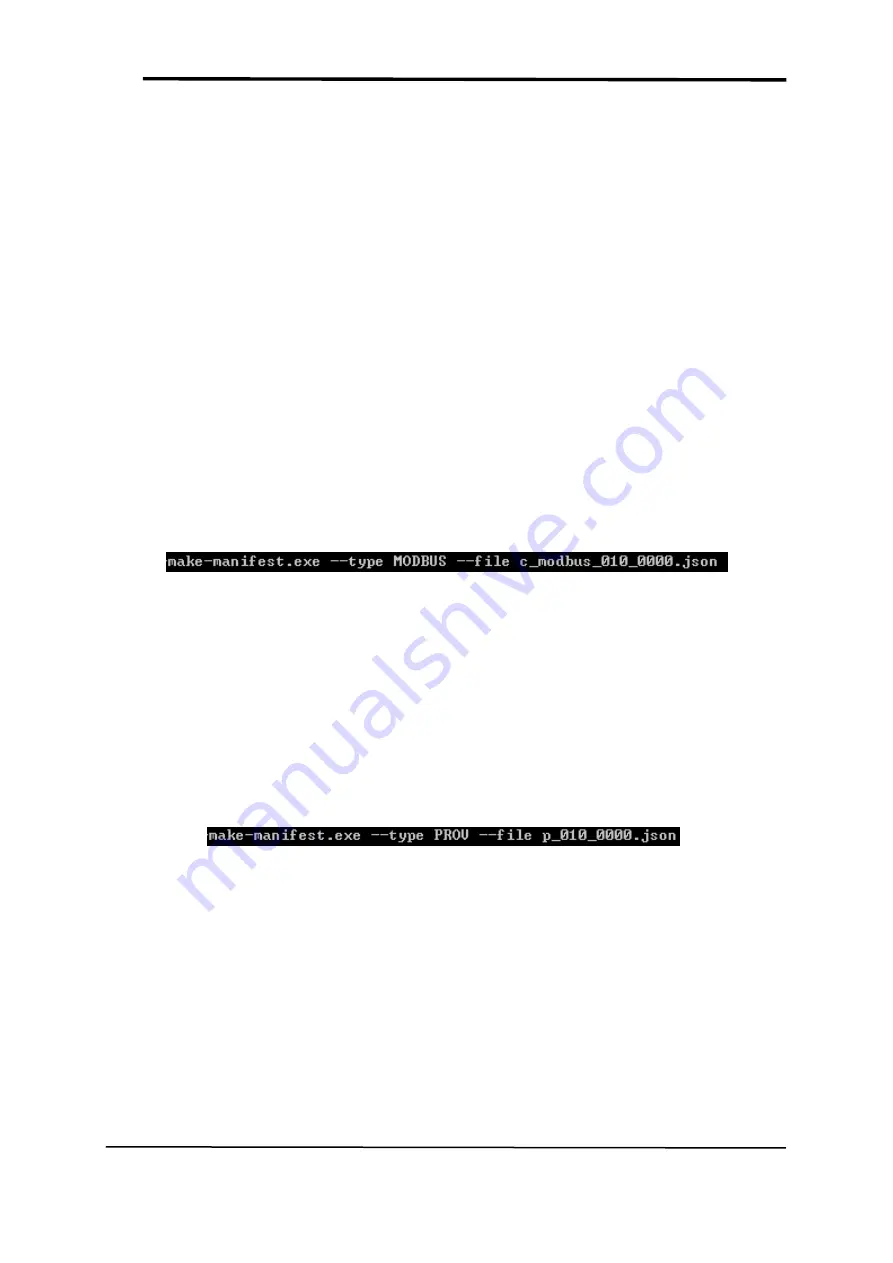
Filename  to  give  to  the  ModBus  configuration  file  before  creating  the  signature  file: 

c_modbus_010_0000.json

.  

Command line to use to create the signature file: 


Afterwards,  both  of  the  files  (c_modbus_010_0000.json  and  c_modbus_010.manifest)  needs  to  be 
copied at the root of the USB stick. 


3.2.4.2


A

LLOWED END

-

DEVICES LIST


Filename  to  give  to  the  allowed  end-devices  list  file  before  creating  the  signature  file: 

p_010_0000.json

.  

Command line to use to create the signature file: 


Afterwards,  both  of  the  files  (c_modbus_010_0000.json  and  c_modbus_010.manifest)  needs  to  be 
copied at the root of the USB stick. 


FIGURE 6 - CREATING THE SIGNATURE FILE FOR THE MODBUS CONFIGURATION 

FIGURE 7 - CREATING THE SIGNATURE FILE FOR THE MODBUS CONFIGURATION 

Содержание Hub'O

Страница 1: ...HUB O GETTING STARTED ...

Страница 2: ...lication adequate design and operating safeguards must be provided by the customer to minimize inherent or procedural hazards Nke Watteco assumes no liability for applications assistance or customer product design Nke Watteco does not warrant or represent that any license either express or implied is granted under any patent right copyright mask work right or other intellectual property right of N...

Страница 3: ...of 14 DOCUMENT HISTORY Date Revision Modification Description April 2018 1 0 Creation November 2018 1 1 Add some more details in the Hardware Set up February 2019 2 0 Modification to use the tool Make cfg new version July 2019 2 1 Since FW 02 04 HUB O can be configured and monitored through an embedded WEB server ...

Страница 4: ...iguration through embeded HUB O WebServer 9 3 2 Configurtion through USB stick file transfer 10 3 2 1 Configuration file creation 10 3 2 2 Signature file creation 10 3 2 3 Upload on Hub O 11 3 2 4 Other files USB upload 11 4 Connection to the network 12 5 Exchanges with the distant server 12 6 Installing Hub O with end devices on site 13 6 1 Installation 13 6 2 First end device configuration 14 ...

Страница 5: ...ble to create your own LoRaWAN network and start working with it This document is here to help you in the installation and the first configuration of Hub O A last paragraph will describe how to correctly install on site a Hub O gateway and LoRaWAN end devices paired to it It will be seen that thanks to its LCD screen the installer can double check that the LoRaWAN end devices are correctly paired ...

Страница 6: ...ocated at the Hub O right side Once the antenna correctly mounted it can be feld to the top to get what can be seen on Figure 1 When shipped Hub O already contains a 9V disposable battery This battery is used to correctly shutdown the gateway in case of pwer cut To open casing it is recommended to use a flathead screwdriver to do lever on one of the red squared area on Figure 2 On the Figure 3 can...

Страница 7: ...a socket a plug needs to be added at the end of the mounted cable CAUTION If the device is connected to the mains power source harmful voltage will be present on all wires during operation Connect or unconnect the device after MAKING SURE TO HAVE SWITCHED OFF MAINS POWER FROM ALL WIRES disconnecting a single wire e g from a manual switch is NOT sufficient 9V Disposable Battery spot LCD screen User...

Страница 8: ...ctor to be used a cable needs to be added If an Ethernet network is used Hub O needs to be cabled to the network with a classic RJ45 ethernet cable Hub O can be fixed against a wall or on any surface thanks to the holes for fastening scews inside the casing cf Figure 3 For a maximum radio range Hub O needs to be fixed with the positioning that can be seen on Figure 1 or 4 Here below can be seen th...

Страница 9: ... Hub O Firmware an embeded WebServer allows reading and writing the 3 main configuration objects GENERAL CONFIGURATION ALLOWED END DEVICES LIST and MODBUS PARAMETERS HUB O Webserver can be used through Ethernet Local Area Network Using factory configuration of Hub O it will try to connect through a DHCP server on your LAN You can set it to static with specific address through USB File Transfer wit...

Страница 10: ... an exhaustive description of this file and how to complete it please see the document named Hub O_Server_Exchanges_Description_X_X pdf on paragraph 5 2 Hub O Configuration file Once your configuration file created you can rename it as follow c_010_0000 json 3 2 2 SIGNATURE FILE CREATION For security reasons to upload a new configuration file on Hub O gateway it is necessary to generate a signatur...

Страница 11: ...n of these files and how to complete it please see the document named Hub O_Server_Exchanges_Description_X_X pdf 3 2 4 1 MODBUS CONFIGURATION FILE Filename to give to the ModBus configuration file before creating the signature file c_modbus_010_0000 json Command line to use to create the signature file Afterwards both of the files c_modbus_010_0000 json and c_modbus_010 manifest needs to be copied...

Страница 12: ...vailable slot if it is not already done Check that the Ethernet 3G switch is at the right position for what you need This switch can be seen on the Figure 3 at the right of the LCD screen and under the user button Afterwards Hub O is correctly configured and can start its exchanges with the distant server 5 EXCHANGES WITH THE DISTANT SERVER In order to have a complete understanding on how Hub O ex...

Страница 13: ...on process will be run between the end device Hub O and the distant server for more details please see Hub O_Server_Exchanges_Description_X_X pdf To have more details about nke Watteco end devices association status please see our support website http support nke watteco com Once all the end devices installed on site a control can be done on Hub O thanks to the user menu Indeed Hub O is able to di...

Страница 14: ...M_Hub_O_VX_X pdf 6 2 FIRST END DEVICE CONFIGURATION By default nke Watteco devices are configured to send unconfirmed frames to the LoRaWAN network in order to be compatible with all the private public existing networks However inside a LoraWAN network managed by Hub O it is strongly adviced to set this configuration to confirmed frames In order to do that the distant server should send an end dev...

Отзывы: