Master Prep
™
Professional
QB1004NZ 30
OWNER’S GUIDE
QB1004NZ_30_IB_120626_2.indd 1
12-06-26 12:59 PM
Страница 1: ...Master Prep Professional QB1004NZ 30 OWNER S GUIDE QB1004NZ_30_IB_120626_2 indd 1 12 06 26 12 59 PM...
Страница 2: ...otect against electric shock DO NOT immerse cord plug or any part of the main unit in water or any other liquids 3 DO NOT let cord hang over edge of table or counter or touch hot surfaces 4 DO NOT ope...
Страница 3: ...DO NOT expose pitcher to extreme temperature changes 14 DO NOT use pitcher if it is cracked or chipped 15 DO NOT use the appliance if chopping blades are bent or damaged 16 Avoid contact with moving p...
Страница 4: ...ICATIONS Voltage 220 240V 50Hz Power 500 Watts Pitcher Capacities 1 5 L 48 ounces 6 cups 1 2 L 40 ounces 5 cups Bowl Capacity 0 5 L 16 ounces 2 cups 4 Z854 SAA110120EA QB1004NZ_30_IB_120626_2 indd 3 1...
Страница 5: ...Ninja Master Prep Professional Getting Started 6 Using the Master Prep Professional Pitchers 8 Using the Master Prep Professional Bowl 10 Cleaning and Maintenance 12 Troubleshooting Guide 12 QB1004NZ_...
Страница 6: ...Master Prep Professional Bowl with Non Slip Base o Bowl Storage Lid p Power Cord not shown a On Off Pulse Button b Power Head c Pouring Spout d Pitcher Splash Guard e Ninja 6 Blade f Master Prep Profe...
Страница 7: ...trical power NEVER allow the power head to become wet when plugged into an electrical outlet WARNING The power head should never be immersed in water or any other liquid CAUTION Make sure that the pow...
Страница 8: ...IMPORTANT Never run the appliance empty 1 Place the Master Prep Professional Pitcher on a clean dry level surface 2 Holding the blade by the shaft place it onto the spindle pin inside the Master Prep...
Страница 9: ...ng the on off pulse button to ensure the unit stays in place NOTE DO NOT operate the appliance continuously for more than 15 seconds at a time 8 To stop the appliance remove your fingers from the on o...
Страница 10: ...de over the lower blade rotating it until it locks onto the lower blade fig 2 IMPORTANT Always assemble the blades inside the container WARNING DO NOT try to place the blades onto the power head and t...
Страница 11: ...ow start by using short pulses to break up large chunks Continue until snow is achieved 5 Place the splash guard on the bowl fig 3 6 Place the power head on top of the splash guard making sure that it...
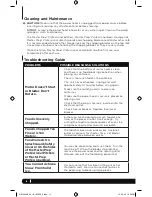
Страница 12: ...tely 10 minutes before using again Make sure the splash guard is securely on container Make sure the power head is securely placed on splash guard Check that the plug is securely inserted into the ele...
Страница 13: ...13 Notes QB1004NZ_30_IB_120626_2 indd 12 12 06 26 12 59 PM...
Страница 14: ...Notes 14 QB1004NZ_30_IB_120626_2 indd 13 12 06 26 12 59 PM...
Страница 15: ...lected altered modified or repaired by anyone The product has been subjected to fair wear and tear The product has not been used for trade professional or hire purposes The product has not sustained d...
Страница 16: ...d Developers Limited Brand Developers Aust Pty Ltd Brand Developers Aust Pty Ltd Printed in China Illustrations may differ from actual product QB1004NZ E 120626 2 Z854 SAA110120EA QB1004NZ_30_IB_12062...