ENGLISH / A-13
Adphibian
™
/ AX 651 Combi EDS - 56041711 -
A-13
BEFORE USING THE ADPHIBIAN™ / AX 651 COMBI EDS FOR EXTRACTING
Thoroughly vacuum the carpet to be cleaned before using the Adphibian/AX 651 Combi EDS automatic carpet extractor.
PRE-SPRAYING THE CARPET
The Adphibian/AX 651 Combi EDS in extract mode has a pre-spray feature. Pre-spray spots and heavy traf
fi
c areas before extracting. For
extremely dirty
fl
oors, a one-pass scrubbing operation may not be satisfactory and a “pre-spray” operation may be required. This operation is the
same as a one-pass scrubbing except on the
fi
rst pass the vacuum shoes are in the up position and the vacuum motors are off. This allows the
cleaning solution/detergent to remain on the
fl
oor to work longer. The
fi
nal pass is made over the same area, with the vacuum shoes lowered and
vacuum motors on to pick up the accumulated solution.
1 The scrub system must be in the off position.
2 Press the orange Floor Mode Switch
(K)
until the display shows
(D11)
indicating Extract Mode has been selected.
3 Press the Solution/Pre-Spray Switch
(C)
, the Display
(D7)
will indicate Fast Prespray Mode. The scrub deck will be lowered and the solution
and detergent systems will be enabled. The Extraction Shoes
(10)
will remain in the up position.
4 Push the Drive Paddle
(20)
forward to start the brushes and solution/detergent.
5 Press the Solution/Pre-Spray Switch
(C)
to exit the prespray mode. The brushes and solution/detergent
fl
ow will be stopped. The scrub deck
will raise.
6 If more solution is desired, press the green Scrub ON Switch
(J)
(while in Fast Prespray Mode) to enter the Heavy Prespray Mode. The Display
(D8)
will indicate the Heavy Prespray Mode has been selected. In this mode the machine moves slower and more solution is sprayed on the
carpet.
PLAN FOR CLEANING
Before you begin extracting, look at the area to be cleaned and plan your work. Divide the space into sections. Overlap each pass 2 inches (5
cm).
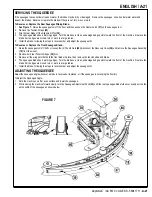
SQUEEGEE INSTALLATION
1
See Figure 3.
Slide the Squeegee Assembly
(18)
onto the squeegee mount bracket and tighten the Squeegee Mount Thumb Nuts
(40)
.
2 Connect the Recovery Hose
(30)
to the squeegee inlet.
3 Lower the squeegee, move the machine ahead slightly and adjust the squeegee tilt using the Squeegee Adjustment Knob
(35)
so that the rear
squeegee blade touches the
fl
oor evenly across its entire width and is bent over slightly as shown.
FIGURE 3


