E
27
Connecting the Camera to a Printer (Direct Print)
Re
feren
ce
S
ect
io
n
5
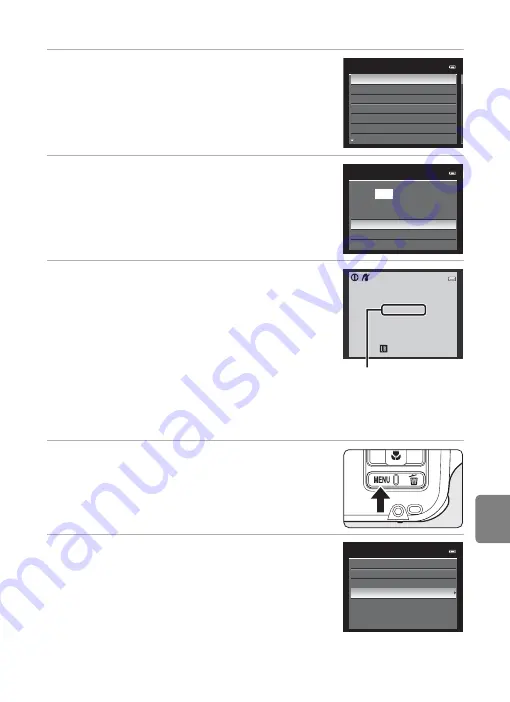
Choose the desired paper size and press the
k
button.
•
To specify the paper size using the printer settings,
choose
Default
in the paper size menu.
6
Choose
Start print
and press the
k
button.
7
Printing starts.
•
The monitor display returns to that shown in step 1
when printing is complete.
•
To cancel before all copies have been printed, press the
k
button.
Printing Multiple Images
After connecting the camera to the printer correctly (
25), print pictures by
following the procedure below.
1
When the
Print selection
screen is displayed,
press the
d
button.
•
The
Print menu
screen is displayed.
2
Use the multi selector to choose
Paper size
and press the
k
button.
•
To exit the print menu, press the
d
button.
Paper size
Default
3.5×5 in.
5×7 in.
100×150 mm
4×6 in.
8×10 in.
Letter
PictBridge
004
prints
Start print
Copies
Paper size
0 0 2 / 0 0 4
Printing
Cancel
Current print/total
number of prints
Print menu
Print selection
Print all images
DPOF printing
Paper size
Содержание COOLPIX AW100
Страница 1: ...En Reference Manual DIGITAL CAMERA ...
Страница 60: ...36 ...
Страница 92: ...68 ...
Страница 116: ...92 ...
Страница 214: ...E94 ...
Страница 241: ...Index F27 Technical Notes and Index Wide 29 Wind noise reduction 83 E56 Z Zoom 29 Zoom buttons 4 5 29 ...


